Acer H6520BD: User Controls
User Controls: Acer H6520BD
21
English
User Controls
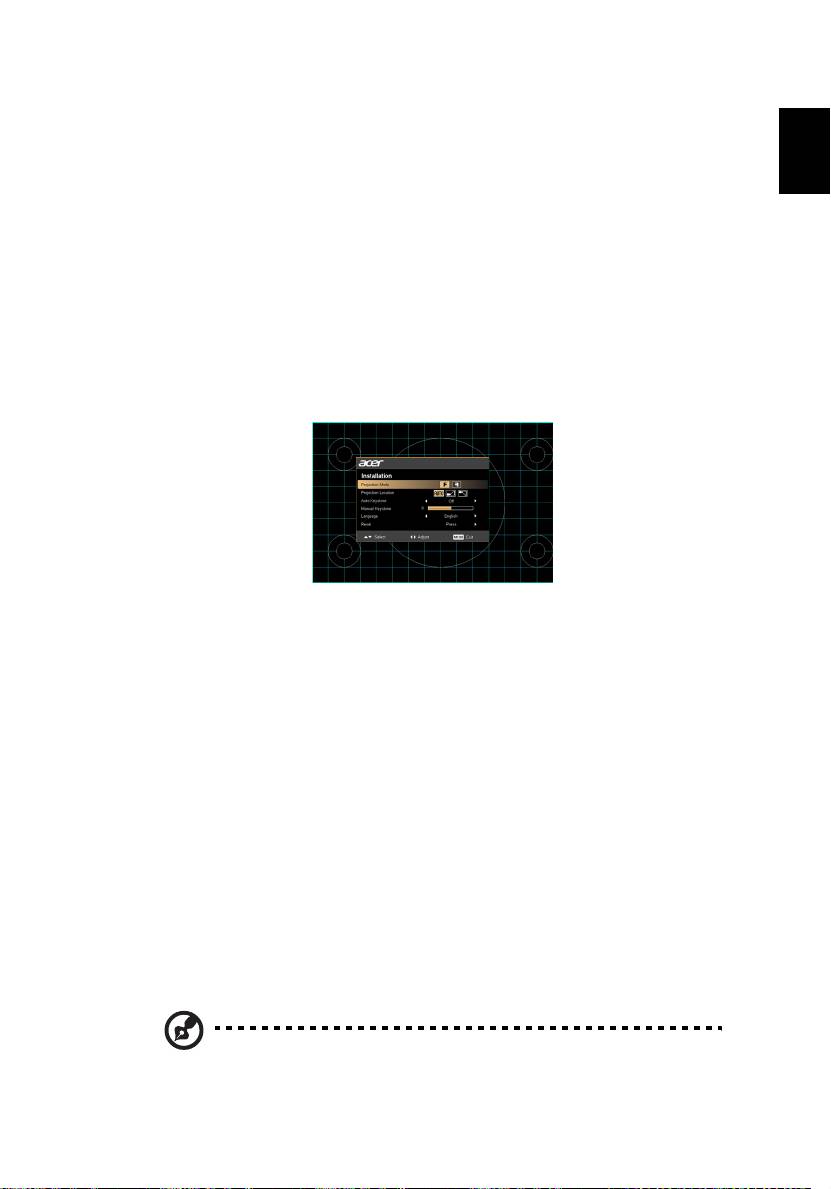
Installation menu
The installation menu provides an onscreen display (OSD) for projector
installation and maintenance. Use the OSD only when the message "No signal
input" is displayed on the screen.
The menu options include settings and adjustments for screen size and distance,
focus, keystone correction and more .
1 Turn on the projector by pressing "Power" button on the control pad.
2 Press the "MENU" button on the control pad to launch the OSD for
projector installation and maintenance.
3 The background pattern acts as a guide to adjusting the calibration and
alignment settings, such as screen size and distance, focus and more .
4 The Installation menu includes the following options:
•Projection Mode
•Projection Location
•Auto Keystone settings
•Manual Keystone settings
•Language settings
•Reset to factory default function
Use the up and down arrow keys to select an option, the left and right
arrow keys to adjust selected option settings, and the right arrow key to
enter a submenu for feature setting. The new settings will be saved
automatically upon exiting the menu.
5 Push the menu button anytime to exit the menu and return to the Acer
welcome screen.
Note: Functions vary depending on model definition.
22
Onscreen Display (OSD) Menus
The projector has multilingual OSD that allow you to make image adjustments
English
and change a variety of settings.
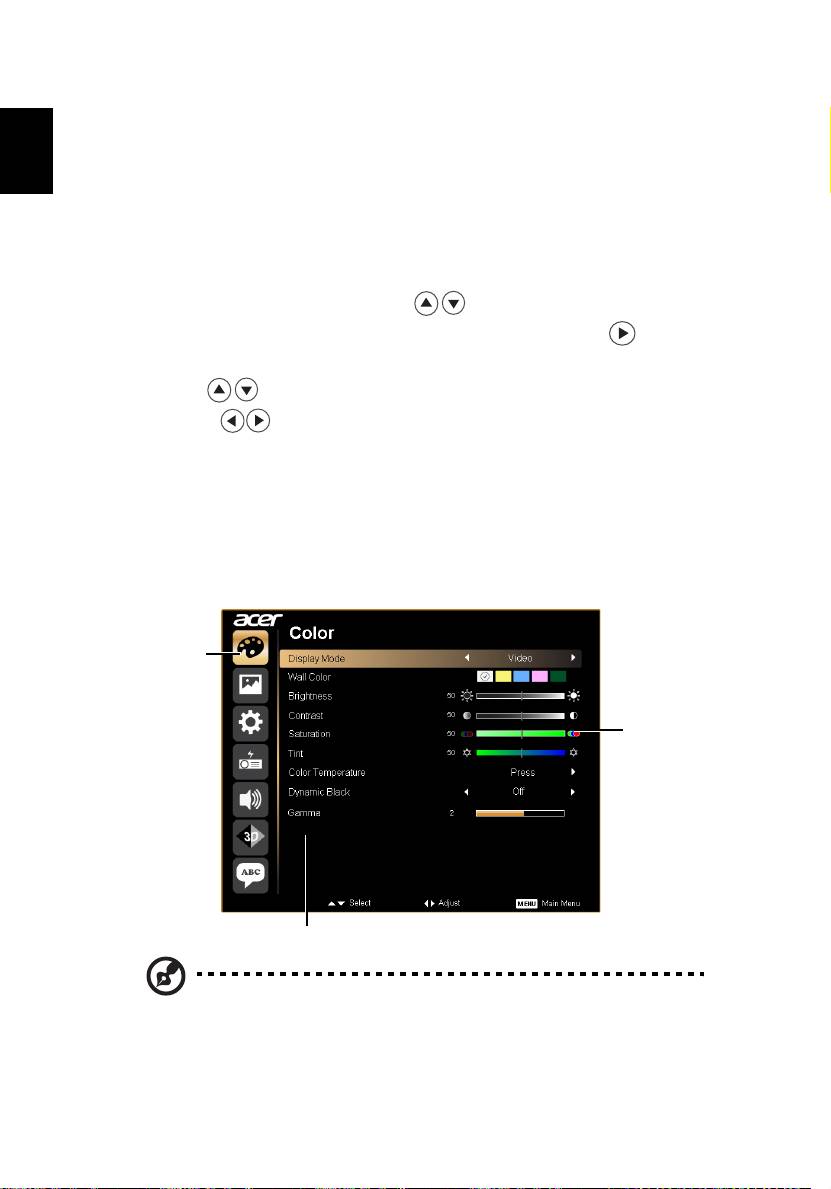
Using the OSD menus
• To open the OSD menu, press "MENU" on the remote control or control
panel.
• When the OSD is displayed, use the keys to select any item in the
main menu. After selecting the desired main menu item, press to enter
submenu for feature setting.
• Use the keys to select the desired item and adjust the settings by
using the keys.
• Select the next item to be adjusted in the submenu and adjust as described
above.
• Press "MENU" on the remote control or control panel, the screen will
return to the main menu.
• To exit OSD, press "MENU" on the remote control or control panel again.
The OSD menu will close and the projector will automatically save the new
settings.
Main menu
Setting
Sub menu
Note: Some of the following OSD settings may not be available. Please
refer to the actual OSD of your projector.
Note: Functions vary depending on model definition.
23
English
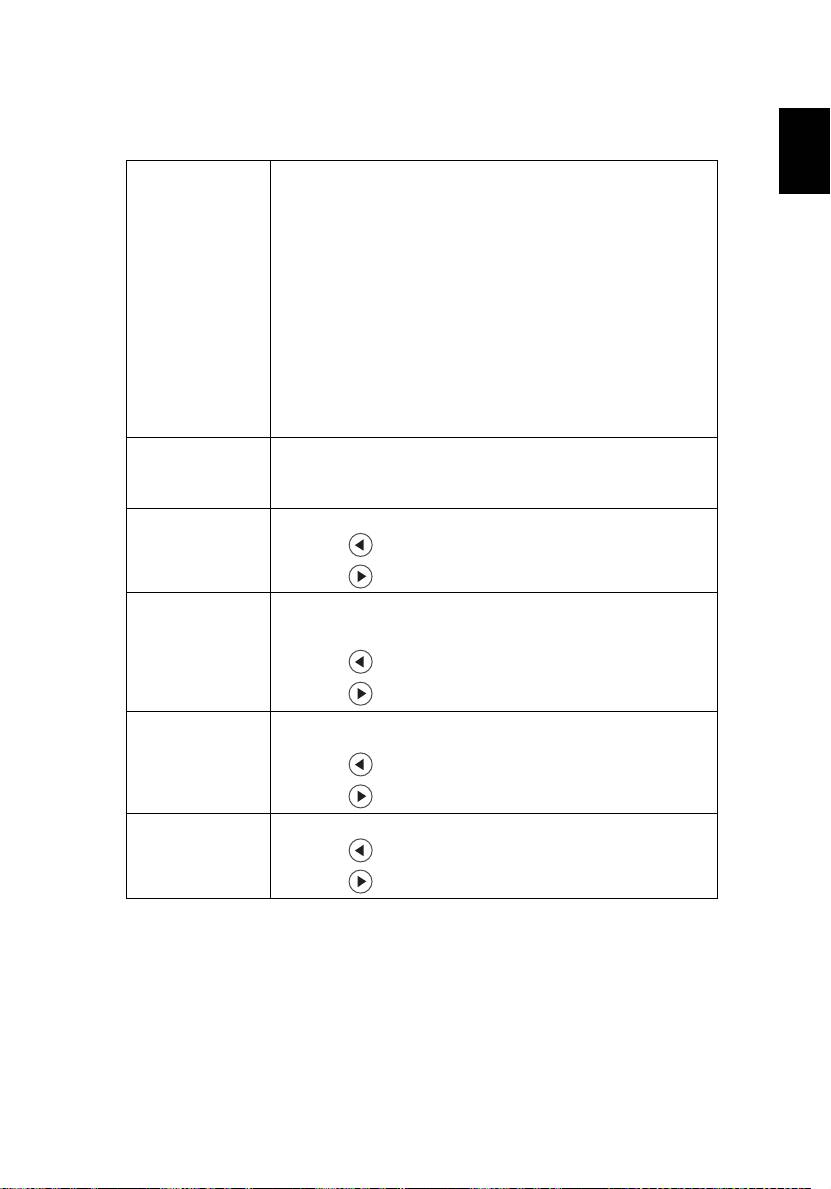
Color
Display Mode
There are many factory presets optimized for various types of
images.
• Bright: For brightness optimization.
• Presentation: For meeting presentation.
• Standard: For common environment.
• Video: For playing video in a bright environment.
• Game: For game content.
• Education: For education environment.
• Movie: For brighter and general movie/video/photo playing.
• Dark Cinema: For dark movie content.
• Sports: For sport picture.
• User: Memorize user's settings.
Wall color
Use this function to choose a proper color according to the wall.
There are several choices, including white, light yellow, light blue,
pink, dark green. It will compensate the color deviation due to the
wall color to show the correct image tone.
Brightness
Adjust the brightness of the image.
• Press to darken the image.
• Press to lighten the image.
Contrast
"Contrast" controls the difference between the lightest and
darkest parts of the picture. Adjusting the contrast changes the
amount of black and white in the image.
• Press to decrease the contrast.
• Press to increase the contrast.
Saturation
Adjusts a video image from black and white to fully saturated
color.
• Press to decrease the amount of color in the image.
• Press to increase the amount of color in the image.
Tint
Adjusts the color balance of red and green.
• Press to increase the amount of green in the image.
• Press to increase the amount of red in the image.
24
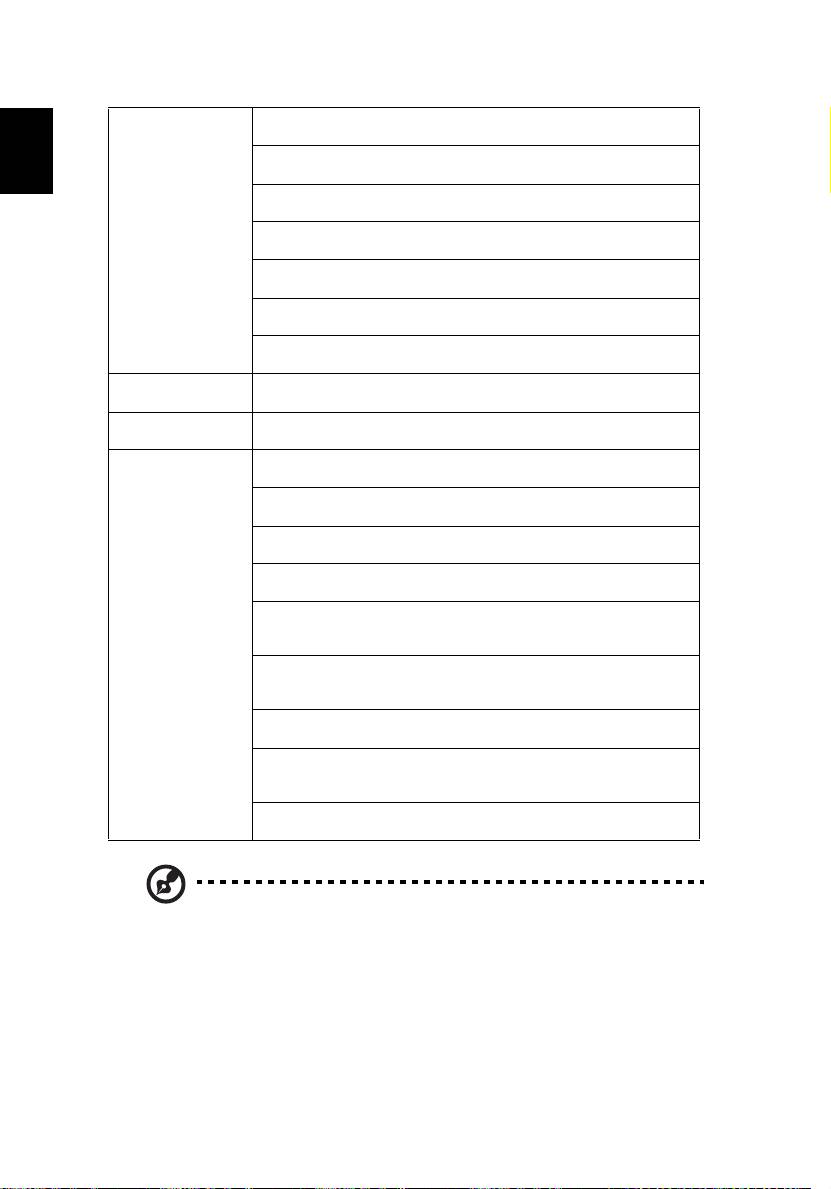
Color
Mode
Use this function to choose CT1, CT2 (Native), CT3, User mode.
Temperature
R Gain
Adjusts the red gain for color temperature optimization.
English
G Gain
Adjusts the green gain for color temperature optimization.
B Gain
Adjusts the blue gain for color temperature optimization.
R Bias
Adjusts the red bias for color temperature optimization.
G Bias
Adjusts the green bias for color temperature optimization.
B Bias
Adjusts the blue bias for color temperature optimization.
Dynamic Black
Choose "On" to automatically optimize the display of dark movie
scenes enabling them to be shown in incredible detail.
Gamma
Effects the representation of dark scenery. With greater gamma
value, dark scenery looks brighter.
Advanced
Ind. Color Management
Adjusts the red, green, blue, cyan, yellow and magenta colors.
Ind. Hue
Adjusts the color balance of red and green.
Ind. Saturation
Adjusts the selected color to be less or more saturated color.
Ind. Gain
Adjusts the selected color's contrast.
Brilliant Color
Produces an expanded on-screen color spectrum that delivers
enhanced color saturation for bright, true-to-life images.
White Peaking
Increases the brightness of whites that are near 100%. (video
sources only)
Film Mode
Sets the image optimized to 24-frame True Film mode.
Noise Reduction
Adjusts signal noise reduction."0" means the noise reduction is off,
">0" increase noise reduction.
Black Extension
This ensures optimum black level for each analog source.
Note: "Saturation" and "Tint" functions are not supported under computer
or HDMI mode.
Note: Functions vary depending on model definition.
25
English
Image
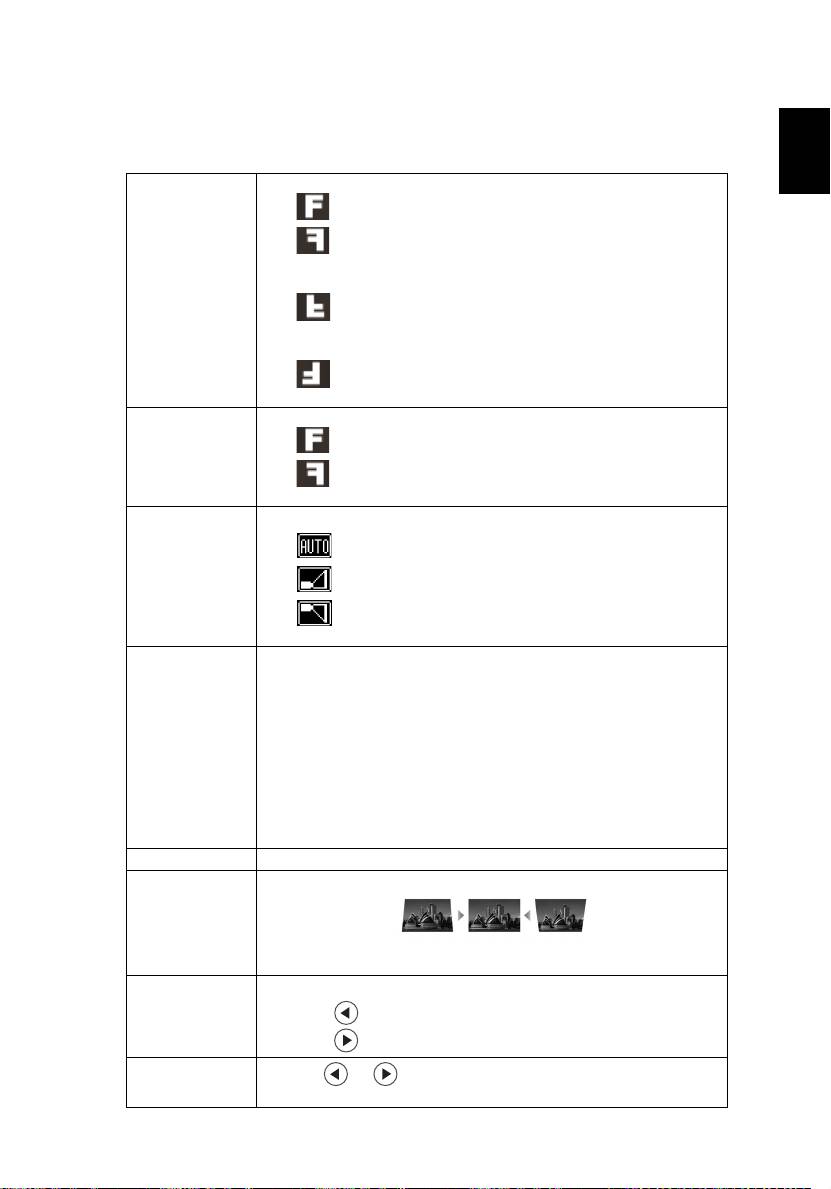
Projection
• Front-Desktop: The factory default setting.
• Rear-Desktop: When you select this function, the projector
reverses the image so you can project from behind a translucent
screen.
• Rear-Ceiling: When you select this function, the projector
reverses and inverts the image at same time. You can project from
behind a translucent screen with ceiling mounted projection.
• Front-Ceiling: When you select this function, the projector
inverts the image for ceiling-mounted projection.
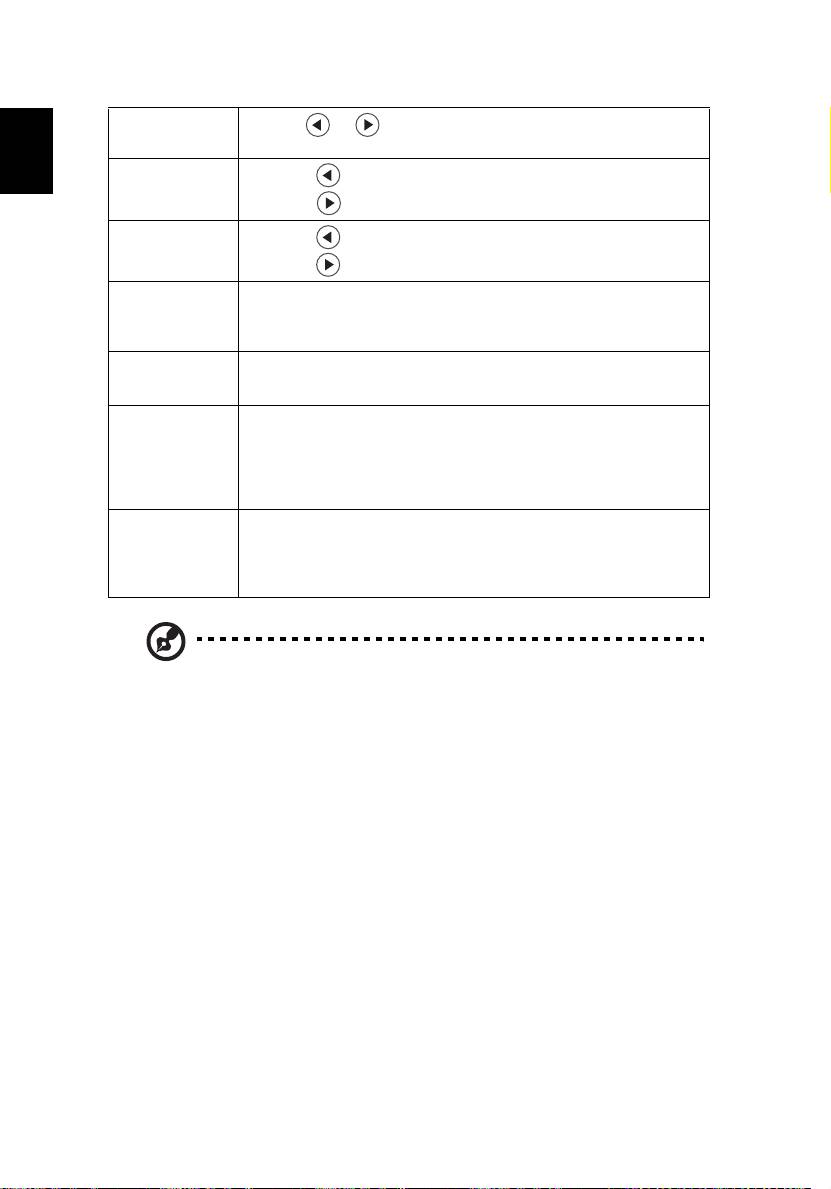
Projection Mode
• Front: The factory default setting.
• Rear: Reverses the image so you can project from behind a
translucent screen.
Projection Location
• Auto: Automatically adjusts projection location of image.
• Desktop
• Ceiling: Turns the image upside down for ceiling-mounted
projection.
Aspect Ratio Use this function to choose your desired aspect ratio.
• Auto: Keep the image with original width-higth ratio and maxi
mize the image to fit native horizontal or vertical pixels.
• Full: Resize image to fit full screen by width (1280 pixels) and
height (800 pixels).
• 4:3: The image will be scaled to fit the screen and displayed using
a 4:3 ratio.
• 16:9: The image will be scaled to fit the width of the screen and
the height adjusted to display the image using a 16:9 ratio.
• L.Box: Keep original signal aspect ratio and zoom in by 1.333
times.
Auto Keystone Automatically adjusts vertical image.
Manual Keystone Adjust image distortion caused by tilting projection. (±40 degrees)
<Note> The Manual Keystone function is unavailable under Auto
Keystone setting to "On".
Sharpeness Adjusts the sharpness of the image.
• Press to decrease the sharpness.
• Press to increase the sharpness.
H. Keystone
Press the or button to adjust image distortion horizontally
and makes a squarer image.
26
V. Keystone
Press the or button to adjust image distortion vertically and
makes a squarer image.
H. Position
• Press to move the image left.
English
(Horizontal
position)
• Press to move the image right.
V. Position
• Press to move the image down.
(Vertical position)
• Press to move the image up.
Frequency "Frequency" changes the projector's refresh rate to match the
frequency of your computer’s graphics card. If you can see a vertical
flickering bar in the projected image, use this function to make the
necessary adjustments.
Tracking Synchronizes the signal timing of the projector with the graphics card.
If you experience an unstable or flickering image, use this function to
correct it.
HDMI Color Range Adjust the color range of the HDMI image data to correct color display
error.
• Auto: Automatically adjust by information from player.
•
Limited Range: Prosess the input image as limited color range data.
• Full Range: Prosess the input image as full color range data.
HDMI Scan Info Adjust the overscan ratio of the HDMI image on screen.
• Auto: Automatically adjust by information from player.
• Underscan: Always no overscan on HDMI image.
• Overscan: Always keep overscan on HDMI image.
Note: "H. Position", "V. Position", "Frequency" and "Tracking" functions
are not supported under HDMI or Video mode.
Note: "HDMI Color Range" and "HDMI Scan Info" functions are only
supported under HDMI mode.
Note: Functions vary depending on model definition.
27
English
Setting
Startup Screen Use this function to select your desired startup screen. If you
change the setting, the changes will take effect when you exit the
OSD menu.
• Acer: The default startup screen of your Acer projector.
• User: Use memorize picture from "Screen Capture" function.
Screen Capture
Use this function to customize the startup screen. To capture the
image that you want to use as the startup screen, follow the
instructions below.
Notice:
Before proceeding with the following steps, make sure that the
"Keystone" is set to the default value 0 and the aspect ratio is set
to 4:3. For details, refer to the "Image" section.
• Change the "Startup Screen" from the default setting "Acer"
to "User".
• Press "Screen Capture" to customize the startup screen.
• A dialog box appears to confirm the action. Choose "Yes" to
use the current image as your customized startup screen. The
capture range is the red rectangular area. Choose "No" to
cancel the screen capture and exit the onscreen display (OSD).
• A message appears, stating that the screen capture is in
progress.
• When the screen capture is finished, the message disappears
and the original display is shown.
• The customized startup screen, as shown below, takes effect
when there is a new input signal or when you restart the
projector.
Source Lock When source lock is turned "Off", the projector will search for
other signals if the current input signal is lost. When source lock is
turned "On", it will "lock" the current source channel unless you
press "Source" button on the remote control for the next channel.
Closed Caption
Selects a preferred closed captioning mode from CC1, CC2, CC3,
CC4, (CC1 displays captions in the primary language in your area).
Select "Off" to turn off the captioning feature. This function is only
available when a composite video or S-Video input signal is
selected and its system format is NTSC.
<Note> Set your screen aspect ratio to 4:3. This function is not
available when the aspect ratio is "16:9" or "Auto" .
VGA OUT (Standby) Default is "Off". Choose "On" to enable VGA OUT connection.
Reset
• Press the button and choose "Yes" to return the
parameters on all menus to the factory default settings.
Security Security
This projector provides a useful security function for the
administrator to manage usage of the projector .
Press to change the "Security" setting. If the security function
is enabled, your must enter the "Administrator Password" first
before changing the security settings.
• Select "On" to enable the security function. The user has to
enter a password to operate the projector. Please refer to the
"User Password" section for details.
• If "Off" is selected, then the user can turn on the projector
without password.
28
Timeout(Min.)
Once "Security" is activated to "On", the administrator can set
timeout function.
English
• Press or to select the timeout interval.
• The range is from 10 minute to 990 minutes.
• When the time is up, the projector will prompt the user to
enter the password again.
• The factory default setting of "Timeout(Min.)" is "Off".
• Once the security function is enabled, the projector will
request user to enter password when switch on the projector .
Both "User Password" and "Administrator Password" can be
accepted for this dialogue.
User Password
• Press to setup or change the "User Password".
• Press number keys to set your password on the remote control
and press "MENU" to confirm.
• Press to delete character.
• Enter the password when you see "Confirm Password"
displayed.
• The password should be between 4 and 8 characters long.
• If you select "Request password only when plugging the
power cord in.", the projector will prompt the user to enter
the password every time the power cord is plugged.
• If you select "Always request password while projector turns
on.", the user has to enter the password every time when the
projector is turned on.
Administrator Password
The "Administrator Password" can be used in both the "Enter
Administrator Password" and "Enter Password" dialog boxes.
• Press to change the "Administrator Password".
• The factory default of "Administrator Password" is "1234".
If you forgot your administrator password, do the following to
retrieve the administrator password:
• An unique 6-digit "Universal Password" which is printed on
the Security Card (please check accessory in the box). This
unique password is the number which will be accepted by
projector anytime no matter what the Administrator
Password is.
• If losing this security card and number, please contact with an
Acer service center.
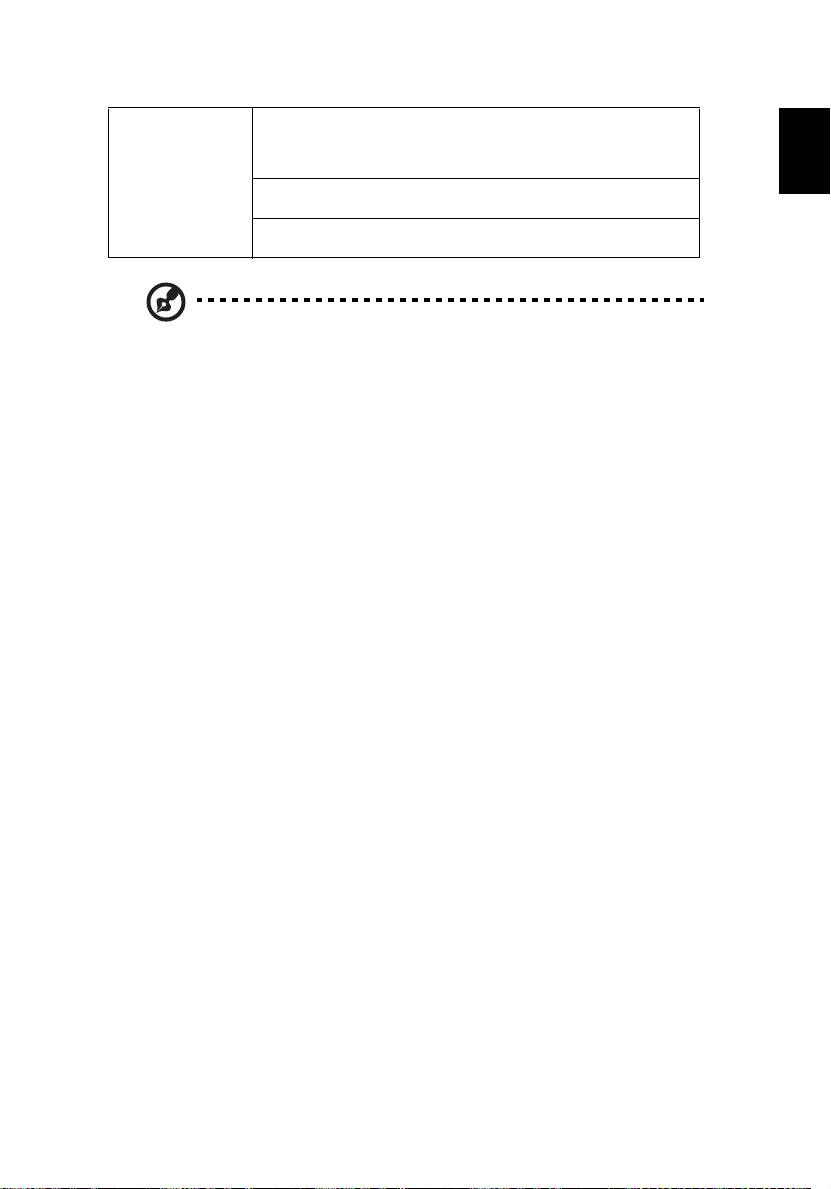
Lock to user startup screen
Default Lock User Startup Screen is "Off". If lock user startup screen
is "On", users cannot change startup screen anymore and avoid
other users change that arbitrarily. Choose "Off" to unlock startup
screen.
29
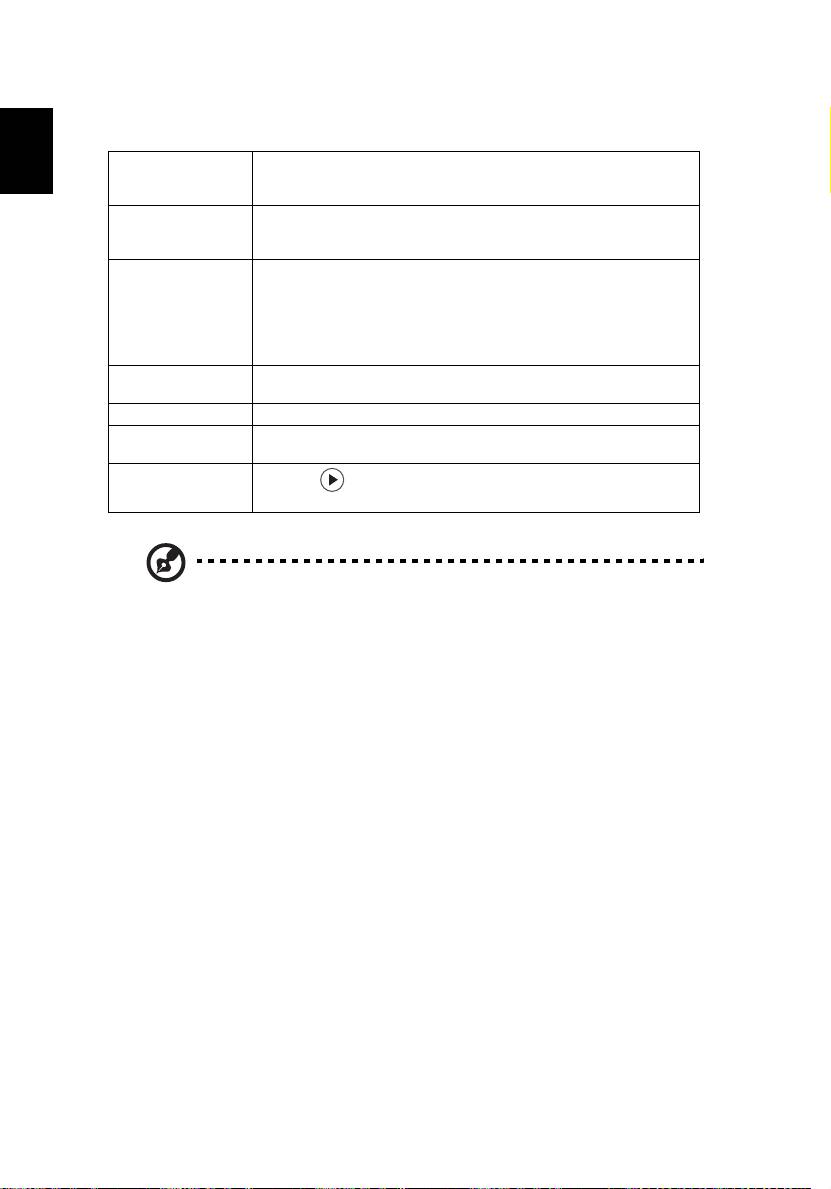
LAN LAN
English
Default is "Off". Choose "On" to enable LAN connection.
<Note> If users want to do LAN control under standby mode,
change VGA OUT (Standby) from Off to On.
LAN IP/Mask
Identify IP and Mask address.
LAN Reset
Reset LAN function.
Note: Functions vary depending on model definition.
30
Management
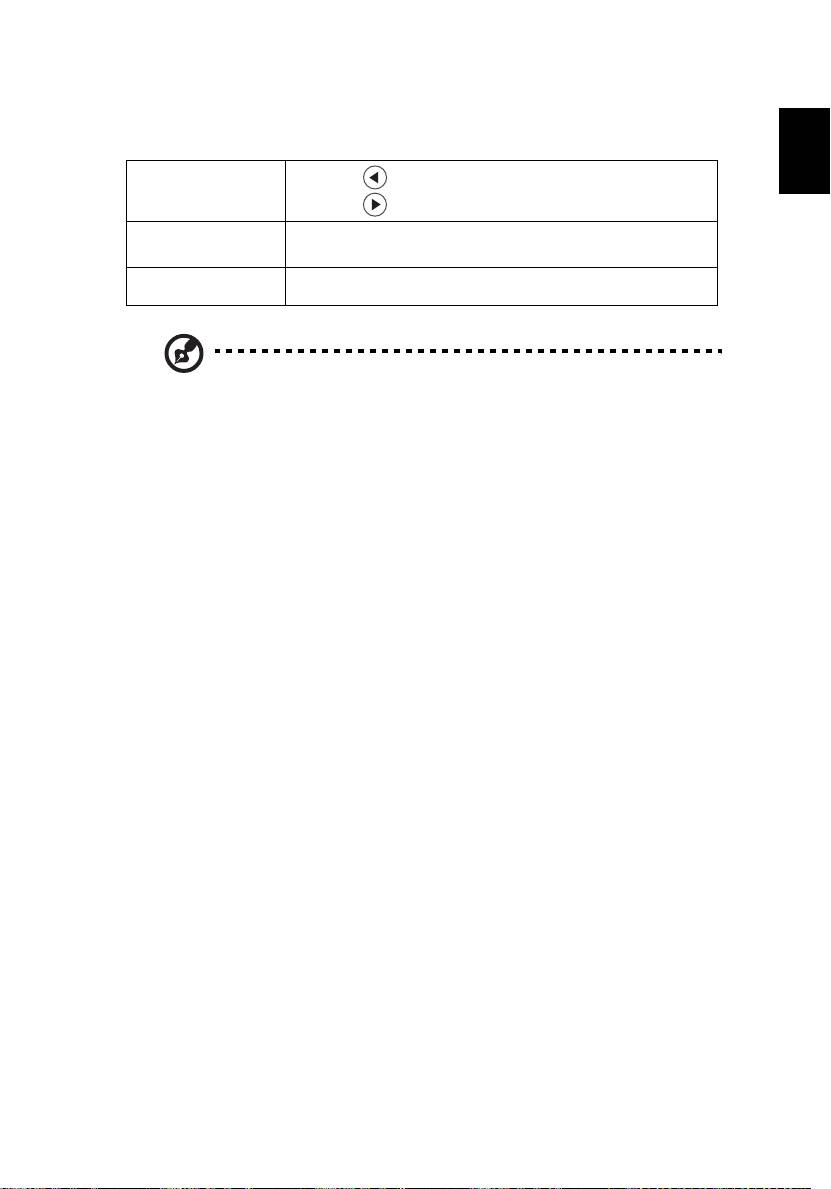
ECO Mode Choose "On" to dim the projector lamp which will lower power
English
consumption, extend the lamp life and reduce noise. Choose "Off"
to return normal mode.
High Altitude Choose "On" to turn on High Altitude mode. Operate the fans at
full speed continuously to allow for proper high altitude cooling of
the projector.
Turn Off Mode
• Instant Off: Shuts down the projector without fan cooling.
• Instant Resume: Resumes the system when the Power button
is pressed again within 2 minutes.
• Standard: Properly shuts down the projector after fan
cooling.
Auto Shutdown The projector will automatically shutdown when there is no signal
input after the allocated time. (default is 120 minutes)
Lamp Hour Elapse Displays the lamp’s elapsed operating time (in hours).
Lamp Reminding Activate this function to display a reminder to change the lamp 30
hours before its expected end-of-life.
Lamp Hour Reset
Press the button and choose "Yes" to turn the lamp hour
counter to 0 hours.
Note: Functions vary depending on model definition.
31
English
Audio
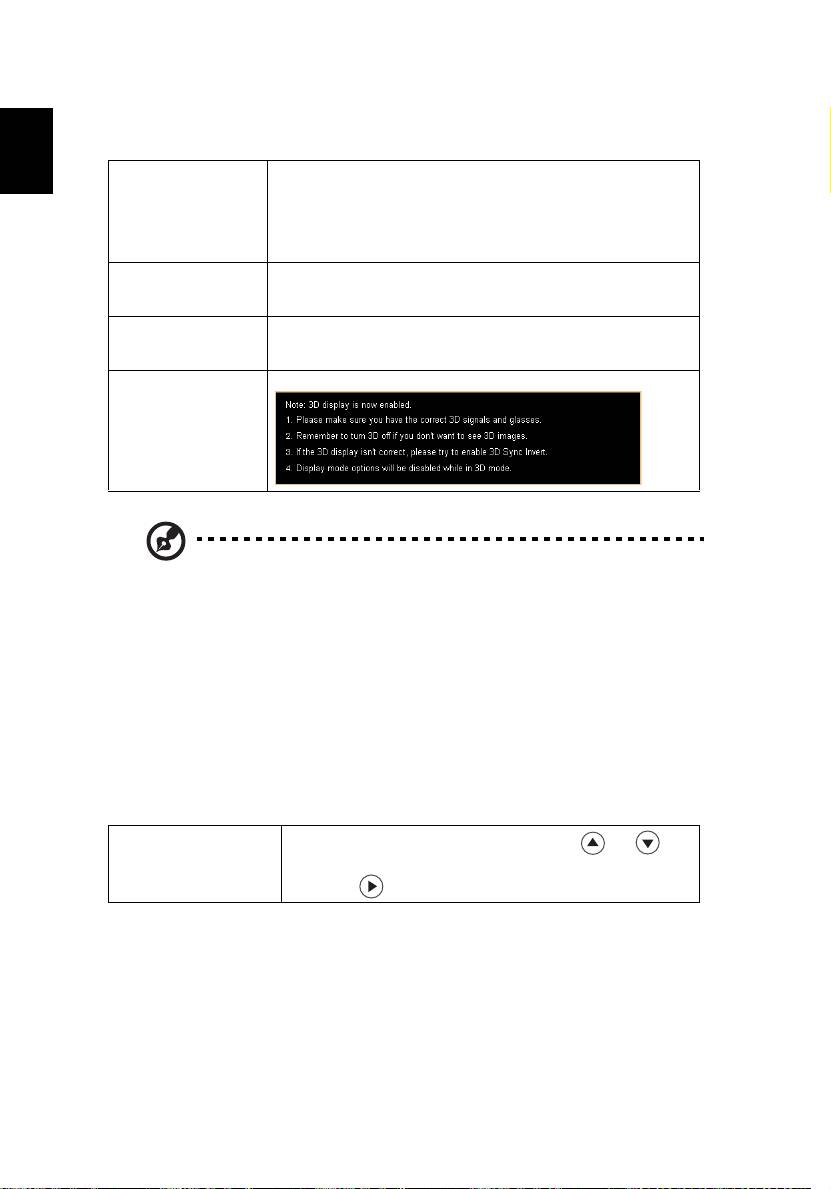
Volume
• Press to decrease the volume.
• Press to increase the volume.
Mute
• Choose "On" to mute the volume.
• Choose "Off" to restore the volume.
Power On/Off Volume Select this function to adjust the notification volume when
turning the projector on/off.
Note: Functions vary depending on model definition.
32
3D
3D Choose "On" to enable DLP 3D function.
English
• On: Choose this item while using DLP 3D glasses, 120Hz 3D
capable graphics cards and HQFS format file or DVD with
corresponding SW player.
• Off: Turn off 3D mode.
3D Format If the 3D content is not displayed correctly, you can select a 3D
format that suits the 3D content you are viewing and obtain the
best result.
3D L/R Invert If you see a discrete or overlapping image while wearing DLP 3D
glasses, you may need to execute "Invert" to get best match of
left/right image sequence to get the correct image (for DLP 3D).
3D Warning Message Choose "On" to display the 3D warning message.
Note: It needs correct settings on graphic card 3D application program for
correct 3D display.
Note: The SW players, such as Stereoscopic Player and DDD TriDef Media
Player can support 3D format files. You can download these three players
on web page below,
- Stereoscopic Player (Trial): http://www.3dtv.at/Downloads/Index_en.aspx
- DDD TriDef Media Player (Trial):
http://www.tridef.com/download/TriDef-3-D-Experience-4.0.2.html
Note: "3D L/R Invert" is only available when 3D is enabled.
Note: There has reminder screen if 3D still enable when power on projector.
Please adjust setting depended on your purpose.
Language
Language
Choose the multilingual OSD menu. Use the or key
to select your preferred menu language.
• Press to confirm the selection.
33
English
Acer LAN webpage management
How to login in
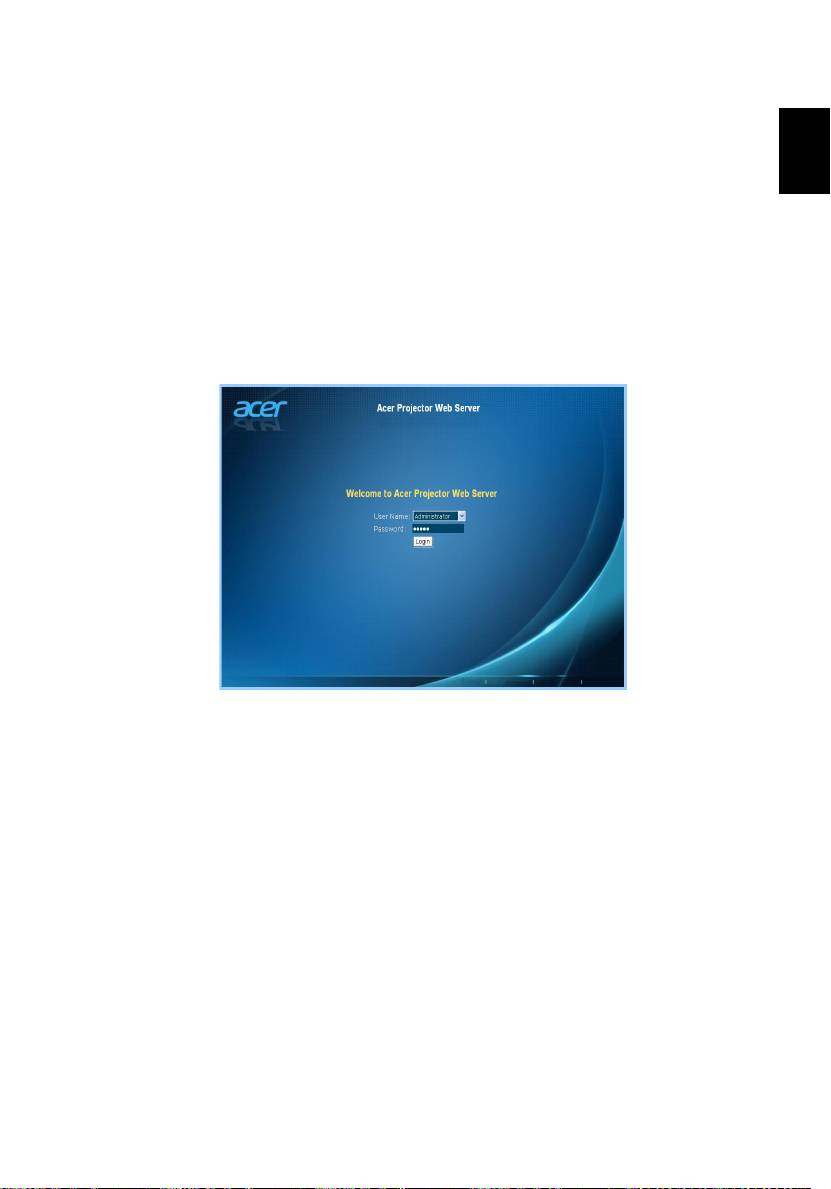
Open browser and enter the Server IP address by 192.168.100.10 to find below
homepage of acer LAN webpage management. A password is needed to login
in before using.
Select a user. Administrator is with high authority that can process more
operations such as network setting and alert setting. Default password of
administrator is "admin". And User is with normal authority with default
password by "user". Click Login button to enter into homepage with correct
password.
34
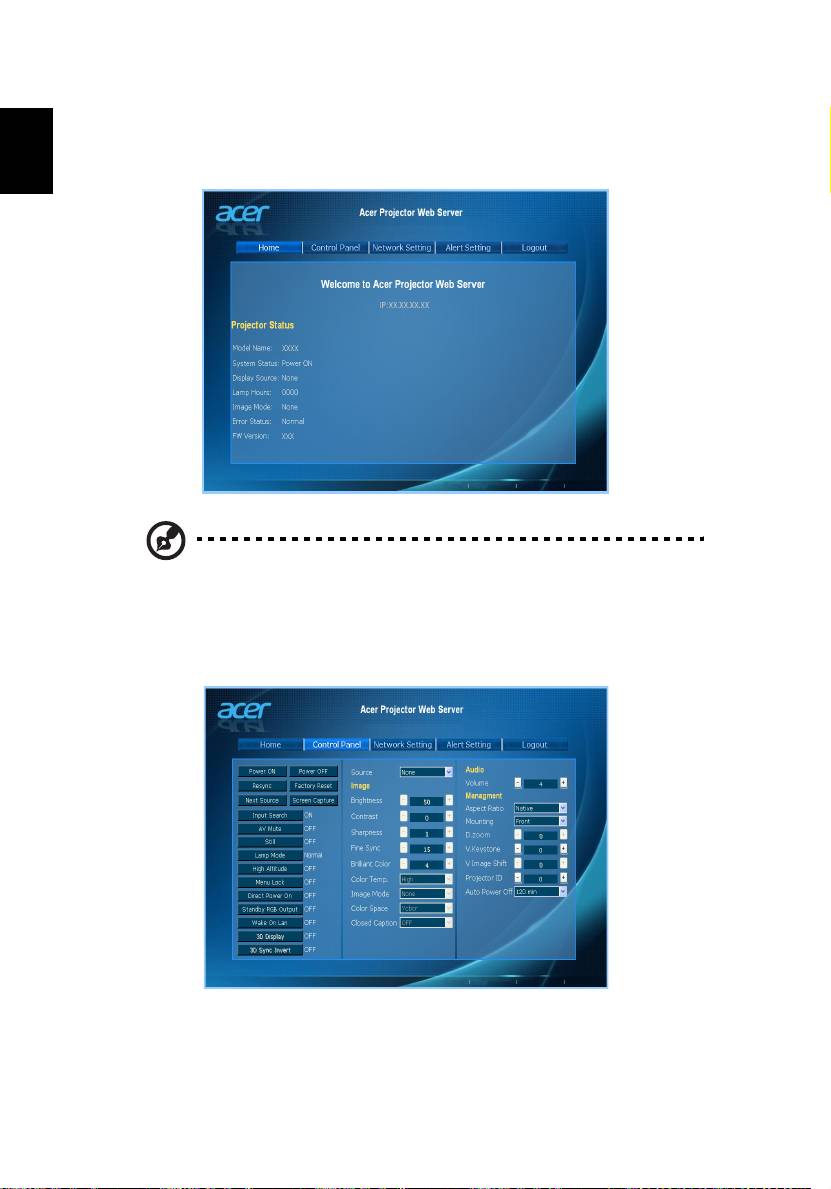
Home
Home page shows connection status and you can find three main functions
listed, Control Panel, Networking Setting and Alert Setting.
English
Note: Control Panel and Network Setting are only for Administrator
account.
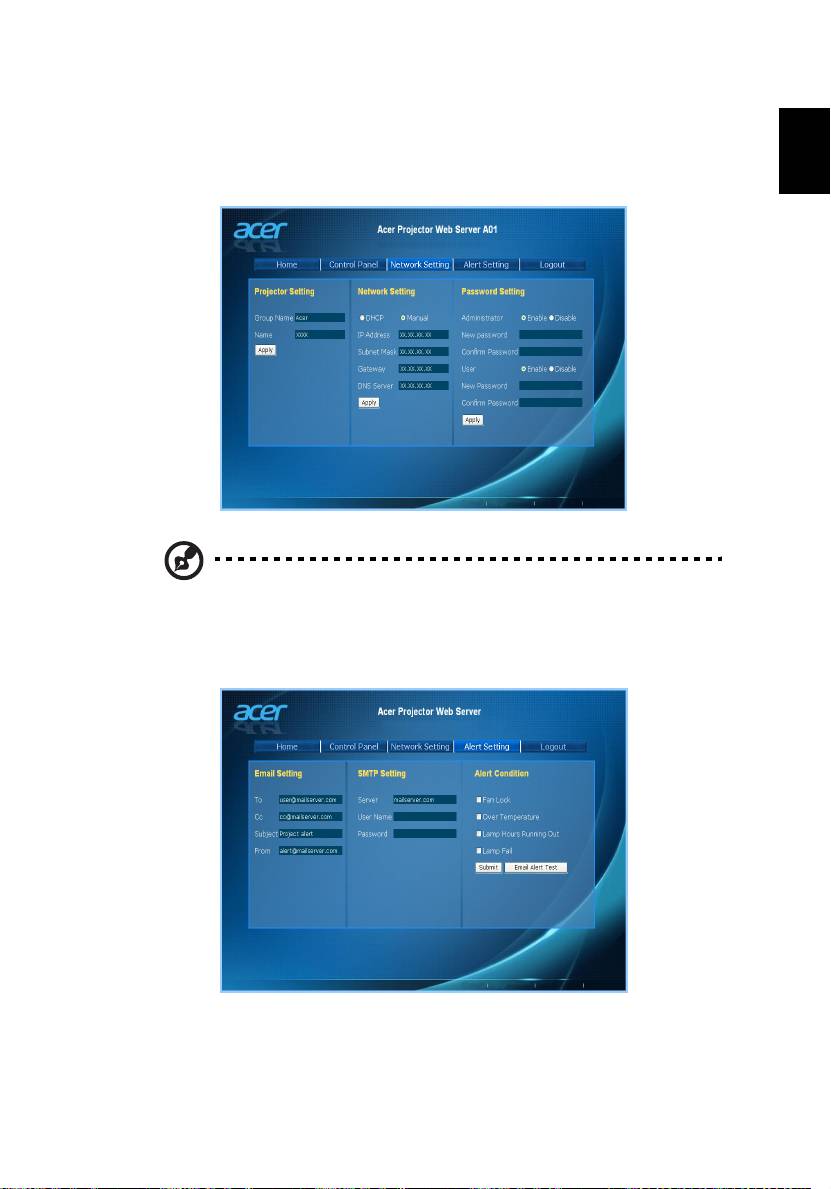
Control Panel
Enduser can control and adjust projector setting value via this page.
35
English
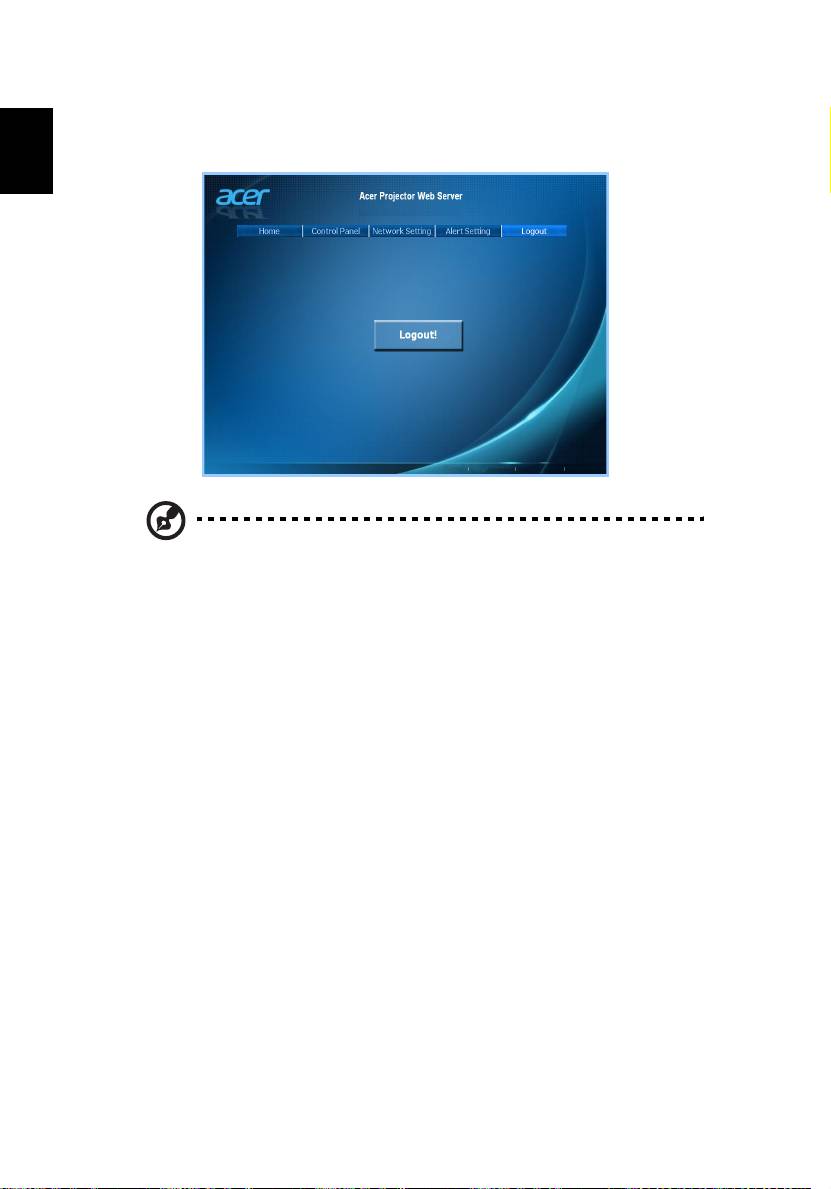
Network Setting
Enduser can set IP address, group name and password as wish. After change
network configurations or password, projector will reboot automatically after
press "Apply".
Note: Group Name and projector Name must be less then 32 characters.
Alert Setting
Enduser can send mail with error message right away if projector has problem.
36
Logout
After tap Logout, you will return to login page within 5 seconds.
English
Note: Functions vary depending on model definition.