Acer H6520BD: Appendices
Appendices: Acer H6520BD
37
English
Appendices
Troubleshooting
If you experience a problem with your Acer projector, refer to the following
troubleshooting guide. If the problem persists, please contact your local reseller
or service center.
Image Problems and Solutions
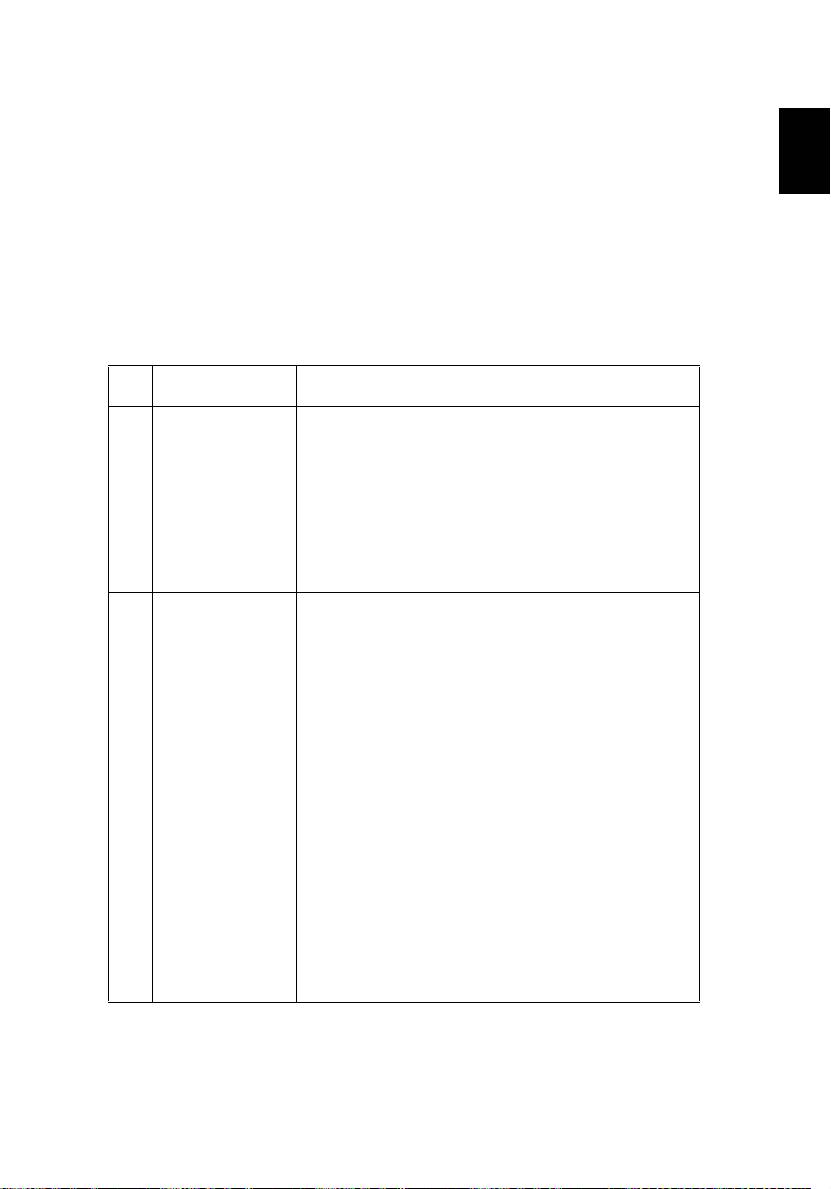
# Problem Solution
1 No image appears
• Connected as described in the "Getting Started"
onscreen
section.
• Ensure none of the connector pins are bent or
broken.
• Check if the projector lamp has been securely
installed. Please refer to the "Replacing the Lamp"
section.
• Make sure you have removed the lens cap and the
projector is switched on.
2 Partial, scrolling
•
Press "RESYNC" on the remote control or control panel.
or incorrectly
• For an incorrectly displayed image:
displayed image
(for PC (Windows
• Open "My Computer," open the "Control
2000/XP/Vista/
Panel," and then double-click the "Display"
Windows 7/
icon.
Windows 8))
• Select the "Settings" tab.
• Verify that your display resolution setting is
lower than or equal to WUXGA-RB (1920 x
1200).
• Click the "Advanced Properties" button.
If the problem still appears, change the monitor display
you are using and follow the steps below:
• Verify that the resolution setting is lower than
or equal to WUXGA-RB (1920 x 1200).
• Click the "Change" button under the
"Monitor" tab.
• Click "Show all devices". Next, select "Standard
monitor types" under the SP box, and choose
the resolution mode you need under the
"Models" box.
• Verify that the resolution setting of the
monitor display is lower than or equal to
WUXGA-RB (1920 x 1200).
38
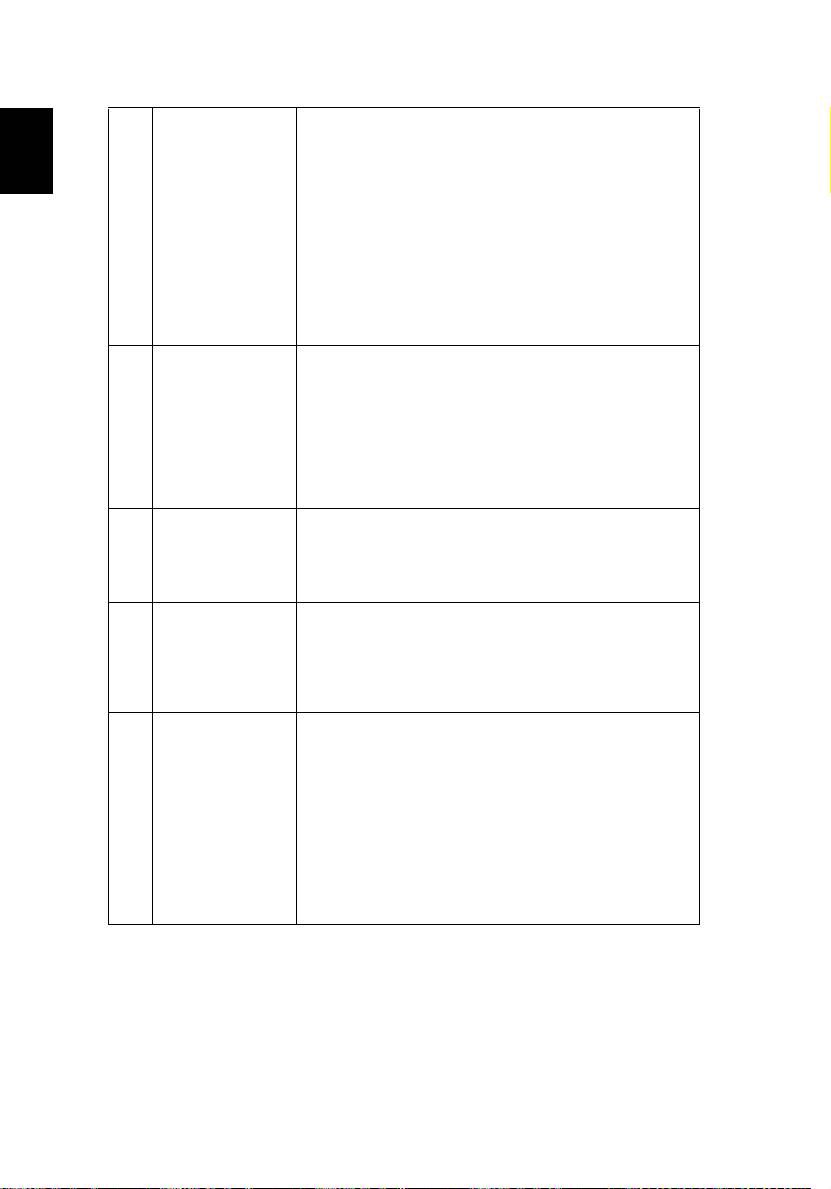
3 Partial, scrolling
• Press "RESYNC" on the remote control or control
or incorrectly
panel.
displayed image
(For notebooks)
• For an incorrectly displayed image:
English
• Follow the steps for item 2 (above) to adjust
the resolution of your computer.
• Press the toggle output settings. Example:
[Fn]+[F4], Compaq [Fn]+[F4], Dell [Fn]+[F8],
Gateway [Fn]+[F4], IBM [Fn]+[F7], HP
[Fn]+[F4], NEC [Fn]+[F3], Toshiba [Fn]+[F5]
• If you experience difficulty changing resolutions or
your monitor freezes, restart all equipment
including the projector.
4 The screen of the
®
®
• If you are using a Microsoft
Windows
based
notebook
notebook: Some notebook PCs may deactivate their
computer is not
own screens when a second display device is in use.
displaying your
presentation
Each has a different way to be reactivated. Refer to
your computer's manual for detailed information.
®
®
• If you are using an Apple
Mac
OS based
notebook: In System Preferences, open Display and
select Video Mirroring "On".
5 Image is unstable
• Adjust the "Tracking" to correct it. Refer to the
or flickering
"Image" section for more information.
• Change the display color depth settings on your
computer.
6 Image has vertical
• Use "Frequency" to make an adjustment. Refer to
flickering bar
the "Image" section for more information.
• Check and reconfigure the display mode of your
graphics card to make it compatible with the
projector.
7 Image is out of
• Make sure the lens cap is removed.
focus
• Adjusts the focus ring on the projector lens.
• Make sure the projection screen is within the
required distance of 3.9 to 39.0 feet (1.2 to 11.9
meters) (SVGA/XGA series) / 3.3 to 32.9 feet (1.0 to
10.0 meters) (WXGA series) / 3.3 to 33.8 feet (1.0 to
10.3 meters) (720p series) / 4.9 to 32.9 feet (1.5 to
10.0 meters) (1080p series) from the projector. Refer
to the "How to Get a Preferred Image Size by
Adjusting Distance and Zoom" section for more
information.
39
English
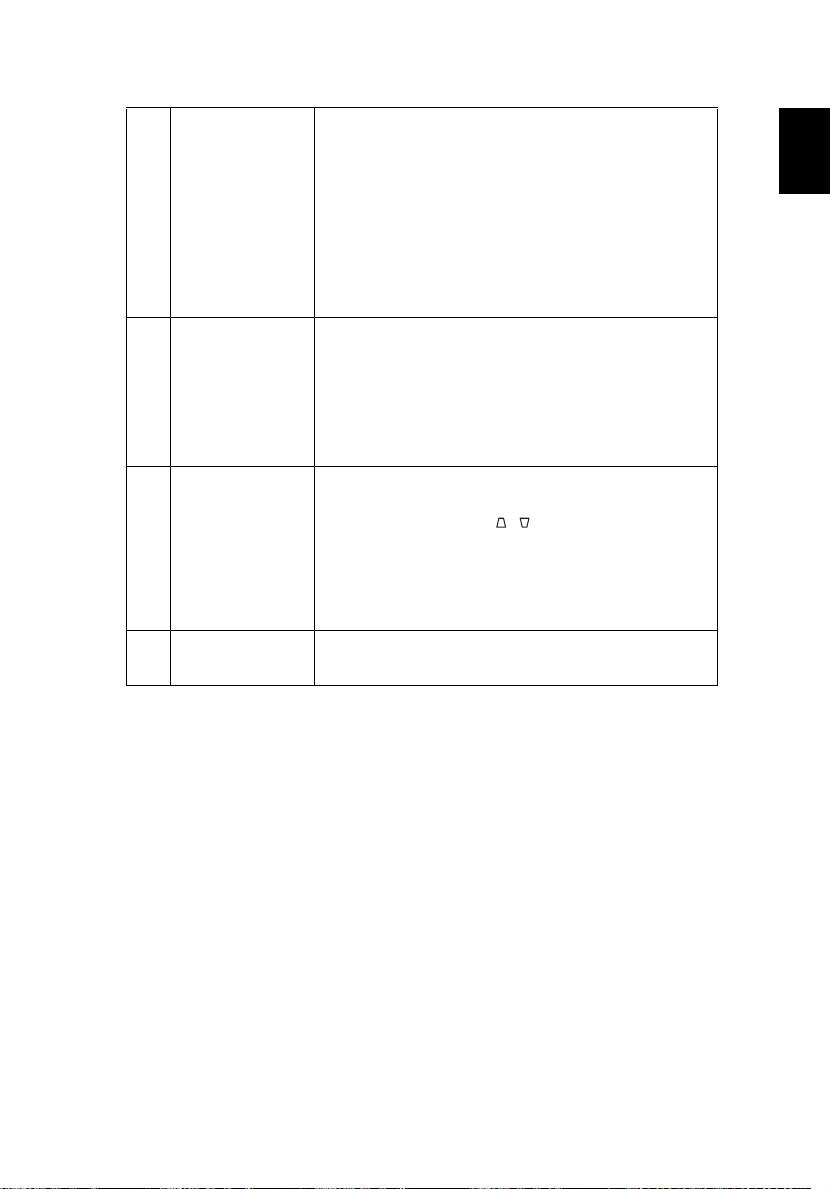
8 Image is stretched
When you play a DVD encoded in anamorphic or 16:9
when displaying a
aspect ratio you may need to adjust the following
"widescreen"
settings:
DVD title
• If you play a 4:3 format DVD title, please change the
format to 4:3 in the projector OSD.
• If the image is still stretched, you will also need to
adjust the aspect ratio. Set up the display format to
16:9 (wide) aspect ratio on your DVD player.
• If you play an Letterbox (LBX) format DVD title,
please change the format to Letterbox (LBX) in the
projector OSD.
9 Image is too small
• Adjust the zoom lever on the top of the projector.
or too large
• Move the projector closer to or further from the
screen.
• Press "MENU" on the remote control. Go to "Image -
-> Aspect Ratio" and try different settings or
press"Aspect Ratio" on the remote control to adjust
directly.
10 Image has slanted
• If possible, reposition the projector so that it is
sides
centered on the screen.
• Press the "Keystone / " button on the remote
control until the sides are vertical.
• Press "MENU" on the remote control. Go to "Image -
-> Auto Keystone" and choose "Off" on the OSD, if
"Keystone" button is not available on the remote
control.
11 Image is reversed
• Select "Image --> Projection" on the OSD and adjust
the projection direction.
40
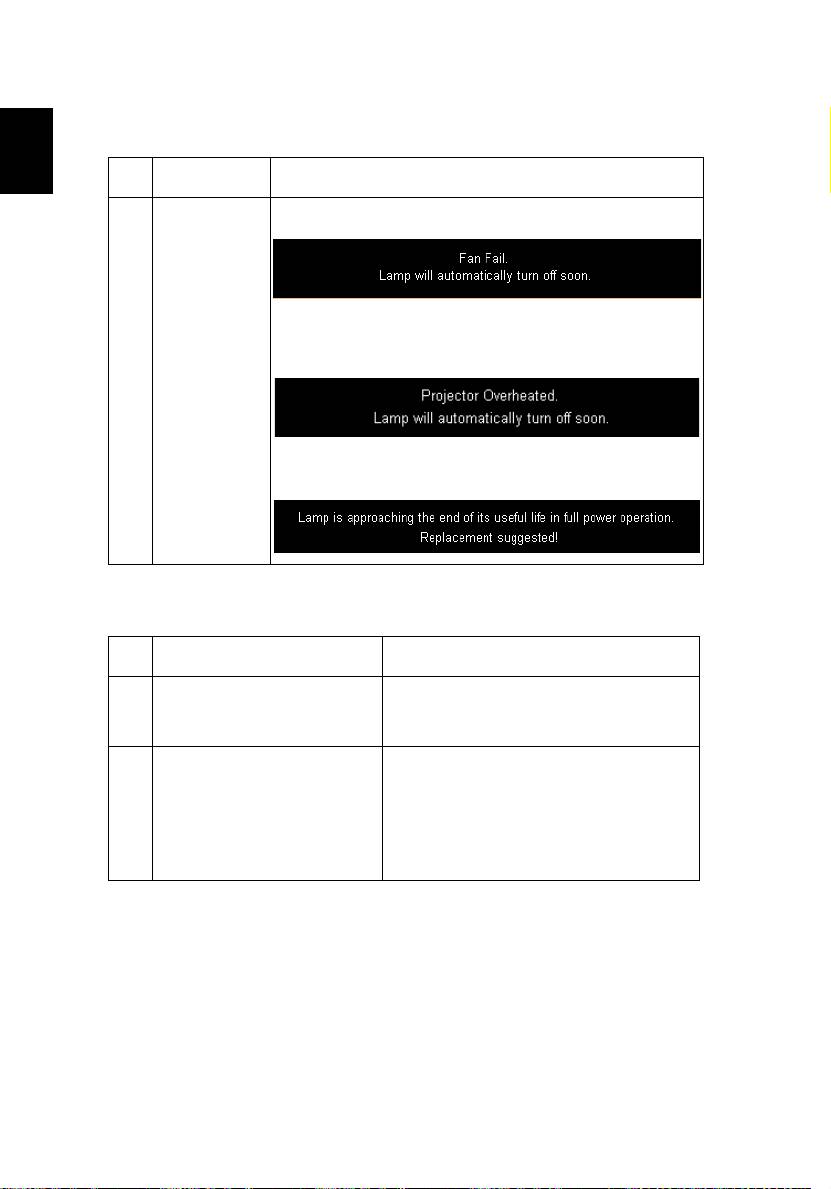
OSD Messages
# Condition Message Reminder
English
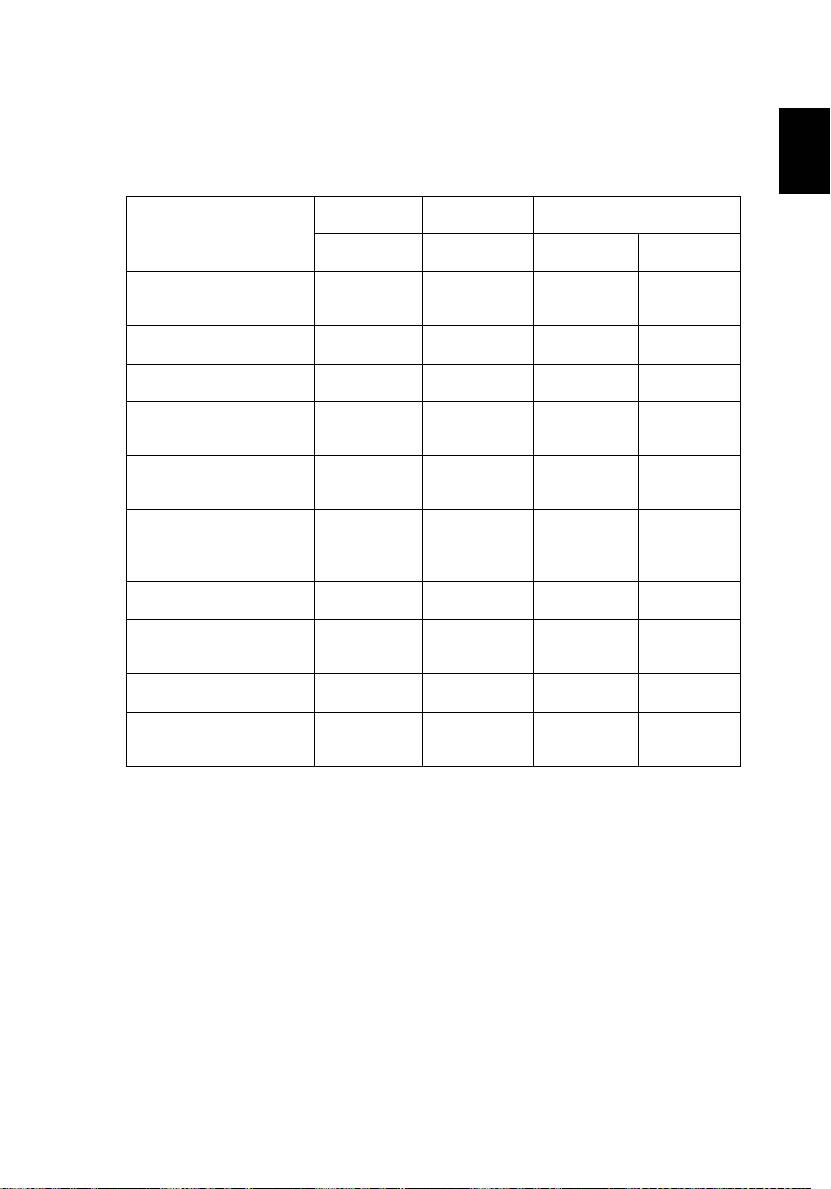
1 Message Fan Fail - the system fan is not working.
Projector Overheated - the projector has exceeded its
recommended operating temperature and must be allowed to
cool down before it may be used.
Replace the lamp - the lamp is about to reach its maximum
lifetime. Prepare to replace it soon.
Problems with the Projector
# Condition Solution
1 The projector stops responding
If possible, turn off the projector, then
to all controls
unplug the power cord and wait at least 30
seconds before reconnecting power.
2 Lamp burns out or makes a
When the lamp reaches the end of its useful
popping sound
life, it will burn out and may make a loud
popping sound. If this happens, the projector
will not turn on until the lamp module has
been replaced. To replace the lamp, follow
the procedures in the "Replacing the Lamp"
section.
41
English
LED & Alarm Definition Listing
LED Messages
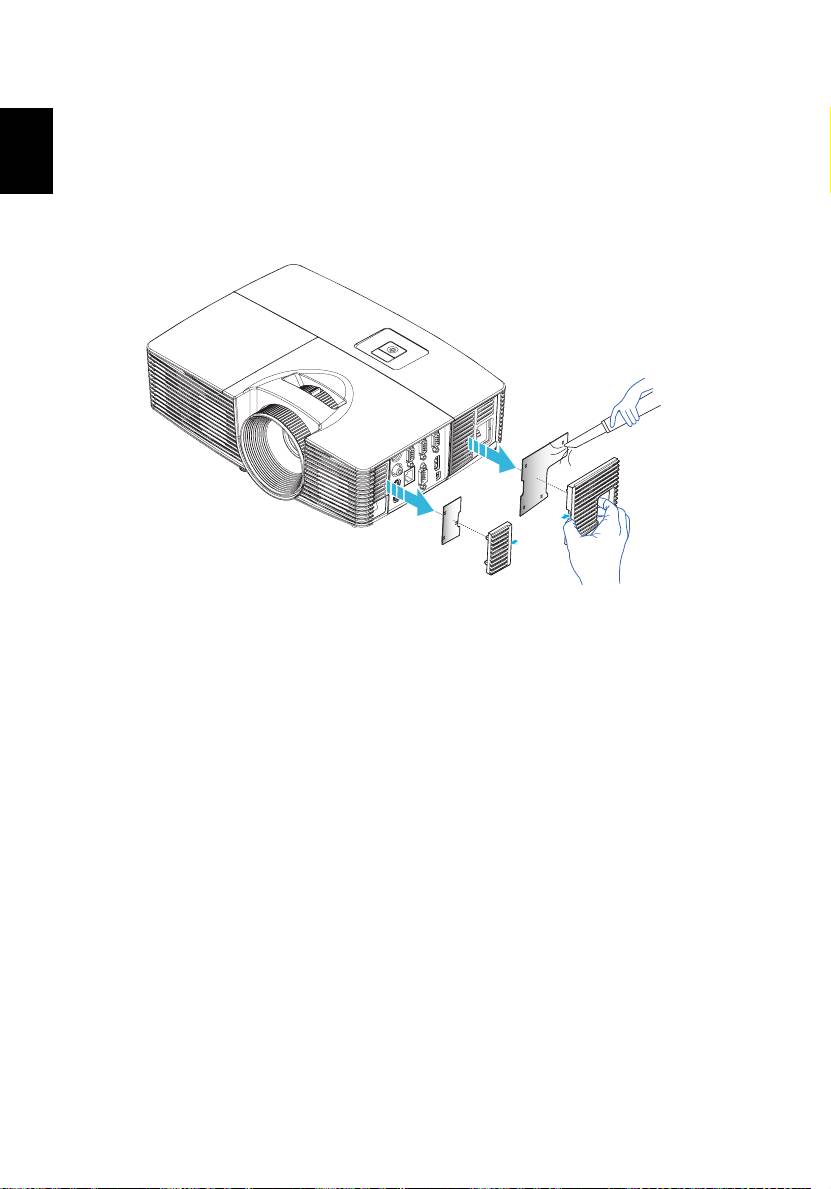
Lamp_LED Temp_LED Power LED
Message
Red Red Red Blue
Input power plug Flash ON to
Flash ON to
Flash ON to
--
OFF 100ms
OFF 100ms
OFF 100ms
Standby -- -- ON --
Power button ON -- -- -- ON
Lamp retry -- -- -- Quick
Flashing
Power off (Cooling state) -- -- Quick
--
Flashing
Power button OFF
-- -- ON --
(cooling completed;
standby mode)
Error (thermal failure) -- ON -- ON
Error (fan lock) -- Quick
-- ON
Flashing
Error (lamp breakdown) ON -- -- ON
Error (color wheel fail) Quick
-- -- ON
Flashing
42
Cleaning and replacing the dust filters
Cleaning the dust filters
English
Clean the dust filters after every 1000 hours of use. If they are note cleaned
periodically, they can become clogged with dust, preventing proper ventilation.
This can cause overheating and damage the projector.
2
1
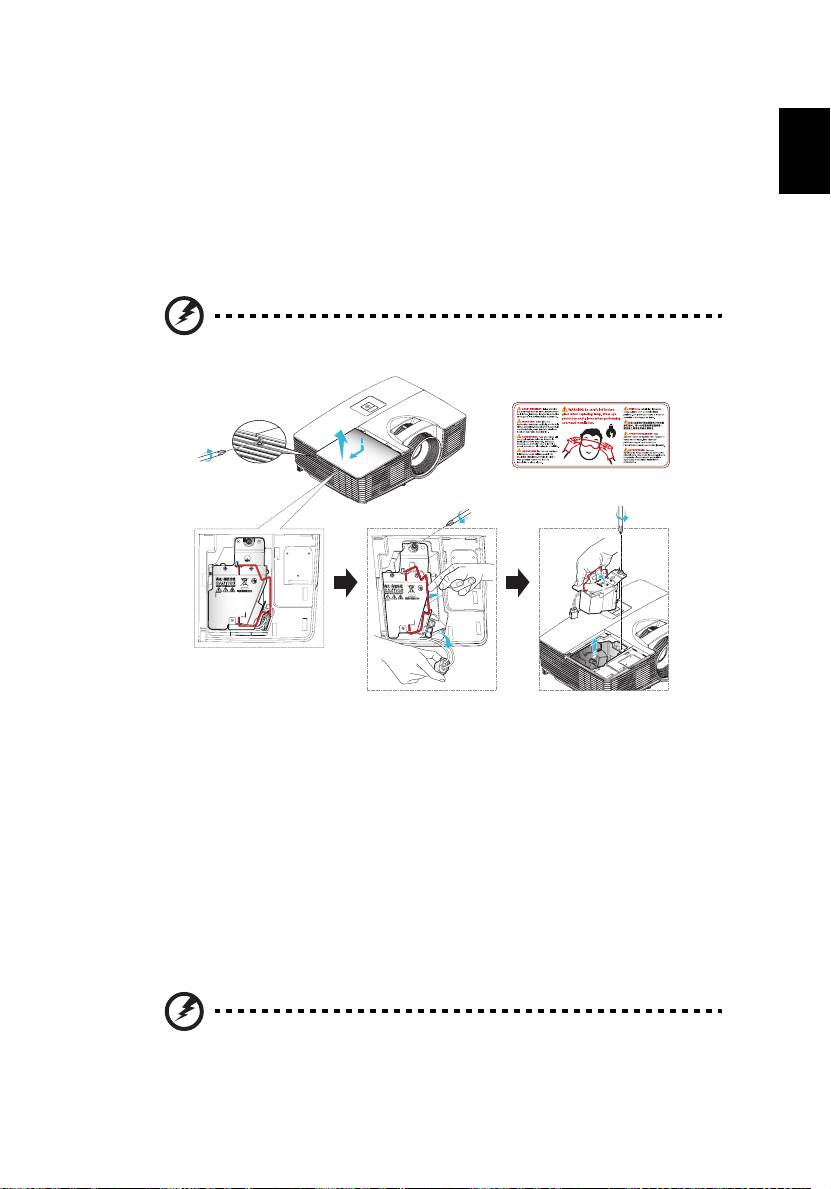
Follow these steps:
1 Turn the projector off. Wait for the Power LED to stop flashing then
unplug the power cord.
2 Allow the projector at least 30 mins to cool down.
3 Pull out the dust filter. (Illustration #1)
4 To clean the dust filters, use a small vacuum cleaner designed for
computers and other office equipment. (Illustration #2)
5 If the dirt is difficult to remove or the filter is broken, please contact your
local dealer or service center to obtain a new filter.
43
English
Replacing the Lamp
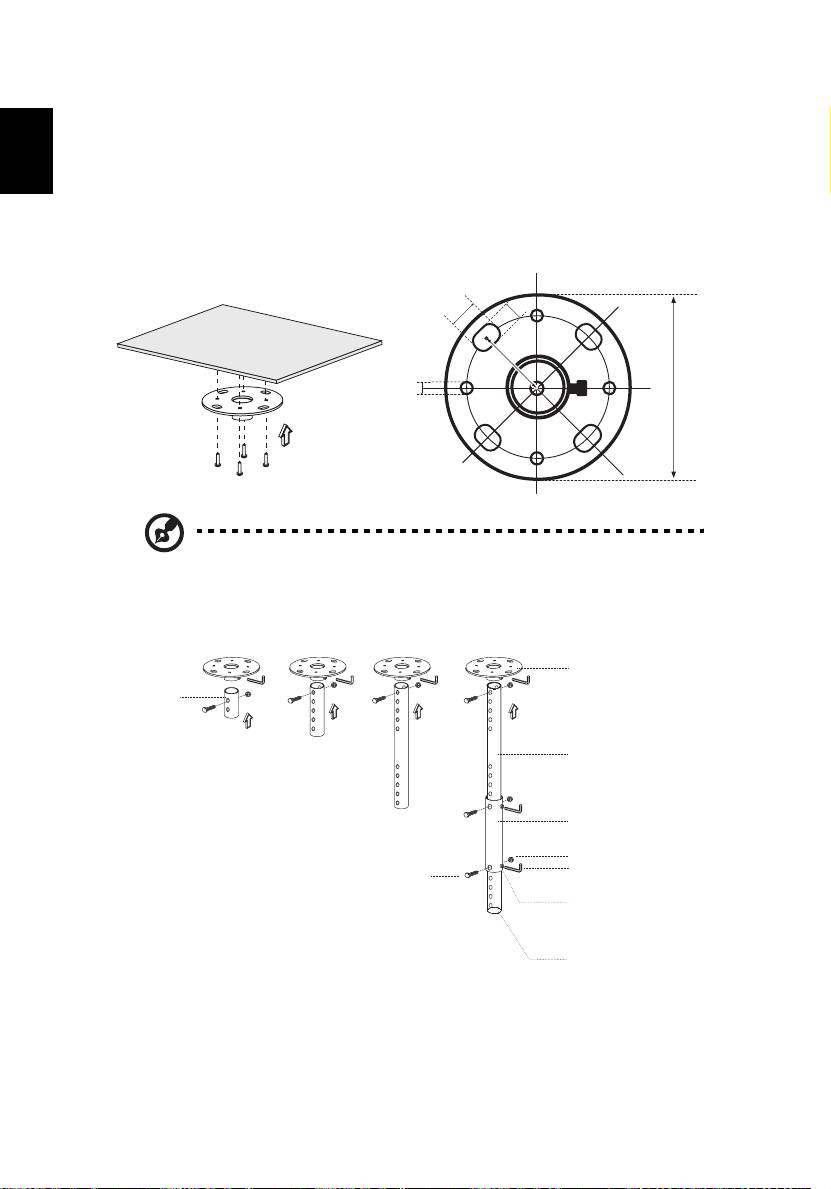
Use a screwdriver to remove the screw(s) from the cover, and then pull out the
lamp.
The projector will detect the lamp life. You will be shown a warning message
"Lamp is approaching the end of its useful life in full power operation.
Replacement suggested!" When you see this message, change the lamp as soon
as possible. Make sure the projector has been cooling down for at least 30
minutes before changing the lamp.
Warning: The lamp compartment is hot! Allow it to cool down
before changing the lamp.
2
1
3
4
6
5
To Change the Lamp
Turn off the projector by pressing the Power button.
Allow the projector at least 30 minutes to cool down.
Disconnect the power cord.
1 Use a screwdriver to remove the screw from the cover. (Illustration #1)
Push up and remove the cover. (Illustration #2)
2 Remove the screw that secure the lamp module. (Illustration #3)
Pull out the lamp plug. (Illustration #4)
Lift the handle so that it stands up. (Illustration #5)
3 Lift the handle so that it stands up. Pull out the lamp module by force.
(Illustration #6)
To replace the lamp module, use a new lamp and reverse the above steps.
Warning: To reduce the risk of personal injury, do not drop the
lamp module or touch the lamp bulb. The bulb may shatter and
cause injury if it is dropped.
44
Ceiling Mount Installation
If you wish to install the projector using a ceiling mount, please refer to the
steps below:
English
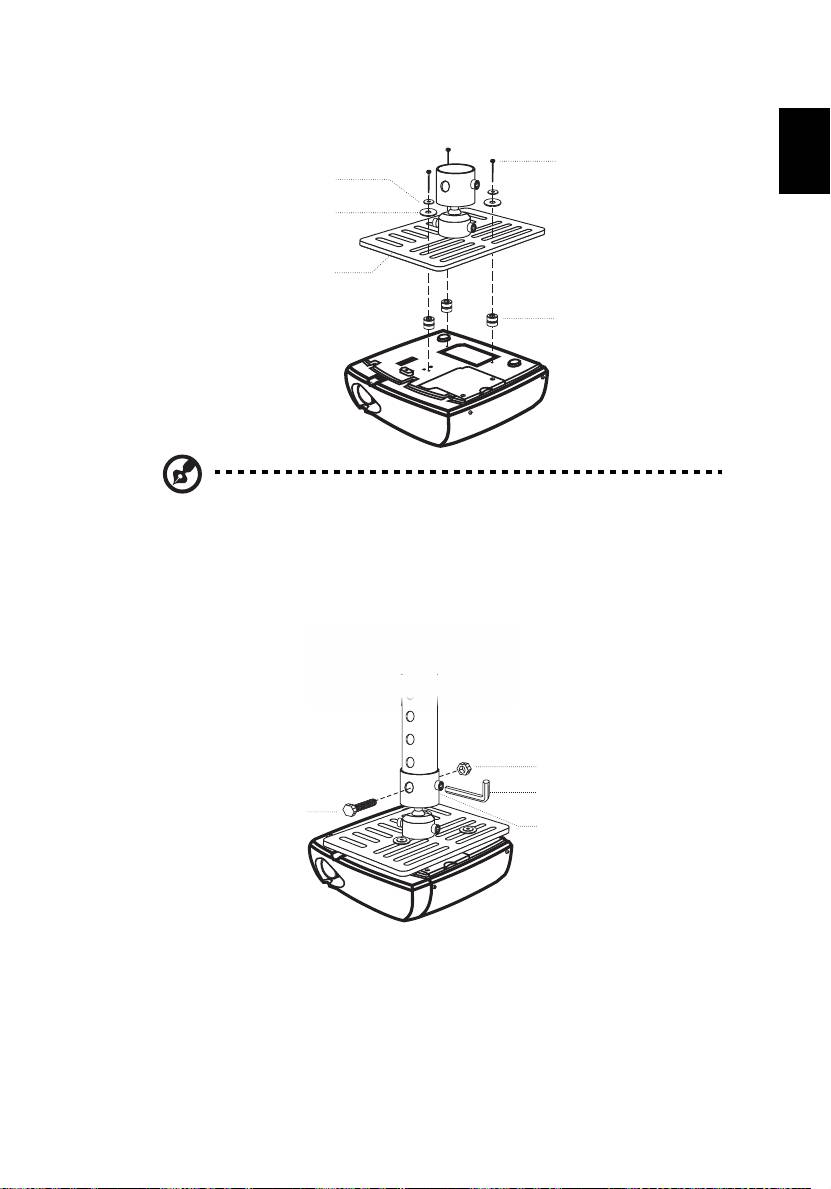
1 Drill four holes into a solid, structurally sound part of the ceiling, and
secure the mount base.
mm
13
20
mm
49.9
mm
130 mm
8.4
mm
Note: Screws are not included. Please obtain the appropriate
screws for your type of ceiling.
2 Secure the ceiling rod using the appropriate type of four-cylinder screws.
Ceiling Mount Base
- Attach to ceiling
Short Rod
Long Rod
Extension Rod
Long Cylinder Cap
Allen Key
Screw Type A
- For tightening/loosening
50 mm length / 8 mm diameter -
Tightening Screw
Medium Rod
45
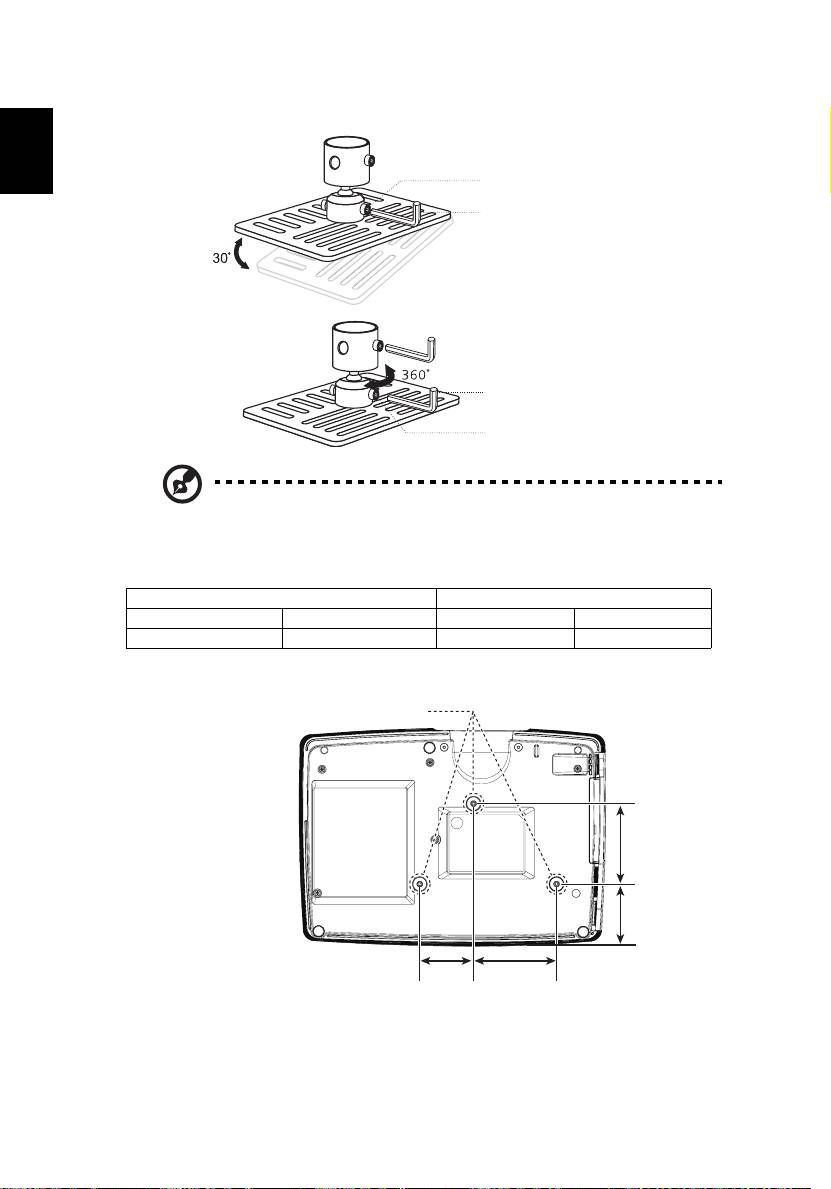
3 Use the appropriate number of screws for the projector size to attach the
English
projector to the ceiling mount bracket.
Smaller Washer
Large Washer
Projector Bracket
-
Note: It is recommended that you keep a reasonable space
between the bracket and the projector to allow for proper heat
distribution. Use two washers for extra support, if deemed
necessary.
4 Attach the ceiling bracket to the ceiling rod.
S
Screw Type B
upports projector and allows
for adjustments
Spacer
- For heat dissipation
Large cylinder cap
Allen Key
- For tightening/loosening
Screw Type A
50 mm length/
-
Tightening Screw
8 mm diameter
46
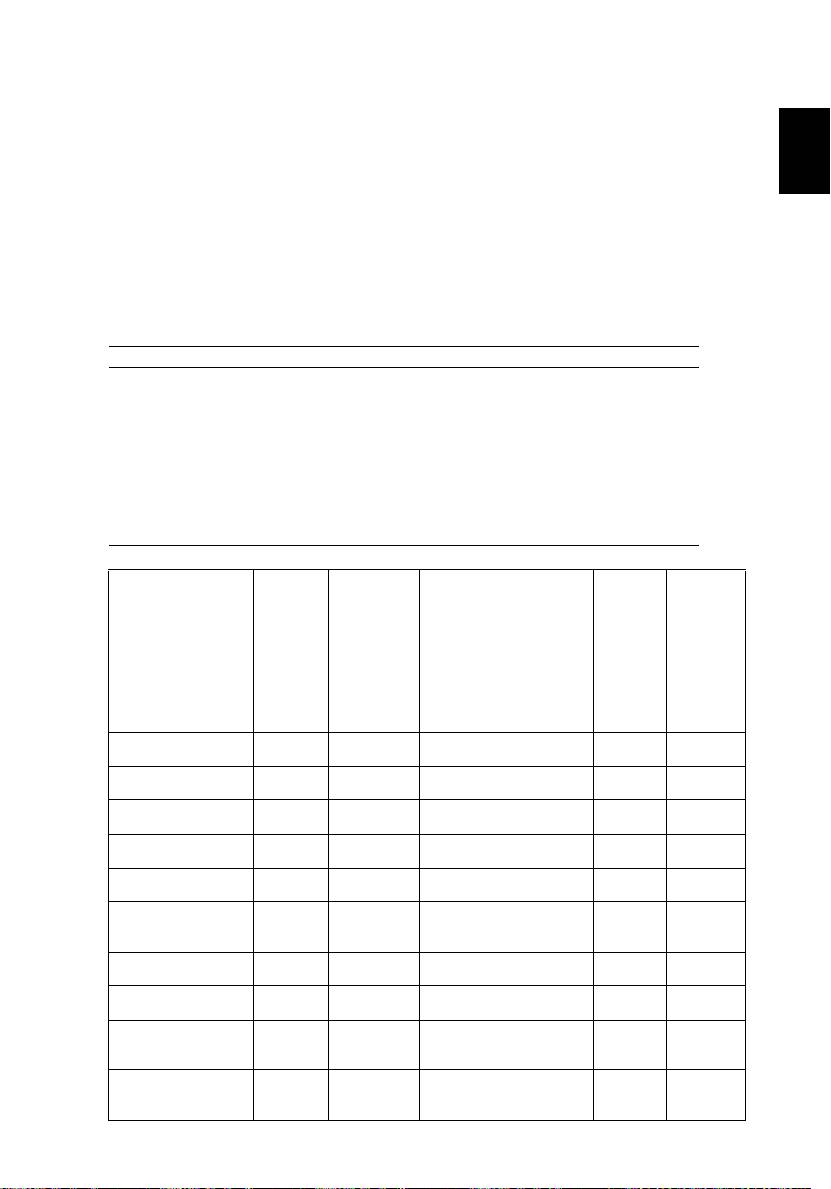
5 Adjust the angle and positioning as necessary.
English
Tightening Screw
Allen Key
Allen Key
Tightening Screw
Note: The appropriate type of screw and washer for each model is
listed in the table below. 4 mm diameter screws are enclosed in
the screw pack.
Screw Type B Washer Type
Diameter (mm) Length (mm) Large Small
425VV
SCREW SPEC. M4 x 25 mm
82.30 mm 63.81 mm
85.00 mm55.00 mm

47
English
Specifications
The specifications listed below are subject to change without notice. For final
specs, please refer to Acer's published marketing specifications.
Projection system
®
DLP
Resolution
• P1183/M403/PE-S42/X1183A/D603P/EV-S62T/X114/
X1183/D603/EV-S62/X113/D600/EV-S60/V10S/AS201
series: Native 800 x 600 SVGA resolution
• P1283/M413/PE-X42/V12X/AX316/P1283n/M413T/
PE-X42G/X1283/X1280/D613/EV-X62 series: Native
1024 x 768 XGA resolution
• P1383W/X1383WH/M423/PE-W42/V12W/AW316/
P1380W/X1380WH/M420/PE-W40/V11W/AW216
series: Native 1280 x 800 WXGA resolution
• H5380BD/E230/HE-720 series: 1280x720 720p
resolution
• P1510/M450/PE-840 series: 1920x1080 1080p
resolution
• Maximum: UXGA (1600 x 1200), WSXGA+
(1680x1050), 1080p(1920x1080), WUXGA-RB (1920
x 1200)
Computer compatibility IBM PC and compatibles, Apple Macintosh, iMac and
VESA standards: SXGA, XGA, VGA, SVGA, SXGA+,
WXGA, WXGA+, WSXGA +
Video compatibility NTSC (3.58/4.43), PAL (B/D/G/H/I/M/N), SECAM (B/D/G/
K/K1/L), HDTV (720p, 1080i, 1080p), EDTV (480p,
576p), SDTV (480i, 576i)
Aspect ratio Full, 4:3, 16:9, L.Box
Displayable colors 16.7 million colors
Projection lens
• P1183/M403 PE-S42/X1183A/D603P/EV-S62T/X114/
X1183/D603/EV-S62/X113/D600/EV-S60/V10S/AS201/
P1283/M413/PE-X42/V12X/AX316/P1283n/M413T/
PE-X42G/X1283/X1280/D613/EV-X62 series:
F = 2.41 ~ 2.55, f = 2.79~23.99 mm, 1.1X manual
zoom and manual focus
• P1383W/X1383WH/M423/PE-W42/V12W/AW316/
P1380W/X1380WH/M420/PE-W40/V11W/AW216
series:
F = 2.5 ~ 2.67, f = 21.80 ~ 23.98 mm, 1.1X manual
zoom and manual focus
• H5380BD/E230/HE-720 series:
F = 2.5 ~ 2.67, f = 21.86 mm ~ 24.00 mm, 1.1X
manual zoom and manual focus
• P1510/M450/PE-840 series:
F = 2.55 ~ 2.87, f = 22.41 mm ~ 26.82 mm, 1.2X
manual zoom and manual focus

48
Projection screen size (diagonal)
• P1183/M403 PE-S42/X1183A/D603P/EV-S62T/X114/
X1183/D603/EV-S62/X113/D600/EV-S60/V10S/AS201/
P1283/M413/PE-X42/V12X/AX316/P1283n/M413T/
PE-X42G/X1283/X1280/D613/EV-X62 series:
English
27" (70 cm) ~ 300" (762 cm)
• P1383W/X1383WH/M423/PE-W42/V12W/AW316/
P1380W/X1380WH/M420/PE-W40/V11W/AW216
series:
27" (69 cm) ~ 300" (762 cm)
• H5380BD/E230/HE-720 series:
27" (67 cm) ~ 300" (762 cm)
• P1510/M450/PE-840 series:
37" (94 cm) ~ 300" (762 cm)
Projection distance
• P1183/M403 PE-S42/X1183A/D603P/EV-S62T/X114/
X1183/D603/EV-S62/X113/D600/EV-S60/V10S/AS201/
P1283/M413/PE-X42/V12X/AX316/P1283n/M413T/
PE-X42G/X1283/X1280/D613/EV-X62 series:
3.9' (1.2 m) ~ 39.0' (11.9 m)
• P1383W/X1383WH/M423/PE-W42/V12W/AW316/
P1380W/X1380WH/M420/PE-W40/V11W/AW216
series:
3.3' (1.0 m) ~ 32.9' (10.0 m)
• H5380BD/E230/HE-720 series:
3.3' (1.0 m) ~ 33.8' (10.3 m)
• P1510/M450/PE-840 series:
4.9' (1.5 m) ~ 32.9' (10.0 m)
Throw ratio
• P1183/M403 PE-S42/X1183A/D603P/EV-S62T/X114/
X1183/D603/EV-S62/X113/D600/EV-S60/V10S/AS201/
P1283/M413/PE-X42/V12X/AX316/P1283n/M413T/
PE-X42G/X1283/X1280/D613/EV-X62 series: 50"@2
m (1.95 ~ 2.15:1)
• P1383W/X1383WH/M423/PE-W42/V12W/AW316/
P1380W/X1380WH/M420/PE-W40/V11W/AW216
series: series: 60"@2 m (1.55 ~ 1.70:1)
•
H5380BD/E230/HE-720 series: 58"@2m (1.55 ~ 1.70:1)
• P1510/M450/PE-840 series: 60"@2m (1.51 ~ 1.83:1)
Horizontal scan rate 30k - 100 kHz
Vertical refresh scan rate 50-120 Hz
Lamp type 190W user-replaceable lamp
Keystone correction
±40 degrees
Audio Internal speaker with 2 W output
Weight 2.5 Kg (5.51 Ibs)
Dimensions (W x D x H) 314 mm X 223.4 mm X 93.4 mm (12.4" x 8.8" x 3.7")
Digital Zoom 2X
Power supply AC input 100 - 240 V auto-switching power supply
49
Power consumption
English
• P1183/M403/PE-S42/X1183A/D603P/EV-S62T/X114/
X1183/D603/EV-S62/X113/D600/EV-S60/V10S/AS201/
P1283/M413/PE-X42/V12X/AX316/P1283n/M413T/
PE-X42G/X1283/X1280/D613/EV-X62/P1383W/
X1383WH/M423/PE-W42/V12W/AW316/P1380W/
X1380WH/M420/PE-W40/V11W/AW216/H5380BD/
E230/HE-720:
Normal mode: 235W ± 10% @ 110VAC
ECO mode: 197W ± 10% @ 110VAC
Standby mode < 0.5W
• P1510/M450/PE-840 series:
Normal mode: 320W ± 10% @ 110VAC
ECO mode: 270W ± 10% @ 110VAC
Standby mode < 0.5W
Operating temperature 0ºC to 40ºC / 32ºF to 104ºF
Standard package contents
• AC power cord x1
• VGA cable x1
• Remote control x1
• Battery x2 (for remote control) (option)
• User's guide (CD-ROM) x1
• Quick start guide x1
• Security card x1
• Carrying case x1 (option)
X113/
P1183/M403/PE-S42/
D600/
X1183A/
P1283/M413/PE-X42/
EV-S60/
X1280/
V12X/AX316/P1383W/
V10S/
D603P/
P1283n/
P1510/
X1383WH/M423/PE-W42/
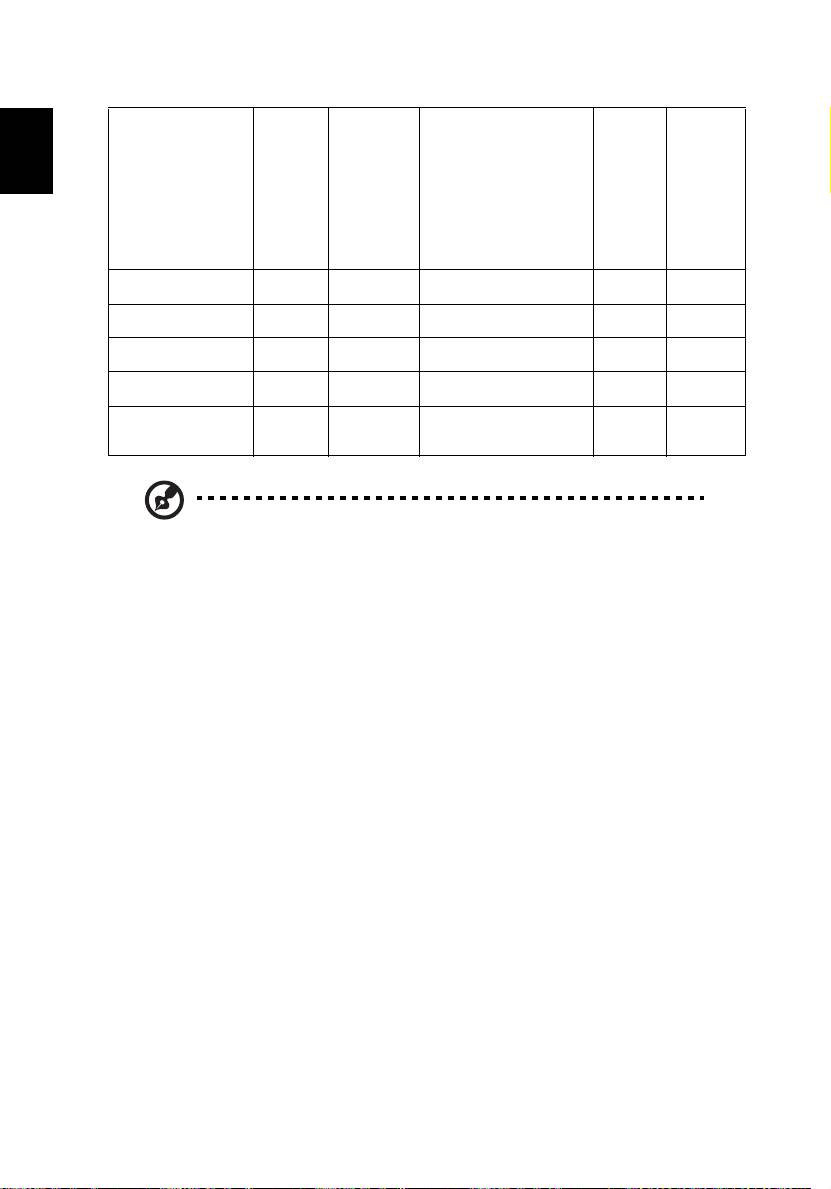
I/O connectors
AS201/
EV-S62T/
M413T/
M450/
V12W/AW316/P1380W/
X114/
X1283/
PE-X42G
PE-840
X1380WH/M420/PE-W40/
X1183/
D613/
V11W/AW216/H5380BD/
D603/
EV-X62
E230/HE-720
EV-S62
Power socket V V V V V
VGA IN V X X X X
VGA IN 1 X V V V V
VGA IN 2 X V V V V
VGA output X V V V V
3.5 mm audio jack
XV V VV
input 1
S-Video V V V V V
Composite video V V V V V
3.5 mm audio jack
XV V VV
input 2
3.5 mm audio jack
XV V VV
output
50
X113/
P1183/M403/PE-S42/
D600/
X1183A/
P1283/M413/PE-X42/
EV-S60/
X1280/
V12X/AX316/P1383W/
V10S/
D603P/
P1283n/
P1510/
English
X1383WH/M423/PE-W42/
I/O connectors
AS201/
EV-S62T/
M413T/
M450/
V12W/AW316/P1380W/
X114/
X1283/
PE-X42G
PE-840
X1380WH/M420/PE-W40/
X1183/
D613/
V11W/AW216/H5380BD/
D603/
EV-X62
E230/HE-720
EV-S62
RJ45 LAN input X X X V X
RS232 X V V V V
HDMI /MHL X X V V V
HDMI X X X X V
Mini USB x1 (for
VV V VV
firmware upgrade)
Note: Design and specifications are subject to change without
notice.
51
English
Compatibility modes
A. VGA Analog
1 VGA Analog - PC Signal
Modes Resolution V.Frequency [Hz] H.Frequency [KHz]
VGA 640x480 60 31.5
640x480 72 37.9
640x480 75 37.5
640x480 85 43.3
640x480 120 61.9
SVGA 800x600 56 35.1
800x600 60 37.9
800x600 72 48.1
800x600 75 46.9
800x600 85 53.7
800x600 120 77.4
XGA 1024x768 60 48.4
1024x768 70 56.5
1024x768 75 60.0
1024x768 85 68.7
1024x768 120 99.0
SXGA 1152x864 70 63.8
1152x864 75 67.5
1152x864 85 77.1
1280X1024 60 64.0
1280X1024 72 77.0
1280X1024 75 80.0
1280X1024 85 91.1
QuadVGA 1280x960 60 60.0
1280x960 75 75.2
SXGA+ 1400x1050 60 65.3
UXGA 1600x1200 60 75.0
PowerBook G4 640x480 60 31.4
PowerBook G4 640x480 66.6(67) 34.9
PowerBook G4
800x600 60 37.9
PowerBook G4
1024x768 60 48.4
PowerBook G4 1152x870 75 68.7
PowerBook G4 1280x960 75 75.0
i Mac DV (G3) 1024x768 75 60.0
52
2 VGA Analog - Extended Wide timing
Modes Resolution V.Frequency [Hz] H.Frequency [KHz]
WXGA 1280x768 60 47.8
English
1280x768 75 60.3
1280x768 85 68.6
1280x720 60 44.8
1280x720 120 92.9
1280x800 60 49.6
*1280x800-RB 119.909 101.6
1440x900 60 59.9
WSXGA+ 1680x1050 60 65.3
1920x1080
60 67.5
(1080P)
1366x768 60 47.7
WUXGA 1920x1200-RB 59.94 74.04
3 VGA Analog -Component Signal
Modes Resolution V.Frequency [Hz] H.Frequency [KHz]
480i 720x480(1440x480) 59.94 (29.97) 15.7
576i 720x576(1440x576) 50(25) 15.6
480p 720x480 59.94 31.5
576p 720x576 50 31.6
720p 1280x720 60 45.0
720p 1280x720 50 37.5
1080i 1920x1080 60(30) 33.8
1080i 1920x1080 50(25) 28.1
1080p 1920x1080 23.97/24 27.0
1080p 1920x1080 60 67.5
1080p 1920x1080 50 56.3
B. HDMI Digital
1 HDMI - PC Signal
Modes Resolution V.Frequency [Hz] H.Frequency [KHz]
VGA 640x480 60 31.5
640x480 72 37.9
640x480 75 37.5
640x480 85 43.3
640x480 120 61.9
53
English
SVGA 800x600 56 35.1
800x600 60 37.9
800x600 72 48.1
800x600 75 46.9
800x600 85 53.7
800x600 120 77.4
XGA 1024x768 60 48.4
1024x768 70 56.5
1024x768 75 60.0
1024x768 85 68.7
1024x768 120 99.0
SXGA 1152x864 70 63.8
1152x864 75 67.5
1152x864 85 77.1
1280X1024 60 64.0
1280X1024 72 77.0
1280X1024 75 80.0
1280X1024 85 91.1
QuadVGA 1280x960 60 60.0
1280x960 75 75.2
SXGA+ 1400x1050 60 65.3
UXGA 1600x1200 60 75.0
PowerBook G4 640x480 60 31.4
PowerBook G4 640x480 66.6(67) 34.9
PowerBook G4
800x600 60 37.9
PowerBook G4
1024x768 60 48.4
PowerBook G4 1152x870 75 68.7
PowerBook G4 1280x960 75 75.0
i Mac DV (G3) 1024x768 75 60.0
2 HDMI - Extended Wide timing
Modes Resolution V.Frequency [Hz] H.Frequency [KHz]
WXGA 1280x768 60 47.8
1280x768 75 60.3
1280x768 85 68.6
1280x720 60 44.8
1280x720 120 92.9
1280x800 60 49.6
*1280x800-RB 119.909 101.6
1440x900 60 59.9
WSXGA+ 1680x1050 60 65.3
54
1920x1080
60 67.5
(1080P)
1366x768 60 47.7
English
WUXGA 1920x1200-RB 59.94 74.04
3 HDMI - Video Signal
Modes Resolution V.Frequency [Hz] H.Frequency [KHz]
480i 720x480(1440x480) 59.94 (29.97) 15.7
576i 720x576(1440x576) 50(25) 15.6
480p 720x480 59.94 31.5
576p 720x576 50 31.6
720p 1280x720 60 45.0
720p 1280x720 50 37.5
1080i 1920x1080 60(30) 33.8
1080i 1920x1080 50(25) 28.1
1080p 1920x1080 23.97/24 27.0
1080p 1920x1080 60 67.5
1080p 1920x1080 50 56.3
4 HDMI - 1.4a 3D Timing
H.Frequency
Modes Resolution V.Frequency [Hz]
[KHz]
720p (Frame Packing) 1280 x 720 50 37.5
720p (Frame Packing) 1280 x 720 60 45.0
1080p (Frame Packing ) 1920 x1080 24 27.0
720p (Frame Packing) 1280 x 720 50 37.5
720p (Frame Packing) 1280 x 720 60 45.0
1080i (Top and Bottom) 1920 x1080 50 (25) 28.1
1080i (Top and Bottom) 1920 x1080 60 (30) 33.8
1080p (Top and Bottom) 1920 x1080 24 27.0
1080p (Top and Bottom) 1920 x1080 50 56.3
1080p (Top and Bottom) 1920 x1080 60 67.5
720p (Side by Side (Half)) 1280 x 720 60 45.0
1080i (Side by Side (Half)) 1920 x1080 50 (25) 28.1
1080i (Side by Side (Half)) 1920 x1080 60 (30) 33.8
1080p (Side by Side (Half)) 1920 x1080 50 56.3
1080p (Side by Side (Half)) 1920 x1080 60 67.5
Horizontal scan rate:
15k-100kHz
Graphic source monitor
Vertical scan rate:
24-120 Hz
range limits
Max. pixel rate:
165 MHz
55
English
C. MHL Digital
V.Frequency
H.Frequency
Modes Resolution
[Hz]
[KHz]
VGA 640x480 59.94/60 31.5
480i 720x480 (1440x480) 59.94/60 15.7
576i 720x576 (1440x576) 50(25) 15.6
480p 720x480 59.94/60 31.5
480p_2x 1440x480 59.94/60 31.5
576p 720x576 50 31.3
576p_2x 1440x576 50 31.3
720p 1280x720 59.94/60 45.0
720p 1280x720 50 37.5
1080i 1920x1080 60(30) 33.8
1080i 1920x1080 50(25) 28.1
1080p 1920x1080 23.97/24 27.0
1080p 1920x1080 25 28.1
1080p 1920x1080 29.97/30 33.8
Graphic source monitor
Horizontal scan rate: 15k-50 kHz
range limits
Vertical scan rate: 24-60 Hz
Max. pixel rate:
Digital: 75 MHz
Note: * Functions vary depending on model definition.