ZyXEL Communications NPS-520: инструкция
Раздел: Бытовая, кухонная техника, электроника и оборудование
Тип: Компьютер
Инструкция к Компьютеру ZyXEL Communications NPS-520

NPS-520
MFP Print Server
Quick Start Guide
Version 1.00
Edition 1
11/2006
Table of Contents
ENGLISH 1
DEUTSCH 17
ESPAÑOL 33
FRANÇAIS 49
ITALIANO 65
РУССКИЙ 81
SVENSKA 99
Copyright © 2006. All rights reserved.
ENGLISH
Overview
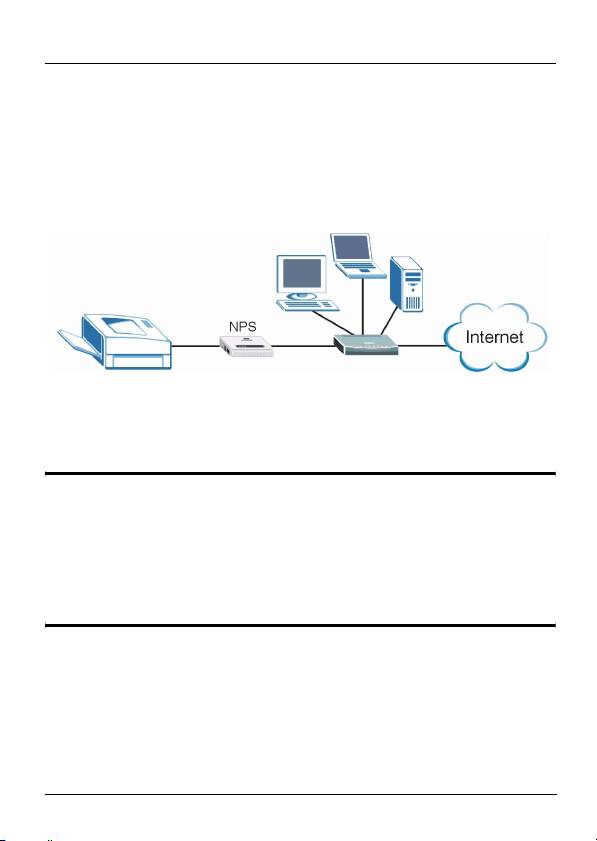
The NPS-520 is a print server and comes with one Ethernet
port and one USB (v2.0) port. You can use the USB port to
share a printer with the computers in the network to which the
NPS-520 (labeled NPS in the following graphic) is connected.
Through the NPS-520, the printer works as if it is connected
directly to your computer.
" You should have already installed the driver
(and utility if there is one) for the printer
(connected to the NPS-520) on your computer.
Refer to your printer documentation for more
information.
This guide shows you how to:
1 Install the hardware.
2 Install and use the ZyXEL utility to manage the NPS-520.
1
ENGLISH
See page 14 for a list of system requirements.
" If your computer operating system version is
older than Windows 2000 SP4, you can only
print on a printer even if the printer provides
print, copy, fax and/or scan functions.
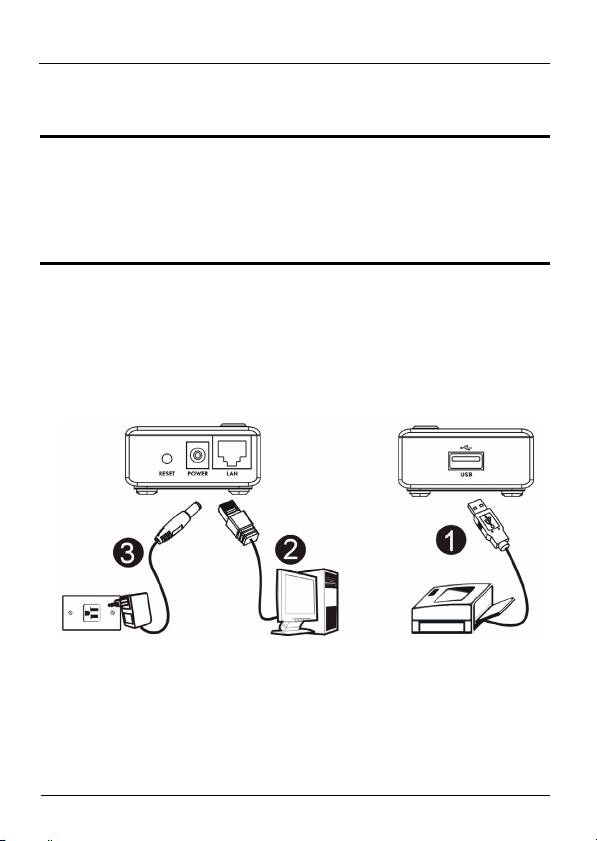
1 Hardware Connection
Follow the steps below to connect the NPS-520 to your
network.
1 Connect the USB port to a USB v2.0 compliant printer
using a USB cable.
2 Connect the LAN port to your local network using an
Ethernet cable.
2
ENGLISH
3 Use the included power adaptor to connect the power
socket on the NPS-520 to an appropriate power source.
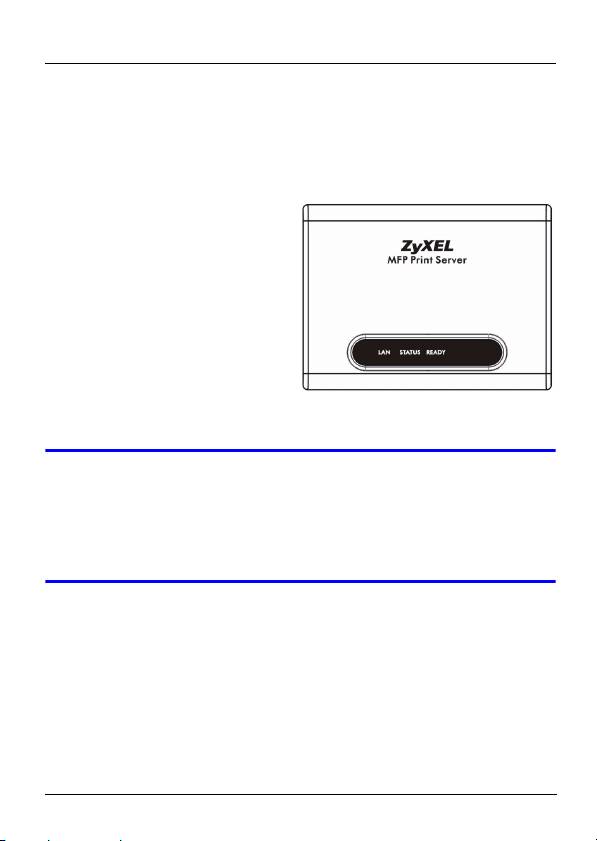
1.1 LEDs
Look at the LEDs (lights) on
the top panel.
The READY LED stays on
when the system is ready.
The LAN LED stays on if the
LAN port is properly
connected and blinks when
there is traffic.
V If none of the LEDs are on, check your
connections, and inspect your cables for
damage. If the LEDs are still off, contact your
local vendor.
2 ZyXEL Utility
Use the utility to install and associate your printer driver as
well as manage the NPS-520.
3
Оглавление
- " You should have already installed the driver
- " If your computer operating system version is
- " The NPS-520’s default IP address is
- " We recommend you give the NPS-520 a static
- " If you disable Auto Release, only that computer
- " If the printer is not connected or not available
- " Der Treiber (und wenn vorhanden das Utility-
- " Wenn Ihr Computer mit einem älteren
- " Die standard IP-Adresse des NPS-520 ist
- " Es wird empfohlen, dem NPS-520 eine statische
- " Wenn Sie die Option Auto Release
- " Wenn der Drucker beim Senden einer
- " Debería tener instalado el controlador (y la
- " Si la versión de su sistema operativo es anterior
- " La dirección IP predeterminada del NPS-520 es
- " Le recomendamos asignar al NPS-520 una
- " Si deshabilita Auto Release (Liberación
- " Si la impresora no está conectada o no está
- " Vous devez avoir déjà installé le pilote (et
- " Si la version du système d'exploitation de votre
- " L'adresse IP par défaut du NPS-520 est
- " Nous vous conseillons de donner au NPS-520
- " Si vous désactivez Auto Release (Abandon
- " Si l'imprimante n'est pas connectée ou si elle
- " Il driver (e il programma di utilità, se esistente)
- " Se il sistema operativo del computer è una
- " L'indirizzo IP predefinito di NPS-520 è
- " Si consiglia di fornire a NPS-520 un indirizzo IP
- " Se si disabilita Auto Release (rilascio
- " Se la stampante non è collegata o non
- " На вашем компьютере уже должен быть
- " Если на компьютере установлена
- " IP-адрес NPS-520 по умолчанию - это
- " Мы рекомендуем вам присваивать NPS-520
- " При отключении функции Auto Release (Авто
- " Если при отправке запроса принтер будет не
- " Du ska redan ha installerat drivrutinen (och
- " Om datorns operativsystemversion är äldre än
- " NPS-520:s standard-IP-adress är 192.168.1.6.
- " Vi rekommenderar att du ger NPS-520 en
- " Om du inaktiverar alternativet Auto Release,
- " Om skrivaren inte är ansluten eller inte är
