ZyXEL Communications ZyXEL ZyWALL USG-1000: инструкция
Раздел: Профоборудование
Тип: Аппарат
Инструкция к Аппарату ZyXEL Communications ZyXEL ZyWALL USG-1000
Copyright © 2007. All rights reserved.
ZyWALL USG 1000
Unified Security Gateway
Quick Start Guide
Version 2.00
8/2007
Edition 1
DEFAULT LOGIN
LAN Port
P1
IP Address http://192.168.1.1
User Name admin
Password
1234
CONTENTS
ENGLISH
2
DEUTSCH
8
ESPAÑOL
15
FRANÇAIS
22
ITALIANO
29
日本語
36
РУССКИЙ
42
简体中文
50
繁體中文
56
2
ENGLISH
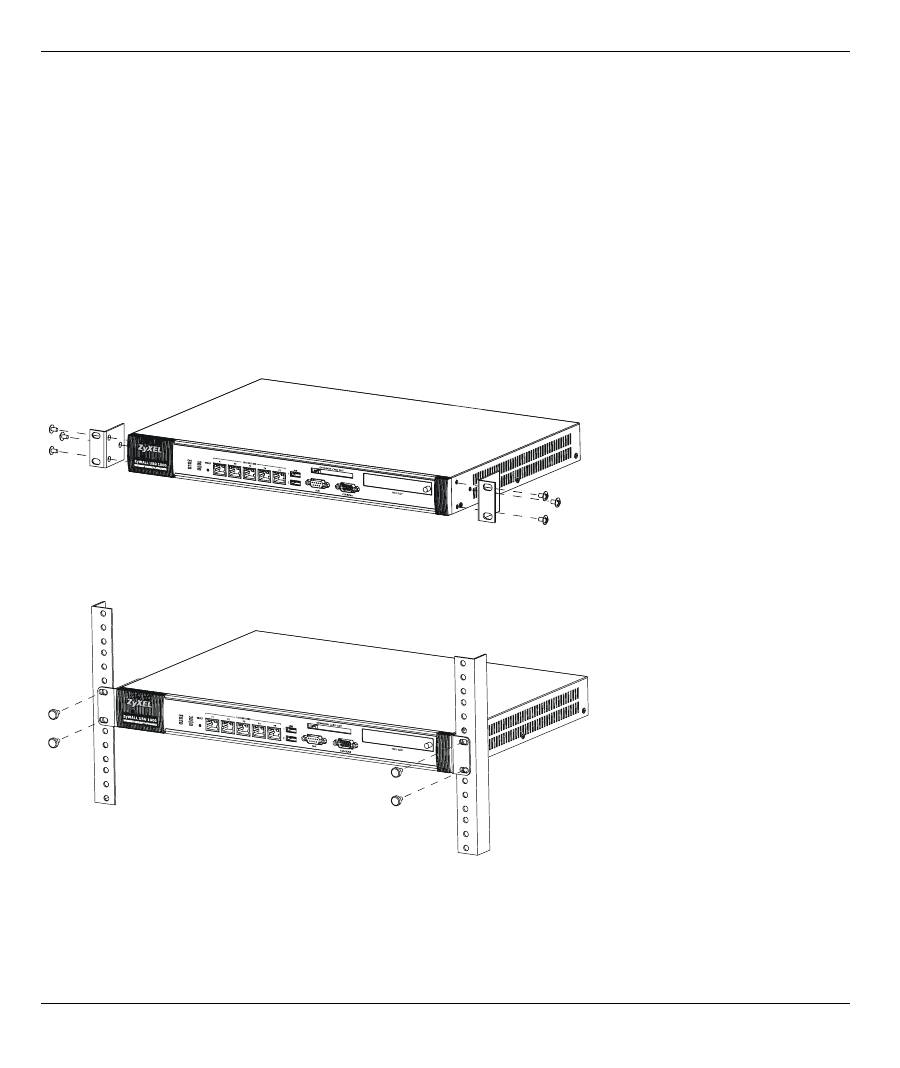
1 Checking the Package Contents 2 Rack-mounted Installation
Mount the ZyWALL in a 19-inch rack or place it on a sturdy, flat surface.
Note:
Leave 10 cm of clearance at the sides and 20 cm in the rear.
1
Align one bracket with the holes on one side of the ZyWALL and secure it with the included bracket
screws. Similarly, attach the other bracket.
2
After attaching both mounting brackets, position the ZyWALL in the rack by lining up the holes in the
brackets with the appropriate holes on the rack. Secure the ZyWALL to the rack with the rack-mounting
screws.
Your package should
include one of each
of the following:
• ZyWALL
• Power cord
• Rack-mounting kit
• RJ-45 Ethernet cable
• RS-232 console Y-cable
• Printed Quick Start Guide
• Configuration Reference Card
• Compact disk (CD)
ENGLISH
3
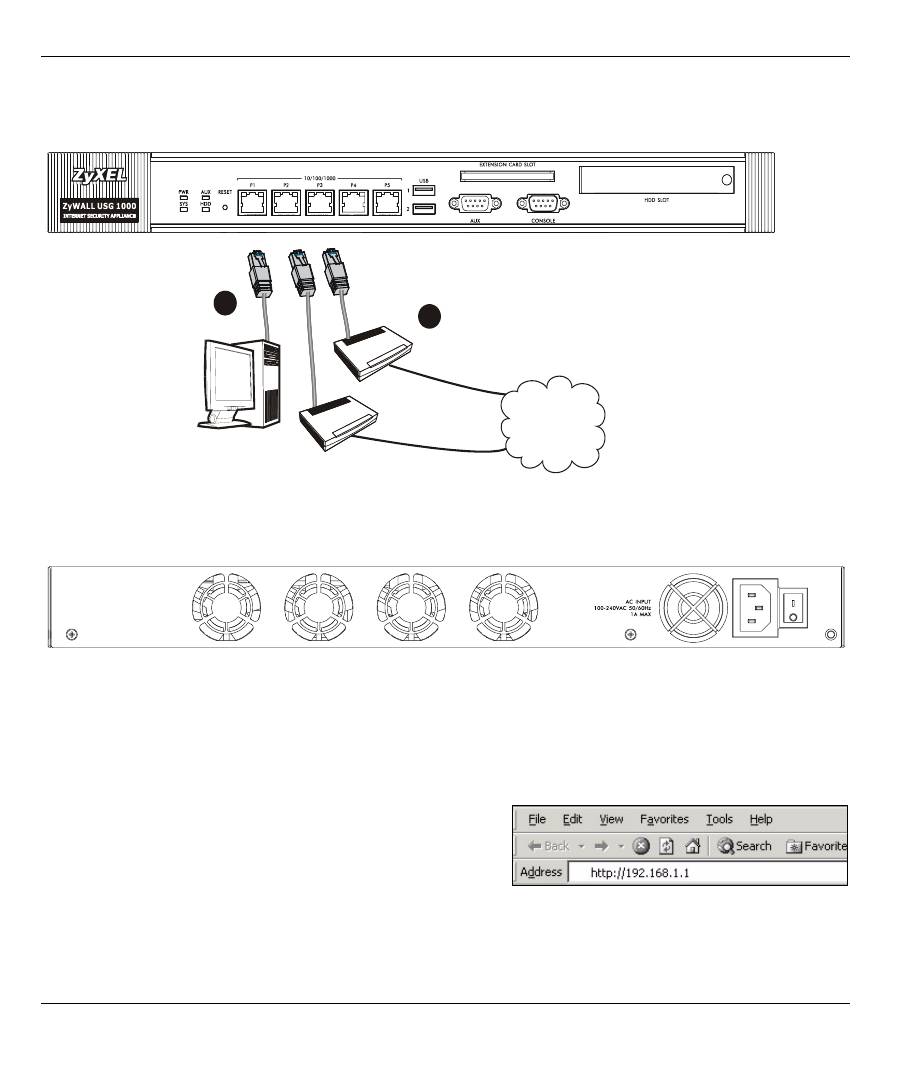
3 Connecting the Hardware
Make sure that the power switch on the rear panel is turned off before you make the hardware connections.
1
It is recommended that you configure the ZyWALL before using it to protect your network. Use an Ethernet
cable to connect a computer to port
1
.
2
Use another Ethernet cable(s) to connect port
2
and/or port
3
to an Ethernet jack with Internet access.
3
Use the included power cord to connect the power socket on the rear panel to a power outlet.
4
Push the power switch to the on position and
look at the front panel. The
PWR
light turns on. The
SYS
light
blinks during system testing and initialization and then stays on when the system is ready.
4 Web Login
1
Launch your web browser and go to
http://192.168.1.1
(the ZyWALL automatically redirects you to https://
192.168.1.1).
Internet
2 51
ENGLISH
4
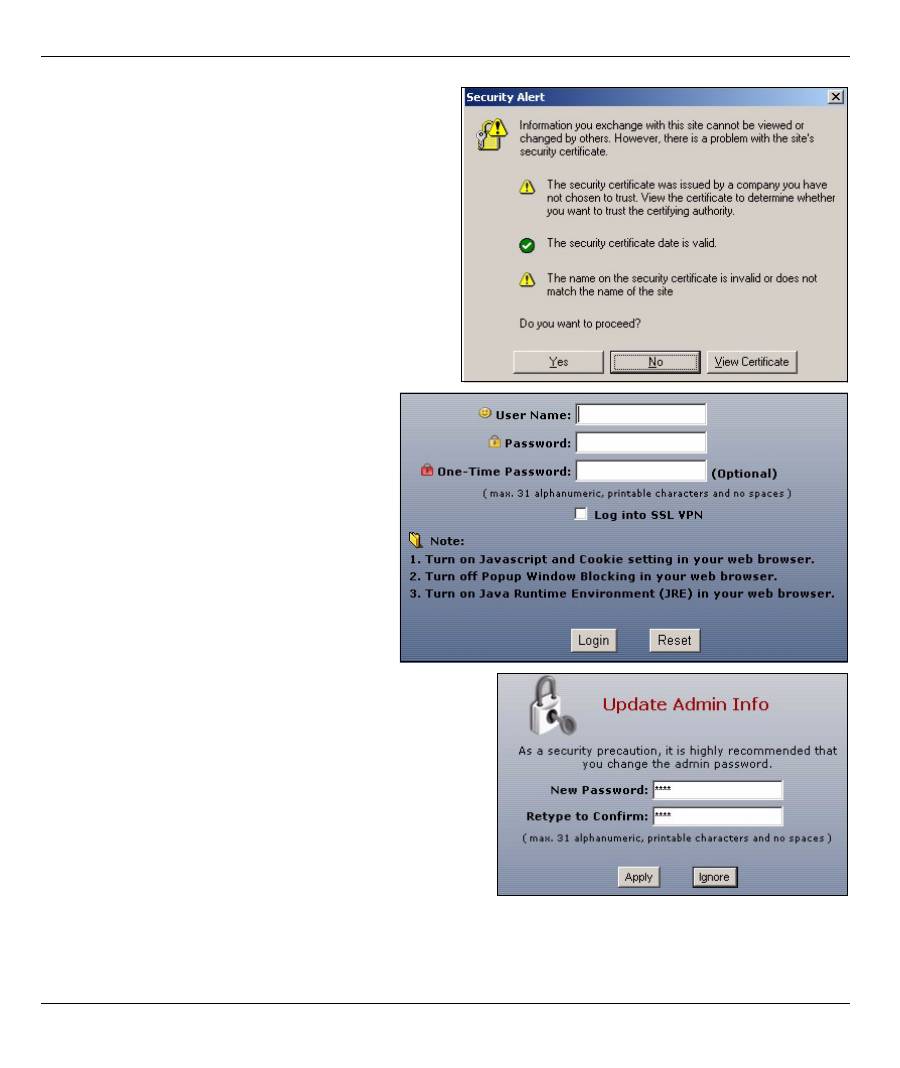
2
Click
Yes
to proceed if you get a security alert or
certificate screen.
3
Enter
admin
as the user name and
1234
as
the password. Click
Login
.
4
It is strongly recommended that you change the
password. Type and retype a new password, and click
Apply
.
Оглавление
- 1 Checking the Package Contents2 Rack-mounted Installation
- 3 Connecting the Hardware
- 5 Installation Setup Wizard
- 6 Default Settings and Port Details
- 7 Troubleshooting 8 Procedure to View a Product’s Certification(s)
- 1 Prüfen des Packungsinhalts2 Rackmontage
- 3 Anschließen der Hardware
- 5 Installationsassistent
- 6 Standardeinstellungen und Anschlussdetails
- 7 Problembeseitigung
- 8 Schritte zum Ansehen von Produktzertifizierung(en)
- 1 Comprobación del contenido del paquete2 Instalación en un rack
- 3 Conectar el hardware
- 5 Asistente para la instalación
- 6 Configuración predeterminada y detalles de los puertos
- 7 Solución de problemas
- 8 Procedimiento para ver la(s) certificación(es) del producto
- 1 Vérification du contenu de l'emballage2 Installation avec montage en rack
- 3 Connecter le matériel
- 5 Assistant d'installation
- 6 Paramètres par défaut et détails du port
- 7 Dépannage
- 8 Procédure pour afficher la (les) certification(s) d'un produit
- 1 Controllo del contenuto della confezione2 Installazione su rack
- 3 Collegamento dell'hardware
- 5 Configurazione guidata installazione
- 6 Impostazioni predefinite e dettagli delle porte
- 7 Risoluzione dei problemi
- 8 Procedura per visualizzare le certificazioni di un prodotto
- 1 パッケージ内容の確認2 ラックマウントへの設置
- 3 ハードウェアの接続
- 5 インストールセットアップウィザード
- 6 デフォルト設定とポートの詳細
- 7 トラブルシューティング 8 製品情報をご覧になるには
- 1 Проверка комплектности 2 Установка в стойку
- 3 Подключение
- 5 Мастер первоначальной настройки Installation Setup Wizard
- 6 Значения конфигурационных параметров и использование портов в состоянии поставки
- 7 Диагностика и устранение неисправностей
- 8 Просмотр информации о соответствии продукта нормативным требованиям
- 1 检查包装内容2 机架安装
- 3 连接硬件
- 5 安装设置向导
- 6 默认值及端口的详细信息
- 7 故障排除8 查看产品的认证
- 1 檢查包裝內容 2 機架安裝
- 3 連接硬體
- 5 安裝設定精靈
- 6 預設值及連接埠的細節
- 7 疑難排解 8 檢視產品的認證
