ZyXEL Communications ZyXEL ZyWALL 70: инструкция
Раздел: Профоборудование
Тип: Аппарат
Инструкция к Аппарату ZyXEL Communications ZyXEL ZyWALL 70
Copyright © 2007. All rights reserved.
ZyWALL 70
Internet Security Appliance
Quick Start Guide
Version 4.03
10/2007
Edition 1
DEFAULT LOGIN
IP Address
http://192.168.1.1
User Name
admin
Password
1234
CONTENTS
ENGLISH
2
DEUTSCH
19
ESPAÑOL
37
FRANÇAIS
54
ITALIANO
71
РУССКИЙ
88
简体中文
106
繁體中文
122
ENGLISH
2
Overview
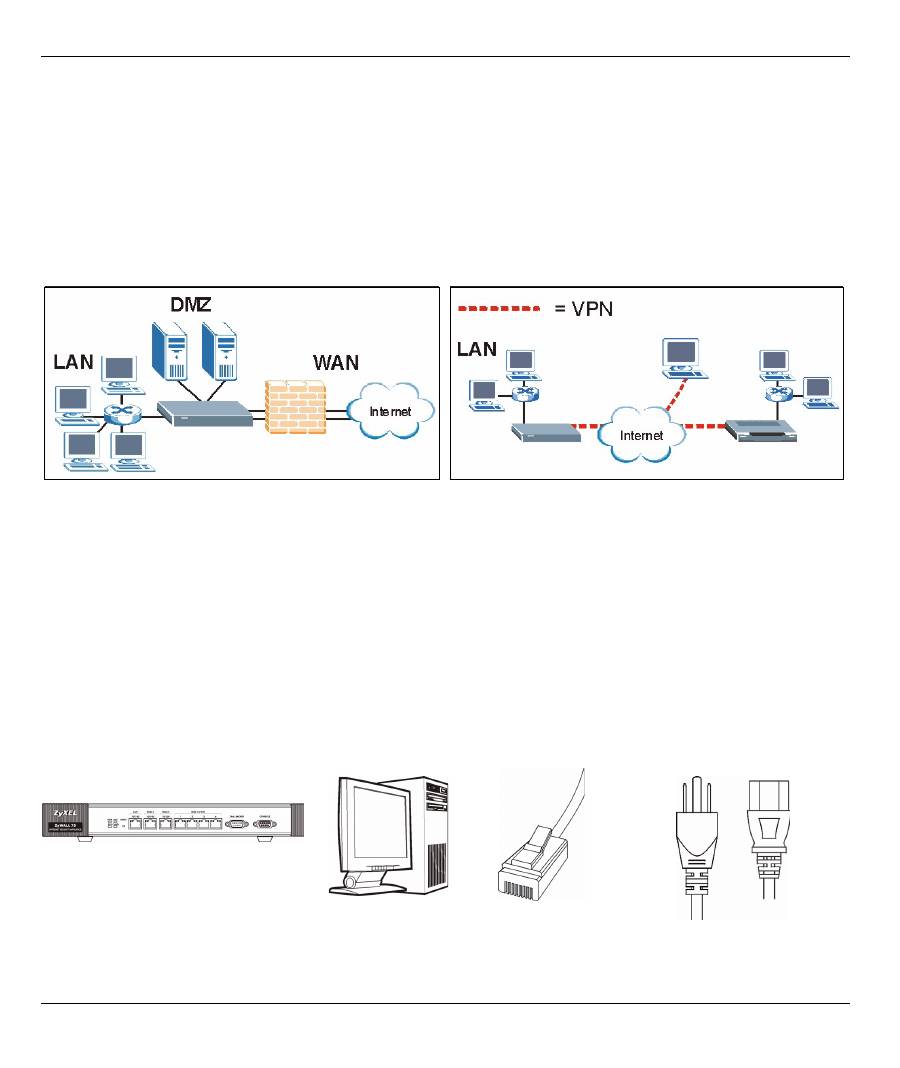
The ZyWALL 70 is a load-balancing, dual WAN firewall with VPN, bandwidth management, content filtering,
anti-spam, anti-virus, IDP (Intrusion Detection and Protection) and many other features. You can use it as a
transparent firewall and not reconfigure your network nor configure the ZyWALL’s routing features. The
ZyWALL increases network security by providing DMZ ports for use with publicly accessible servers. This
guide covers the initial connections and configuration needed to start using the ZyWALL in your network.
See the User’s Guide for more information on all features.
You may need your Internet access information.
This guide is divided into the following sections.
1 Hardware Connections
You need the following.
1
Hardware Connections
2
Accessing the Web Configurator
3
Bridge Mode
4
Internet Access Setup and Product Registration
5
DNS
6
NAT
7
Firewall
8
VPN Rule Setup
9
Anti-Spam Setup
10
Troubleshooting
ZyWALL
Computer
Ethernet Cables
Power Cord
ENGLISH
ENGLISH
3
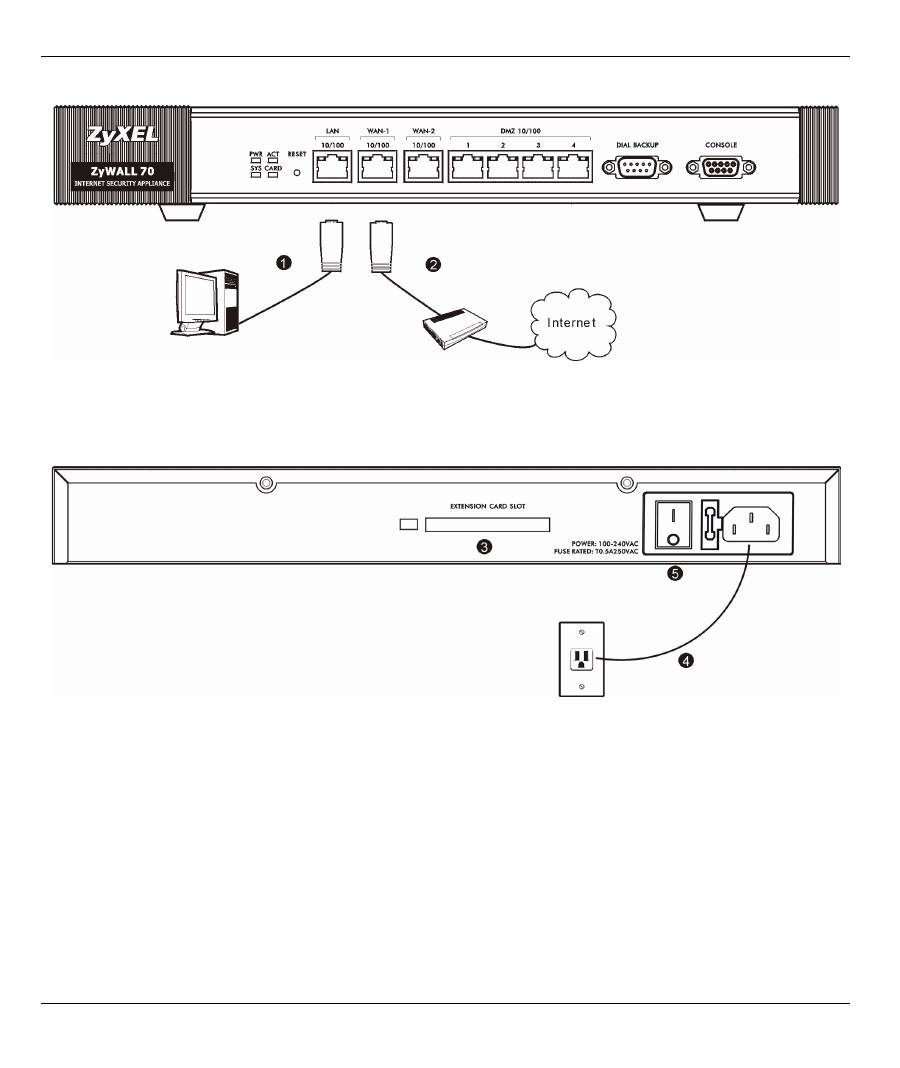
Do the following to make hardware connections for initial setup.
1
Use an Ethernet cable to connect the
LAN
port to a computer. You can also use Ethernet cables to
connect public servers (web, e-mail, FTP, etc.) to the
DMZ
ports.
2
Use another Ethernet cable(s) to connect the
WAN 1
and/or
WAN 2
port to an Ethernet jack with Internet
access.
3
Insert the ZyWALL Turbo extension card to use the anti-virus and IDP features or insert a wireless LAN
card to use the wireless LAN feature. See the ZyWALL Turbo Card guide for more information about the
extension card. See the user’s guide about installing a wireless LAN card.
4
Use the included power cord to connect the power socket (on the rear panel) to a power outlet.
5
Push the power switch to the on position and
look at the front panel. The
PWR LED
turns on. The
SYS
LED
blinks while performing system testing and then stays on if the testing is successful. The
ACT
,
CARD
,
LAN
,
DMZ
, and
WAN
LEDs turn on and stay on if the corresponding connections are properly made.
ENGLISH
4
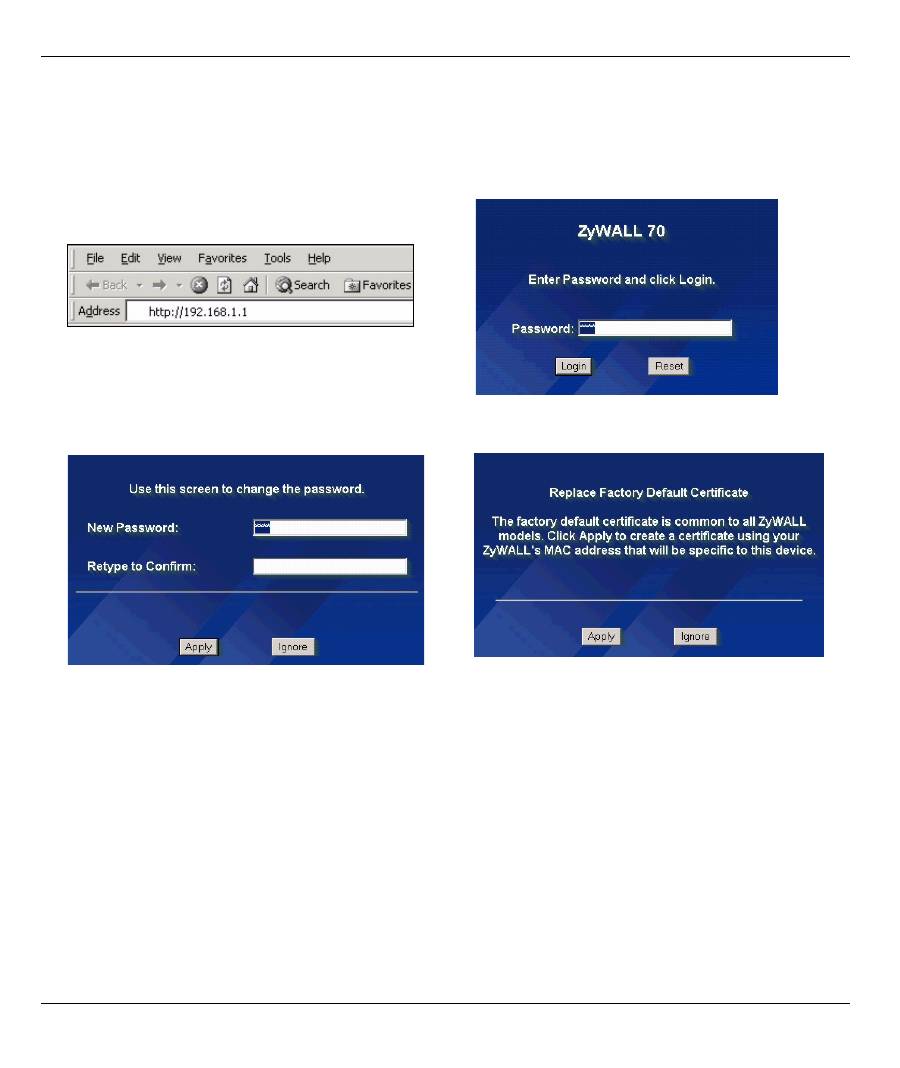
2 Accessing the Web Configurator
Use this section to configure the
WAN 1
interface for Internet access.
5
The
HOME
screen opens.
The ZyWALL is in router mode by default. Continue to the next step if you want to use routing features
such as NAT, DHCP and VPN.
Go to
Section 3
if you prefer to use the ZyWALL as a transparent firewall.
1
Launch your web browser. Enter
192.168.1.1
(the
ZyWALL’s default IP address) as the address.
If the login screen does not display, see
Section
10.1
to set your computer’s IP address.
2
Click
Login
(the default password 1234 is already
entered).
3
Change the login password by entering a new
password and clicking
Apply
.
4
Click
Apply
to replace the ZyWALL’s default
digital certificate.
Оглавление
- Overview
- 2 Accessing the Web Configurator
- 3 Bridge Mode
- 4 Internet Access Setup and Product Registration
- 5 DMZ
- 6 NAT
- 7 Firewall
- 9 Anti-Spam Setup
- 10 Troubleshooting
- Procedure to View a Product’s Certification(s)
- Übersicht
- 2 Zugriff auf den Web-Konfigurator
- 3 Bridge Modus
- 4 Einrichten des Internetzugriffs und Produktregistrierung
- 5 DMZ
- 6 NAT
- 7 Firewall
- 9 Anti-Spam Setup (Anti-Spam einrichten)
- 10 Problembeseitigung
- Schritte zum Ansehen der Produktzertifizierung(en)
- Vista previa
- 2 Acceso al configurador Web
- 3 Modo puente (bridge)
- 4 Configuración del acceso a Internet y registro del producto
- 5 DMZ
- 6 NAT
- 7 Cortafuegos
- 9 Configuración Anti-Spam
- 10 Solución de problemas
- Procedimiento para ver la(s) certificación(es) del producto
- Présentation
- 2 Accéder au Configurateur Web
- 3 Mode Pont
- 4 Installation de l'accès à Internet et inscription du produit
- 5 DMZ
- 6 NAT
- 7 Pare-feu
- 9 Paramétrage de l’Anti-Spam
- 10 Dépannage
- Procédure pour Afficher la (les) certification(s) d'un produit
- Cenni generali
- 2 Accesso allo strumento di configurazione Web
- 3 Modalità Bridge
- 4 Configurazione dell'accesso a Internet e Registrazione del prodotto
- 5 DMZ
- 6 NAT
- 7 Firewall
- 9 Configurazione della funzione Anti-Spam
- 10 Risoluzione dei problemi
- Procedura per visualizzare le certificazioni di un prodotto
- Обзор
- 1 Подключение оборудования
- 2 Доступ к Web- конфигуратору
- 3 Режим межсетевого моста
- 4 Настройка доступа в Интернет и регистрация изделия
- 5 DMZ
- 6 NAT
- 7 Межсетевой экран
- 9 Настройка Анти - Спама
- 10 Поиск и устранение неисправностей
- Порядок просмотра сертификата ( ов ) на изделие
- 概述
- 2 访问网络状态设置程序
- 3 桥接模式
- 4 互联网访问设置以及产品注册
- 5 DMZ
- 7 防火墙
- 9 防垃圾邮件设置
- 10 故障排除
- 概觀
- 2 存取網路組態設定程式
- 3 橋接模式
- 4 網際網路存取設定以及產品註冊
- 5 DMZ
- 7 防火牆
- 9 防垃圾郵件設定
- 10 疑難排解
