ZyXEL Communications ZyXEL ZyWALL 70: 7 Firewall
7 Firewall: ZyXEL Communications ZyXEL ZyWALL 70
ENGLISH
11
7 Firewall
You can use the ZyWALL without configuring the firewall.
The ZyWALL’s firewall is pre-configured to protect your LAN from attacks from the Internet. By default, no
traffic can enter your LAN unless a request was generated on the LAN first. The ZyWALL allows access to the
DMZ from the WAN or LAN, but blocks traffic from the DMZ to the LAN.
8 VPN Rule Setup
A VPN (Virtual Private
Network) tunnel gives you a
secure connection to another
computer or network.
A gateway policy identifies the
IPSec routers at either end of a
VPN tunnel.
A network policy specifies
which devices (behind the
IPSec routers) can use the
VPN tunnel.
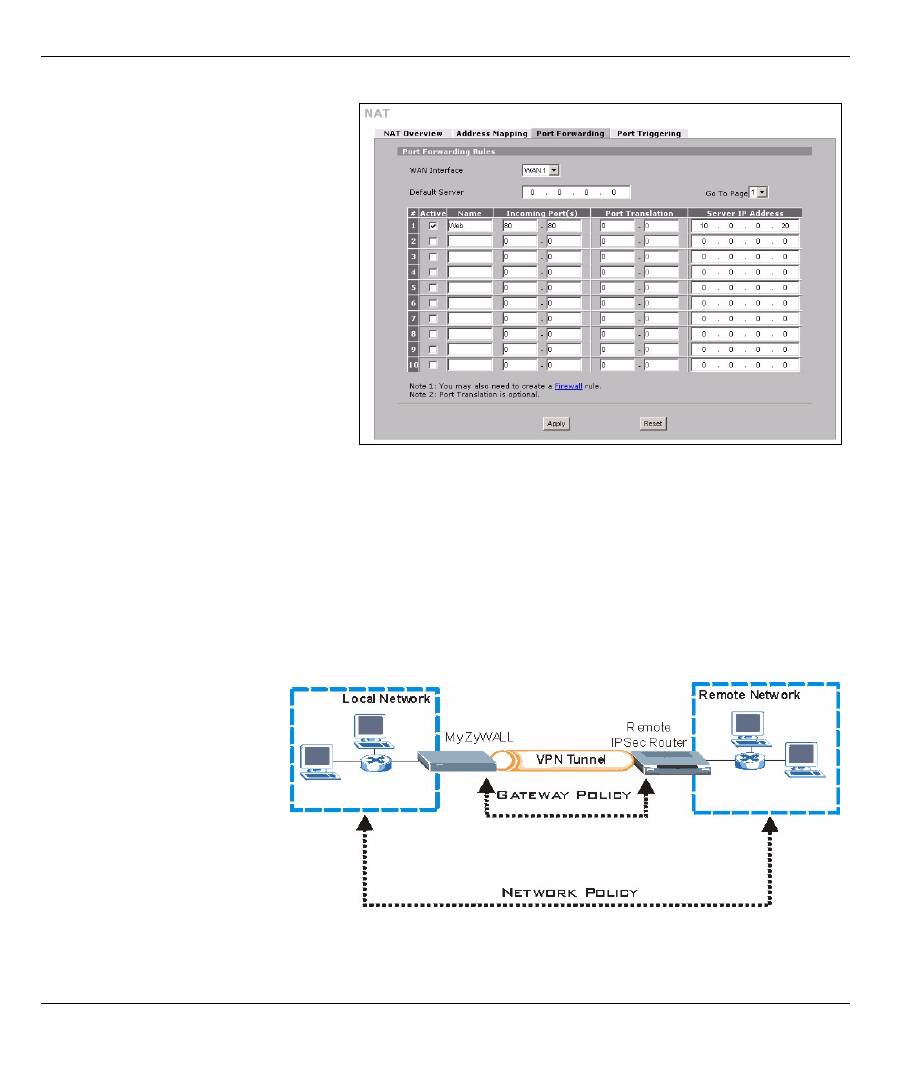
1
Click
ADVANCED
,
NAT
in the
navigation panel and then
Port
Forwarding
.
2
Select the
Active
check box.
3
Type a name for the rule.
4
Type the port number that the
service uses.
5
Type the HTTP server’s IP address.
6
Click
Apply
.
ENGLISH
12
This figure helps explain the main fields in the wizard screens.
1
Click the
Wizard
icon (
)
in the
HOME
screen and then the
VPN Setup
link to open the VPN wizard.
Note:
Your settings are not saved when you click
Back.
2
Use this screen to configure the gateway policy.
Name
: Enter a name to identify the gateway policy.
Remote Gateway Address
: Enter the IP address or
domain name of the remote IPSec router.
3
Use this screen to configure the network policy.
Leave the
Active
check box selected.
Name
: Enter a name to identify the network policy.
Select
Single
and enter an IP address for a single IP
address.
Select
Range IP
and enter starting and ending IP
addresses for a specific range of IP addresses.
Select
Subnet
and enter an IP address and subnet
mask to specify IP addresses on a network by their
subnet mask.
ENGLISH
13
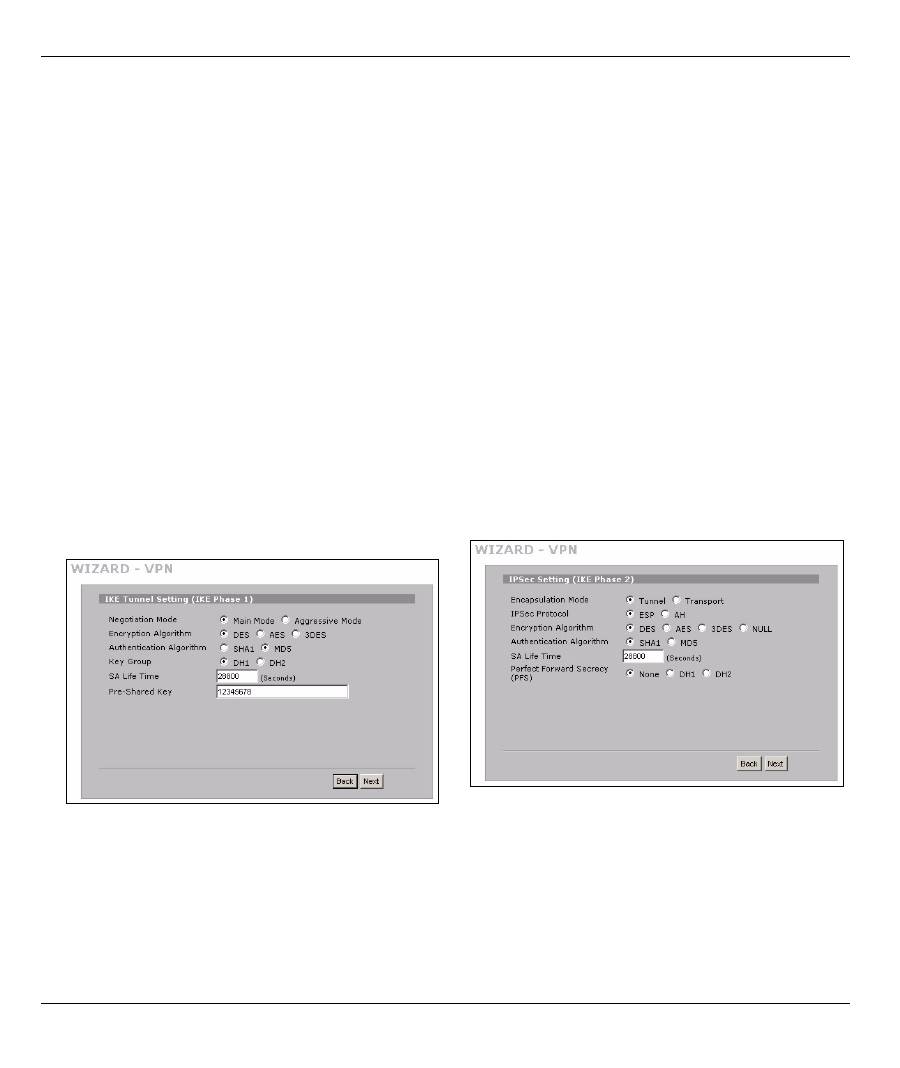
Note:
Make sure that the remote IPSec router uses the same security settings that you configure in
the next two screens.
Negotiation Mode
: Select
Main Mode
for identity protection. Select
Aggressive Mode
to allow more
incoming connections from dynamic IP addresses to use separate passwords.
Note:
Multiple SAs (security associations) connecting through a secure gateway must have the same
negotiation mode.
Encryption Algorithm
: Select
3DES
or
AES
for stronger (and slower) encryption.
Authentication Algorithm
: Select
MD5
for minimal security or
SHA-1
for higher security.
Key Group
: Select
DH2
for higher security.
SA Life Time
: Set how often the ZyWALL renegotiates the IKE SA (minimum 180 seconds). A short SA life
time increases security, but renegotiation temporarily disconnects the VPN tunnel.
Pre-Shared Key
: Use 8 to 31 case-sensitive ASCII characters or 16 to 62 hexadecimal ("0-9", "A-F")
characters. Precede a hexadecimal key with a "0x” (zero x), which is not counted as part of the 16 to 62
character range for the key.
Encapsulation Mode
:
Tunnel
is compatible with NAT,
Transport
is not.
IPSec Protocol
:
ESP
is compatible with NAT,
AH
is not.
Perfect Forward Secrecy (PFS)
:
None
allows faster IPSec setup, but
DH1
and
DH2
are more secure.
4
Use this screen to configure IKE (Internet Key
Exchange) tunnel settings.
5
Use this screen to configure IPSec settings.
ENGLISH
14
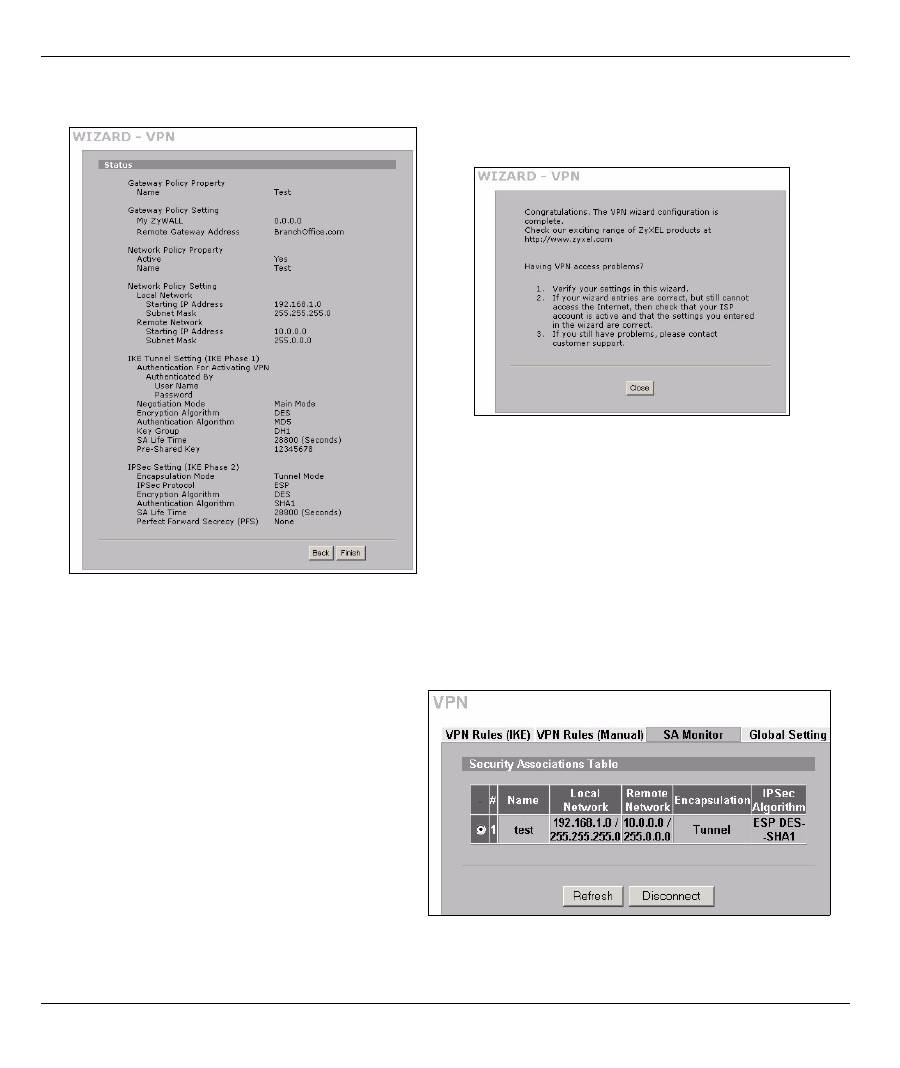
8.1 Using the VPN Connection
Use VPN tunnels to securely send and retrieve files, and allow remote access to corporate networks, web
servers and e-mail. Services work as if you were at the office instead of connected through the Internet.
For example, the “test” VPN rule allows secure
access to an web server on a remote corporate
LAN. Enter the server’s IP address (10.0.0.23 in
this example) as your browser’s URL. The
ZyWALL automatically builds the VPN tunnel
when you attempt to use it.
Click
SECURITY
,
VPN
in the navigation panel and
then the
SA Monitor
tab to display a list of
connected VPN tunnels (the “test” VPN tunnel is
up here).
6
Check your VPN settings. Click
Finish
to save the
settings.
7
Click
Close
in the final screen to complete the
VPN wizard setup.
Continue with the next section
to activate the VPN rule and establish a VPN
connection.
Оглавление
- Overview
- 2 Accessing the Web Configurator
- 3 Bridge Mode
- 4 Internet Access Setup and Product Registration
- 5 DMZ
- 6 NAT
- 7 Firewall
- 9 Anti-Spam Setup
- 10 Troubleshooting
- Procedure to View a Product’s Certification(s)
- Übersicht
- 2 Zugriff auf den Web-Konfigurator
- 3 Bridge Modus
- 4 Einrichten des Internetzugriffs und Produktregistrierung
- 5 DMZ
- 6 NAT
- 7 Firewall
- 9 Anti-Spam Setup (Anti-Spam einrichten)
- 10 Problembeseitigung
- Schritte zum Ansehen der Produktzertifizierung(en)
- Vista previa
- 2 Acceso al configurador Web
- 3 Modo puente (bridge)
- 4 Configuración del acceso a Internet y registro del producto
- 5 DMZ
- 6 NAT
- 7 Cortafuegos
- 9 Configuración Anti-Spam
- 10 Solución de problemas
- Procedimiento para ver la(s) certificación(es) del producto
- Présentation
- 2 Accéder au Configurateur Web
- 3 Mode Pont
- 4 Installation de l'accès à Internet et inscription du produit
- 5 DMZ
- 6 NAT
- 7 Pare-feu
- 9 Paramétrage de l’Anti-Spam
- 10 Dépannage
- Procédure pour Afficher la (les) certification(s) d'un produit
- Cenni generali
- 2 Accesso allo strumento di configurazione Web
- 3 Modalità Bridge
- 4 Configurazione dell'accesso a Internet e Registrazione del prodotto
- 5 DMZ
- 6 NAT
- 7 Firewall
- 9 Configurazione della funzione Anti-Spam
- 10 Risoluzione dei problemi
- Procedura per visualizzare le certificazioni di un prodotto
- Обзор
- 1 Подключение оборудования
- 2 Доступ к Web- конфигуратору
- 3 Режим межсетевого моста
- 4 Настройка доступа в Интернет и регистрация изделия
- 5 DMZ
- 6 NAT
- 7 Межсетевой экран
- 9 Настройка Анти - Спама
- 10 Поиск и устранение неисправностей
- Порядок просмотра сертификата ( ов ) на изделие
- 概述
- 2 访问网络状态设置程序
- 3 桥接模式
- 4 互联网访问设置以及产品注册
- 5 DMZ
- 7 防火墙
- 9 防垃圾邮件设置
- 10 故障排除
- 概觀
- 2 存取網路組態設定程式
- 3 橋接模式
- 4 網際網路存取設定以及產品註冊
- 5 DMZ
- 7 防火牆
- 9 防垃圾郵件設定
- 10 疑難排解
