ZyXEL Communications G-4100: инструкция
Раздел: Профоборудование
Тип: Аппарат
Инструкция к Аппарату ZyXEL Communications G-4100

G-4100 v2
802.11g Wireless Hotspot Gateway
Quick Start Guide
Version 1.00
7/2006
Edition 1
Copyright © 2006 ZyXEL Communications Corporation. All rights reserved.
ENGLISH
2
DEUTSCH
13
ESPAÑOL
25
FRANÇAIS
37
ITALIANO
48
РУССКИЙ
59
SVENSKA
71
繁體中文
83

2
ENGLISH
1 Connecting the Hardware
ENGLISH
3
1 LAN 1~4
: Use Ethernet cables to connect the LAN ports to computers, switches and a statement printer
(optional).
2 WAN
: Connect your broadband modem to this port with the Ethernet cable that came with your modem.
3 POWER 5VDC
: Connect the G-4100 v2’s included power adaptor to the G-4100 v2’s power socket. The
PWR
light (LED) turns on. The
LAN
and
WAN
LEDs flash and then turn on if they have proper connections.
The
ZyAIR
LED turns on for 20 seconds and then turns off. The
SYS
LED turns on. The
ZyAIR
LED turns
back on and blinks if the wireless connection is active.
2 Web Login 3 Setup Wizard
The Wizard Setup screens appear automatically after your first login.
1
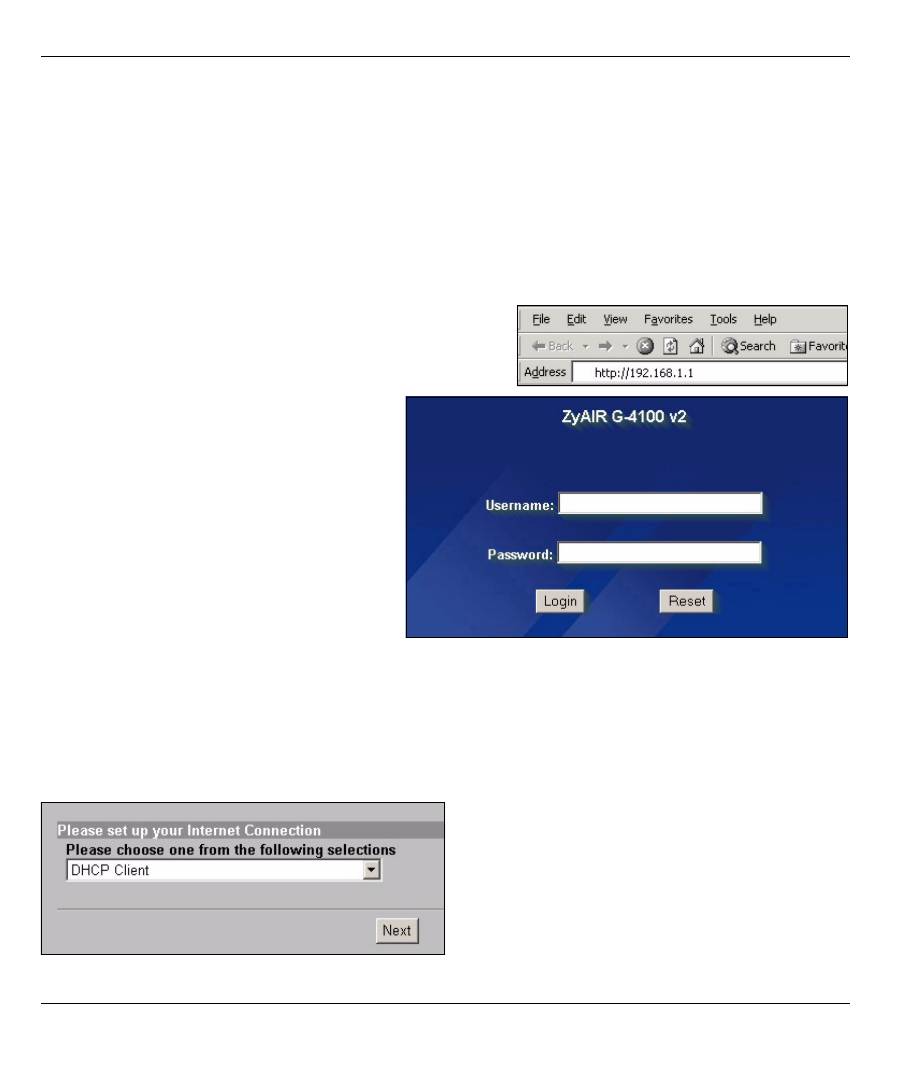
Fill in the fields with information from your ISP. Refer to the online help for details.
The screen varies depending on the encapsulation type you use. Leave fields set to the default if you don’t
have that information.
1
Launch your web browser and go to
http://192.168.1.1
.
2
Enter
admin
as the user name and
1234
as
the password. Click
Login
.
ENGLISH
4
2
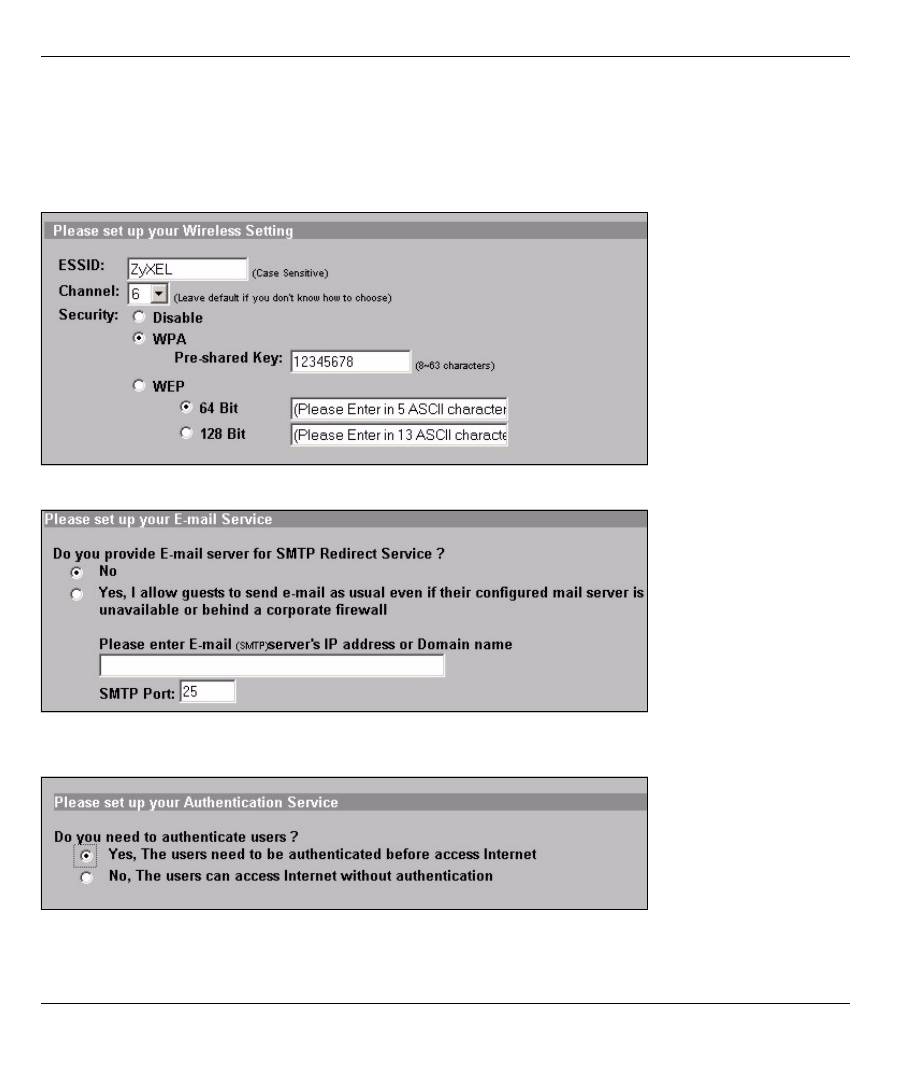
Enter a unique name as the ESSID to identify the G-4100 v2 in the wireless LAN.
Select a channel (range of radio frequencies) that is not being used by other wireless devices in the area.
WPA provides user authentication and data encryption. WPA’s data encryption is stronger than WEP’s. The pre-
shared key is case-sensitive ASCII characters (including spaces and symbols). Use the advanced wireless
setup screen if you want to use WPA with a RADIUS server (see the User’s Guide for details).
WEP provides data encryption only (no user authentication).
3
You can configure a backup e-mail server in the event that a subscriber’s e-mail server is unreachable
from the G-4100 v2.
4
Select
Yes
to be able to create and use subscriber accounts. This wizard configures authentication and
accounting settings for the G-4100 v2’s built-in local subscriber database. Use the advanced RADIUS
setup screen to use an external RADIUS server instead (see the User’s Guide for details).
ENGLISH
5
5
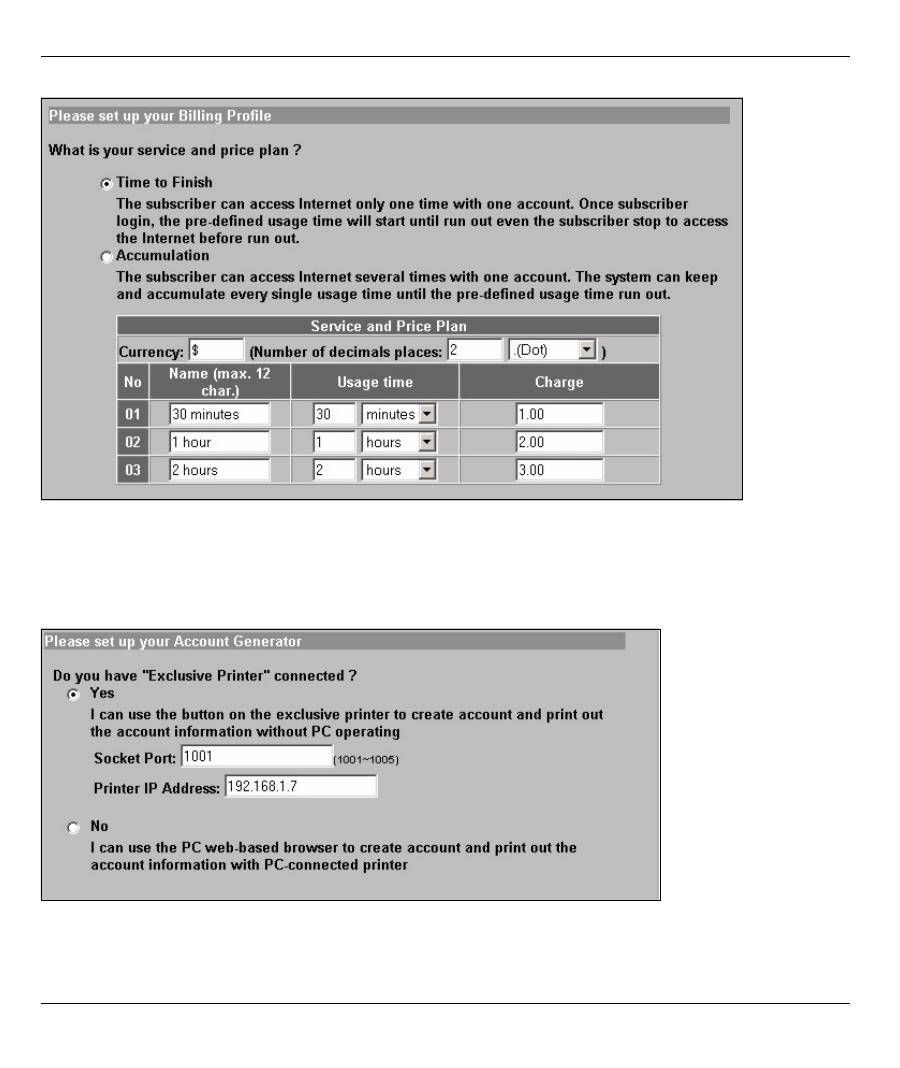
Set the type of accounting to use. Set up Internet access time periods and their prices.
6
You can use a statement printer to generate subscriber accounts and print subscriber statements. If you do
so, make sure that no other devices on your network use the same IP address as the printer (192.168.1.7
by default). If you need to change the printer port number or IP address here, make sure you also change
it in the printer, see the printer’s user’s guide for how to do this.
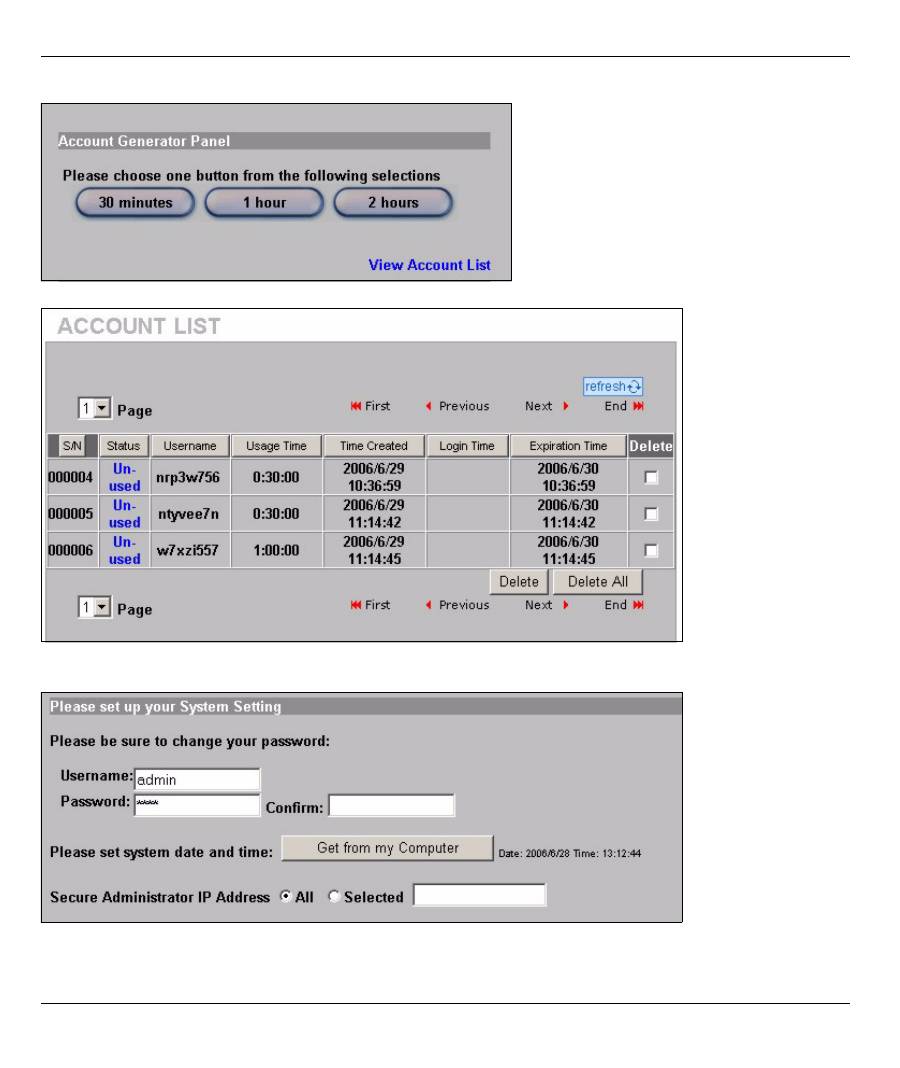
You can alternatively generate subscriber accounts in the web-based account generator and print the
statements on your regular printer.
7
Select a subscriber billing profile for each button on the “exclusive printer” (statement printer) or the web-
based account generator. The billing profile defines the maximum Internet access time and charge per
time unit.
ENGLISH
6
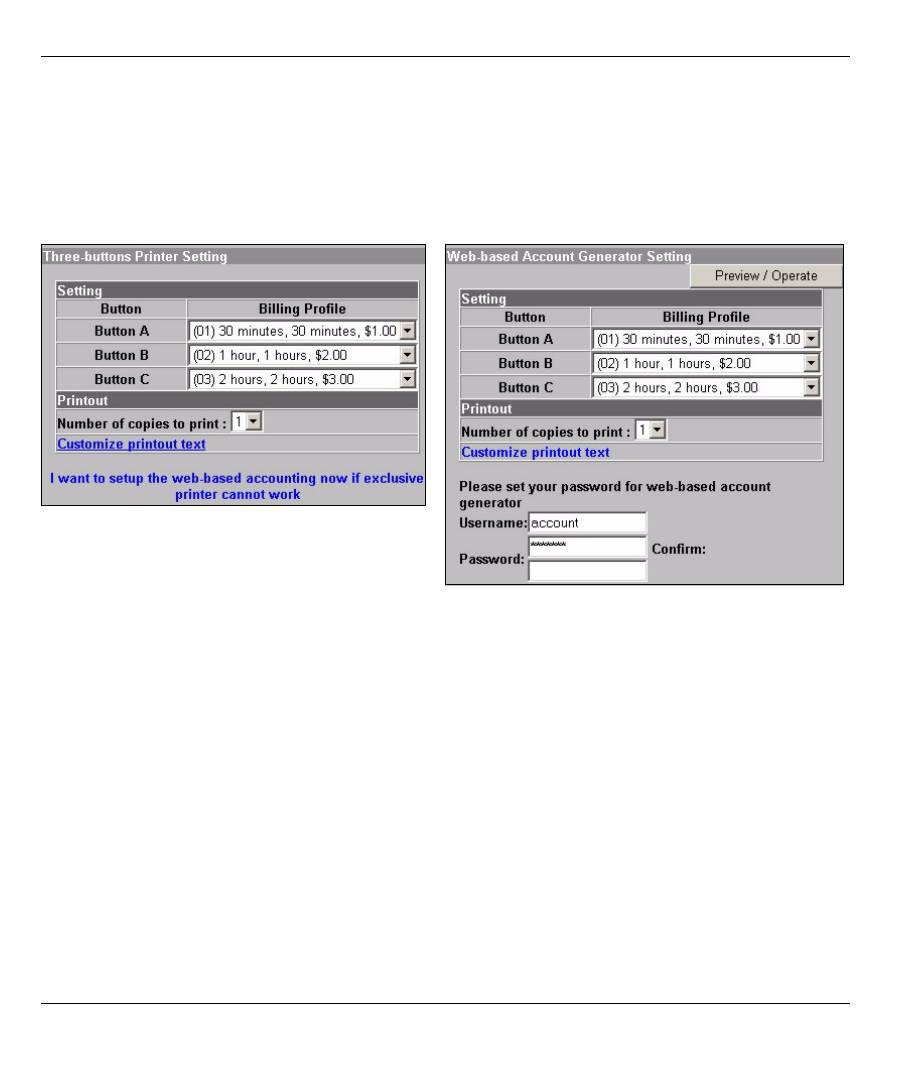
Set how many copies of the subscriber statement to print.
Click
Customize printout text
to tailor the subscriber statements (see page
7
).
For the three button (statement) printer, Click
I want to setup...
to also configure the web-based account
generator settings.
In the web-based account generator setup:
Click
Preview/Operate
to open the account generator (see page
8
).
Set the username and password for accessing the account generator.
ENGLISH
7
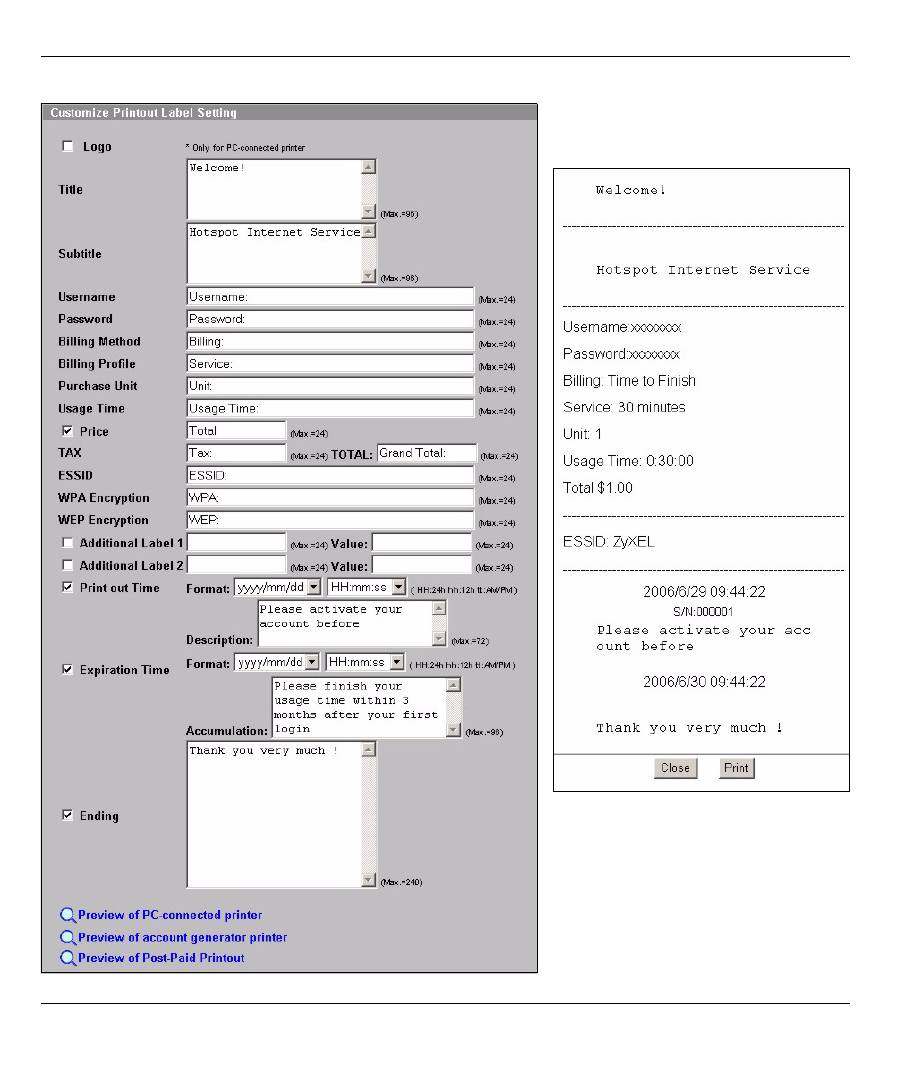
Use this screen to tailor what displays on the subscriber statements. This is an example of the default
subscriber statement when you print it
from an account generator printer (the
statement printer).
ENGLISH
8
8
Change the G-4100 v2’s management password and update the time. You can also specify from which IP
address the G-4100 v2 can be managed.
This is the web-based account generator. Click one or more of the buttons to generate accounts.
Click
View Account List
to see the accounts you generated.
Оглавление
- 1 Connecting the Hardware
- 2 Web Login3 Setup Wizard
- 4 Generating and Printing Subscriber Account Statements
- 6 Hardware Installation
- 7 Troubleshooting
- 8 Procedure to View a Product’s Certification(s)
- 1 Anschluß der Hardware
- 2 Web Login3 Einrichten Wizard
- 4 Erstellen und Drucken von Abonnenten-Kontoauszügen.
- 6 Installation der Hardware
- 7 Fehlersuche
- 8 Produktzertifizierungen anzeigen
- 1 Conectando el hardware
- 2 Inicio de sesión web3 Asistente de configuración
- 4 Generación e impresión de declaraciones de cuenta de suscriptor
- 6 Instalación del hardware
- 7 Solución de problemas
- 8 Procedimiento para ver la certificación de un producto
- 1 Connecter le matériel
- 2 Ouverture d'une session web3 Assistant d’installation
- 4 Générer et imprimer les relevés des comptes d'abonnés
- 6 Installation matérielle
- 7 Dépannage
- 8 Procédure pour afficher la (les) certification(s) d'un produit
- 1 Collegamento dell'hardware
- 2 Login Web3 Configurazione guidata
- 4 Generazione e stampa di resoconti di conti di sottoscrittore
- 6 Installazione hardware
- 7 Risoluzione dei problemi
- 8 Procedura per visualizzare le certificazioni di un prodotto
- 1 Подключение оборудования
- 2 Web имя пользователя 3 Мастер установки
- 4 Создание и печать выписки по учетной записи абонента
- 6 Установка оборудования
- 7 Устранение неисправностей
- 8 Процедура просмотра сертификата ( сертификатов ) продукта
- 1 Ansluta maskinvara
- 2 Webbinloggning3 Installationsguide
- 4 Generera och skriva ut prenumeranters kontoutdrag
- 6 Installation av maskinvara
- 7 Felsökning
- 8 Procedur för att visa en produkts certifikat
- 1 連接硬體
- 2 網路登入3 設定精靈
- 4 產生及列印用戶帳號報告單
- 7 疑難排解
- 8 檢視產品憑證的程序
