ZyXEL Communications G-4100: 6 Hardware Installation
6 Hardware Installation: ZyXEL Communications G-4100
ENGLISH
10
6 Hardware Installation
In general, the best location for the access point is at the center of your intended wireless coverage area. For
better performance, mount the G-4100 v2 high up in a spot free of obstructions.
Note:
Do not block the ventilation holes.
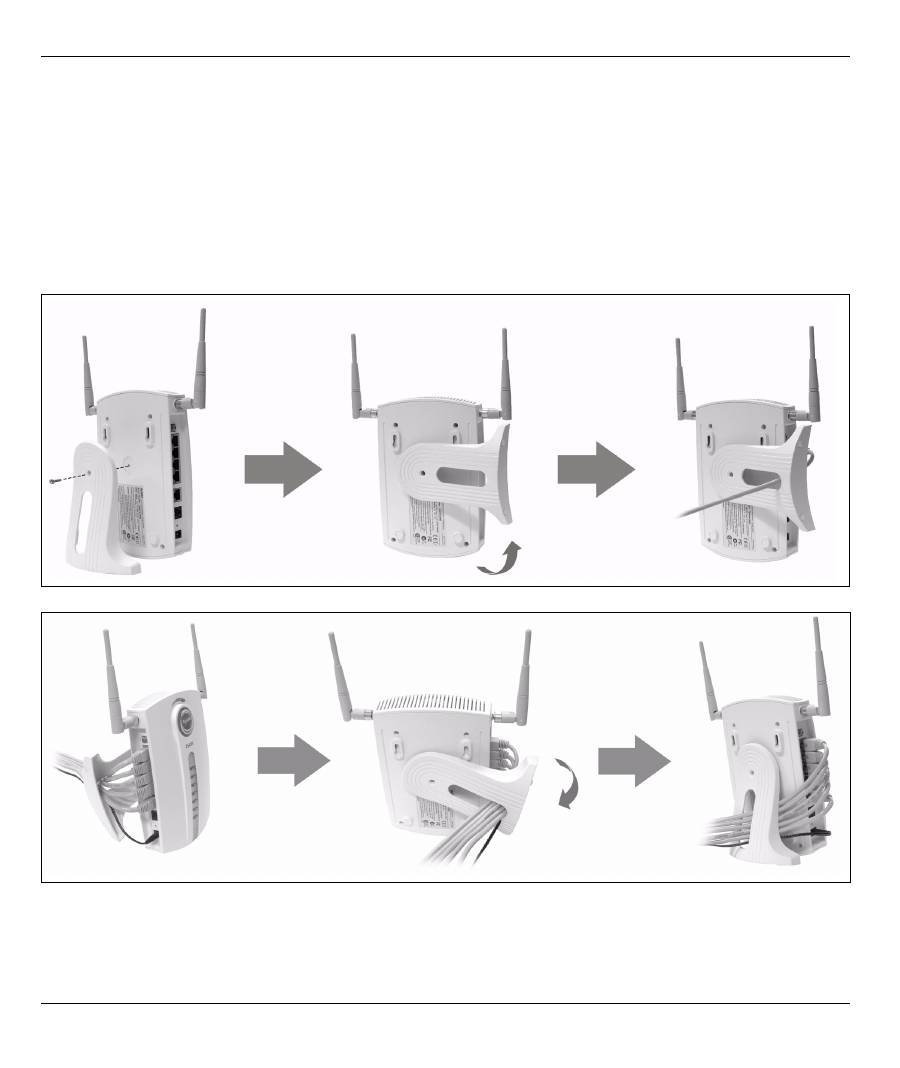
6.1 Free-standing Installation
1
Use the included screw to connect the G-4100 v2’s stand. Do not tighten the screw yet.
2
Twist the stand to the side and un the connection wires through the gap in the stand.
3
Twist the stand back to the vertical position and tighten the screw.
6.2 Wall-mounted Installation
1
Install the two included screws in the wall 80mm (3.15") apart. Do not screw the screws all the way into the
wall. Leave a small gap between the head of the screws and the wall.
Оглавление
- 1 Connecting the Hardware
- 2 Web Login3 Setup Wizard
- 4 Generating and Printing Subscriber Account Statements
- 6 Hardware Installation
- 7 Troubleshooting
- 8 Procedure to View a Product’s Certification(s)
- 1 Anschluß der Hardware
- 2 Web Login3 Einrichten Wizard
- 4 Erstellen und Drucken von Abonnenten-Kontoauszügen.
- 6 Installation der Hardware
- 7 Fehlersuche
- 8 Produktzertifizierungen anzeigen
- 1 Conectando el hardware
- 2 Inicio de sesión web3 Asistente de configuración
- 4 Generación e impresión de declaraciones de cuenta de suscriptor
- 6 Instalación del hardware
- 7 Solución de problemas
- 8 Procedimiento para ver la certificación de un producto
- 1 Connecter le matériel
- 2 Ouverture d'une session web3 Assistant d’installation
- 4 Générer et imprimer les relevés des comptes d'abonnés
- 6 Installation matérielle
- 7 Dépannage
- 8 Procédure pour afficher la (les) certification(s) d'un produit
- 1 Collegamento dell'hardware
- 2 Login Web3 Configurazione guidata
- 4 Generazione e stampa di resoconti di conti di sottoscrittore
- 6 Installazione hardware
- 7 Risoluzione dei problemi
- 8 Procedura per visualizzare le certificazioni di un prodotto
- 1 Подключение оборудования
- 2 Web имя пользователя 3 Мастер установки
- 4 Создание и печать выписки по учетной записи абонента
- 6 Установка оборудования
- 7 Устранение неисправностей
- 8 Процедура просмотра сертификата ( сертификатов ) продукта
- 1 Ansluta maskinvara
- 2 Webbinloggning3 Installationsguide
- 4 Generera och skriva ut prenumeranters kontoutdrag
- 6 Installation av maskinvara
- 7 Felsökning
- 8 Procedur för att visa en produkts certifikat
- 1 連接硬體
- 2 網路登入3 設定精靈
- 4 產生及列印用戶帳號報告單
- 7 疑難排解
- 8 檢視產品憑證的程序
Топ 10 инструкций
100.00
MB QUART DSG 21399.98
Skil 0790 RA99.98
Bosch KGN39VW2199.97
Sony CDX-CA750X RU99.97
Braun 310 Series 399.96
Asus P3-PE599.96
Siemens MQ 5 N 29899.96
YUKON EXTEND LRS-1000