ZyXEL Communications 802.11A/B/G WIRELESS ACCESS POINT / BRIDGE G-570U: инструкция
Раздел: Профоборудование
Тип: Аппарат
Инструкция к Аппарату ZyXEL Communications 802.11A/B/G WIRELESS ACCESS POINT / BRIDGE G-570U
G-570U
802.11a/b/g Wireless Access Point / Bridge
Quick Start Guide
Version 1.00
6/2006
Copyright © 2006 ZyXEL Communications Corporation.
Overview
This Quick Start Guide shows you how to connect the G-
570U to a broadband router for wireless Internet access.
The wireless adapters on the computers must comply
with the IEEE 802.11a, 802.11b or 802.11g wireless
standards.
Hardware Installation
Requirements
Before installation, make sure you have the following:
• Power Adapter (12V DC, 1A) (Included)
• Ethernet Cable (straight-through or crossover)
(Included)
• Broadband Router
Making the Connections
Follow the steps below to connect your G-570U for
Internet access.
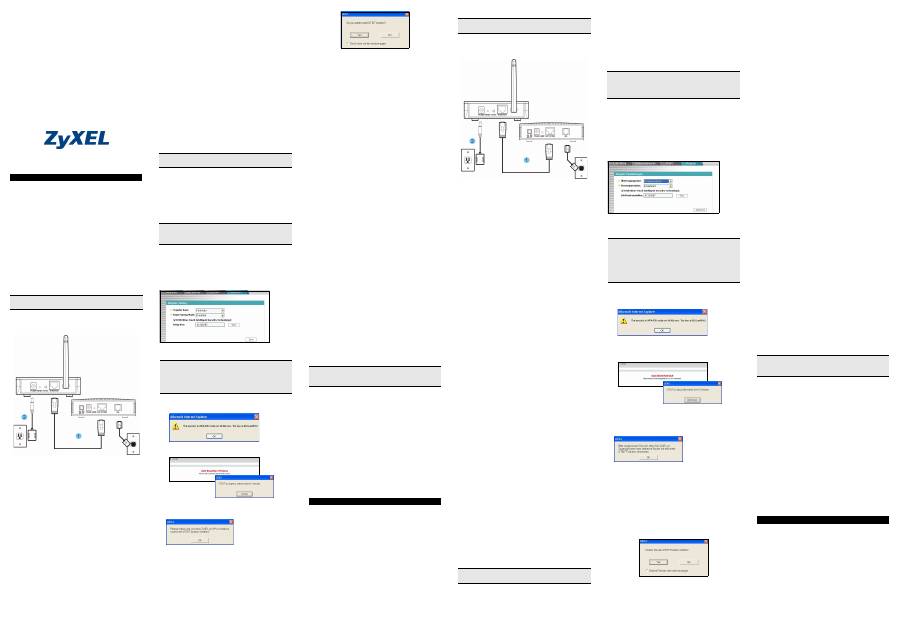
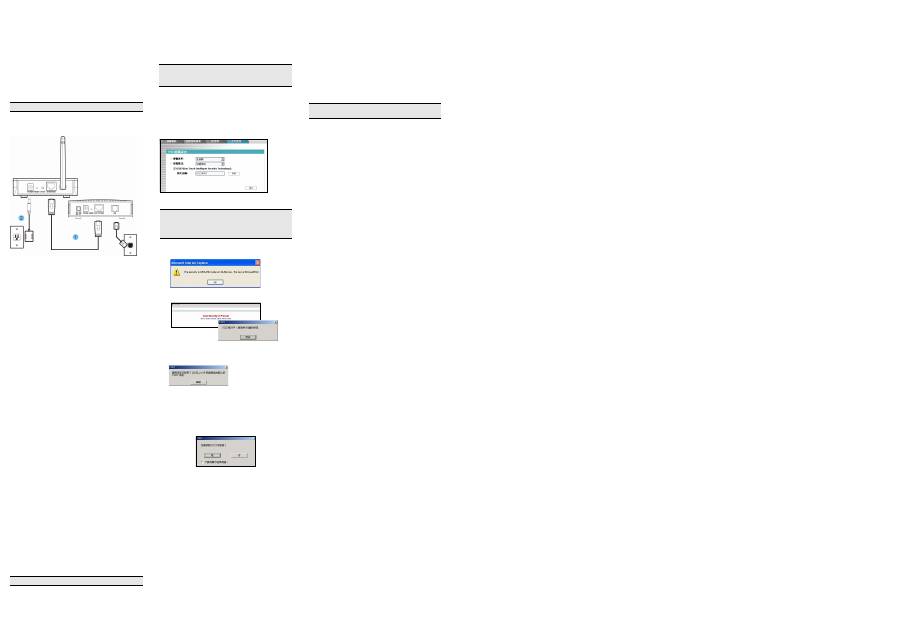
1 Connect your broadband router to the G-570U's
ETHERNET
port with an Ethernet cable.
2 Connect the included power adapter to the G-
570U's
POWER
port and connect the power
adapter to a power supply (outlet).
Installation Verification
When the power and the
ETHERNET
port are properly
connected, the
PWR/SYS
LED blinks while performing
system tests and then turns steady on.
The
ETHN
LED also turns on. See the Front Panel LED
Description table in the User's Guide for more
information.
Default Settings
Use a wireless-ready computer to search for and join the
wireless network to access the Internet.
The default settings of the G-570U are shown below:
SSID: ZyXEL G-570U
Channel: 6
Security: Disable
Security is disabled by default. This means your
neighbor could access and see your network traffic.
See the User's Guide for how to enable wireless security.
Introduction to OTIST
In a wireless network, the wireless clients must have the
same SSID and security settings as the access point
(AP) or wireless router (we will refer to both as "AP"
here) in order to associate with it. Traditionally this meant
that you had to configure the settings on the AP and then
manually configure the exact same settings on each
wireless client.
OTIST (One-Touch Intelligent Security Technology)
allows you to transfer your AP's SSID and WEP or WPA-
PSK security settings to wireless clients that support
OTIST and are within transmission range. You can also
choose to have OTIST generate a WPA-PSK key for you
if you didn't configure one manually.
Enabling OTIST
You must enable OTIST on both the AP and the wireless
client before you start transferring settings.
We use the G-570U and the G-162 screens in this guide
as an example. Screens may vary slightly for your
ZyXEL devices.
AP
You can enable OTIST using the
OTIST
button or the
web configurator. If you use the
OTIST
button, the
default (01234567) or previous saved (through the web
configurator)
Setup
key
is used to encrypt the settings
that you want to transfer.
Hold in the
OTIST
button for one or two seconds.
See the User's Guide for how to use the web
configurator to enable OTIST on the AP.
Wireless Client
Start the ZyXEL Utility and click the
Adapter
tab. Select
the
OTIST
check box, enter the same Setup Key as your
AP's and click
Save
.
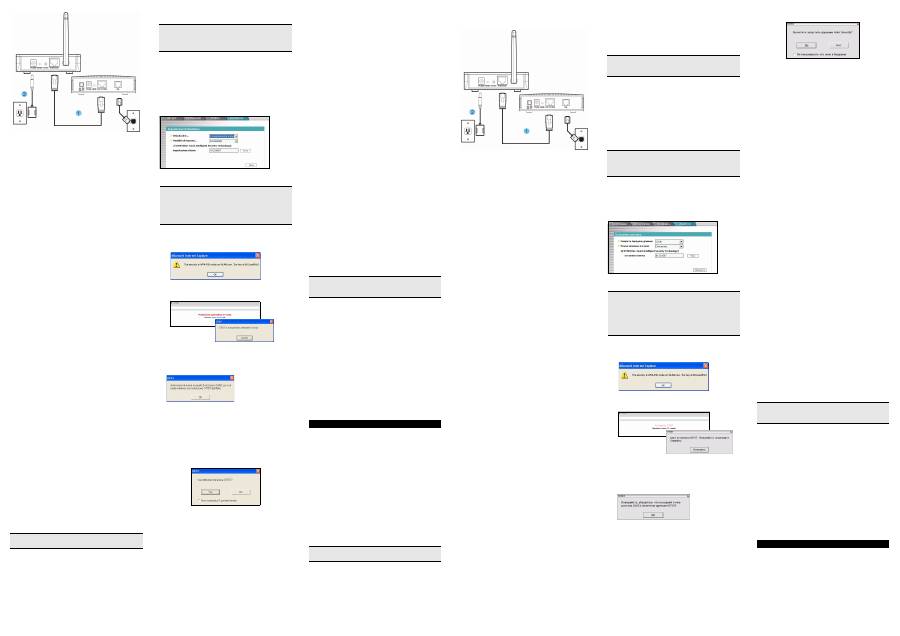
Starting OTIST
1 In the AP, a web configurator screen pops up
showing you the security settings to transfer. After
reviewing the settings, click
OK
.
2 This screen appears while OTIST settings are being
transferred. It closes when the transfer is complete.
• In the wireless client, you see this screen if it can't find
an OTIST-enabled AP (with the same
Setup key
).
Click
OK
to go back to the ZyXEL Utility main screen.
• If there is more than one OTIST-enabled AP within
range, you see a screen asking you to select one AP
to get settings from.
Notes on OTIST
1 If you enabled OTIST in the wireless client, you see
this screen each time you start the ZyXEL Utility.
Click Yes for it to search for an OTIST-enabled AP.
2 If an OTIST-enabled wireless client loses its
wireless connection for more than ten seconds, it
will search for an OTIST-enabled AP for up to one
minute. (If you manually have the wireless client
search for an OTIST-enabled AP, there is no
timeout; click
Cancel
in the OTIST progress screen
to stop the search.)
3 When the wireless client finds an OTIST-enabled
AP, you must still hold in the
OTIST
button (for one
or two seconds) for the AP to transfer settings.
4 If you change the SSID or the keys on the AP after
using OTIST, you need to run OTIST again or enter
them manually in the wireless client(s).
5 If you configure OTIST to generate a WPA-PSK key,
this key changes each time you run OTIST.
Therefore, if a new wireless client joins your
wireless network, you need to run OTIST on the AP
and ALL the wireless clients again.
Accessing the G-570U Web Configurator
You can use your wireless client computer to access and
configure the G-570U.
Launch your web browser. Enter “192.168.1.2” as the
web site address. See the web help or the User’s Guide
for configuration information.
You may need to set your wireless adapter’s IP address
to be in the same subnet as IP address 192.168.1.2. See
the User’s Guide for details.
Hardware Mounting
In general, the best location for the access point is at the
center of your intended wireless coverage area. For
better performance, mount the G-570U in a place that is
high up and free of obstructions.
Wall-mounted
Follow the steps to attach your G-570U to a wall.
1 Locate a high position on the wall that is free of
obstructions.
2 Connect two screws (not included) in the wall 74mm
apart. Use screws with 6mm ~ 8mm (0.24" ~ 0.31")
wide heads. Do not screw the screws all the way
into the wall. Leave a small gap between the head
of the screw and the wall. The gap must be big
enough for the screw heads to slide into the screw
slots and the connection cables to run down the
back of the G-570U.
3 Adjust the cables.
a. Run the connection cables down the back of the
G-570U.
OR:
b. Run the connection cables upward and along the
edge of the ceiling.
4 Align the holes on the back of the G-570U with the
screws on the wall. Hang the G-570U on the
screws.
Procedure to View a product's certification(s)
1 Go to www.zyxel.com
2 Select your product from the drop-down list box on
the ZyXEL home page to go to that product's page.
3 Select the certification you wish to view.
Überblick
Diese Schnellstartanleitung zeigt Ihnen, wie Sie den G-
570U für einen drahtlosen Internetzugang an einen
Breitbandrouter anschließen können. Die WLAN-
Netzwerkkarten der Computer müssen den WLAN-
Standards IEEE 802.11a, 802.11b oder 802.11g
entsprechen.
Installation der Hardware
Anforderungen
Stellen Sie vor der Installation sicher, dass Sie über
Folgendes verfügen:
• Netzteil (12V Gleichstrom, 1A) (beiliegend)
• Ethernet-Kabel (Straight-through (geradlinig belegte)
oder Crossover (gekreuzte)) (beiliegend)
• Breitbandrouter
Die Verbindungen herstellen
Folgen Sie den folgenden Schritten, um Ihren G-570U
für den Internetzugang anzuschließen.
1 Schließen Sie Ihren Breitbandrouter mit einem
Ethernet-Kabel an den
ETHERNET
-Port des G-
570U an.
2 Schließen Sie das beigefügte Netzteil an den
POWER
Anschluss des G-570U an und verbinden
Sie das Netzteil mit dem Stromnetz (Steckdose).
Prüfung der Installation
Wenn sowohl Stromversorgung als auch
ETHERNET
-
Port richtig angeschlossen sind, blinkt
PWR/SYS
während der Durchführung der Systemtests und leuchtet
im Anschluss dauerhaft. Die
ETHN
-LED beginnt auch zu
leuchten.
Genauere Informationen erhalten Sie in der
Tabelle Front Panel LED Description (Beschreibung der
LEDs auf der Vorderseite) im User's Guide
(Benutzerhandbuch).
Standardeinstellungen
Verwenden Sie einen WLAN-fähigen Computer, um
nach dem drahtlosen Netzwerk zu suchen, eine
Verbindung herzustellen und ins Internet zu gehen.
Unten sehen Sie die Standardeinstellungen des G-570U:
SSID: ZyXEL G-570U
Kanal: 6
Sicherheit: Deaktiviert
Die Sicherheit ist standardmäßig deaktiviert. Das
bedeutet, dass Ihr Nachbar eine Verbindung herstellen
und Ihren Netzwerkverkehr beobachten könnte.
Lesen Sie bitte im User's Guide nach, wie Sie die
WLAN-Sicherheit aktivieren.
Einführung von OTIST
In einem drahtlosen Netzwerk müssen die drahtlosen
Clients dieselben SSID- und Sicherheitseinstellungen
haben wie der AP (Access Point) oder der drahtlose
Router (im weiteren Textverlauf werden beide als AP
bezeichnet), um eine Verbindung herstellen zu können.
Früher mussten zunächst die Einstellungen am AP und
dann genau dieselben Einstellungen manuell an jedem
drahtlosen Client konfiguriert werden.
Mit der OTIST-Technologie (One-Touch Intelligent
Security Technology) ist es möglich, die AP SSID- und
WEP- oder WPA-PSK-Sicherheitseinstellungen zu
solchen drahtlosen Clients zu übertragen, die OTIST
unterstützen und sich innerhalb des
Übertragungsbereichs befinden. Sie können auch
festlegen, dass mit OTIST ein WPA-PSK-Schlüssel
erzeugt wird, wenn Sie keinen manuell konfiguriert
haben.
OTIST aktivieren
Vor dem Übertragen der Einstellungen müssen Sie
OTIST sowohl beim AP als auch beim drahtlosen Client
aktivieren.
In dieser Bedienungsanleitung verwenden wir die
Benutzeroberflächen des G-570U und G-162 als
Beispiel. Es ist möglich, dass die Benutzeroberflächen
bei Ihren ZyXEL-Geräten leicht abweichen.
AP
Sie können OTIST mit der
OTIST
-Taste oder dem Web-
Konfigurator aktivieren. Wenn Sie die
OTIST
-Taste
verwenden, können Sie den Standard-
Schlüssel
einrichten
(01234567) oder den zuvor gespeicherten
Schlüssel verwenden, um die Einstellungen zu
verschlüsseln, die übertragen werden sollen.
Halten Sie die
OTIST
-Taste eine oder zwei Sekunden
lang gedrückt.
Eine Beschreibung, wie OTIST mit dem Web-
Konfigurator auf dem AP aktiviert wird, finden Sie im
Benutzerhandbuch.
Drahtloser Client
Starten Sie das ZyXEL-Programm und klicken Sie auf
die Registerkarte
Adapter
. Wählen Sie die Option
OTIST
, geben Sie denselben
Schlüssel
ein, den auch
der AP hat und klicken Sie auf
Save
(
Speichern
).
Starten von OTIST
1 Im AP erscheint ein Web-Konfigurationsfenster, in
dem die Sicherheitseinstellungen für die
Übertragung angezeigt werden. Überprüfen Sie die
Einstellungen und klicken Sie auf
OK
.
2 Dieses Fenster erscheint, während die OTIST-
Einstellungen übertragen werden. Es wird wieder
geschlossen, sobald die Übertragung
abgeschlossen ist.
• Im drahtlosen Client erscheint dieses Fenster, wenn
er keinen AP findet, bei dem OTIST aktiviert ist (und
der denselben
Schlüssel
hat). Klicken Sie auf
OK
,
um zum Hauptfenster des ZyXEL-Programms zurück-
zukehren.
• Wenn sich im Übertragungsbereich mehr als ein AP
befindet, bei dem OTIST aktiviert ist, werden Sie in
einem Fenster dazu aufgefordert, den AP auszu-
wählen, von dem die Einstellungen geladen werden
sollen.
Hinweise zu OTIST
1 Wenn Sie im drahtlosen Client OTIST aktiviert
haben, erscheint dieses Fenster bei jedem Start des
Programms. Klicken Sie auf
Yes
(
Ja
), damit es nach
einem AP sucht, bei dem OTIST aktiviert ist.
2 Wenn ein drahtloser Client, bei dem OTIST aktiviert
ist, die drahtlose Verbindung länger als 10
Sekunden verliert, sucht er bis zu einer Minute lang
nach einem AP, bei dem OTIST aktiviert ist. (Wenn
sie die Suche nach den drahtlosen Clients manuell
aktiviert haben, schaltet sich das Gerät nicht
automatisch ab; klicken Sie im OTIST-
Fortschrittsfenster auf
Cancel
(
Abbrechen
), um die
Suche abzubrechen.)
3 Auch wenn der Wireless-Client einen für OTIST
aktivierten AP erkennt, müssen Sie weitere ein bis
zwei Sekunden auf die
OTIST
-Taste drücken, damit
der AP die Einstellungen übertragen kann.
4 Wenn Sie die SSID oder die Schlüssel des AP
ändern, nachdem Sie OTIST verwendet haben,
müssen Sie OTIST noch einmal starten, oder sie bei
den drahtlosen Clients manuell eingeben.
5 Wenn Sie OTIST so konfigurieren, dass ein WPA-
PSK-Schlüssel erzeugt wird, ändert sich dieser
Schlüssel jedes Mal, wenn Sie OTIST starten. Aus
diesem Grund müssen Sie, wenn ein neuer
drahtloser Client zum Netzwerk hinzukommt, beim
AP und ALLEN drahtlosen Clients OTIST noch
einmal starten.
Zugreifen auf den G-570U Web-Konfigurator
Sie können mit Ihrem Wireless-Client-Computer auf den
G-570U zugreifen und ihn konfigurieren.
Starten Sie Ihren Webbrowser. Geben Sie als
Websiteadresse “192.168.1.2” ein. Weitere
Informationen zur Konfiguration finden Sie in der Web-
Hilfe und im Benutzerhandbuch.
Möglicherweise müssen Sie die IP-Adresse des
Wireless-Adapters auf dasselbe Subnetz einstellen wie
das der IP-Adresse 192.168.1.2. Ausführliche
Informationen finden Sie im Benutzerhandbuch.
Montage der Hardware
Im Allgemeinen befindet sich die beste Position für den
Access Point im Zentrum des Bereiches, der durch
WLAN abgedeckt werden soll. Bringen Sie den G-570U,
um eine bessere Leistung zu erzielen, an einer
hochgelegenen Stelle an, die frei von Hindernissen ist.
Wandbefestigung
Befolgen Sie diese Schritte, um Ihren G-570U an einer
Wand zu befestigen.
1 Suchen sie einen hohen Punkt an der Wand aus,
der frei von Hindernissen ist.
2 Befestigen Sie im Abstand von 74mm zwei
Schrauben (nicht beiliegend) an der Wand.
Verwenden Sie Schrauben mit 6mm ~ 8mm (0.24" ~
0.31") breiten Köpfen. Drehen Sie die Schrauben
nicht vollständig in die Wand ein. Lassen Sie eine
kleine Lücke zwischen dem Kopf der Schraube und
der Wand. Diese Lücke muss so groß sein, dass die
Schraubenköpfe in die Schraubenschlitze passen
und die Anschlusskabel an der Rückseite des G-
570U entlang geführt werden können.
3 Richten Sie die Kabel aus.
a. Führen Sie die Anschlusskabel an der Rückseite
des G-570U entlang.
ODER:
b. Führen Sie die Anschlusskabel nach oben und
am Rand der Decke entlang.
4 Richten Sie die Löcher auf der Rückseite des G-
570U so aus, dass Sie sich über den Schrauben an
der Wand befinden. Hängen Sie den G-570U auf die
Schrauben.
Vorgehensweise zum Aufrufen einer
Produktzertifizierung
1 Gehen Sie auf www.zyxel.com
2 Wählen Sie Ihr Produkt aus der Dropdownliste aus,
um die Seite des entsprechenden Produkts
aufzurufen.
3 Wählen Sie die Zertifizierung aus, die Sie aufrufen
möchten.
Generalidades
Esta Guía de inicio rápido le muestra la manera de
conectar la G-570U a un router de banda ancha para
obtener acceso inalámbrico a Internet. Los adaptadores
inalámbricos en los ordenadores deben satisfacer las
normas de comunicaciones inalámbricas IEEE 802.11a,
802.11b o 802.11g.
Instalación del hardware
Requisitos
Antes de la instalación, asegúrese de que dispone de lo
siguiente:
English
Use only the supplied power adapter to connect the G-
570U.
Broadband Router
ZyXEL G-570U
The AP and wireless client(s) MUST use the same
Setup key
.
The
11a
and
11g
LEDs blink in series while the G-570U
transfers OTIST settings. When the G-570U has finished
transferring settings, both LEDs blink together.
You must start OTIST both on the AP and on the
wireless client(s)
Adapter
screen within three minutes
(at the time of writing). You can start OTIST in the
wireless clients and AP in any order but they must all be
within range and have OTIST enabled.
Make sure the screws are securely fixed to the wall and
strong enough to hold the weight of the G-570U with the
connection cables.
Deutsch
Verwenden Sie nur das mitgelieferte Netzteil zum
Anschluss des G-570U.
Der AP und die drahtlosen Client(s) MÜSSEN denselben
Setup Key
(
Schlüssel
) verwenden.
Breitbandrouter
ZyXEL G-570U
Während der G-570U die
OTIST-Einstellungen überträgt,
blinken die LEDs
11a
und
11g
abwechselnd. Wenn die
Datenübertragung durch den G-570U abgeschlossen ist,
blinken die zwei LEDs gleichzeitig.
Sie müssen OTIST innerhalb von drei Minuten (zum
Zeitpunkt der Eingabe) sowohl auf dem AP als auch im
Fenster
Adapter
der Wireless-Client(s) starten. Sie
können OTIST in den drahtlosen Clients und im AP in
einer beliebigen Reihenfolge starten, sie müssen sich
jedoch alle innerhalb der Reichweite befinden, und
OTIST muss aktiviert sein.
Vergewissern Sie sich, dass die Schrauben fest in der
Wand stecken und stark genug sind, das Gewicht des G-
570U mitsamt der Anschlusskabel zu tragen.
Español
• Adaptador de alimentación eléctrica (12 V CC, 1A)
(Incluido)
• Cable Ethernet (directo o cruzado) (Incluido)
• Router de banda ancha
Realización de las conexiones
Para proveer acceso a Internet a su G-570U siga los
pasos que se indican a continuación.
1 Conecte su router de banda ancha al puerto
ETHERNET
de la G-570U con un cable Ethernet.
2 Conecte el adaptador de alimentación eléctrica
incluido al puerto
ALIMENTACIÓN
de la G-570U y
a una toma de alimentación eléctrica.
Verificación de la instalación
Cuando los puertos de alimentación eléctrica y
ETHERNET
están conectados adecuadamente, el
indicador
PWR/SYS
parpadea mientras se llevan a cabo
comprobaciones del sistema y luego se enciende de
manera continua. El LED
ETHN
también se enciende.
Para obtener información adicional consulte la tabla
Front Panel LED Description en la User's Guide.
Configuración predeterminada
Para buscar y unirse a una red inalámbrica por la que
acceder a Internet utilice un ordenador preparado para
operar en forma inalámbrica.
A continuación se muestran los parámetros
predeterminados de la G-570U:
SSID: ZyXEL G-570U
Canal: 6
Seguridad: Deshabilitar
La seguridad está deshabilitada de manera
predeterminada. Esto significa que su vecino podría
acceder y ver su tráfico de red.
Consulte la User's Guide para obtener la manera de
habilitar la seguridad inalámbrica.
Introducción a OTIST
En una red inalámbrica, los clientes inalámbricos deben
tener la misma configuración de SSID y seguridad que el
punto de acceso (PA) o router inalámbrico (nos
referiremos a ambos aquí como PA) para asociarlos con
él. Tradicionalmente esto significaba que se debían
configurar los valores del PA y luego configurar
manualmente los mismos valores exactos en cada
cliente inalámbrico.
OTIST (Tecnología inteligente de seguridad en un paso)
le permite transferir su configuración de seguridad SSID
y WEP o WPA-PSK del PA a clientes inalámbricos que
soportan OTIST y que están dentro del alcance de
transmisión. También puede hacer que OTIST genere
una clave WPA-PSK si no ha configurado una
manualmente.
Activar OTIST
Debe activar OTIST tanto en el PA como en el cliente
inalámbrico antes de comenzar a transferir la
configuración.
Usamos las pantallas del G-570U y del G-162 en esta
guía como ejemplo. Las pantallas pueden variar
ligeramente según los dispositivos ZyXEL.
PA
Puede activar OTIST utilizando el botón
OTIST
(
Reiniciar
) del configurador de web. Si utiliza el botón
OTIST
(
Reiniciar
), la
Setup key
(
Clave de
configuración
) predeterminada (01234567) o la
grabada anteriormente (con el configurador de web) se
utilizará para cifrar la configuración que desee transferir.
Mantenga pulsado el botón
OTIST
(
Reiniciar
) durante
uno o dos segundos.
Consulte la Guia del usuario para utilizar el configurador
web y habilitar OTIST en el PA.
Cliente inalámbrico
Inicie la utilidad ZyXEL y haga clic en la ficha
Adapter
(
Adaptador
). Seleccione la casilla de verificación
OTIST
, introduzca la misma
Setup Key
(
Clave de
configuración
) que en su PA y haga clic en
Save
(
Guardar
).
Iniciar OTIST
1 En el PA, aparecerá una pantalla del configurador
de web mostrándole la configuración de seguridad
para transferir. Tras revisar la configuración, haga
clic en
OK
(
Aceptar
).
2 Esta pantalla aparece mientras la configuración de
OTIST se está transfiriendo. Se cierra cuando la
transferencia se ha completado.
• En el cliente inalámbrico, verá esta pantalla si no
puede encontrar un PA con OTIST activado (con la
misma
Setup key
(
Clave de configuración
)). Haga
clic en
OK
(
Aceptar
) para regresar a la pantalla prin-
cipal de la utilidad ZyXEL.
• Si hay más de un PA con OTIST activado dentro del
alcance, verá una pantalla pidiéndole que seleccione
un PA desde el que obtener la configuración.
Notas sobre OTIST
1 Si ha activado OTIST en el cliente inalámbrico, verá
esta pantalla cada vez que inicie la utilidad. Haga
clic en
Yes
(
Sí
) para que busque un PA con OTIST
activado.
2 Si un cliente inalámbrico con OTIST activado pierde
su conexión inalámbrica durante más de diez
segundos, buscará un PA con OTIST activado
durante un minuto. (Si tiene activada la búsqueda
manual de clientes inalámbricos para un PA con
OTIST activado, no hay límite de tiempo; haga clic
en
Cancel
(
Cancelar
) en la pantalla de progreso de
OTIST para detener la búsqueda)
3 Cuando el cliente inalámbrico encuentre un PA con
OTIST activado, deberá mantener pulsado el botón
OTIST
(durante uno o dos segundos) para que el
PA transfiera la configuración.
4 Si cambia el SSID o las claves en el PA tras usar
OTIST, deberá ejecutar OTIST de nuevo o
introducirlas manualmente en el/los cliente(s)
inalámbrico(s).
5 Si configura OTIST para que genere una clave
WPA-PSK, esta clave cambiará cada vez que
ejecute OTIST. Por tanto, si un nuevo cliente
inalámbrico se une a su red inalámbrica, deberá
ejecutar OTIST en el PA y TODOS los clientes
inalámbricos de nuevo.
Acceder al configurador Web G-570U
Puede utilizar su ordenador cliente inalámbrico para
acceder y configurar el G-570U.
Abra su explorador web. Escriba “192.168.1.2” como
dirección del sitio web. Consulte la ayuda web o la Guía
del usuario para información sobre la configuración.
Puede que necesite ajustar la dirección IP de su
adaptador inalámbrico para que esté en la misma
subred que la dirección IP 192.168.1.2. Consulte la Guía
del usuario para más detalles.
Montaje del hardware
En general, la mejor ubicación para el punto de acceso
es en el centro de su zona deseada de cobertura
inalámbrica. Para un mejor rendimiento, monte la G-
570U en un lugar elevado y libre de obstrucciones.
Montaje en pared
Para fijar su G-570U a una pared siga estos pasos.
1 Ubique una posición alta en la pared, que se
encuentre libre de obstrucciones.
2 Coloque dos tornillos (no incluidos) en la pared, a
74 mm de distancia entre sí. Utilice tornillos con
cabezas de 6 mm ~ 8 mm (0,24" ~ 0,31") de ancho.
No atornille a fondo los tornillos en la pared. Deje un
pequeño espacio entre la cabeza de los tornillos y la
pared. El espacio debe ser lo suficientemente
grande como para que las cabezas de los tornillos
se deslicen en las ranuras para los mismos y los
cables de conexión corran por detrás de la G-570U.
3 Ajuste los cables.
a. Haga correr los cables de conexión por la parte
trasera de la G-570U.
O bien:
b. Haga correr los cables de conexión hacia arriba y
a lo largo del borde del cielorraso.
4 Alinee los agujeros de la parte trasera de la G-570U
con los tornillos de la pared. Cuelgue la G-570U de
los tornillos.
Procedimiento para ver las certificaciones de un
producto
1 Vaya a www.zyxel.com.
2 Seleccione el producto que desea en el cuadro de
lista desplegable que se encuentra en la página
principal de ZyXEL para obtener acceso a la página
de dicho producto.
3 Seleccione la certificación que desea ver en esta
página.
Vue d'ensemble
Ce guide de démarrage rapide vous montre comment
connecter le G-570U à un routeur haut débit pour un
accès à Internet sans fil. Les adaptateurs sans fil sur les
ordinateurs doivent être conformes aux normes sans fil
IEEE 802.11a, 802.11b ou 802.11g.
Installation du matériel
Prérequis
Avant l'installation, assurez-vous que vous possédez les
éléments suivants:
• Adaptateur d'alimentation (12V DC, 1A) (fourni)
• Câble Ethernet (droit ou croisé) (fourni)
• Routeur haut débit
Réaliser les connexions
Suivez les étapes ci-dessous pour connecter votre G-
570U à Internet.
1 Connectez votre routeur haut débit sur le port
ETHERNET
de votre G-570U à l'aide du câble
Ethernet.
2 Connectez l'adaptateur d'alimentation fourni sur le
port
POWER
de votre G-570U et à une source
d'alimentation (prise murale).
Vérification de l'Installation
Affichage DEL
Lorsque le port power et le port
ETHERNET
sont
correctement connectés, la DEL
PWR/SYS
clignote lors
des tests du système puis devient fixe. La LED
ETHN
s’allume aussi. Référez-vous au tableau Front Panel
LED Description (Description des DEL du Panneau
Frontal) dans le User's Guide (Guide Utilisateur) pour de
plus amples informations.
Paramètres par défaut
Utilisez un ordinateur sans fil pour rechercher et vous
associer à un réseau sans fil afin d'accéder à Internet.
Les paramètres par défaut du G-570U sont les suivants:
SSID: ZyXEL G-570U
Canal: 6
Sécurité: Désactivée
La sécurité est désactivée par défaut. Cela signifie que
votre voisinage peut accéder et voir votre trafic réseau.
Consultez le guide de l’tilisateur pour savoir comment
activer la sécurité sans fil.
Présentation d'OTIST
Dans un réseau sans fil, les clients sans fil doivent avoir
les mêmes paramètres SSID et de sécurité que le point
d'accès (AP) ou le routeur sans fil (nous les nommerons
tous deux "AP" ici) afin de s'associer à celui-ci.
Traditionnellement, cela signifie que vous devez
configurer les paramètres sur l'AP et configurer
manuellement exactement les mêmes paramètres sur
chaque client sans fil.
OTIST (One-Touch Intelligent Security Technology) vous
permet de transférer les paramètres de sécurité SSID,
WEP et WPA-PSK de votre AP vers des clients sans fil
prenant en charge OTIST et se trouvant dans les limites
de la plage de transmission. Vous pouvez aussi choisir
de faire générer une clé WPA-PSK par OTIST si vous ne
voulez pas la configurer manuellement.
Activer OTIST
Vous devez activer OTIST à la fois sur l'AP et le client
avant de commencer à transférer les paramètres.
Nous utilisons les écrans du G-570U et du ZyXEL G-162
comme exemple dans ce guide. Les écrans peuvent
légèrement varier selon vos matériels ZyXEL.
AP
Vous pouvez activer OTIST à l'aide du bouton
OTIST
(
Réinitialiser
) ou du configurateur web. Si vous utilisez
le bouton
OTIST
(
Réinitialiser
), la
Setup key
(
Clé de
configuration
) par défaut (01234567) ou celle
précédemment enregistrée (à l'aide du configurateur
web) est utilisée pour coder les paramètres que vous
voulez transférer.
Appuyez sur le bouton
OTIST
(
Réinitialiser
) pendant
une à deux secondes.
Consultez le guide de l'utilisateur pour la maniere
d'utiliser le configurateur web afin d'activer OTIST sur
l'AP.
Client sans fil
Démarrez l'utilitaire de ZyXEL et cliquez sur l'onglet
Adapter
(
Adaptateur
). Sélectionnez la case à cocher
OTIST
, entrez la même
Setup Key
(
Clé de
configuration
) que pour votre AP et cliquez sur
Save
(
Enregistrer
).
Démarrer OTIST
1 Dans l'AP, un écran de configurateur web apparaît
vous indiquant les paramètres de sécurité à
transférer. Après avoir vérifié les paramètres,
cliquez sur
OK
.
2 Cet écran apparaît quand les paramètres OTIST
sont en cours de transfert. Il se ferme quand le
transfert est terminé.
• Dans le client sans fil, cet écran apparaît s'il ne trouve
pas d'AP avec la fonction OTIST activée (avec la
même
Setup key
(
Clé de configuration
)). Cliquez
sur
OK
pour retourner à l'écran principal de l'utilitaire
du ZyXEL.
• S'il y a plus d'un AP à portée avec la fonction OTIST
activée, vous verrez apparaître un écran vous invitant
à sélectionner un AP à partir duquel obtenir les
paramètres.
Remarques sur OTIST
1 Si vous activez OTIST dans le client sans fil, vous
verrez cet écran chaque fois que vous démarrerez
l'utilitaire. Cliquez sur
Yes
(
Oui
) pour qu'il recherche
un AP avec la fonction OTIST activée.
2 Si un client sans fil avec la fonction OTIST activée
perd sa connexion sans fil pendant plus de dix
secondes, il recherchera un AP avec la fonction
OTIST activée pendant une minute au maximum.
(Si vous faites une recherche manuelle d'un AP
avec la fonction OTIST activée par le client sans fil,
il n'y a pas de délai; cliquez sur
Cancel
(
Annuler
)
dans l'écran de progression d'OTIST pour arrêter la
recherche.)
3 Quand le client sans fil trouve un AP activé OTIST,
vous devez quand même maintenir le bouton
OTIST
(pendant une ou deux secondes) pour
permettre à l’AP de transférer les paramètres.
4 Si vous modifiez le SSID ou les clés sur l'AP après
avoir utilisé OTIST, vous devez exécuter à nouveau
OTIST ou les entrer manuellement dans le(s)
client(s) sans fil.
5 Si vous configurez OTIST pour générer une clé
WPA-PSK, cette clé change chaque fois que vous
exécutez OTIST. Donc, si un nouveau client se
connecte à votre réseau sans fil, vous devez à
nouveau exécuter OTIST sur l'AP et TOUS les
clients sans fil.
Accéder au configurateur web G-570U
Vous pouvez utiliser votre ordinateur client sans fil pour
accéder et configurer le G-570U.
Lancez votre navigateur web. Entrez “192.168.1.2”
comme adresse de site web. Voir l’aide en ligne ou le
guide de l’utilisateur pour les informations de
configuration.
Vous devrez peut-être définir l’adresse IP de votre
adaptateur sans fil dans le même sous réseau que
l’adresse IP 192.168.1.2. Consultez le guide de
l'utilisateur pour plus de détails.
Montage matériel
En général, le meilleur emplacement pour le point
d'accès se trouve au centre de votre zone de couverture
sans fil prévue. Pour une meilleure performance,
installez le G-570U à un endroit en hauteur et sans
obstacles.
Fixation murale
Suivez les étapes ci-dessous pour fixer votre G-570U
sur un mur.
1 Repérez une position élevée sur le mur et dégagée
de tout obstacle.
2 Installez séparément sur le mur, deux vis (non
fournies) à une distance de 74mm l'une de l'autre.
Utilisez des vis avec des têtes larges de 6mm ~
8mm (0.24" ~ 0.31"). Ne les vissez pas
complètement dans le mur. Laissez un petit
intervalle entre la tête des vis et le mur. L'intervalle
doit être suffisamment important pour que les têtes
des vis puissent se glisser dans les emplacements
prévus et que les câbles de connexion puissent
descendre à l'arrière du G-570U.
3 Réglez les câbles.
a. Faites descendre les câbles de connexion à
l'arrière du G-570U.
OU:
b. Dirigez les câbles de connexion vers le haut et
faites-les passer le long des bords du plafond.
4 Alignez les trous se trouvant à l'arrière du G-570U
avec les vis sur le mur. Accrochez le G-570U sur les
vis.
Procèdure permettant de consulter une(les)
certification(s) du produit
1 Allez sur www.zyxel.com.
2 Sèlectionnez votre produit dans la liste dèroulante
se trouvant sur la page d'accueil ZyXEL pour
accèder à la page du produit concernè.
3 Sèlectionnez sur cette page la certification que vous
voulez consulter.
Panoramica
Questa Guida Rapida spiega come collegare il G-570U
ad un router a banda larga. Gli adattatori wireless che
utilizzate sui computer devono essere conformi agli
standard IEEE 802.11a, 802.11b o 802.11g.
Installazione dell'hardware
Requisiti
Prima di effettuare l'installazione, accertarsi di avere:
• Adattatore di tensione (12 V di Corrente continua, 1 A)
(Incluso)
• Cavo Ethernet (intermedio o incrociato) (Incluso)
• Router a banda larga
Collegamenti
Seguire le indicazioni specificate di seguito per effettuare
il collegamento del G-570U verso il router a banda larga.
Utilice para conectar la G-570U únicamente el adaptador
de alimentación eléctrica provisto.
El PA y el/los cliente(s) inalámbrico(s) DEBEN usar la
misma
Setup key
(
Clave de configuración
).
Router de banda ancha
ZyXEL G-570U
Los LEDs
11a
y
11g
parpadean en serie mientras el G-
570U transfiere la configuración OTIST. Cuando el G-
570U ha finalizado la transferencia de la configuración,
los LEDs parpadean a la vez.
Debe iniciar OTIST tanto en el PA como en la pantalla
del
Adaptador (Adapter)
del cliente(s) en tres minutos
(en el momento de escribir). Puede iniciar OTIST en los
clientes inalámbricos y el PA en cualquier orden, pero
todos deben estar dentro del alcance y tener OTIST
activado.
Asegúrese de que los tornillos queden bien fijos a la
pared y de que sean lo suficientemente sólidos como
para soportar el peso de la G-570U y de sus cables de
conexión.
Français
N'utilisez que l'adaptateur d'alimentation fourni pour
connecter le G-570U.
L'AP et le(s) client(s) sans fil DOIVENT utiliser la même
Setup key
(
Clé de configuration
).
Les LED
11a
et
11g
clignotent alternativement lorsque le
G-570U transfert les paramètres OTIST. Quand le G-
570U a terminé de transférer les paramètres, les deux
LED clignotent simultanément.
Routeur haut débit
ZyXEL G-570U
Vous devez démarrer OTIST à la fois sur l’AP et dans
l'écran de l’
adaptateur
du (des) client(s) sans fil en
l'espace de trois minutes (au moment de l'activation).
Vous pouvez démarrer OTIST dans les clients sans fil et
l'AP dans n'importe quel ordre mais ils doivent tous se
trouver à portée et avoir OTIST activé.
Assurez-vous que les vis sont fermement fixées au mur
et suffisamment résistantes pour supporter le poids du
G-570U et des câbles de connexion.
Italiano
Usare soltanto l'adattatore di tensione fornito per
collegarsi al G-570U.
1 Collegare il router a banda larga alla porta
ETHERNET
del G-570U con un cavo Ethernet dritto
o incrociato.
2 Collegare l'adattatore di tensione incluso alla porta
di
ALIMENTAZIONE
del G-570U ed attaccare
quindi l'adattatore di alimentazione alla presa
elettrica.
Verifica dell'installazione
Quando l'alimentazione e la porta
ETHERNET
sono stati
collegati correttamente, il LED
PWR/SYS
lampeggia,
mentre vengono svolti i test del sistema, e poi rimane
acceso permanentemente. Si accende anche il LED
ETHN
. Per ottenere ulteriori informazioni, fare
riferimento alla tabella “Front Panel LED Description”
(Descrizione dei LED del Pannello frontale) nella User's
Guide (Guida dell'utente).
Impostazioni predefinite
Per poter accedere ad Internet attraverso il G-570U il
vostro computer deve essere dotato di una scheda
wireless.
Le impostazioni predefinite del G-570U sono mostrate di
seguito:
SSID: ZyXEL G-570U
Canale: 6
Sicurezza: Disattiva
Attenzione le i parametri di sicurezza sono disattivati
nelle impostazioni predefinite. Questo vuol dire che altri
utenti potrebbero accedere al vostro traffico di rete ed
osservarlo.
Fare riferimento alla User's Guide per attivare i parametri
di Sicurezza dell'apparato wireless.
Introduzione a OTIST
In una rete wireless, i client wireless devono avere lo
stesso SSID e le stesse impostazioni di sicurezza
dell'access point (AP) o del router wireless (in questo
documento si farà riferimento a entrambi come "AP"),
questo per consentirne l'associazione. Generalmente,
ciò significa che l'utente dovrà configurare le
impostazioni sull'AP, quindi configurare manualmente le
stesse impostazioni su ciascun client wireless.
La tecnologia OTIST (One-Touch Intelligent Security
Technology) consente di trasferire le impostazioni di
sicurezza SSID e WEP o WPA-PSK dell'AP ai client
wireless che supportano OTIST e che si trovano
all'interno del campo di trasmissione. È anche possibile
lasciare che sia OTIST a generare una chiave WPA-PSK
al posto dell'utente, il quale non dovrà quindi impostarne
una manualmente.
Attivazione di OTIST
È necessario attivare OTIST sia sull'AP sia sul client
wireless prima di iniziare la trasmissione delle
impostazioni.
A titolo esemplificativo, in questo documento saranno
utilizzare le schermate relative a G-570U e a G-162. Le
schermate possono variare leggermente rispetto ai
dispositivi ZyXEL in proprio possesso.
Access Point (AP)
È possibile attivare OTIST utilizzando il pulsante
OTIST
(
Reimposta
) dello strumento di configurazione Web. Se
si utilizza il pulsante OTIST, per crittografare le
impostazioni che si desidera trasferire sarà utilizzata la
Setup key predefinita (01234567) o quella
precedentemente salvata.
Tenere premuto il pulsante
OTIST
per uno o due
secondi.
Vedere la guida utente per le istruzioni dettagliate su
come utilizzare la configurazione via Web per abilitare
la funzionalità OTIST sull'AP.
Client wireless
Avviare il programma di utilità di ZyXEL e fare clic sulla
scheda
Adapter
(
Adattatore
). Selezionare la casella di
controllo OTIST, immettere la stessa
Setup Key
(
Impostazione chiave
) dell'AP e fare clic su
Save
(
Salva
).
Avvio di OTIST
1 Nell'AP, attraverso la configurazione via Web viene
visualizzata una schermata che mostra le
impostazioni di sicurezza da trasferire. Dopo aver
controllato le impostazioni, fare clic su OK.
2 Nel corso del trasferimento OTIST appare la
seguente schermata. Essa si chiude quando il
trasferimento è completo.
• Sul client wireless si vedrà questa schermata se non
viene trovato un AP con la funzione OTIST attivata
(con la stessa
Setup key
(
Impostazione chiave
)).
Fare clic su
OK
per tornare alla schermata principale
del programma di utilità ZyXEL.
• Se vi è più di un AP con la funzione OTIST attivata
all'interno del campo, sarà visualizzata una schermata
che richiede di selezionare da quale AP scaricare le
impostazioni.
Note su OTIST
1 Se si è attivato OTIST sul client wireless, si vedrà
questa schermata ogni volta che si avvia il
programma di utilità. Fare clic su
Yes
(
Sì
) per
ricercare un AP con la funzione OTIST attiva.
2 Se un client wireless con la funzione OTIST attiva
perde la sua connessione wireless per più di 10
secondi, esso cercherà un AP con la funzione
OTIST attiva per un tempo massimo di un minuto
(se sul client wireless si attiva manualmente la
ricerca di un AP con la funzione OTIST attiva, non vi
è alcun timeout; fare clic su
Cancel
(
Annulla
) nella
schermata di visualizzazione dell'andamento OTIST
per interrompere la ricerca).
3 Quando il client wireless trova un AP abilitato
OTIST, è ancora necessario tenere premuto il
pulsante
OTIST
(per uno o due secondi) affinché
l'AP trasferisca le impostazioni.
4 Se si cambia SSID o le chiavi sull'AP dopo aver
utilizzato OTIST, è necessario avviare nuovamente
OTIST oppure immettere manualmente i dati sui
client wireless.
5 Se si configura OTIST per generare una chiave
WPA-PSK, questa cambierà ogni volta che si
esegue OTIST. Pertanto, se si aggiunge un nuovo
client wireless alla rete wireless, è necessario
eseguire nuovamente OTIST sull'AP e su TUTTI i
client wireless.
Accesso al Configuratore Web G-570U
È possibile utilizzare un computer con installato un client
wireless per accedere al G-570U e poterlo configurare.
Avviare il browser. Immettere “192.168.1.2” come
indirizzo del sito Web. Consultare la guida in linea o la
Guida dell'utente per le informazioni sulla
configurazione.
Potrebbe essere necessario configurare l'indirizzo IP
della scheda wireless per essere nella stessa subnet
dell'indirizzo IP 192.168.1.2. Vedere la guida utente per i
dettagli.
Montaggio dell'hardware
Generalmente, l'ubicazione migliore per il punto
d'accesso è al centro della zona di copertura
dell'apparecchio senza fili prescelta. Per ottenere
prestazioni migliori, montare il G-570U in un luogo in
sopraelevato che sia privo di ostruzioni.
Montaggio a parete
Seguire i procedimenti descritti di seguito per attaccare il
G-570U ad una parete.
1 Individuare sulla parete un punto elevato e privo di
ingombri.
2 Collegare due viti (non incluse) al muro, ad una
distanza di 74 mm l'una dall'altra. Usare viti con
teste larghe 6 - 8 mm (0,24 - 0,31 pollici). Non
inserire le viti completamente dentro il muro.
Lasciare un piccolo spazio tra la testa della vite e la
parete. Lo spazio deve essere abbastanza grande
da permettere alle teste delle viti di entrare dentro
gli incavidell’AP ed ai cavi di collegamento di
scorrere verso il basso sul retro del G-570U.
3 Regolare i cavi.
a. Far scorrere i cavi verso il basso sul retro del G-
570U.
O:
b. Far scorrere i cavi verso l'alto e lungo il margine
del soffitto.
4 Allineare i fori, sul retro del G-570U, ai fori sul muro.
Attaccare il G-570U alle viti.
Procedura per visualizzare le certificazioni di un
prodotto ZyXEL
1 Andare alla pagina www.zyxel.com
2 Nel sito ZyXEL, selezionare il proprio prodotto
dall’elenco a discesa ed accedere alla pagina del
prodotto.
3 Da questa pagina selezionare la certificazione che
si vuole visionare.
Обзор
Данн
oe
к
pa
тк
oe
руководство
продемонстрирует
вам
,
как
подключать
G-570U
к
широкополосному
маршрутизатору
для
получения
беспроводного
доступа
в
Интернет
.
Беспроводные
клиенты
должны
соответствовать
стандартам
на
беспроводные
соединения
IEEE 802.11a, 802.11b
или
802.11g.
Установка аппаратных средств
Требования
Перед
установкой
убедитесь
в
наличии
следующего
:
•
Адаптер
питания
(12
В
постоянного
тока
, 1 A)
(
входит
в
комплект
)
•
Кабель
Ethernet (
прямой
или
перекрестный
)
(
входит
в
комплект
)
Подключения
Для
подключения
вашей
G-570U
к
Интернет
выполните
следующие
действия
.
1
Подключите
широкополосный
маршрутизатор
к
порту
ETHERNET
G-570U
при
помощи
Ethernet-
кабеля
.
2
Подключите
входящий
в
комплект
адаптер
питания
к
гнезду
POWER
G-570U
и
вставьте
вилку
сетевого
шнура
в
розетку
.
Проверка правильности установки
Светодиодная
индикация
Если
подключение
к
сети
питания
и
к
порту
Ethernet
выполнено
правильно
,
то
начнет
мигать
индикатор
PWR/SYS
и
по
завершении
самодиагностики
загорится
постоянно
.
Индикатор
ETHN
также
включается
.
См
.
таблицу
Описание
индикаторов
на
передней
панели
в
Руководстве
пользователя
для
получения
более
подробной
информации
.
Настройки
по
умолчанию
Для
подключения
к
беспроводной
сети
используйте
компьютер
,
оборудованный
беспроводным
адаптером
.
Настройки
G-570U
по
умолчанию
приведены
ниже
:
SSID: ZyXEL G-570U
Channel (
канал
): 6
Security (
Безопасность
): Disable (
Отключена
)
Безопасность
отключена
по
умолчанию
.
Это
означает
,
что
Ваш
сосед
,
к
примеру
,
может
получить
доступ
к
Вашей
сети
и
видеть
сетевой
трафик
.
Чтобы
узнать
,
как
активировать
безопасность
беспроводного
соединения
,
см
.
Руководство
пользователя
.
Доступ к web- конфигуратору G-570U
Вы
можете
использовать
компьютер
с
беспроводным
адаптером
для
получения
доступа
и
настройки
G-
570U.
Вам
может
понадобиться
установить
IP
адрес
вашего
беспроводного
адаптера
на
IP
адрес
из
той
же
подсети
,
что
и
IP
адрес
192.168.1.2 (
например
,
192.168.1.5).
Для
получения
дополнительной
информации
см
.
Руководство
пользователя
.
Запустите
ваш
web-
броузер
.
Введите
адрес
точки
доступа
“192.168.1.2”.
Для
получения
информации
о
настройке
обратитесь
к
системе
web-
помощи
или
к
Руководству
пользователя
.
Введение в OTIST
Клиенты
беспроводной
сети
должны
иметь
тот
же
идентификатор
SSID
и
те
же
параметры
безопасности
,
что
и
точка
доступа
(
ТД
)
или
беспроводной
маршрутизатор
(
далее
оба
они
будут
называться
"
ТД
"),
с
которыми
клиенты
устанавливают
связь
.
Раньше
это
означало
для
вас
необходимость
настраивать
ТД
,
а
затем
вручную
устанавливать
те
же
самые
параметры
в
каждом
беспроводном
клиенте
.
Технология
OTIST (One-Touch Intelligent Security
Technology -
Интеллектуальная
технология
автонастройки
безопасности
)
позволяет
Вам
передавать
идентификатор
SSID
точки
доступа
,
а
также
параметры
безопасности
WEP
или
WPA-PSK
беспроводным
клиентам
,
которые
находятся
в
зоне
действия
точки
доступа
и
поддерживают
OTIST.
Если
вы
не
сконфигурировали
ключ
WPA-PSK
вручную
,
устройство
,
поддерживающее
технологию
OTIST,
может
сделать
это
за
вас
.
Активация OTIST
Перед
началом
передачи
параметров
необходимо
активировать
OTIST
в
точке
доступа
и
в
беспроводном
клиенте
.
В
качестве
примеров
в
данном
руководстве
использованы
снимки
с
экранов
G-570U
и
G-162.
В
зависимости
от
используемых
вами
устройств
ZyXEL
экраны
могут
немного
отличаться
.
Точка
доступа
Вы
может
активировать
OTIST
с
помощью
кнопки
перезапуска
или
Web-
конфигуратора
.
Если
вы
используете
кнопку
перезапуска
,
для
шифрования
параметров
будет
использован
Установочный
ключ
,
заданный
по
умолчанию
(01234567),
или
ключ
,
предварительно
сохраненный
через
Web-
конфигуратор
.
Удерживайте
кнопку
перезапуска
нажатой
в
течение
одной
или
двух
секунд
.
Беспроводной
клиент
Запустите
утилиту
ZyXEL
и
перейдите
на
вкладку
Adapter (
Адаптер
)
.
Поставьте
флажок
OTIST
,
введите
тот
же
Установочный
ключ
(
Setup Key
),
который
использует
точка
доступа
,
и
нажмите
Save
(
Сохранить
)
.
Запуск OTIST
1
В
окне
WEB-
конфигуратора
ТД
появляется
окно
,
показывающее
вам
параметры
безопасности
,
которые
будут
установлены
с
помощью
OTIST.
После
проверки
параметров
щелкните
OK
.
2
Это
окно
появляется
во
время
передачи
параметров
с
помощью
OTIST.
Оно
закрывается
после
окончания
передачи
.
•
Если
клиент
находится
вне
зоны
действия
беспроводной
сети
,
функция
OTIST
не
включена
или
не
поддерживается
ТД
или
клиентом
,
либо
отличаются
установочные
ключи
клиента
и
ТД
,
то
появится
следующее
окно
.
Щелкните
OK
,
чтобы
вернуться
к
главному
окну
утилиты
ZyXEL.
•
Если
в
зоне
действия
беспроводной
сети
находятся
несколько
ТД
,
поддерживающих
OTIST,
вы
увидите
экран
,
предлагающий
выбрать
ТД
,
от
которой
будут
получены
параметры
.
Замечания относительно OTIST
1
Если
вы
включили
поддержку
OTIST
беспроводным
клиентом
,
каждый
раз
при
запуске
утилиты
вы
будете
видеть
следующее
окно
.
Щелкните
Да
,
чтобы
начать
поиск
точки
доступа
,
поддерживающей
OTIST.
2
Если
беспроводной
клиент
,
поддерживающий
OTIST,
теряет
беспроводную
связь
с
точкой
доступа
более
чем
на
десять
секунд
,
он
будет
искать
точку
доступа
,
поддерживающую
OTIST,
в
течение
одной
минуты
. (
Если
Вы
вручную
запускаете
в
беспроводном
клиенте
поиск
точки
доступа
,
поддерживающей
OTIST,
автоматической
остановки
поиска
не
происходит
;
щелкните
Cancel
в
окне
отображения
поиска
OTIST,
чтобы
остановить
поиск
.)
3
Когда
беспроводной
клиент
найдет
ТД
,
поддерживающую
OTIST,
нужно
продолжать
удерживать
кнопку
OTIST
еще
одну
-
две
секунды
,
чтобы
ТД
смогла
передать
необходимые
настройки
.
4
Если
вы
измените
идентификатор
SSID
или
ключи
в
точке
доступа
после
их
настройки
с
помощью
OTIST,
вам
придется
повторить
настройку
параметров
с
помощью
OTIST
или
ввести
их
вручную
на
беспроводном
(-
ых
)
клиенте
(-
ах
).
5
Если
вы
выбрали
генерацию
ключа
WPA-PSK
с
помощью
OTIST,
этот
ключ
создается
каждый
раз
,
когда
вы
запускаете
OTIST.
Поэтому
если
к
Вашей
беспроводной
сети
присоединяется
новый
беспроводной
клиент
,
вам
необходимо
снова
запустить
OTIST
на
ТД
и
на
ВСЕХ
беспроводных
клиентах
.
Размещение точки доступа
Обычно
,
наилучшим
местом
для
размещения
ТД
является
центр
предполагаемой
зоны
покрытия
беспроводной
сети
.
Для
повышения
эффективности
разместите
G-570U,
по
возможности
,
достаточно
высоко
,
так
,
чтобы
прохождению
сигнала
не
мешали
препятствия
или
их
количество
было
бы
минимальным
.
Монтаж
G-570U
на
стене
Для
монтажа
G-570U
на
стене
проделайте
следующее
.
1
Найдите
на
стене
место
,
расположенное
достаточно
высоко
;
2
Вкрутите
в
стену
два
самореза
(
не
входят
в
комплект
поставки
)
на
расстоянии
74
мм
друг
от
друга
.
Головки
саморезов
должны
быть
диаметром
от
6
до
8
мм
.
Саморезы
вкручивайте
не
полностью
,
а
оставьте
небольшой
зазор
между
головкой
и
стеной
.
Зазор
должен
быть
достаточным
для
того
,
чтобы
головки
саморезов
прошли
в
монтажные
отверстия
,
расположеные
на
нижней
части
ТД
;
3
Выберите
способ
расположения
проводов
:
а
)
Пропустите
провода
между
стеной
и
задней
панелью
G-570U;
б
)
Протяните
провода
вверх
и
пустите
по
краю
потолка
.
4
Совместите
монтажные
отверстия
в
задней
панели
G-570U
с
вкрученными
в
стену
саморезами
и
повесьте
на
них
G-570U.
Процедура
просмотра
сертификатов
изделий
1
Зайдите
на
сайт
www.zyxel.ru.
2
Выберите
нужное
изделие
из
раскрывающегося
списка
на
домашней
странице
корпорации
ZyXEL
и
перейдите
на
страницу
,
посвященную
этому
изделию
.
3
Выберите
на
этой
странице
нужный
сертификат
.
低功率電波輻射性電機管理辦法
經型式認證合格之低功率射頻電機,非經許可,公司、
商號或使用者均不得擅自變更頻率、加大功率或變更原
設計之特性及功能。
低功率射頻電機之使用不得影響飛航安全及干擾合法通
信;經發現有干擾現象時,應立即停用;並改善至無干
擾時方得繼續使用。
前項合法通信,指依電信法規定作業之無線電信。低功
率射頻電機須忍受合法通信或工業、科學及醫療用電波
輻射信電機設備之干擾。
L'AP e i client wireless DEVONO utilizzare la stessa
Setup key
(
Impostazione chiave
).
Router a banda larga
ZyXEL G-570U
I LED
11a
e
11g
lampeggiano a turno mentre il G-570U
trasferisce le impostazioni OTIST. Quando il G-570U ha
terminato il trasferimento delle impostazioni, entrambi i
LED lampeggiano insieme.
È necessario avviare OTIST sia sull'AP sia nella
schermata
Adapter
(scheda) dei client wireless entro tre
minuti (al momento della scrittura). È possibile avviare
OTIST sui client wireless e sull'AP in qualsiasi ordine,
ma è necessario che siano tutti interni al campo di
trasmissione e che abbiano OTIST attivato.
Accertarsi che le viti siano fissate alla parete saldamente
e che siano sufficientemente resistenti da sostenere il
peso del G-570U e dei i cavi di collegamento.
Русский
Для
подключения
к
сети
питания
G-570U
используйте
только
входящий
в
комплект
адаптер
питания
.
Широкополосный
маршрутизатор
ZyXEL G-570U
Точка
доступа
и
беспроводной
(-
ые
)
клиент
(-
ы
)
ДОЛЖНЫ
использовать
один
и
тот
же
Установочный
ключ
(Setup key)
.
Индикаторы
11a
и
11g
мигают
последовательно
,
когда
G-570U
передает
настройки
OTIS.
Когда
G-
570U
закончит
передачу
настроек
,
оба
индикатора
будут
мигать
вместе
.
Вы
долны
запустить
OTIST
и
на
ТД
,
и
на
закладке
Adapter[
Адаптер
]
утилит
всех
беспроводных
клиентов
в
течение
трех
минут
(
включая
время
набора
).
Запускать
OTIST
на
беспроводных
клиентах
и
точке
доступа
можно
в
любом
порядке
,
но
все
они
должны
находиться
в
зоне
доступа
и
поддержка
OTIST
должна
быть
включена
.
Проверьте
надежность
крепления
саморезов
к
стене
.
Они
должны
выдерживать
вес
G-570U
вместе
с
проводами
.
繁體中文
概要
本快速安裝指南教導您如何將
G-570U
連接至寬頻數據
機,
以提供無線上網。電腦上的無線網卡必須符合
IEEE
802.11a
,
802.11b
或
IEEE 802.11g
的無線標準。
硬體安裝
需求
在安裝前,
請先確定您有下列配備:
•
變壓器
(
直流
12
伏特,
1
安培
) (
隨附
)
•
乙太網路線
(
直通或交叉
) (
隨附
)
•
寬頻數據機
接線
遵循下列步驟連接
G-570U
上網。
1
將寬頻數據機以乙太網路線連接至
G-570U
的
ETHERNET
(
乙太網路
)
埠。
2
將隨附的變壓器連接至
G-570U
的
POWER
(
電源
)
埠,
並將變壓器插上電源
(
插座
)
。
安裝確認
LED
顯示
當電源與
ETHERNET
(
乙太網路
)
埠正確連接,
進行系
統測試時,
PWR/SYS
會閃爍,然後維持穩定的發亮。
ETHN
燈號 也會點亮。
詳細資料請參閱
User's Guide (
使
用指南
)
的
Front Panel
LED Description (
前面板
LED
說明
)
表。
預設設定值
使用具備無線上網功能的電腦,搜尋並加入無線網路以
上網。
G-570U
的預設值顯示如下:
SSID
:
ZyXEL G-570U
頻道:
6
安全性:
停用
預設是停用安全性。
這表示您的芳鄰可存取並看到您的
網路資料流。
關於如何啟用無線網路安全性,請參閱
User's Guide
。
OTIST 簡介
在無線網路中,無線網路用戶端必須有和基地台
(AP)
或
無線路由器
(
此處我們將此二者稱為
"AP")
相同的
SSID
及安全性設定,
以與其相連。傳統上此代表您必須設定
AP
組態,然後以相同設定值手動設定每一部無線用戶端
的組態。
OTIST (One-Touch
智慧型安全性技術
)
讓您將
AP
的
SSID
及
WEP
或
WPA-PSK
安全性設定,轉移到支援
OTIST
且在傳輸範圍內的無線用戶端
。如果您尚未手動
設定
WPA-PSK
金鑰,還可以選擇讓
OTIST
產生
。
啟用 OTIST
在開始轉移設定前,您必先在
AP
及無線用戶端上啟用
OTIST
。
本手冊中,我們使用
G-570U
及
G-162
畫面做為範例。
畫面可能和您的
ZyXEL
裝置略有不同。
AP
您可以使用
OTIST
(
重設
)
按鈕或網路組態設定程式啟用
OTIST
。如果您使用
OTIST
(
重設
)
按鈕,會使用預設
(01234567)
或之前
(
經由網路組態設定程式
)
儲存的設
定金鑰
,將要轉移的設定加密。
按住
OTIST
(
重設
)
按鈕一至兩秒。
有關如何使用網路設定器來啟動
AP
上的
OTIST
,請參
閱使用指南。
無線用戶端
啟動
ZyXEL
公用程式,然後按一下
Adapter
(
卡片設定
)
標籤。選取
OTIST
核取方塊,輸入和您的
AP
相同的
Setup Key
(
設定金鑰
)
,然後按一下
Save
(
儲存
)
。
啟動 OTIST
1
在
AP
上會蹦現網路組態設定程式畫面,為您顯示
轉移的安全性設定。在檢視設定後,按一下
OK
(
確定 )。
2
轉移
OTIST
設定時會出現此畫面。轉移完成時會關
閉畫面。
•
在無線用戶端上,您會看見找不到
(
具相同設定金鑰
)
已啟用
OTIST
的
AP
的此畫面。按一下
OK
( 確定 ),
回到
ZyXEL
公用程式主畫面。
•
如果範圍內有超過一個以上已啟用
OTIST
的
AP
,畫
面會要求您選取一個
AP
以取得設定值。
OTIST 注意事項
1
如果您已啟用無線用戶端的
OTIST
,每次啟動公用
程式時都會看到此畫面。按一下
Yes
( 是 ),讓其搜
尋啟用
OTIST
的
AP
。
2
如果啟用
OTIST
的無線用戶端無線連線斷線
10
秒
以上,則將會搜尋已啟用
OTIST
的
AP
至多一分
鐘。
(
如果您已手動讓無線用戶端搜尋已啟用
OTIST
的
AP
,則不會停止搜尋;按一下
OTIST
進行畫面
中的
Cancel
( 取消 )
以停止搜尋。
)
3
當無線用戶端找到啟用
OTIST
的
AP
時,您必須
按住
OTIST
按鈕 ( 一或兩秒 ) 以便
AP
傳輸設
定。
4
如果您在使用
OTIST
後變更
AP
的
SSID
或金鑰,
則必須再次執行
OTIST
,或手動輸入無線用戶端。
5
如果您設定
OTIST
產生
WPA-PSK
金鑰,每次執行
OTIST
時都會變更此金鑰。因此,若有新的無線用
戶端加入您的無線網路中,則必須再次執行
AP
及所
有無線用戶端的
OTIST
。
使用 G-570U 網頁設定介面
您可以使用無線用戶端電腦存取與設定
G-570U
。
啟動您的網頁瀏覽器。輸入 「
192.168.1.2
」為網站位
址。若需設定資訊,請參閱網站說明或 《使用手冊》。
可能需要將無線網路卡的
IP
位址設定在與
IP
位址
192.168.1.2
相同的子網路中。如需相關詳細資料,請參
閱 《使用手冊》。
硬體配置
一般來說,基地台的最佳位置是在無線訊號所欲涵蓋的
區域中心。
欲獲得最佳效能,請將
G-570U
安裝於高處
且無障礙的地方。
安裝牆上
按照下列步驟將
G-570U
安裝於牆上。
1
在牆上找一處高且沒有阻礙物的地方。
2
將兩根螺絲釘 ( 未隨附 ) 固定在牆上相距 74mm 處。使
用螺帽寬
6mm ~ 8mm (0.24" ~ 0.31")
的螺絲釘。
不要把螺絲釘完全鎖入牆中。在螺帽與牆間留下小
小的間隙。此空間必須大到足以讓螺絲帽能滑入
G-
570U
的螺絲槽,且接線能穿過
G-570U
背後。
3
調整接線。
a.
將接線繞到
G-570U
的背後。
或是
:
b.
將接線朝上並沿著天花板邊緣走。
4
將
G-570U
背後的孔對準牆上的螺絲。把
G-570U
掛
在螺絲上。
如何查閱產品的認證
1
請到
ZyXEL
網站
www.zyxel.com
。
2
請在
ZyXEL
首頁的產品頁面上,透過下拉式選單選
取產品名字。
3
從這個頁面上選擇你想查閱的產品認證。
注意:只能使用隨附的變壓器連接
G-570U
。
AP
及無線用戶端必須使用相同的設定金鑰。
寬頻數據機
ZyXEL G-570U
11a
和
11g
燈號 會在
G-570U
傳送
OTIST
設定時連
續閃動。
G-570U
傳送設定完成之後,這兩個 燈號 會一
起閃動。
您必須在三分鐘內 ( 在本文撰寫時 ) 於 AP 及無線用戶
端的
Adapter
( 配接器設定 ) 畫面中啟動
OTIST
。您能
以任何順序啟動無線用戶端及
AP
的
OTIST
,但二者必
須皆在範圍內,且已啟用
OTIST
。
請確定螺絲緊密固定於牆上,並且足以負載
G-570U
加上
連接線的重量。
