Brennenstuhl Solar Energy Set SES P4033 Solar celltype Mono-crystalline 2x20Wp Panel dimensions 592x 641x25mm Inverter 150W: Solar Energy Set SES P4033 V3
Solar Energy Set SES P4033 V3: Brennenstuhl Solar Energy Set SES P4033 Solar celltype Mono-crystalline 2x20Wp Panel dimensions 592x 641x25mm Inverter 150W
Solar Energy Set SES P4033 V3
GB
6
This solar energy set, consisting of a solar panel, charge regula-
tor, power inverter and further components, is intended for gener-
ating and storing solar energy.
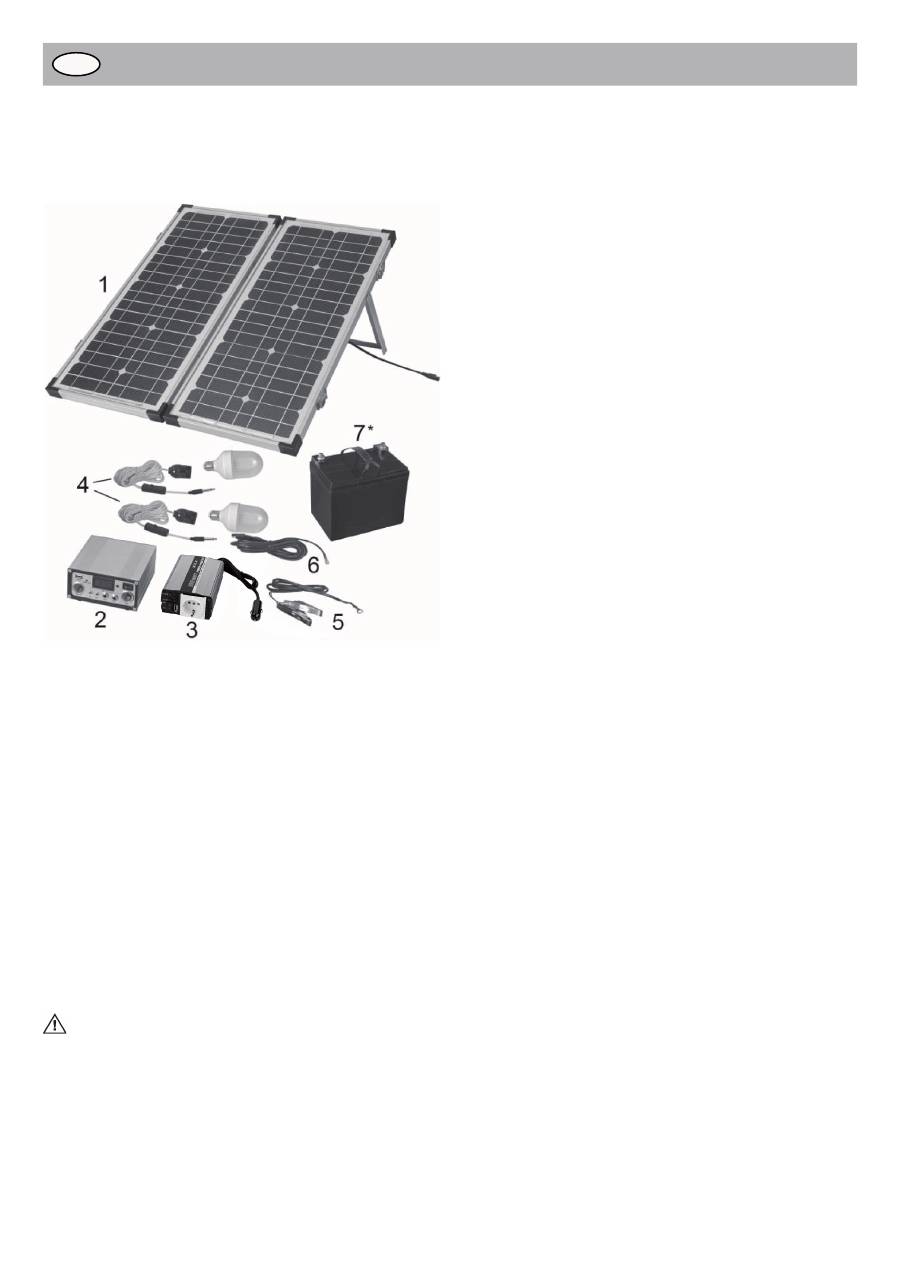
Components
1 Solar Panel (Mono-Crystalline)
Output Power: 40 Wp
Included positioner (bracket at backside)
2 Solar Charge Regulator
Charge regulator is designed to control the charging from solar
panel into the battery, and the power draw from battery to out-
puts.
Included:
- Digital voltage meter
- USB charging socket
- Several low voltage DC output sockets
3 Power Inverter (150 W)
Converts DC 12 V into household AC 230 V (modified sine
waves)
4 2x energy saving light set (12 V DC/5 W) with 5 m cable and
ON/OFF switch
5 Cable set (battery to charge regulator), length = 1 m
6 Cable set (solar panel to charge regulator), length = 5 m
7* Not included: 12 V/33 Ah rechargeable battery (sealed lead
acid), please order separately (art. no. 1292990) or use compa-
rable 12 V DC battery.
Caution
Keep this instruction for future reference.
PLEASE READ AND FULLY UNDERSTAND THIS MANUAL
BEFORE THE USE OF THIS PRODUCT TO REDUCE ANY FAIL-
URE OR INCORRECT OPERATION OF THE SYSTEM.
●
Power may cause danger! Suggest a professional to operate
the item and keep the item away from children! This product is
not intended for use by young children or in
fi
rm person unless
they are being adequately supervised by a responsible person
to ensure that they can use the appliance safely.
●
The solar panel generates electricity when exposed to light.
●
Do not short circuit any lead cables.
●
Always switch off charge regulator and/or power inverter before
connecting or disconnecting.
●
Please always connect with the sequence of:
Battery
appliance (DC Lights ...)
Solar panel.
Please always disconnect with the sequence of:
Solar panel
appliance (DC Lights ...)
battery.
●
All the parts are not water proof, except for the solar panel.
●
Charge the battery using the solar module prior to
fi
rst use for
3 days with full sunlight (initial charge up).
●
Do not expose the battery to
fi
re or high heat, it may explode.
●
Always place the inverter and charge regulator in an
environment which is:
- well ventilated
- not exposed to direct sunlight or heat source
- out of reach from children
- away from water/moisture, oil or grease
- away from any
fl
ammable substance
- secure and no risk of falling
●
Use the included energy-saving lamp and never operate using
230 V~, E27 socket.
●
Use the included energy-saving lamp sets only with suitable
12 V DC bulbs.
Installation
●
Remove solar energy set from packaging carefully.
●
Unclip the two latches on the side of the solar panel (item 1)
and fold panels outward. Extend the two stands to their
maximum length and lock in position.
●
Place the solar panel in position facing the sun. Make sure that
the solar panel is not covered by shadow from trees, buildings
or other objects.
NOTE:
To obtain maximum output, it is suggested that the
panels are regularly moved to track the suns movement
throughout the day.
●
Fully extend 5 m connecting cable (item 6) and connect it to the
solar panel at its solar connector end.
●
Switch off charge regulator (item 2).
●
Connect rechargeable battery to the “BATTERY” terminal at the
back of the charge regulator with connecting battery cable
(item 5).
Be sure to connect with right polarity. Please follow the
connection sequence:
A. red cable (positive)
red socket
B. black cable (negative)
black socket
Ensure that battery clamps do not come in contact with
one another.
For disconnecting use the reverse sequence.
●
Connect low voltage device like DC energy saving light (item 4)
to charge regulator (front side DC output, 12 V).
●
Connect the power inverter (item 3) to charge regulator with
cigarette lighter adapter (front side “INVERTER” socket).
●
Connect solar panel to the “SOLAR PANEL” terminal at the
back of charge regulator.
●
Switch on charge regulator and power inverter.
●
Charge the battery using the solar module prior to
fi
rst use for
3 days with full sunlight (initial charge up).
●
When battery is full loaded, the kit is ready to use
Switch on the lights or other appliances.
Оглавление
- Solar Energie-Set SES P4033 V3
- Solar Energie-Set SES P4033 V3
- Solar Energie-Set SES P4033 V3
- Solar Energy Set SES P4033 V3
- Solar Energy Set SES P4033 V3
- Solar Energy Set SES P4033 V3
- Kit solaire Photovoltaïque SES P4033 V3
- Kit solaire Photovoltaïque SES P4033 V3
- Kit solaire Photovoltaïque SES P4033 V3
- Zonne-energie installatie SES P4033 V3
- Zonne-energie installatie SES P4033 V3
- Zonne-energie installatie SES P4033 V3
- Solenergisats SES P4033 V3
- Solenergisats SES P4033 V3
- Solenergisats SES P4033 V3
- Sistema de Energía Solar SES P4033 V3
- Sistema de Energía Solar SES P4033 V3
- Sistema de Energía Solar SES P4033 V3
- Kit energia solare SES P4033 V3
- Kit energia solare SES P4033 V3
- Kit energia solare SES P4033 V3
- Zestaw z panelem s ł onecznym SES P4033 V3
- Zestaw z panelem s ł onecznym SES P4033 V3
- Zestaw z panelem s ł onecznym SES P4033 V3
- Σετ Ηλιακής Ενέργειας SES P4033 V3
- Σετ Ηλιακής Ενέργειας SES P4033 V3
- Σετ Ηλιακής Ενέργειας SES P4033 V3
- Güne ş Enerjisi Seti SES P4033 V3
- Güne ş Enerjisi Seti SES P4033 V3
- Güne ş Enerjisi Seti SES P4033 V3
- Комплект электропитания от солнечной энергии SES P4033 V3
- Комплект электропитания от солнечной энергии SES P4033 V3
- Комплект электропитания от солнечной энергии SES P4033 V3
- Комплект электропитания от солнечной энергии SES P4033 V3
- Sistema de energia solar SES P4033 V3
- Sistema de energia solar SES P4033 V3
- Sistema de energia solar SES P4033 V3
