Brennenstuhl Solar LED-light Duo Premium SOL LV0805 P1 IP44 with PIR sensor 8xLED 0,5W 320lm Cable length 4,75m Colour Anthracite: инструкция
Раздел: Электроустановочные изделия
Тип:
Инструкция к Brennenstuhl Solar LED-light Duo Premium SOL LV0805 P1 IP44 with PIR sensor 8xLED 0,5W 320lm Cable length 4,75m Colour Anthracite
SOL SV0805 P1 IP 44, SOL LV0805 P1 IP44, SOL SV0805 P2 IP44,
SOL LV0805 P2 IP44, SOL SV1205 P2 IP44, SOL LV1205 P2 IP44
INSTALLATIONS- UND BEDIENUNGSANLEITUNG .......................... 2
INSTRUCTIONS FOR INSTALLATION AND USE ................................ 6
MODE D’INSTALLATION ET D’EMPLOI .............................................. 9
INSTALLATIE- EN BEDIENINGSHANDLEIDING ................................ 13
ISTRUZIONI PER L'INSTALLAZIONE E L’USO .................................. 16
INSTALLATIONS- UND BRUKSANVISNING...................................... 20
MANUAL DE INSTALACIÓN Y OPERACIÓN .................................... 23
INSTRUKCJA INSTALACJI I OBSŁUGI .............................................. 26
NÁVOD K INSTALACI A POUŽÍVÁNÍ P
Ř
ÍSTROJE .......................... 30
TELEPÍTÉSI ÉS KEZELÉSI UTASÍTÁS .............................................. 33
KURULUM VE KULLANMA KILAVUZU ............................................ 36
ASENNUS- JA KÄYTTÖOHJE ............................................................ 39
ΟΔΗΓΙΕΣ ΕΓΚΑΤΑΣΤΑΣΗΣ ΚΑΙ ΧΡΗΣΗΣ
...................................... 42
РУКОВОДСТВО ПО УСТАНОВКЕ И ОБСЛУЖИВАНИЮ ИЗДЕЛИЯ
46
INSTRUÇÕES DE INSTALAÇÃO E MANUAL DO UTILIZADOR .... 50
PAIGALDUS- JA KASUTUSJUHEND ................................................ 54
NÁVOD NA INŠTALÁCIU A POUŽÍVANIE PRÍSTROJA .................. 57
NAVODILA ZA INŠTALACIJO IN UPORABO.................................... 60
INSTAL
Ā
CIJAS UN LIETOŠANAS INSTRUKCIJA............................ 63
Į
RENGIMO IR NAUDOJIMO INSTRUKCIJA ...................................... 66
043413 SOL SH_LH Doppelstrahler 17.05.13 18:47 Seite 1

Vielen Dank, dass Sie sich zum Kauf dieses Produkts
entschieden haben.
Machen Sie sich vor der ersten Inbetriebnahme mit dem Pro-
dukt vertraut. Lesen Sie hierzu aufmerksam die nachfolgende
Bedienungsanleitung und die Sicherheitshinweise. Benutzen
Sie das Gerät nur wie beschrieben und für die angegebenen
Einsatzbereiche.
Bewahren Sie diese Anleitung auf. Händigen Sie alle
Unterlagen bei Weitergabe des Gerätes an Dritte mit aus.
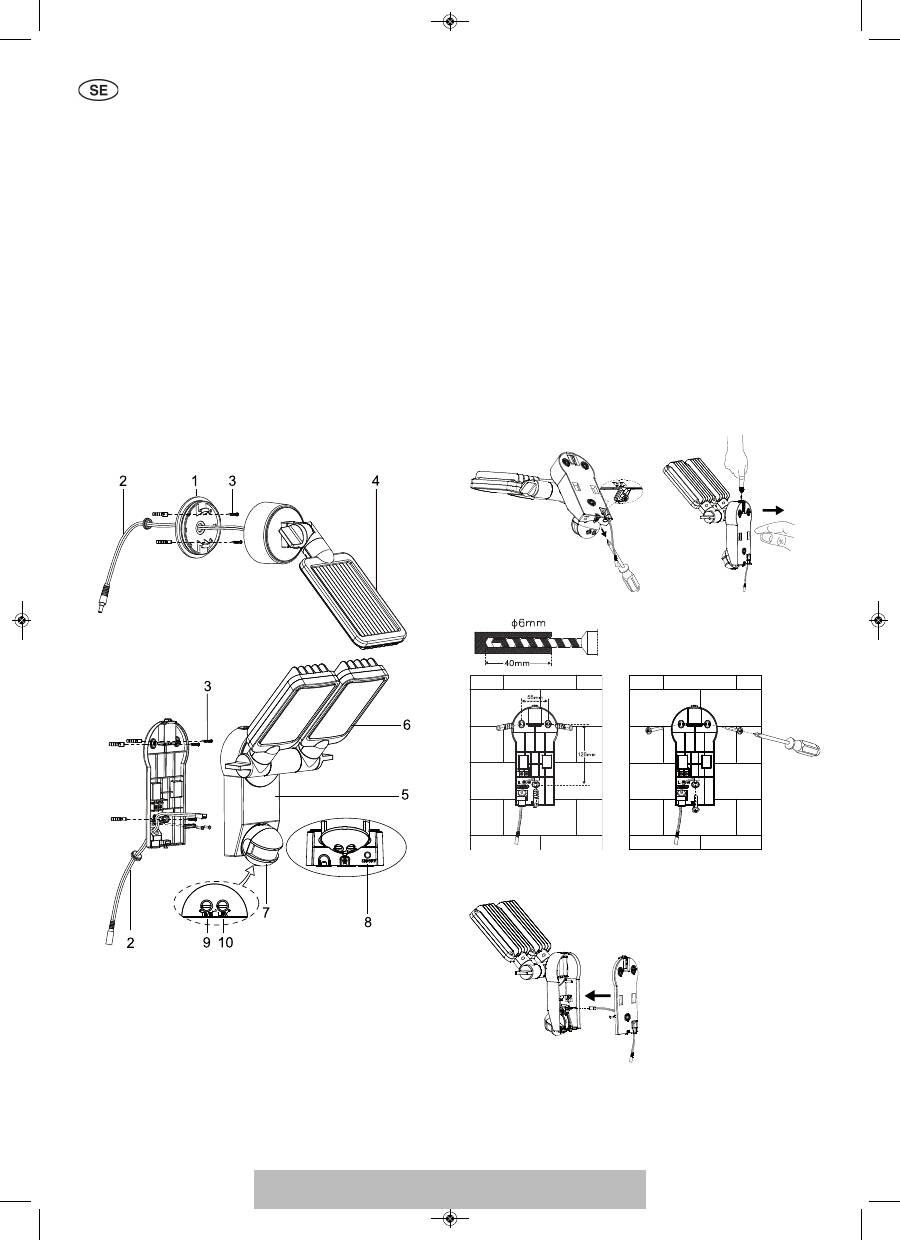
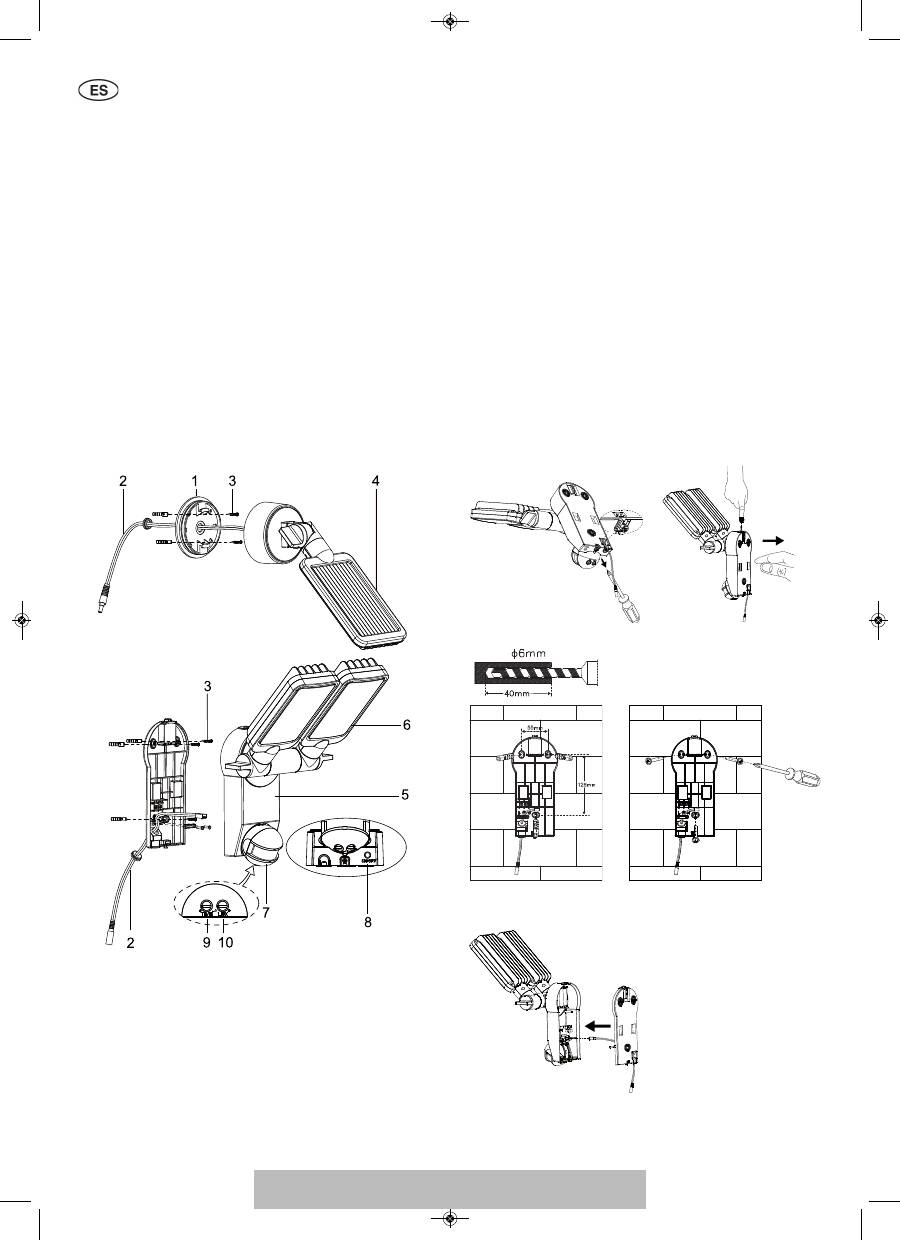
TEILELISTE
1
Halterung Solarpanel
2
Verbindungskabel Solarpanel
3
Montageschrauben für Solarmodul und Haupteinheit (5x)
4
Solarmodul
5
Haupteinheit
6
LED-Einheit
7
Bewegungsmelder
8
ON / OFF Schalter
9
Regler Leuchtdauer
10 Regler Ansprechempfindlichkeit
ERSTMALIGES AUFLADEN DER SOLARLEUCHTE
Bevor Sie die Solarleuchte in Betrieb nehmen, muss diese
zunächst über das Solarmodul aufgeladen werden.
Verbinden Sie das Kabel vom Solarmodul mit der Haupteinheit.
Der ON / OFF-Schalter an der Haupteinheit muss auf OFF
gestellt sein. Platzieren Sie das Solarmodul an einer Stelle, wo
es möglichst lange von direktem Sonnenlicht bestrahlt wird.
Beachten Sie bitte auch die Hinweise zu geeigneten Montage-
orten im nächsten Abschnitt.
Je nach Jahreszeit, Witterung und Position des Solarmoduls
kann das Aufladen bis zu 4 Tage andauern, bevor die Leuchte
in Betrieb genommen werden kann.
GEEIGNETE MONTAGEORTE FÜR SOLARLEUCHTE UND
SOLARMODUL
Haupteinheit:
Die Haupteinheit enthält die Leuchte, den Bewegungsmelder
und den Akku. Bedenken Sie bitte, wenn Sie die Haupteinheit
montieren, dass der Überwachungsbereich des Bewegungs -
melders je nach Montagehöhe max. 180° bei einer Reichweite
von max. 10 Metern beträgt.
Für die Montage auf einem stabilen Untergrund, z.B. Mauerwerk
verwenden Sie die dem Paket beiliegenden Schrauben (Pos. 3
der Teileliste). Je nach Untergrund sind passende Schrauben
und Dübel zu verwenden.
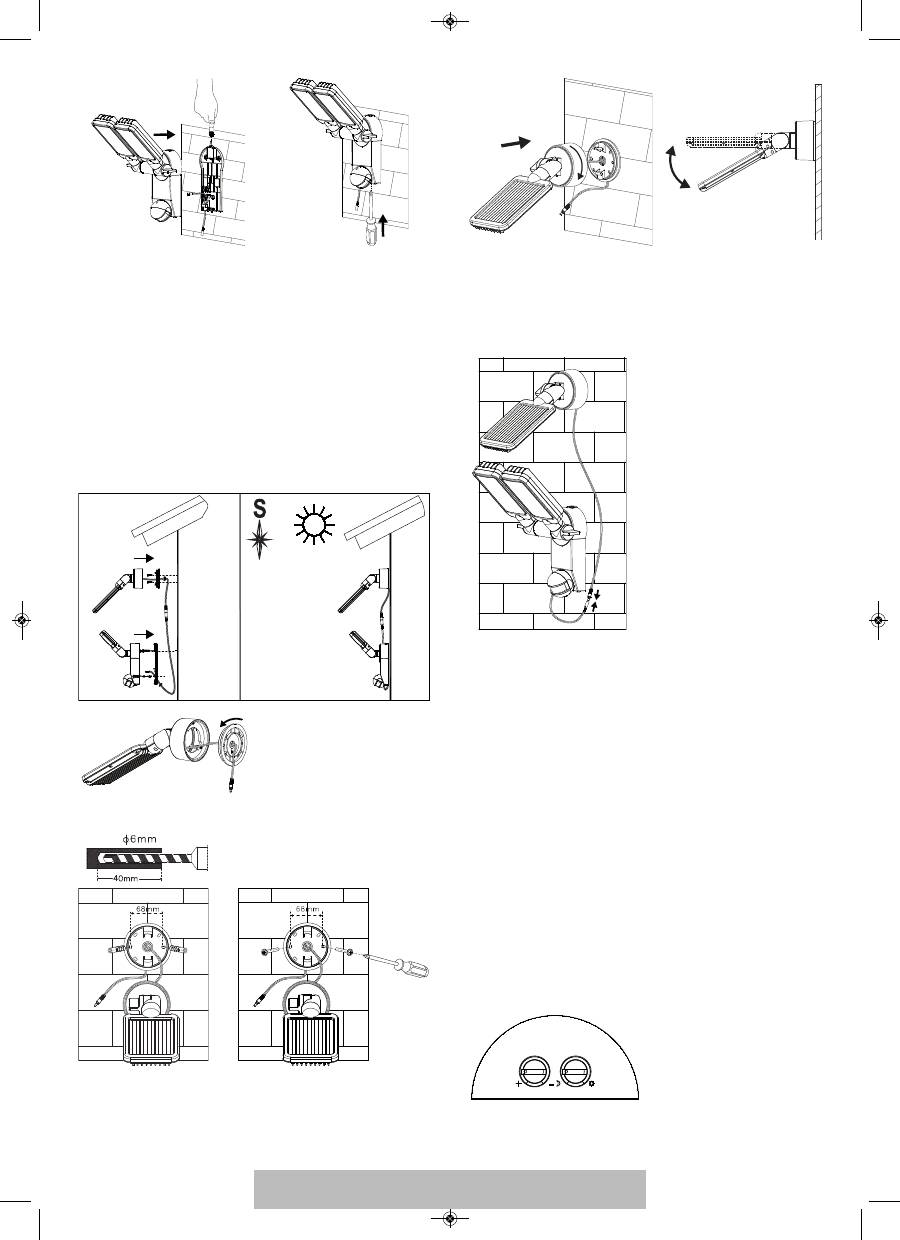
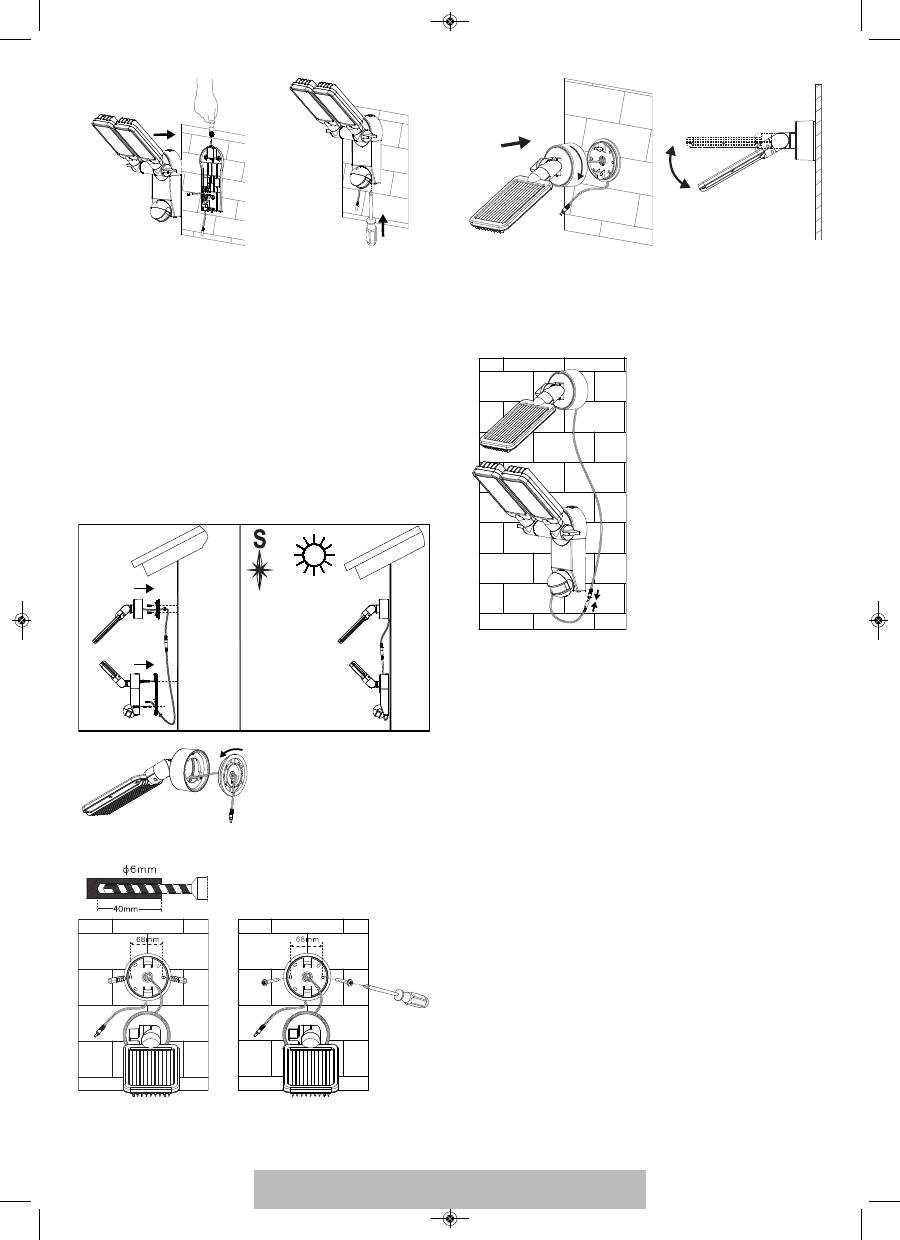
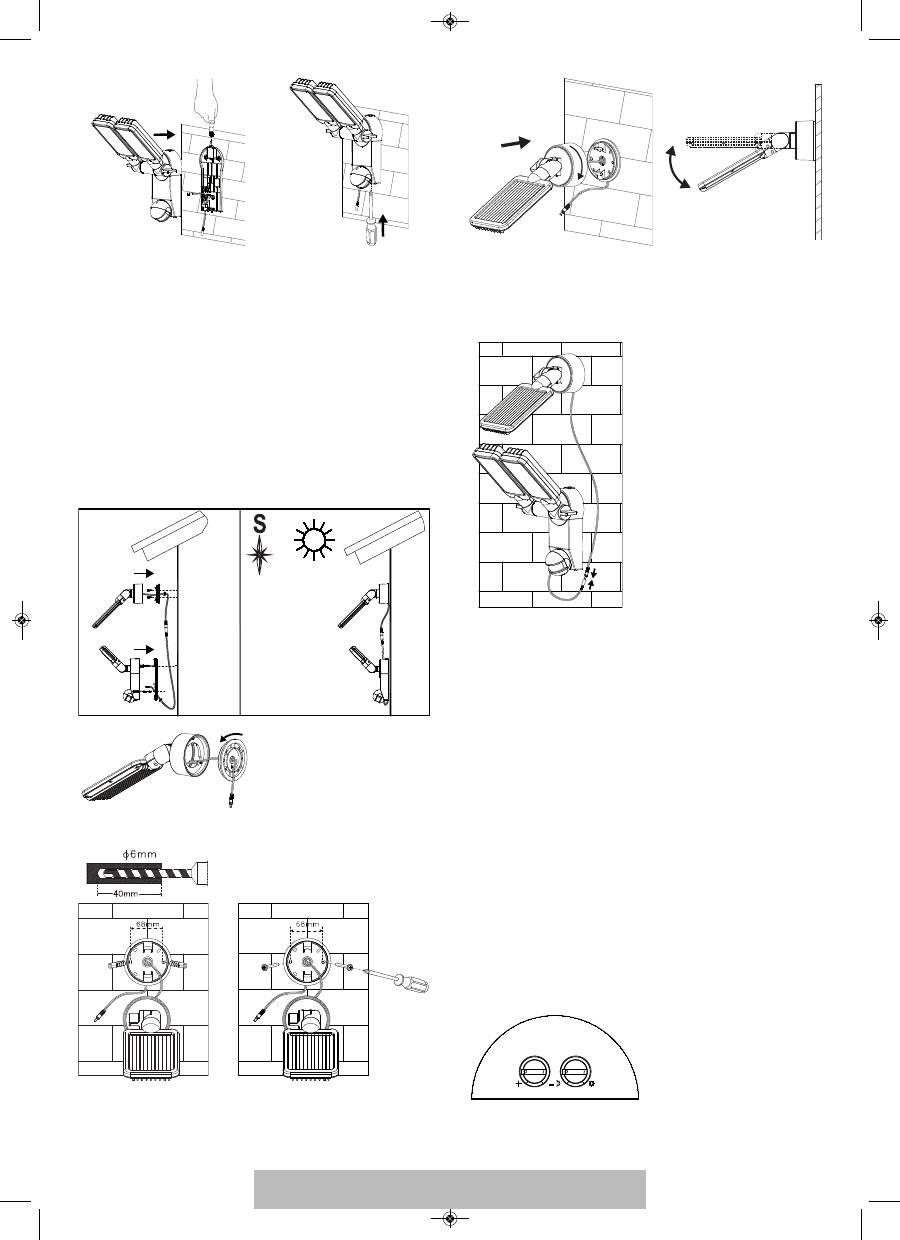
Montage:
•
Lösen Sie die Schraube (Bild 1) der Wandhalterung
•
Drücken Sie den Entriegelungsknopf auf der Oberseite
(Bild 2) und öffnen Sie das Gehäuse durch wegziehen der
Wandhalterung
•
Achten Sie darauf, dass bei der Bohrung der Montagelöcher
in der Wand bzw. beim Festschrauben keine vorhandenen
Kabel oder Leitungen beschädigt werden
Bild 1
Bild 2
Bild 3
Bild 4
Bild 5
2
INSTALLATIONS- UND BEDIENUNGSANLEITUNG
SOL SV0805 P1 IP 44, SOL LV0805 P1 IP44, SOL SV0805 P2 IP44,
SOL LV0805 P2 IP44, SOL SV1205 P2 IP44, SOL LV1205 P2 IP44
043413 SOL SH_LH Doppelstrahler 17.05.13 18:47 Seite 2

Bild 6
Bild 7
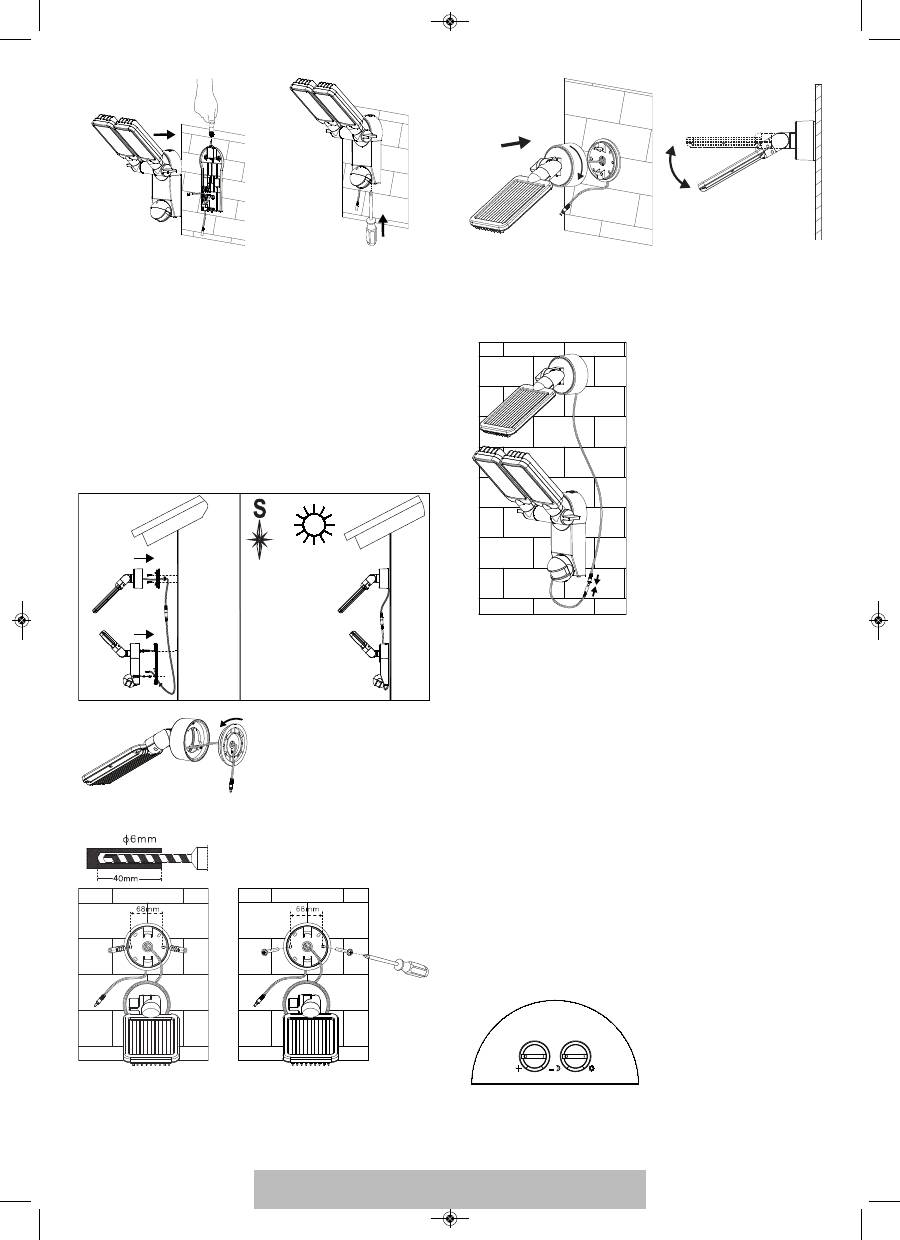
Solarmodul:
Das Solarmodul ist die Hauptstromquelle der Solarleuchte.
Es wandelt Sonnenlicht in Strom um und lädt den Akku auf.
Bitte bedenken Sie bei der Montage des Solarmoduls, dass die
Solarzelle möglichst DIREKTES SONNENLICHT benötigt. Je
länger die Solarzelle direktem Sonnenlicht ausgesetzt ist, desto
länger kann die Leuchte in Betrieb sein. Das Solarmodul sollte
möglichst nach Süden ausgerichtet sein, um eine direkte Son-
neneinstrahlung zu erreichen. Vermeiden Sie jegliche Art der
Beschattung. In Mitteleuropa wird ein Neigungswinkel von ca.
30° bis 40° empfohlen. Nutzen Sie die dem Paket beiliegenden
Schrauben (Pos. 3 der Teileliste), um das Solarmodul auf einem
festen Untergrund z.B. Mauerwerk zu montieren. Je nach
Untergrund sind passende Schrauben und Dübel zu verwenden.
Bild 8
Bild 9
Bild 10
3
Bild 11
Bild 12
Verlegen sie das nun das Kabel von der Solarzelle zur Haupt-
einheit und verbinden Sie das Kabel der Haupteinheit und der
Solarzelle über Stecker und Buchse miteinander.
EINSTELLUNG UND INBETRIEBNAHME
Nach der erfolgreichen Installation der Solarleuchte können
Sie das Gerät mit wenigen, einfachen Schritten einstellen.
Wichtig:
Vergewissern Sie sich, dass die Solarleuchte wie im
Abschnitt „Erstmaliges Aufladen der Solarleuchte“
beschrieben aufgeladen wurde, bevor die Leuchte
eingeschaltet wird.
An der Haupteinheit befindet sich ein Schalter mit zwei
Stellmöglichkeiten:
ON:
Stellung für Betrieb mit Bewegungsmelder.
OFF:
Schaltet die Funktion des Bewegungsmelders / LED-
Leuchte aus. Stellung für die Aufladung.
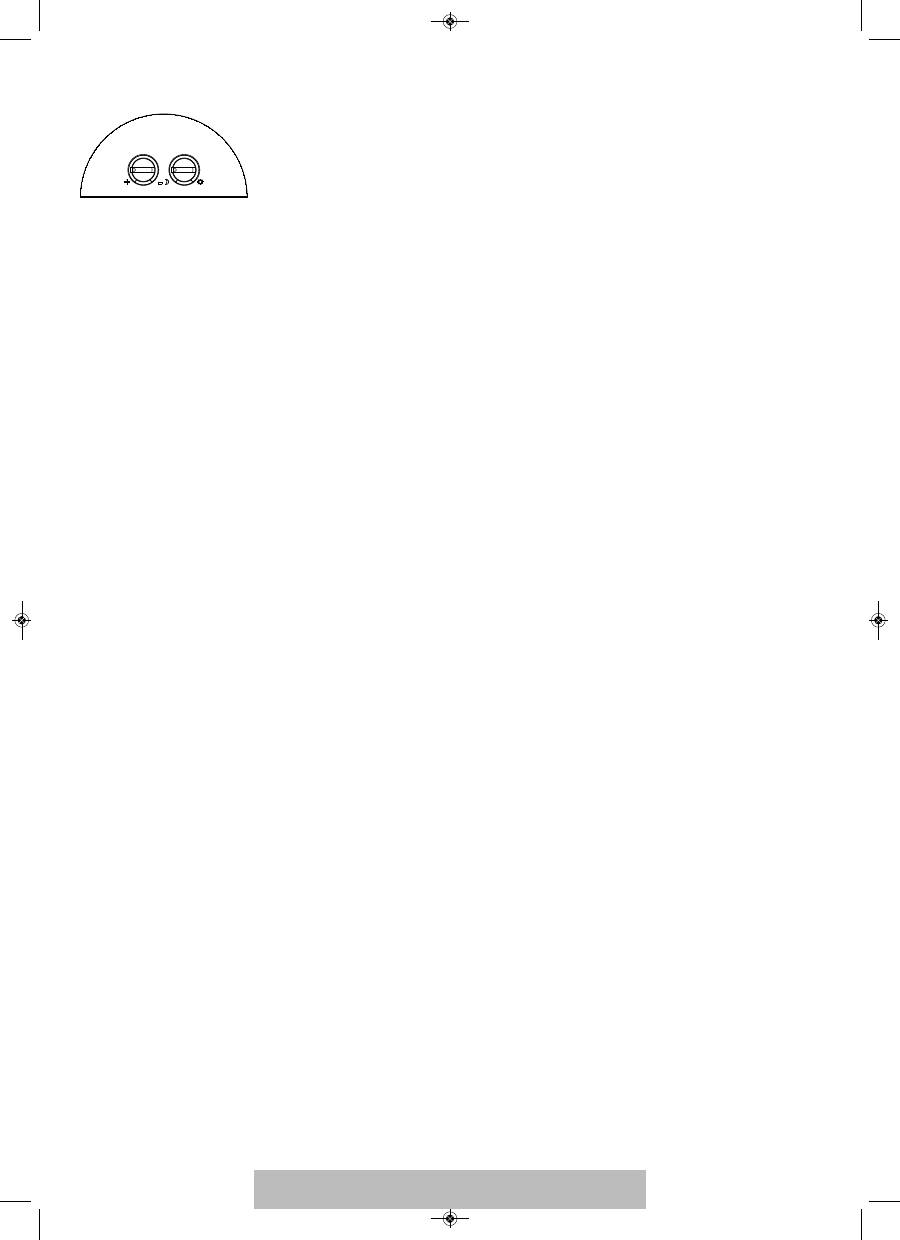
Einstellen des Bewegungsmelders
Stellen Sie den Schalter nach erfolgter Grundladung auf die
Position ON. Richten Sie den Bewegungsmelder in die
Richtung, aus der Sie Bewegungen erkennen wollen. Stellen Sie
den
-Regler an der Rückseite des Bewegungsmelders auf
„Minimum“ (-) und den LUX-Regler auf die Position „hell“ (
).
Testen Sie den Erfassungsbereich, indem Sie langsam um das
zu überwachende Gebiet gehen. Wenn die Solarleuchte nicht
wie gewünscht angeht, muss die Ausrichtung des Bewegungs-
melders angepasst werden.
043413 SOL SH_LH Doppelstrahler 17.05.13 18:47 Seite 3

Am Bewegungsmelder befinden sich zwei Regler:
(TIME) = Leuchtdauer: Sie können die Zeit, die die Leuchte
nach dem Erkennen einer Bewegung eingeschaltet bleibt, auf
einen Zeitraum zwischen ca. 10 Sekunden und 1 Minute einstel-
len. Drehen Sie den TIME-Regler in Richtung (+), um die
Leuchtdauer zu erhöhen bzw. in Richtung (-), um die
Leuchtdauer zu verringern.
Achtung:
Der eingestellte Zeitraum beginnt nach dem
Auslösen des Bewegungsmelders. Mit jeder nachfolgenden
Erkennung einer Bewegung beginnt dieser Zeitraum wieder
von vorn.
/
(LUX) = Ansprechempfindlichkeit: Mit dem LUX-Regler
kann die Umgebungshelligkeit eingestellt werden, bei der der
Betrieb aufgenommen wird. Damit wird vermieden, dass die
Leuchte bei Tageslicht zu leuchten beginnt. In der (
) Position
wird die Leuchte am Tag und nachts eingeschaltet, während sie
in der (
) Position nur nachts eingeschaltet wird. Sie können
die gewünschte Lichtstärke, bei der die Einheit ihren Betrieb
aufnimmt, mit dem LUX-Regler einstellen.
AUSTAUSCH DER AKKUS
Achtung:
Wenn Sie die Akkus wechseln, muss der Schalter an
der Leuchteinheit auf OFF stehen und der Stecker des
Solarmoduls von der Haupteinheit getrennt sein. Zum Ersetzen
der Akkus öffnen Sie das Gehäuse der Haupteinheit wie im
Abschnitt „Haupteinheit“ In Bild 1 und 2 beschrieben. Entfernen
Sie die Akkus aus der Halterung und ersetzen Sie die Akkus
gegen neue. Wenn möglich laden Sie die Akkus zuvor mit einem
handelsüblichen Ladegerät für 1,2 V AA Ni-MH Akkus auf. Ist die
Aufladung mit einem Ladegerät nicht möglich befolgen Sie
bitte den Abschnitt „ERSTMALIGES AUFLADEN DER
SOLARLEUCHTE“.
Setzen Sie das Gerät in umgekehrter Reihenfolge wieder
zusammen.
Achtung:
Beachten Sie beim Einlegen der Akkus unbedingt die
korrekte Polarität. Das Gerät und die Akkus könnten bei
falscher Polung Schaden nehmen.
ALLGEMEINE SICHERHEITSHINWEISE
1.
Verwenden Sie kein anderes Solarmodul als das mit ge lie -
fer te. Die Benutzung eines anderen Solarmoduls kann zu
Verletzungen oder zur Beschädigung der Leuchte und zum
Erlöschen der Garantie führen.
2. Verlegen Sie das Kabel so, dass es sicher befestigt ist und
keine Gefahr (z. B. Stolpergefahr) davon ausgehen kann.
Benutzen Sie die Solarleuchte nicht weiter, wenn das Kabel
beschädigt oder defekt ist.
REINIGUNG
Halten Sie den Bewegungsmelder frei von Staub und Ablage-
rungen, indem Sie ihn gelegentlich mit einem feuchten Tuch
abwischen. Verwenden Sie keine Chemikalien oder Scheuer -
mittel zum Reinigen des Gerätes. Stellen Sie zudem sicher, dass
das Solarmodul jederzeit frei von Schmutz und Ablagerungen
gehalten wird. Eine verunreinigte Solarzelle kann den Akku
nicht vollständig aufladen. Dies kann zur vorzeitigen Alterung
des Akkus und zu einer unzuverlässigen Funktion des Geräts
führen.
TIME
LUX
LAGERUNG
Folgen Sie diesen Schritten, falls Sie Ihre Leuchte mehr als
zwei oder drei Tage im Haus lagern möchten, um Schäden an
der Batterie zu vermeiden:
1.
Stellen Sie den Schalter in die OFF-Position.
2. Lagern Sie die Leuchte und das Solarmodul dort, wo diese
täglich Sonnenlicht oder Raumlicht erhalten können.
Der Akku braucht Licht, um die Aufladung während der
Lagerung zu erhalten.
3. Während einer längeren Lagerung muss die Einheit alle vier
Monate voll aufgeladen werden. Um die volle Leistungsfä-
higkeit zu erhalten, lagern Sie sie nicht über längere Zeit-
räume.
BETRIEBSSTÖRUNGEN
(STÖRUNG / URSACHE
➔
ABHILFE)
Leuchte schaltet sich bei Bewegungen im Überwachungs -
bereich nicht ein.
Mögliche Lösungen:
Stellen Sie sicher, dass:
- Der Schalter in der Position „ON“ ist.
- Der LUX-Regler nicht zu weit in Richtung (
) eingestellt ist.
- Der Bewegungsmelder so eingestellt ist, dass Bewegungen
erfasst werden können.
- Die Solarzelle so ausgerichtet ist, dass sie tagsüber möglichst
viel direktes Sonnenlicht erhält.
- Die Ladung des Akkus nicht zu niedrig ist (über 3-4 Sonnen-
tage aufladen, mit Schalter auf OFF).
Leuchte schaltet sich während des Tages ein.
Mögliche Lösungen:
Stellen Sie sicher, dass der LUX-Regler nicht zu weit in
Richtung (
) eingestellt ist.
Für weitere Informationen empfehlen wir den Bereich
Service/FAQ’s auf unserer Homepage www.brennenstuhl.com.
TECHNISCHE DATEN:
Akku:
SOL SV0805 P1 IP44, SOL LV0805 P1 IP44,
SOL SV0805 P2 IP44, SOL LV0805 P2 IP44:
3 x 1,2 V / 2200 mAh Ni-MH wiederaufladbare Batterien
SOL SV1205 P2 IP44, SOL LV1205 P2 IP44:
3 x 1,2 V / 2500 mAh Ni-MH wiederaufladbare Batterien
Solarmodul:
SOL SV0805 P1 IP44, SOL LV0805 P1 IP44:
190 x 115 mm
SOL SV0805 P2 IP44, SOL LV0805 P2 IP44,
SOL SV1205 P2 IP44, SOL LV1205 P2 IP44:
220 x 190 mm
Anzahl LEDs:
SOL SV0805 P1 IP44, SOL LV0805 P1 IP44,
SOL SV0805 P2 IP44, SOL LV0805 P2 IP44:
8 x 0,5 W
SOL SV1205 P2 IP44, SOL LV1205 P2 IP44:
12 x 0,5 W
Leuchtdauer:
einstellbar von ca. 10 Sekunden
bis 1 Minute
Überwachungswinkel:
180º horizontal
Reichweite:
max. 10 Meter
Ansprechempfindlichkeit:
einstellbar von Tageslicht bis Nacht
Schutzart:
IP44
Umgebungstemperatur:
-15 °C - +45 °C
4
043413 SOL SH_LH Doppelstrahler 17.05.13 18:47 Seite 4

ENTSORGUNG
Elektrogeräte umweltgerecht entsorgen!
Elektrogeräte gehören nicht in den Hausmüll.
Gemäß Europäischer Richtlinie 2012/19/EU über Elektro-
und Elektronikaltgeräte müssen verbrauchte Elektrogeräte
getrennt gesammelt und einer umwelt gerechten Wiederver-
wertung zugeführt werden. Möglichkeiten zur Entsorgung des
ausgedienten Geräts erfahren Sie bei Ihrer Gemeinde- oder
Stadtverwaltung.
Umweltschäden durch falsche Entsorgung der Batterien
und Akkus!
Batterien und Akkus gehören nicht in den Hausmüll. Sie
können giftige Schwermetalle enthalten und unterliegen der
Sondermüllbehandlung. Geben Sie deshalb verbrauchte
Batterien bei einer kommunalen Sammelstelle ab.
5
043413 SOL SH_LH Doppelstrahler 17.05.13 18:47 Seite 5

6
We'd like to thank you for purchasing this product.
Please familiarise yourself with the product before using it for
the first time. Read the following instructions and safety notes
carefully. Use the device as described and for the specified
purposes only.
Do not throw away these instructions. Include all
documentation if giving the device to a third party.
PARTS LIST
1
Solar panel mounting bracket
2 Solar panel connection cable
3 Solar module mounting screws and main unit mounting
screws (5x)
4 Solar module
5 Main unit
6 LED unit
7 Motion detector
8 ON / OFF switch
9 Light ON time adjustment knob
10 Sensitivity adjustment knob
CHARGING THE SOLAR LIGHT FOR THE FIRST TIME
Before you can use your solar light it must be charged using
the solar module.
Connect the solar module cable with the main unit.
The ON / OFF switch on the main unit must be set to OFF.
Put the solar module in a location where it will get maximum
exposure to direct sunlight. Refer to the notes on suitable
installation locations in the following section.
Depending on the season, the weather and the location of the
solar module charging may take up to 4 days before the light is
ready for use.
SUITABLE LOCATIONS FOR INSTALLING THE SOLAR
LIGHT AND THE SOLAR MODULE
Main Unit:
The main unit contains the light, the motion detector and the
batteries. Please note when installing the main unit that the
monitoring range of the motion detector is a maximum of 180º
within an 10-metre range, depending on installation height.
Use the screws included in the package (item 3 on the parts
list) for installing the light on a firm surface, such as a wall. Use
screws and screw anchors that are suitable for the installation
surface.
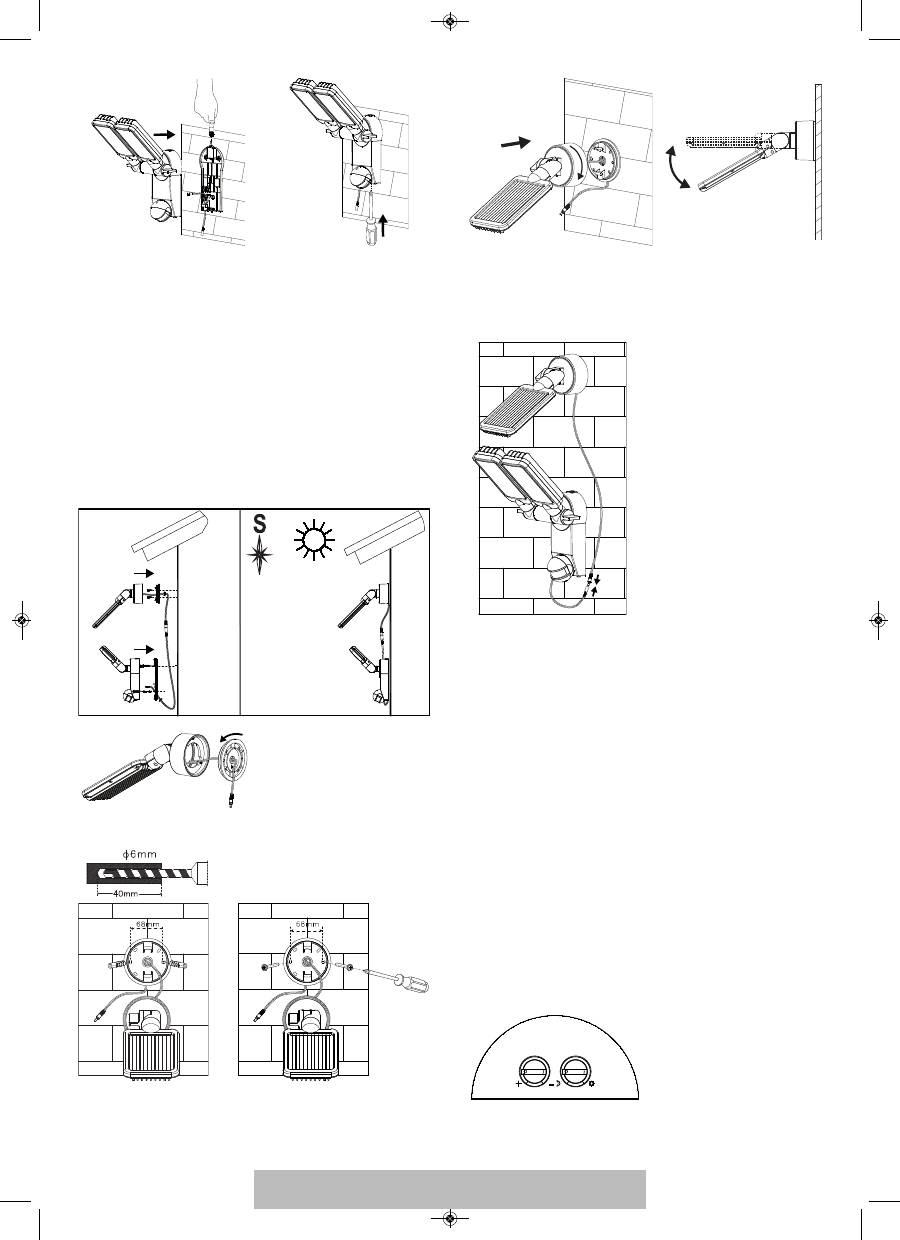
Installation:
• Loosen the screw (Fig. 1) of the wall bracket
• Press the release button on the top side (Fig. 2) and open
the cover by pulling the wall bracket
• Avoid damaging existing cables or wires when drilling
mounting holes in the wall or when tightening the screws
Fig. 1
Fig. 2
Fig. 3
Fig. 4
Fig. 5
INSTRUCTIONS FOR INSTALLATION AND USE
SOL SV0805 P1 IP 44, SOL LV0805 P1 IP44, SOL SV0805 P2 IP44,
SOL LV0805 P2 IP44, SOL SV1205 P2 IP44, SOL LV1205 P2 IP44
043413 SOL SH_LH Doppelstrahler 17.05.13 18:47 Seite 6
7
Fig. 6
Fig. 7
Solar Module:
The solar module is the main power source of the solar light. It
converts sunlight into electricity and charges the batteries.
Please keep in mind when installing the solar module that the
photovoltaic cell works best in DIRECT SUNLIGHT. The longer
the photovoltaic cell is exposed to direct sunlight, the longer
the light can be used. Ideally, the solar module should face
south in order to capture direct solar radiation. Avoid shade of
any kind. For Central Europe, we recommend an angle of
approx. 30º - 40º. Use the screws included in the package
(item 3 of the parts list) to install the solar module on a firm
surface, such as a wall. Use screws and screw anchors that are
suitable for the installation surface.
Fig. 8
Fig. 9
Fig. 10
Fig. 11
Fig. 12
Position the cable between the photovoltaic cell and the main
unit and connect the cable of the main unit with that of the
photovoltaic cell by connecting the plug and the socket.
ADJUSTMENT AND INITIAL OPERATION
After successful installation of the solar light the device can be
adjusted in a few simple steps.
Important:
Make sure the solar light has been charged as described
under "Charging the Solar Light for the First Time" before
the light is switched on.
The main unit features a switch with two settings:
ON:
Setting used with the motion detector.
OFF:
Switches off the motion detector feature / LED light.
Setting used for charging.
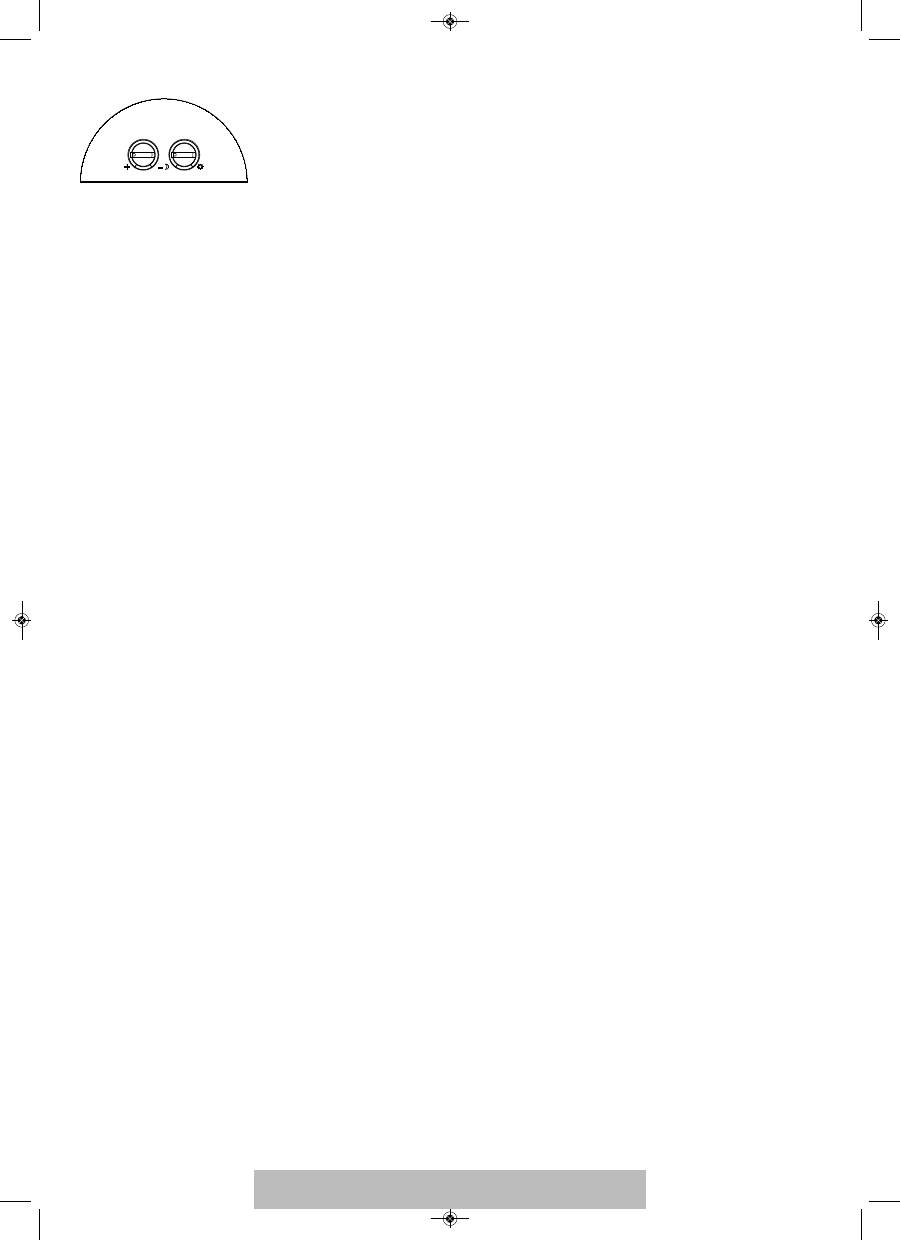
Adjusting the Motion Detector
Switch the button to the ON position after initial charging has
been completed. Point the motion detector in the direction you
wish to monitor. Set the
adjustment knob on the back side of
the motion detector to "Minimum" (-) and the LUX adjustment
knob to "Light" (
). Test the detection range by slowly circling
the area to be monitored. If the solar light does not light up as
desired the angle of the motion detector must be adjusted.
The motion detector has two adjustment knobs:
(TIME) = light ON time: The length of time the light remains
on after a movement has been detected can be adjusted to
anywhere between approx. 10 seconds and 1 minute. Turn the
TIME
LUX
043413 SOL SH_LH Doppelstrahler 17.05.13 18:47 Seite 7
8
TIME knob towards the (+) sign to increase the light ON time or
towards the (-) sign to decrease the light ON time.
Please note:
The selected cycle will start after the motion
detector has been triggered. The cycle starts over with each
subsequent detection.
/
(LUX) = Sensitivity: The LUX adjustment knob can be used
to adjust the amount of ambient light required for the device to
switch on. This helps to prevent the light from switching on
during daylight hours. In the (
) position the light switches on
during the day and at night, whereas in the (
) position it only
comes on at night. The desired ambient light at which the unit
starts operating can be adjusted with the LUX adjustment knob.
REPLACING THE BATTERY
Please note:
Before replacing the battery the switch on the
lamp unit must be set to OFF and the solar module must be dis-
connected from the main unit. To replace the battery, open the
cover of the main unit as described in Fig. 1 and 2 in the section
"Main Unit". Remove the old batteries from the holder and
insert new ones If possible, charge the rechargeable batteries
first using a standard charger for 1.2 V AA NiMH batteries.
If unable to charge the batteries with a charger please follow
the instructions in the section "CHARGING THE SOLAR LIGHT
FOR THE FIRST TIME".
Reverse the instructions to re-assemble the device.
Please note:
Pay attention to correct polarity when inserting
the batteries. Incorrect polarity may damage the device and
the batteries.
GENERAL SAFETY NOTES
1. Only use the solar module included in the delivery. Using a
different solar module may result in injuries or damage to
the light and may void the warranty.
2. When installing the cable make sure it is fastened securely
and does not pose a hazard (e.g., tripping hazard). Stop
using the solar light if the cable is damaged or defective.
CLEANING
Keep the motion detector free from dust and deposits by
wiping it with a damp cloth from time to time. Do not use
chemicals or abrasives to clean the device. Keep the solar
module free from dirt and deposits. A dirty photovoltaic cell is
unable to fully charge the batteries. This may reduce the life of
the battery and result in an unreliable device.
STORAGE
To avoid damaging the batteries, follow these steps to store
your light inside the house for longer than two or three days:
1. Turn the switch to the OFF position.
2. Store the light and the solar module in a location where they
will be exposed to sunlight or ambient light every day. The
rechargeable batteries require light in order to stay charged
during storage.
3. If storing the unit for an extended period it must be fully
charged every four months. Avoid long storage times to
maintain performance.
MALFUNCTIONS
(FAILURE / CAUSE
➔
REMEDY)
The light doesn't turn on when there is movement within the
monitoring range.
Possible Solutions:
Make sure that:
-
The switch is in the ON position.
-
The LUX adjustment knob is not turned too far towards (
)
-
The motion detector is set at the correct angle for detecting
movement.
-
The photovoltaic cell is aligned to receive as much direct
sunlight as possible during the day.
-
The battery charge is not too low (charge over 3-4 sunny
days with the switch set to OFF).
The light turns on during the day.
Possible Solutions:
-
Make sure the LUX adjustment knob is not turned too far
towards (
).
More information can be found in the Service/FAQ section on
our homepage, www.brennenstuhl.com.
SPECIFICATIONS:
Batteries:
SOL SV0805 P1 IP44, SOL LV0805 P1 IP44,
SOL SV0805 P2 IP44, SOL LV0805 P2 IP44:
3 x 1.2 V / 2200 mAh Ni-MH rechargeable batteries
SOL SV1205 P2 IP44, SOL LV1205 P2 IP44:
3 x 1.2 V / 2500 mAh Ni-MH rechargeable batteries
Solar Module:
SOL SV0805 P1 IP44, SOL LV0805 P1 IP44:
190 x 115 mm
SOL SV0805 P2 IP44, SOL LV0805 P2 IP44,
SOL SV1205 P2 IP44, SOL LV1205 P2 IP44:
220 x 190 mm
Number of LEDs:
SOL SV0805 P1 IP44, SOL LV0805 P1 IP44,
SOL SV0805 P2 IP44, SOL LV0805 P2 IP44:
8 x 0.5 W
SOL SV1205 P2 IP44, SOL LV1205 P2 IP44:
12 x 0.5 W
adjustable:
from approx. 10 seconds to 1 minute
Sensing angle:
180º horizontal
Range:
max. 10 metres
Sensitivity:
adjustable from daylight to night
Type of protection:
IP44
Ambient temperature:
-15 °C - +45 °C
DISPOSAL
Dispose of electrical devices in an environmentally
responsible manner! Do not dispose of electrical
devices with household rubbish.
In accordance with Directive 2012/19/EU on waste electrical
and electronic equipment, used electrical equipment must be
collected separately and reused or recycled in an environmen-
tally responsible manner. Please contact your local authorities
for available disposal options for your worn-out device.
Improper disposal of batteries and rechargeable batteries
damages the environment!
Batteries and rechargeable batteries do not belong in the
household rubbish. They may contain toxic heavy metals and
must be treated as hazardous waste. Please take your used
batteries to a community collection centre.
043413 SOL SH_LH Doppelstrahler 17.05.13 18:47 Seite 8
9
Merci d'avoir décidé d’acheter ce produit.
Familiarisez-vous avec le produit avant la première mise en
service. Pour cela, lisez attentivement le mode d’emploi ci-après
et les indications de sécurité. Utilisez l’appareil uniquement
comme décrit et pour les domaines d’intervention indiqués.
Conservez ce mode d’emploi. Remettez tous les documents aussi
en même temps que l’appareil en cas de transmission à un tiers.
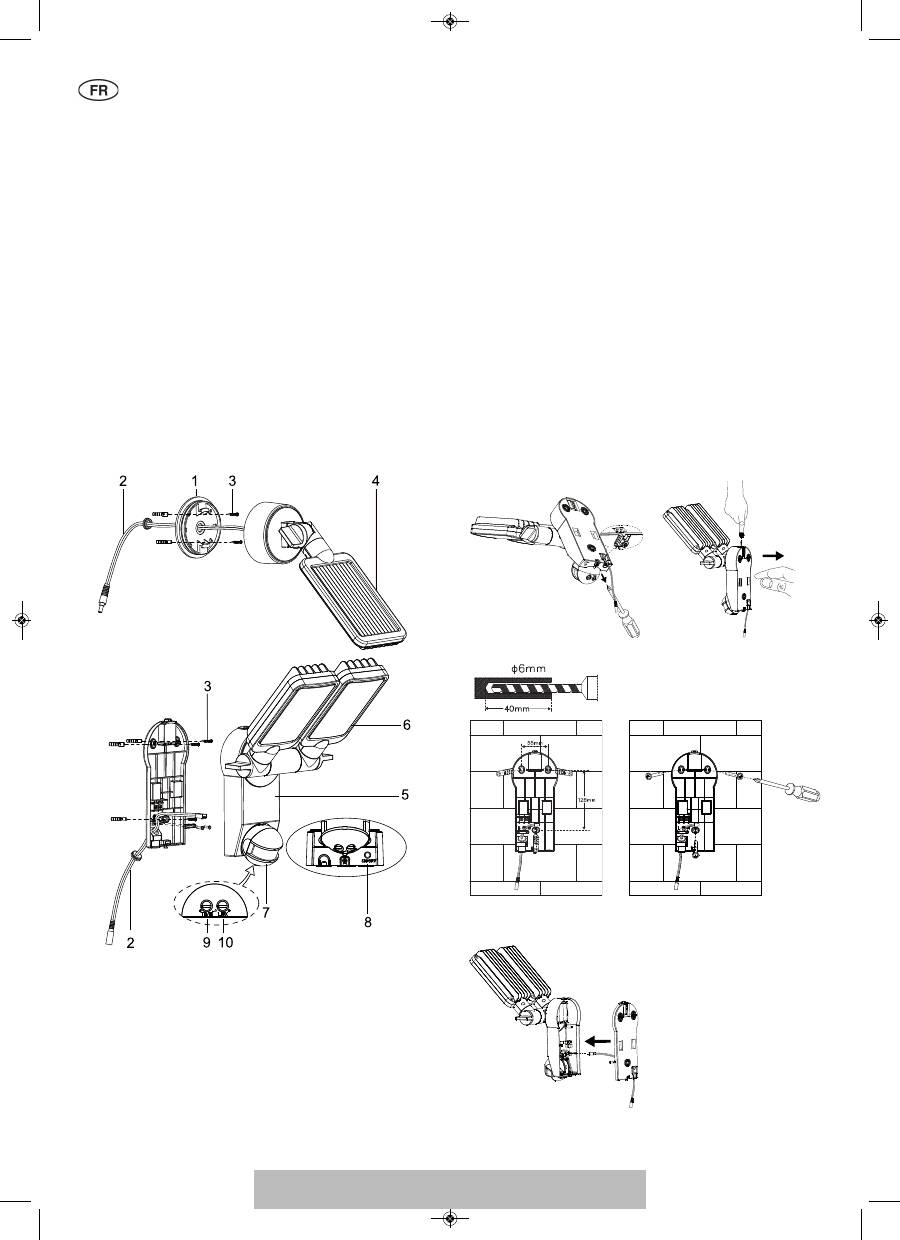
LISTE DES PIÈCES
1
Support du panneau solaire
2
Câble de liaison du panneau solaire
3
Vis de montage pour le module solaire et de l’unité
principale (5x)
4
Module solaire
5
Unité principale
6
Unité à LED
7
Détecteur de mouvements
8
Interrupteur ON/OFF
9
Régulateur de la durée d’éclairage
10 Régulateur de la sensibilité de réponse
PREMIER CHARGEMENT DE LA LAMPE SOLAIRE
Avant de mettre la lampe solaire en service, celle-ci doit être
d’abord chargée par l’intermédiaire du module solaire.
Connectez le câble du module solaire à l’unité principale.
L’interrupteur ON/OFF de l’unité principale doit être réglé sur
OFF. Placez le module solaire à un endroit où il sera soumis le
plus longtemps possible à la lumière solaire directe. Veuillez
respecter aussi les indications relatives aux lieux de montage
appropriés mentionnées dans le paragraphe suivant.
En fonction de la saison, des intempéries et de la position du
module solaire, le chargement peut durer jusqu’à 4 jours avant
que la lampe ne puisse être mise en service.
LIEUX DE MONTAGE APPROPRIÉS POUR LA LAMPE
SOLAIRE ET LE MODULE SOLAIRE
Unité principale :
L’unité principale contient la lampe, le détecteur de mouve-
ments et l’accumulateur. Quand vous montez l’unité principale,
prenez en considération qu’en fonction de la hauteur de mon-
tage, la zone de surveillance du détecteur de mouvements
s’élève à max. 180° pour une portée de max. 10 mètres.
Pour le montage sur une base stable (par exemple : maçonne-
rie), utilisez les vis fournies dans le paquet (pos. 3 de la liste
des pièces). En fonction de la base, utiliser des vis et des
chevilles adaptées.
Montage :
• Desserrez la vis (image 1) du support mural
• Appuyez sur le bouton de déverrouillage situé sur la
partie supérieure (image 2) et ouvrez le corps en tirant le
support mural
• Lors du perçage des trous de montage dans le mur ou lors
du serrage ferme, veillez à éviter tout endommagement de
câbles ou de fils existants
Image 1
Image 2
Image 3
Image 4
Image 5
MODE D’INSTALLATION ET D’EMPLOI
SOL SV0805 P1 IP 44, SOL LV0805 P1 IP44, SOL SV0805 P2 IP44,
SOL LV0805 P2 IP44, SOL SV1205 P2 IP44, SOL LV1205 P2 IP44
043413 SOL SH_LH Doppelstrahler 17.05.13 18:47 Seite 9
10
Image 6
Image 7
Module solaire :
Le module solaire est la principale source de courant de la
lampe solaire. Il transforme la lumière solaire en courant et
charge l’accumulateur. Lors du montage du module solaire,
veuillez prendre en considération que la cellule solaire requiert
la lumière solaire la plus directe possible. Plus l’exposition de la
cellule solaire à la lumière solaire est longue, plus le fonction-
nement de la lampe sera long. Le module solaire doit être
orienté le plus possible en direction du sud pour obtenir un
ensoleillement direct. Evitez toute forme d’ombrage. En Europe
centrale, l’angle d’inclinaison recommandé est d’environ 30° à
40°. Utilisez les vis fournies dans le paquet (pos. 3 de la liste
des pièces), pour monter le module solaire sur une base solide,
de la maçonnerie, par exemple. En fonction de la base, utiliser
des vis et des chevilles adaptées.
Image 8
Image 9
Image 10
Image 11
Image 12
Posez maintenant le câble reliant la cellule solaire et l’unité
principale et connectez ensemble le câble de l’unité principale
et de la cellule solaire par l’intermédiaire du connecteur et de
la douille.
RÉGLAGE ET MISE EN SERVICE
Après avoir réussi l’installation de la lampe solaire, vous
pouvez régler l’appareil en quelques étapes simples.
Important :
Avant d’allumer la lampe solaire, assurez-vous qu’elle a été
chargée comme décrit au paragraphe « Premier
chargement de la lampe solaire ».
L'unité principale comprend un interrupteur pourvu de deux
réglages possibles :
ON :
Réglage pour le fonctionnement du détecteur de
mouvement.
OFF :
Désactive le fonctionnement du détecteur de
mouvements / lampe à LED. Réglage pour le chargement.
Réglage du détecteur de mouvement
Après le chargement complet,
réglez l’interrupteur sur la position ON. Orientez le détecteur
de mouvements dans la direction, dans laquelle vous souhaitez
reconnaître les mouvements. Réglez le régulateur
situé au
dos du détecteur de mouvements sur « minimum » (-) et le
régulateur LUX sur la position « clair » (
). Testez la zone de
saisie en marchant lentement autour de la zone à surveiller.
Si la lampe solaire ne s’allume pas comme souhaité, adapter
l’orientation du détecteur de mouvement.
043413 SOL SH_LH Doppelstrahler 17.05.13 18:47 Seite 10
11
Le détecteur de mouvements comporte deux régulateurs :
(TIME) = durée d’éclairage : vous pouvez régler la durée,
pendant laquelle la lampe reste allumée après la reconnais-
sance d’un mouvement, sur une période comprise entre env.
10 secondes et 1 minute. Tournez le régulateur TIME dans le
sens (+), pour augmenter la durée d'éclairage ou dans le sens
(-) pour réduire la durée d’éclairage.
Attention :
la durée réglée commence après le déclenchement
du détecteur de mouvement. Cette période recommence depuis
le début à chaque reconnaissance de mouvements suivante.
/
(LUX) = sensibilité de réponse : le régulateur LUX permet
de régler la luminosité ambiante qui active le fonctionnement.
Il est ainsi évité que la lampe commence à s’allumer à la lu-
mière du jour. En position (
), la lampe s’allume de jour et de
nuit, alors qu’en position (
), elle ne s’allume que de nuit.
Vous pouvez régler l’intensité de lumière souhaitée, par
laquelle l’unité se met en marche, à l'aide du régulateur LUX.
REMPLACEMENT DE L’ACCUMULATEUR
Attention :
quand vous remplacez l’accumulateur, l’interrup-
teur situé sur l’unité d’éclairage doit être sur OFF et le connec-
teur du module solaire doit être séparé de l’unité principale.
Pour remplacer l’accumulateur, ouvrez le corps de l’unité
principale comme décrit sur l’image 1 et 2 au paragraphe
« Unité principale ». Retirez les accumulateurs du support et
remplacez-les par des nouveaux. Si possible, chargez les
accumulateurs au préalable à l’aide d’un chargeur disponible
sur le marché pour les accumulateurs 1,2 V NiMH AA. Si le
chargement n’est pas possible avec un chargeur, veuillez suivre
le paragraphe « Premier chargement de la lampe solaire ».
Remontez l’appareil dans l’ordre inverse.
Attention :
Lors de l’insertion des accumulateurs, respectez
absolument la bonne polarité. L’appareil et les accumulateurs
pourraient être endommagés en cas de polarité incorrecte.
INDICATIONS GÉNÉRALES DE SÉCURITÉ
1. N’utilisez aucun autre module solaire que celui qui vous a
été livré. L’utilisation d’un autre module solaire peut
entraîner des blessures ou l’endommagement de la lampe et
l’expiration de la garantie.
2. Posez le câble de telle manière qu'il soit bien fixé et ne
puisse générer aucun risque (par exemple : risque de
trébucher). Cessez d’utiliser la lampe solaire si le câble est
endommagé ou défectueux.
NETTOYAGE
Gardez le détecteur de mouvements exempt de poussière et de
dépôts en le nettoyant à l’occasion avec un chiffon humide.
N’utilisez aucun produit chimique ou abrasif pour nettoyer l’ap-
pareil. De plus, assurez-vous que le module solaire soit à tout
moment exempt de poussière et de dépôts. Une cellule solaire
contaminée ne peut pas charger complètement l’accumulateur.
Ceci peut entraîner un vieillissement précoce de l’accumula-
teur et un fonctionnement non fiable de l’appareil.
TIME
LUX
STOCKAGE
Suivez ces étapes si vous souhaitez entreposer votre lampe à
la maison pendant plus de deux ou trois jours pour éviter
l’endommagement de la batterie :
1. Réglez l’interrupteur dans la position OFF.
2. Entreposez la lampe et le module solaire là où ils peuvent
recevoir quotidiennement la lumière solaire ou la lumière de
la pièce. L’accumulateur a besoin de lumière pour préserver
le chargement pendant le stockage.
3. Pendant un stockage plus long, l’unité doit être chargée
complètement tous les quatre mois. Pour préserver toute la
capacité de rendement, ne l'entreposez pas pendant de
longues périodes.
DYSFONCTIONNEMENTS
(TROUBLE / CAUSE
➔
REMÈDE)
La lampe ne s’allume pas en cas de mouvements dans la zone
de surveillance.
Solutions possibles :
Assurez-vous que :
-
L’interrupteur est sur « ON ».
-
Le régulateur LUX n’est pas réglé trop loin dans le sens (
).
-
Le détecteur de mouvements est réglé de telle manière à
pouvoir capter les mouvements.
-
La cellule solaire est orientée de telle manière à recevoir
quotidiennement le plus possible de lumière solaire directe.
-
La charge de l’accumulateur est trop faible (charger
pendant 3 à 4 jours, avec l’interrupteur sur OFF).
La lampe s’allume pendant la journée.
Solutions possibles :
Assurez-vous que le régulateur LUX n’est pas réglé trop loin
dans le sens (
).
Pour de plus amples informations, nous vous recommandons
de consulter le domaine Service/FAQ sur notre page internet :
www.brennenstuhl.com.
CARACTÉRISTIQUES TECHNIQUES :
Accumulateur :
SOL SV0805 P1 IP44, SOL LV0805 P1 IP44,
SOL SV0805 P2 IP44, SOL LV0805 P2 IP44:
3 x 1,2 V / 2200 mAh Ni-MH piles rechargeables
SOL SV1205 P2 IP44, SOL LV1205 P2 IP44:
3 x 1,2 V / 2500 mAh Ni-MH piles rechargeables
Module solaire :
SOL SV0805 P1 IP44, SOL LV0805 P1 IP44:
190 x 115 mm
SOL SV0805 P2 IP44, SOL LV0805 P2 IP44,
SOL SV1205 P2 IP44, SOL LV1205 P2 IP44:
220 x 190 mm
Nombre de LED :
SOL SV0805 P1 IP44, SOL LV0805 P1 IP44,
SOL SV0805 P2 IP44, SOL LV0805 P2 IP44:
8 x 0,5 W
SOL SV1205 P2 IP44, SOL LV1205 P2 IP44:
12 x 0,5 W
Durée d’éclairage :
réglable entre env. 10 secondes
et 1 minute
Angle de surveillance :
180º horizontal
Portée :
max. 10 mètres
Sensibilité de réponse :
réglable de la lumière du jour
jusqu’à la nuit
Type de protection :
IP44
Température ambiante :
-15 °C - +45 °C
043413 SOL SH_LH Doppelstrahler 17.05.13 18:47 Seite 11

ELIMINATION DES DÉCHETS
Jetez les appareils électriques conformément aux
impératifs écologiques ! Ne jetez pas les appareils
électriques dans les ordures ménagères.
Conformément à la directive européenne 2012/19/UE sur les
vieux appareils électriques et électroniques, les appareils élec-
triques usés doivent être collectés séparément et transportés
dans un centre de recyclage conforme aux impératifs écolo-
giques. Vous obtiendrez des informations sur les possibilités
d’élimination de l’appareil usé auprès de l’administration de
votre commune ou municipalité.
Une mauvaise élimination des piles et des accumulateurs
peut entraîner des dommages environnementaux !
Ne jetez pas les piles et les accumulateurs dans les ordures
ménagères. Ils peuvent contenir des métaux lourds toxiques et
sont soumis au traitement spécial des ordures. Par consé-
quent, remettez les piles usagées auprès d'un centre de
collecte communal.
12
043413 SOL SH_LH Doppelstrahler 17.05.13 18:47 Seite 12

13
Hartelijk dank voor de aankoop van dit product.
Maak eerst kennis met het product voordat u het in gebruik
neemt. Lees hierbij de volgende bedieningshandleiding en
veiligheidsvoorschriften zorgvuldig door. Gebruik het apparaat
alleen volgens de beschrijving en voor de aangegeven
gebruiksmogelijkheden.
Bewaar deze handleiding. Overhandig alle documenten als u
deze doorgeeft aan derden.
ONDERDELENLIJST
1
Houder zonnepaneel
2
Aansluitkabel zonnepaneel
3
Montageschroeven voor zonnemodule, hoofdeenhei (5x)
4
Zonnemodule
5
Hoofdeenheid
6
LED-eenheid
7
Bewegingsmelder
8
ON/OFF-schakelaar
9
Regelaar brandduur
10 Regelaar reactiegevoeligheid
EERSTE KEER OPLADEN VAN DE ZONNELAMP
Voordat u de zonnelamp in gebruik neemt, moet deze eerst via
de zonnemodule worden opgeladen.
Sluit de kabel van de zonnemodule op de hoofdeenheid aan.
De ON/OFF-schakelaar moet op OFF zijn ingesteld. Plaats de
zonnemodule op een plek waar deze zo lang mogelijk door di-
rect zonlicht wordt bestraald. Neem in de volgende paragraaf
de aanwijzingen voor geschikte montageplaatsen in acht.
Afhankelijk van jaargetijde, weersomstandigheden en positie
van de zonnemodule kan het opladen maximaal 4 dagen duren
voordat de lamp in gebruik kan worden genomen.
GESCHIKTE MONTAGEPLAATSEN VOOR ZONNELAMP EN
ZONNEMODULE
Hoofdeenheid:
Deze hoofdeenheid bevat de lamp, de bewegingsmelder en de
accu. Houd er rekening dat bij het monteren van de hoofdeen-
heid het detectiegebied max 180° bedraagt, bij een reikwijdte
van max. 10 meter.
Voor montage op een stabiele ondergrond, zoals bijv. metsel-
werk, heeft in het pakket meegeleverde schroeven (nr. 3 van de
onderdelenlijst) nodig. Afhankelijk van de ondergrond moeten
geschikte schroeven en pluggen worden gebruikt.
Montage:
• Verwijder de schroeven (afb. 1) van de wandhouder
• Druk op de ontgrendelingsknop aan de bovenzijde (afb. 2)
en open de behuizing door aan de wandhouder te trekken
• Let op dat bij het boren van montagegaten in de muur, ofwel
bij het vastschroeven, geen aanwezige kabels of leidingen
worden beschadigd
Afb. 1
Afb. 2
Afb. 3
Afb. 4
Afb. 5
INSTALLATIE- EN BEDIENINGSHANDLEIDING
SOL SV0805 P1 IP 44, SOL LV0805 P1 IP44, SOL SV0805 P2 IP44,
SOL LV0805 P2 IP44, SOL SV1205 P2 IP44, SOL LV1205 P2 IP44
043413 SOL SH_LH Doppelstrahler 17.05.13 18:47 Seite 13
14
Afb. 6
Afb. 7
Zonnemodule:
De zonnemodule is de hoofdstroomvoorziening van de zonne-
lamp. Deze zet zonlicht om in stroom en laadt de accu op.
Merk op dat bij de montage van de zonnemodule de zonnecel-
len zo veel mogelijk DIRECT ZONLICHT nodig hebben. Hoe
langer de zonnecellen aan direct zonlicht worden blootgesteld,
des te langer kan de lamp worden gebruikt. De zonnemodule
moet bij voorkeur naar het zuiden zijn gericht, om optimaal
van de zonnestraling gebruik te kunnen maken. Vermijd elke
vorm van schaduw. Voor Midden-Europa wordt een hellings-
graad van ca. 30° tot 40° aanbevolen. Gebruik de in het pakket
meegeleverde schroeven (nr. 3 van de onderdelenlijst).
Afhankelijk van de ondergrond moeten geschikte schroeven en
pluggen worden gebruikt.
Afb. 8
Afb. 9
Afb. 10
Afb. 11
Afb. 12
Leg nu de kabel van de zonnecellen naar de hoofdeenheid en
sluit de kabel van de hoofdeenheid en de zonnecellen met
behulp van de stekker en het stopcontact op elkaar aan.
INSTELLEN EN IN GEBRUIK NEMEN
Na de succesvolle installatie van de zonnelamp kunt u het
apparaat met weinig, eenvoudige stappen instellen.
Belangrijk:
Zorg ervoor dat de zonnelamp, zoals beschreven in de
paragraaf „Eerste keer opladen van de zonnelamp“,
is opgeladen voordat de lamp wordt ingeschakeld.
Op de hoofdeenheid bevindt zich een schakelaar met twee
instelmogelijkheden:
ON:
Instelling voor werking met bewegingsmelder.
OFF:
Schakelt de functie van de bewegingsmelder/LED-lamp
uit. Instelling voor het opladen.
De bewegingsmelder instellen
Stel na een succesvolle eerste oplading de schakelaar in op de
positie ON. Positioneer de bewegingsmelder in de richting van
waaruit u beweging wilt detecteren. Stel de
-regelaar aan de
achterzijde van de bewegingsmelder in op „minimum“ (-) en de
LUX-regelaar op de positie „helder“ (
). Test het detectiege-
bied door langzaam om het te detecteren gebied te lopen. Als
de zonnelamp niet naar wens inschakelt, moet de positie van
de bewegingsmelder worden aangepast.
Op de bewegingsmelder bevinden zich twee regelaars:
(TIME) = brandduur: U kunt de tijd dat de lamp ingeschakeld
blijft nadat de beweging werd gedetecteerd, binnen een tijds-
duur van ca. 10 seconden en 1 minuut instellen. Draai de TIME-
TIME
LUX
043413 SOL SH_LH Doppelstrahler 17.05.13 18:47 Seite 14

15
regelaar in de richting (+) om de brandduur te verhogen ofwel
in de richting (-) om de brandduur te verlagen.
Let op:
De ingestelde tijdsduur begint na het in werking stellen
van de bewegingsmelder. Bij elk volgende detectie van een
beweging begint de ingestelde tijdsduur weer van voren af aan.
/
(LUX) = reactiegevoeligheid: Met de LUX-regelaar kan de
helderheid van de omgeving worden ingesteld, waarbij de
bewegingen worden opgenomen. Daarmee wordt voorkomen
dat de lamp bij daglicht gaat branden. In de positie (
) wordt
de lamp dag en nacht ingeschakeld, terwijl de lamp in de
positie (
) alleen ’s nachts wordt ingeschakeld. U kunt de
gewenste lichtsterkte, waarbij de eenheid uw bewegingen
opneemt, met de LUX-regelaar instellen.
DE ACU VERVANGEN
Let op:
Wanneer u de accu vervangt, moet de schakelaar op de
lichteenheid op ON staan en moet de stekker van de zonnemo-
dule zijn losgekoppeld van de eenheid. Bij het vervangen van
de accu opent u de behuizing van de eenheid volgens de para-
graaf „Hoofdeenheid“, zoals beschreven in afb. 1 en 2. Verwij-
der de accu uit de houder en vervang de accu voor een nieuwe
accu. Indien mogelijk laadt u de accu van te voren op met een
in de handel verkrijgbare oplader voor 1,2 V AA Ni-MH-accu’s.
Is opladen met een oplader niet mogelijk, volg dan de
paragraaf „EERSTE KEER OPLADEN VAN DE ZONNELAMP“.
Zet het apparaat in omgekeerde volgorde weer in elkaar.
Let op:
Bij het plaatsen van de accu moet perse de juiste
polariteit in acht worden genomen. Het apparaat en de accu
kunnen bij onjuiste poolaansluiting schade oplopen.
ALGEMENE VEILIGHEIDSVOORSCHRIFTEN
1. Gebruik alleen de meegeleverde zonnemodule. Het gebruik
van een andere zonnemodule kan letsel veroorzaken of tot
beschadiging van de lamp leiden en de garantie doen
vervallen.
2. Leg de kabel zo neer, dat het goed bevestigd is en geen
gevaar (bijv. struikelgevaar) oplevert. Staak het gebruik van
de zonnelamp wanneer de kabel beschadigd of defect is.
REINIGEN
Houd de bewegingsmelder vrij van stof en afzettingen door
deze regelmatig af te nemen met een vochtige doek. Gebruik
geen chemicaliën of schuurmiddelen voor het reinigen van het
apparaat. Zorg ervoor dat de zonnemodule te allen tijde vrij is
van vuil en afzettingen. Een vervuilde zonnecel kan de accu
niet volledig opladen. Dit kan tot vroegtijdige slijtage van de
accu en tot onbetrouwbare werking van het apparaat leiden.
BEWAREN
Volg deze stappen als u uw lamp meer dan twee of drie dagen
in huis wilt opbergen zonder dat de batterij schade oploopt:
1. Stel de schakelaar in op de OFF-positie.
2. Bewaar de lamp en de zonnemodule daar waar u dagelijks
zonlicht of kamerlicht opvangt. De accu heeft licht nodig om
de lading tijdens de opslag te behouden.
3. Tijdens langere opslag moet de eenheid elke vier maanden
volledig worden opgeladen. Om het vermogen van de accu te
behouden moet deze niet voor langere tijd worden opgeslagen.
STORINGEN
(STORING/OORZAAK
➔
OPLOSSING)
Lamp schakelt niet in bij bewegingen binnen het
bewakingsgebied.
Mogelijke oplossingen:
Let op dat:
-
De schakelaar in de positie „ON“ staat.
-
De LUX-regelaar niet te ver in de richting (
) staat ingesteld.
-
De bewegingsmelder zodanig is ingesteld, dat bewegingen
kunnen worden geregistreerd.
-
De zonnecel zo gepositioneerd is, dat deze overdag zoveel
mogelijk zonlicht opvangt.
-
De lading van de accu niet te weinig is (gedurende 3-4
zonnedagen opladen, met schakelaar op OFF).
Lamp schakelt gedurende de dag in.
Mogelijke oplossingen:
Let op dat de LUX-regelaar niet te ver in richting (
) staat
ingesteld.
Raadpleeg voor meer informatie Service/FAQs op onze
homepage www.brennenstuhl.com.
TECHNISCHE GEGEVENS:
Accu:
SOL SV0805 P1 IP44, SOL LV0805 P1 IP44,
SOL SV0805 P2 IP44, SOL LV0805 P2 IP44:
3 x 1,2 V / 2200 mAh Ni-MH oplaadbare batterijen
SOL SV1205 P2 IP44, SOL LV1205 P2 IP44:
3 x 1,2 V / 2500 mAh Ni-MH oplaadbare batterijen
Zonnemodule:
SOL SV0805 P1 IP44, SOL LV0805 P1 IP44:
190 x 115 mm
SOL SV0805 P2 IP44, SOL LV0805 P2 IP44,
SOL SV1205 P2 IP44, SOL LV1205 P2 IP44:
220 x 190 mm
Aantal LEDs:
SOL SV0805 P1 IP44, SOL LV0805 P1 IP44,
SOL SV0805 P2 IP44, SOL LV0805 P2 IP44:
8 x 0,5 W
SOL SV1205 P2 IP44, SOL LV1205 P2 IP44:
12 x 0,5 W
Brandduur:
instelbaar van ca. 10 seconden
tot 1 minuut
Detectiehoek:
180º horizontaal
Reikwijdte:
max. 10 meter
Reactiegevoeligheid:
instelbaar van daglicht tot nacht
Beschermingsklasse:
IP44
Omgevingstemperatuur:
-15 °C - +45 °C
VERWIJDERING
Elektrische apparaten milieuvriendelijk vernietigen!
Elektrische apparaten behoren niet bij het huisvuil.
Volgens Europese richtlijn 2012/19/EU voor elektrische en
elektronische apparaten moeten gebruikte elektrische appara-
ten gescheiden worden ingezameld en op milieuvriendelijke
wijze worden afgevoerd. Voor mogelijkheden over vernietiging
van afgedankte apparaten kunt u informeren bij uw gemeente
of stadsbestuur.
Milieuschade door onjuist weggooien van de batterijen en
accu’s!
Batterijen en accu’s behoren niet bij het huisvuil. Ze kunnen
giftige zware metalen bevatten en moeten als chemisch afval
worden behandeld. Lever daarom uw gebruikte batterijen in bij
een gemeentelijk inzamelpunt.
043413 SOL SH_LH Doppelstrahler 17.05.13 18:47 Seite 15

16
Grazie per aver deciso di acquistare questo prodotto.
È necessario familiarizzare con il prodotto prima di metterlo in
funzione per la prima volta. Si prega, al riguardo, di leggere
attentamente le seguenti istruzioni per l'uso e le indicazioni di
sicurezza. Utilizzare l'apparecchio solo come descritto e per gli
ambiti di utilizzo indicati.
Conservare le presenti istruzioni. In caso l'apparecchio venga
ceduto a terzi, è necessario cedere anche la relativa documen-
tazione.
LISTA PEZZI
1
Supporto pannello solare
2
Cavo di collegamento pannello solare
3
Viti di montaggio per modulo solare e unità principale (5x)
4
Modulo solare
5
Unità principale
6
Unità LED
7
Sensore di movimento
8
Interruttore ON / OFF
9
Regolatore durata illuminazione
10 Regolatore sensibilità di risposta
PRIMA CARICA DELLA LAMPADA SOLARE
Prima di mettere in funzione la lampada è necessario caricarla
mediante il modulo solare.
Collegare il cavo del modulo solare all'unità principale.
L'interruttore ON / OFF che si trova sull'unità principale deve
essere posizionato su OFF. Collocare il modulo solare in una po-
sizione in cui possa essere irradiato il più a lungo possibile
dalla luce solare diretta. Attenersi anche alle indicazioni sui
punti di montaggio adeguati contenute nel capitolo successivo.
A seconda della stagione, del tempo e della posizione del mo-
dulo solare, la carica può durare fino a 4 giorni prima che la
lampada possa essere messa in funzione.
PUNTI DI MONTAGGIO ADEGUATI A LAMPADA E MODULO
SOLARE
Unità principale:
L’unità principale contiene la lampada, il sensore di movimento
e l'accumulatore. Durante l'installazione dell'unità principale
tener conto del fatto che l'area di monitoraggio del sensore
di movimento, a seconda dell'altezza a cui viene montato,
raggiunge un massimo di 180° con una portata massima di
10 metri.
Per il montaggio su base solida, p.es. un'opera in muratura,
utilizzare le viti fornite con la confezione (pos. 3 della lista
pezzi). A seconda della base occorrerà utilizzare viti e tasselli
adeguati.
Montaggio:
• Allentare la vite (illustr. 1) del supporto a parete
• Premere il pulsante di sbloccaggio sulla parte superiore
(illustr. 2) e aprire l'involucro tirando le supporto a parete
• Fare attenzione in proposito a che nessun cavo o conduttura
presente venga danneggiato durante l'esecuzione dei fori di
montaggio sulla parete o durante l'avvitamento
Illustr. 1
Illustr. 2
Illustr. 3
Illustr. 4
Illustr. 5
ISTRUZIONI PER L'INSTALLAZIONE E L’USO
SOL SV0805 P1 IP 44, SOL LV0805 P1 IP44, SOL SV0805 P2 IP44,
SOL LV0805 P2 IP44, SOL SV1205 P2 IP44, SOL LV1205 P2 IP44
043413 SOL SH_LH Doppelstrahler 17.05.13 18:47 Seite 16

17
Illustr. 6
Illustr. 7
Modulo solare:
Il modulo solare è la fonte di alimentazione elettrica principale
della lampada solare. Esso trasforma la luce del sole in
corrente e carica la batteria. Durante il montaggio del modulo
solare, tener conto del fatto che la cella solare necessita il più
possibile della LUCE DIRETTA DEL SOLE. Quanto più a lungo la
cella solare è esposta alla luce diretta del sole, tanto più a
lungo la lampada è in grado di funzionare. Il modulo solare
dovrebbe essere possibilmente orientato verso sud, in modo da
ricevere un'irradiazione solare diretta. Evitare qualsiasi tipo di
ombreggiamento. Nell'Europa centrale si raccomanda un
angolo di inclinazione da circa 30° a 40°. Utilizzare le viti
fornite con la confezione (pos. 3 della lista pezzi) per montare il
modulo solare su una base solida, p. es. su un’opera in muratura.
A seconda della base occorrerà utilizzare viti e tasselli adeguati.
Illustr. 8
Illustr. 9
Illustr. 10
Illustr. 11
Illustr. 12
Posare ora il cavo dalla cella solare all’unità principale e
collegare il cavo dell’unità principale e della cella solare l’uno
con l’altro tramite spina e presa.
REGOLAZIONE E MESSA IN FUNZIONE
Terminata con successo l'installazione della lampada solare,
è possibile regolare l'apparecchio in pochi, semplici passaggi.
Importante:
Accertarsi, prima di accenderla, che la lampada solare sia
stata caricata come descritto nel capitolo "Prima carica
della lampada solare".
Sull'unità principale si trova un interruttore con due possibilità
di regolazione:
ON:
posizione per funzionamento con sensore di movimento.
OFF:
disattiva il funzionamento del sensore di movimento /
lampada a LED. Posizione per la carica.
Regolazione del sensore di movimento
Una volta terminata l'operazione di carica di base, posizionare
l'interruttore su ON. Orientare il sensore di movimento nella
direzione in cui si desidera rilevare i movimenti. Posizionare
l’interruttore di regolazione
sul lato posteriore del sensore
di movimento su "minimo" (-) e l’interruttore di regolazione
LUX sulla posizione "chiaro"(
). Testare il campo di copertura
camminando lentamente intorno alla zona da monitorare. Se la
lampada solare non si accende come desiderato, occorre
adeguare l'orientamento del sensore di movimento.
043413 SOL SH_LH Doppelstrahler 17.05.13 18:47 Seite 17
18
Sul sensore di movimento ci sono interruttori di regolazione:
(TIME) = durata di illuminazione: è possibile regolare il
tempo in cui la lampada debba rimanere accesa dopo il
rilevamento di un movimento da circa 10 secondi a 1 minuto.
Ruotare l’interruttore di regolazione TIME in direzione (+),
per aumentare la durata di illuminazione, oppure in direzione
(-) per ridurre la durata di illuminazione.
Attenzione:
il periodo di tempo impostato parte dallo scatto
del sensore di movimento. Con ogni successivo rilevamento di
un movimento, questo intervallo di tempo riparte da capo.
/
(LUX) = sensibilità di risposta: con l’interruttore di
regolazione LUX è possibile impostare la luminosità ambiente
di funzionamento. In questo modo si evita che la lampada si
accenda di giorno. Nella posizione (
) la lampada si accende di
giorno e di notte, mentre nella posizione (
) si accende solo di
notte. Con l’interruttore di regolazione LUX, è possibile
regolare l'intensità di luce in corrispondenza della quale l'u-
nità debba entrare in funzione.
SOSTITUZIONE DELLA BATTERIA
Attenzione:
quando si sostituisce la batteria, l’interruttore
sull’unità di illuminazione deve essere posizionato su OFF e la
spina del modulo solare deve essere staccata dall’unità princi-
pale. Per sostituire la batteria aprire l’involucro dell’unità
principale come descritto nelle illustrazioni 1 e 2 del capitolo
“Unità principale”. Togliere le batterie dal supporto e sosti-
tuirle con quelle nuove. Se possibile, caricare preventivamente
le batterie con un caricabatterie d’uso commerciale per batte-
rie da 1,2 V AA Ni-MH. Qualora non sia possibile eseguire la
carica con un caricabatterie, attenersi alle istruzioni di cui al
capitolo “PRIMA CARICA DELLA LAMPADA SOLARE”.
Riassemblare l'apparecchio seguendo il procedimento inverso.
Attenzione:
nell’introdurre la batteria controllarne
assolutamente la corretta polarità. In caso di errata polarità
l'apparecchio e le batterie potrebbe subire dei danni.
INDICAZIONI GENERALI DI SICUREZZA
1. Non utilizzare alcun altro modulo solare che non sia quello
fornito. L'utilizzo di un altro modulo solare può causare
lesioni o danni alla lampada e far decadere la garanzia.
2. Posare il cavo in modo che sia ben fissato e non rappresenti
alcun pericolo (ad es. pericolo di inciampare). Non conti-
nuare ad utilizzare la lampada solare se il cavo è danneg-
giato o difettoso.
PULIZIA
Mantenere il sensore di movimento pulito da polvere e depositi,
pulendolo di quando in quando con un panno umido.
Non utilizzare prodotti chimici o abrasivi per pulire l’apparec-
chio. Assicurarsi, inoltre, che il modulo solare sia sempre libero
da sporcizia e depositi. Una cella solare sporca non è in grado
di caricare completamente la batteria. Ciò può comportare un
prematuro invecchiamento della batteria e un funzionamento
inattendibile dell'apparecchio.
TIME
LUX
MAGAZZINAGGIO
Seguire questi passaggi nel caso si desideri tenere la propria
lampada in casa per più di due o tre giorni, in modo da evitare
danni alla batteria:
1. Posizionare l'interruttore su OFF.
2. Depositare la lampada e il modulo solare dove siano
quotidianamente esposti alla luce del sole o ambientale.
La batteria necessita di luce per mantenere la carica
durante il magazzinaggio.
3. Durante un magazzinaggio prolungato, l'unità deve essere
caricata ogni quattro mesi. Per ottenere la massima
efficienza, non depositarla per periodi di tempo prolungati.
ANOMALIE DI FUNZIONAMENTO
(ANOMALIA / CAUSA
➔
SOLUZIONE)
La lampada non si accende muovendosi nell'area di
monitoraggio.
Possibili soluzioni:
Accertarsi che:
- l'interruttore sia in posizione "ON"
- l'interruttore di regolazione LUX non sia troppo impostato in
direzione (
)
- il sensore di movimento sia regolato in modo tale da poter
rilevare i movimenti
- la cellula solare sia orientata in modo tale da ricevere,
durante il giorno, quanta più luce solare diretta possibile
- la carica della batteria non sia troppo bassa (caricare per
3-4 giorni di sole con l'interruttore su OFF)
La luce si accende durante il giorno.
Possibili soluzioni:
accertarsi che l’interruttore di regolazione LUX non sia troppo
impostato in direzione (
).
Per ulteriori informazioni consigliamo di visitare la sezione del
nostro sito www.brennenstuhl.com dedicata all’assistenza/FAQ.
DATI TECNICI:
Batteria:
SOL SV0805 P1 IP44, SOL LV0805 P1 IP44,
SOL SV0805 P2 IP44, SOL LV0805 P2 IP44:
3 x 1.2 V / 2200 mAh Ni-MH batterie ricaricabili
SOL SV1205 P2 IP44, SOL LV1205 P2 IP44:
3 x 1.2 V / 2500 mAh Ni-MH batterie ricaricabili
Modulo solare:
SOL SV0805 P1 IP44, SOL LV0805 P1 IP44:
190 x 115 mm
SOL SV0805 P2 IP44, SOL LV0805 P2 IP44,
SOL SV1205 P2 IP44, SOL LV1205 P2 IP44:
220 x 190 mm
Numero di LED:
SOL SV0805 P1 IP44, SOL LV0805 P1 IP44,
SOL SV0805 P2 IP44, SOL LV0805 P2 IP44:
8 x 0,5 W
SOL SV1205 P2 IP44, SOL LV1205 P2 IP44:
12 x 0,5 W
Durata di illuminazione:
regolabile da ca. 10 secondi fino ad
1 minuto
Angolo di monitoraggio:
180° in orizzontale
Portata:
max. 10 metri
Sensibilità di risposta:
regolabile dalla luce del giorno alla
notte
Tipo di protezione:
IP44
Temperatura ambiente:
-15 °C - +45 °C
043413 SOL SH_LH Doppelstrahler 17.05.13 18:47 Seite 18
SMALTIMENTO
Smaltire gli apparecchi elettrici in modo ecocompati-
bile! Gli apparecchi elettrici non devono essere messi
con i rifiuti domestici.
Conformemente alla Direttiva Europea 2012/19/UE sugli
apparecchi elettrici ed elettronici gli apparecchi elettrici usati
devono essere raccolti separatamente e riciclati in modo
ecocompatibile. Si possono richiedere le modalità di
smaltimento dell'apparecchio inutilizzato presso la propria
amministrazione comunale o cittadina.
Danni ambientali causati da un errato smaltimento di
batterie e accumulatori!
Batterie e accumulatori non fanno parte dei rifiuti domestici.
Possono contenere metalli pesanti velenosi e devono essere
trattati come rifiuti speciali. Di conseguenza le batterie usate
devono essere conferite a un centro di raccolta comunale.
19
043413 SOL SH_LH Doppelstrahler 17.05.13 18:47 Seite 19
20
Tack för att du har beslutat dig för att köpa den här produkten.
Bekanta dig med produkten innan du tar den i drift. Läs därför
uppmärksamt den bifogade säkerhets- och bruksanvisningen.
Använd bara utrustningen så som beskrivits och inom det
område som angivits.
Spara bruksanvisningen och lämna över den när utrustningen
överlåts till tredje person.
ARTIKELLISTA
1
Hållare för solpanel
2
Anslutningskabel för solpanel
3
Monteringsskruvar för solcellsrmodulen och
monteringsskruvar huvudenhet (5x)
4
Solcellsmodul
5
Huvudenhet
6
LED-enhet
7
Rörelsedetektor
8
ON/OFF-omkopplare
9
Reglage: ljuslängds-cykeln
10 Reglage: ljuskänslighet
FÖRSTA UPPLADDNINGEN AV SOLCELLSLAMPAN
Innan du använder solcellslampan måste den först laddas upp
via solcellsmodulen.
Anslut solcellsmodulens kabel till huvudenheten.
ON/OFF-omkopplaren på huvudenheten måste stå i OFF-läget.
Placera solcellsmodulen där den får direkt solljus så länge som
möjligt. Beakta även anvisningarna beträffade lämpliga
monteringsställen i nästa avsnitt.
Beroende på årstid, väder och position kan uppladdningen ta
upp till 4 dagar innan lampan kan användas.
LÄMPLIGA STÄLLEN FÖR MONTERING AV
SOLCELLSLAMPAN OCH SOLCELLSMODULEN
Huvudenheten:
Huvudenheten innehåller lampan, rörelsedetektorn och
batteriet. Tänk på att rörelsedetektorns övervakningsområde,
beroende på hur högt den sitter, är max. 180° med en räckvidd
på 10 meter, när du monterar den.
För montering på en stabil yta t.ex. en murad vägg skall man
använda de skruvarna som finns med i förpackningen (punkt 3
i artikellistan). Beroende på underlaget skall lämpliga skruvar
och pluggar användas.
Montering:
• Lossa de båda skruvarna (Bild 1) i väggfästet
• Tryck på frigöringsknappen på ovansidan (Bild 2) och öppna
höljet genom att dra väggfästet
• Vid borrningen av monteringshålen i väggen respektive
fastskruvningen måste man vara noga med att ingen kabel
eller ledning skadas
Bild 1
Bild 2
Bild 3
Bild 4
Bild 5
INSTALLATIONS- UND BRUKSANVISNING
SOL SV0805 P1 IP 44, SOL LV0805 P1 IP44, SOL SV0805 P2 IP44,
SOL LV0805 P2 IP44, SOL SV1205 P2 IP44, SOL LV1205 P2 IP44
043413 SOL SH_LH Doppelstrahler 17.05.13 18:47 Seite 20
21
Bild 6
Bild 7
Solcellsmodulen:
Solcellsmodulen är den huvudsakliga strömkällan för solcells-
lampan. Den omvandlar solljus till ström och laddar upp batte-
riet. Vid monteringen av solcellsmodulen måste man betänka
att den i möjligaste mån behöver DIREKT SOLLJUS. Ju längre
tid solcellsmodulen utsätts för direkt solljus desto längre kan
lampan hållas i drift. Solcellsmodulen skall om möjligt riktas
mot söder för att komma åt det direkta solljuset. Undvik alla
slags skuggor. I Centraleuropa skall den vinklas uppåt i c:a 30°
till 40°. Använd de medskickade skruvarna (punkt 3 i artikellis-
tan), för att montera solcellsmodulen på ett fast underlag t.ex.
en murad vägg. Beroende på underlaget skall lämpliga skruvar
och pluggar användas.
Bild 8
Bild 9
Bild 10
Bild 11
Bild 12
Placera nu kabeln från solcellsmodulen till huvudenheten och
anslut solcellens huvudenhet med varandra via kontakten och
bussningen.
INSTÄLLNING OCH IDRIFTSTAGANDE
När solcellslampan har installerats kan utrustningen ställas in
med några enkla steg.
Viktigt:
Förvissa dig om att solcellslampan, så som beskrivits ovan
i avsnittet ”Första uppladdningen av solcellslampan,” är
uppladdad innan lampan tänds.
På huvudenheten finns en omkopplare med två lägen:
ON:
Inställning för drift med rörelsedetektor.
OFF:
Slår av rörelsedetektorns / LED-lampan. Detta är läget
för uppladdning.
Inställning av rörelsedetektorn
Sätt omkopplaren i läge PÅ efter den framgångsrika grundupp-
laddningen. Rikta in rörelsedetektorn åt det håll som den skall
upptäcka rörelser. Sätt
-reglaget på rörelsedetektorns bak-
sida på ”Minimum” (-) och LUX-reglaget i läge ”ljus” (
). Testa
sedan räckvidden genom att gå långsamt till det övervakade
området. Om solcellslampan inte reagerar som önskat måste
rörelsedetektorns anfallsvinkel anpassas.
På rörelsedetektorn sitter två reglage:
(TIME) = Brinntid: Du kan ställa in tiden som lampan lyser
efter att en rörelse detekterats mellan c:a 10 sekunder och
1 minut. Vrid TIME-reglaget mot ”+” för att förlänga tiden
respektive mot ”-” för att korta ner den
TIME
LUX
043413 SOL SH_LH Doppelstrahler 17.05.13 18:47 Seite 21
22
OBS:
Den inställda tiden börjar efter att rörelsedetektorn har
lösts ut. För alla därpå följande detekterade rörelser börjar den
här tidsperioden om från början.
/
(LUX) = Känslighet: Med LUX-reglaget kan det omgivande
ljuset ställas in, vid vilken driften startas. I och med detta und-
viks att lampan börjar lysa i dagsljus. I (
)-läget förblir lampan
tänd dag och natt, medan den i (
)-läget bara är påslagen på
kvällen/natten. Du kan ställa in önskad ljusstyrka då enheten
skall ta över driften, med LUX-reglaget.
BATTERIBYTE
OBS:
När man byter batteri måste omkopplaren på lampen -
heten stå på OFF och solcellsmodulens kontakt tas bort från
huvudenheten. För det första, för att byta batteri öppnar man
huvudenhetens hölje enligt vad som beskrivs i avsnittet
”Huvudenhet” i bild 1 och 2. Ta bort batteriet från hållaren och
byt ut det mot ett nytt. Om möjligt laddar man upp batteriet
innan med en vanlig batteriladdare för 1,2 V AA Ni-MH
batterier. Om uppladdning med en batteriladdare inte är möjlig,
skall man följa avsnittet ”FÖRSTA UPPLADDNINGEN AV
SOLCELLSLAMPAN”.
Sätt ihop apparaten i omvänd ordningsföljd.
OBS:
Var noga med att polariteten blir rätt vid isättning av
batteriet. Utrustningen och batteriet kan skadas om polerna är
felkopplade.
ALLMÄNNA SÄKERHETSANVISNINGAR
1. Använd ingen annan solcellsmodul än den som följer med
leveransen. Användning av en annan solcellmodul kan leda
till personskada eller skada på lampan och kan också leda
till att garantin upphävs.
2. Placera kabeln så att den sitter säkert och inte kan fram-
kalla fara (t.ex. snubbelrisk). Använd inte solcellslampan om
kabeln är skadad eller defekt.
RENGÖRING
Håll rörelsedetektorn fri från damm och avlagringar genom att
då och då torka av den med en fuktig trasa. Använd inga
kemikalier eller slipmedel i rengöring av enheten. Säkerställ
dessutom att solcellsmodulen alltid hålls fri från smuts och
avlagringar. En förorenad solcell kan inte ladda upp batteriet
ordentligt. Detta kan leda till för tidigt åldrande av batteriet
och opålitlig funktion hos enheten.
FÖRVARING
Följ dessa steg om du måste förvara lampan längre än två eller
tre dagar i huset för att undvika skador på batteriet:
1. Sätt omkopplaren i OFF-läget.
2. Förvara lampan och solcellsmodulen där denna får solljus
eller rumsbelysning dagligen. Batteriet behöver ha ljus för
uppladdning under förvaringen.
3. Under en längre förvaringsperiod måste enheten laddas upp
helt var fjärde månad. För att nå full kapacitet bör den
förvaras längre tid än så.
DRIFTSTÖRNINGAR
(STÖRNING/ORSAK
➔
ÅTGÄRD)
Lampan tänds inte av rörelser i övervakningsområdet.
Möjliga lösningar:
Försäkra dig om att:
-
Omkopplaren står i ”ON”-läget.
- LUX-reglaget inte är ställt alltförför långt åt (
).
-
Rörelsedetektorn är inställd så att rörelser inte kan uppfattas.
-
Solcellen är riktad så att den får så mycket direkt solljus
som möjligt hela dagen.
-
Uppladdningen av batteriet inte är för kort (skall laddas upp
under mer än 3-4 soladagar med omkopplaren på OFF).
Lampan sätts på under dagen.
Möjliga lösningar:
Säkerställ att LUX-reglaget inte är inställt alltför långt i
riktningen (
).
För ytterligare upplysningar rekommenderar vi avdelningen
Service/FAQ på vår hemsida, www.brennenstuhl.com.
TEKNISKA DATA:
Batteri:
SOL SV0805 P1 IP44, SOL LV0805 P1 IP44,
SOL SV0805 P2 IP44, SOL LV0805 P2 IP44:
3 x 1,2 V / 2200 mAh Ni-MH återuppladdningsbara batterier
SOL SV1205 P2 IP44, SOL LV1205 P2 IP44:
3 x 1,2 V / 2500 mAh Ni-MH återuppladdningsbara batterier
Solcellsmodulen:
SOL SV0805 P1 IP44, SOL LV0805 P1 IP44:
190 x 115 mm
SOL SV0805 P2 IP44, SOL LV0805 P2 IP44,
SOL SV1205 P2 IP44, SOL LV1205 P2 IP44:
220 x 190 mm
Antal LED-lampor:
SOL SV0805 P1 IP44, SOL LV0805 P1 IP44,
SOL SV0805 P2 IP44, SOL LV0805 P2 IP44:
8 x 0,5 W
SOL SV1205 P2 IP44, SOL LV1205 P2 IP44:
12 x 0,5 W
Brinntid:
inställbar från c:a 10 sekunder
till 1 minut
Övervakningsvinkel:
180º horisontellt
Räckvidd:
max. 10 meter
Känslighet:
inställbar från dagsljus till natt
Skyddstyp:
IP44
Omgivningstemperatur:
-15 °C - +45 °C
AVFALLSHANTERING
Hantera elektronisk utrustning miljövänligt! Elektrisk
utrustning hör inte hemma i hushållsavfallet
Enligt den europeiska riktlinjen 2012/19/EU beträffande
elektro- och föråldrad elektronisk utrustning så måste förbru-
kat elektroniskt material samlas in sorterat och en miljöriktig
återanvändning utföras. Alternativ för avfallshantering av
uttjänt utrustning erhålles från kommunen.
Miljöskador pga. felaktig avfallshantering av batterier!
Batterier hör inte hemma i hushållsavfallet. De kan utsöndra
giftiga tungmetaller och underkastas specialavfallshantering.
Lämna därför förbrukade batterier till en kommunal depå.
043413 SOL SH_LH Doppelstrahler 17.05.13 18:47 Seite 22
23
Gracias por comprar este producto.
Antes del primer uso, familiarícese con el producto. Por favor,
lea atentamente las instrucciones de uso y las indicaciones de
seguridad. Utilice este aparato solo para el uso destinado
según lo descrito en el manual.
Conserve este manual. Asegúrese de incluir toda la documen-
tación en caso de transferir el aparato a cualquier persona.
LISTA DE PIEZAS
1
Soporte del panel solar
2
Cable de conexión del panel solar
3
Tornillos de fijación para módulo solar e para la unidad
principal (5x)
4
Módulo solar
5
Unidad principal
6
Unidad LED
7
Detector de movimientos
8
Interruptor ON / OFF
9
Regulador del tiempo iluminación
10 Control de sensibilidad
PRIMERA CARGA DE LA LÁMPARA SOLAR
Antes de poner la lámpara solar en funcionamiento, ésta
primero deberá cargarse a través del módulo solar.
Conecte el cable del módulo solar con la unidad principal.
El interruptor ON / OFF de la unidad principal debe estar en
posición OFF. Coloque el módulo solar en un lugar donde esté
expuesto a la luz solar directa el mayor tiempo posible.
Tenga en cuenta también, la información acerca de ubicaciones
adecuadas de montaje en la sección siguiente.
Dependiendo de la temporada, el clima y la posición del
módulo solar, la recarga puede durar hasta 4 días antes de que
se pueda poner la lámpara en funcionamiento.
UBICACIONES DE MONTAJE ADECUADAS PARA
LÁMPARA SOLAR Y MÓDULO SOLAR
Unidad principal:
La unidad principal incluye la lámpara, el detector de movi-
mientos y la batería. Por favor, recuerde, cuando monte la
unidad principal, que la cobertura de vigilancia del detector
de movimientos, dependiendo de la altura de la instalación,
ascienda a un máximo de 180º con un alcance máximo de
10 metros.
Para la instalación en una superficie estable, por ejemplo ce-
mento, utilice los tornillos adjuntos al paquete (posición 3 de la
lista de piezas). Deben utilizarse tornillos y clavijas adecuados,
en función de la superficie.
Montaje:
• Afloje el tornillo (Figura 1) del soporte de pared
• Pulse el botón de desbloqueo del parte superior (Figura 2)
y abra la caja tirando en el soporte de pared
• Asegúrese de que no se estén dañando cables o tuberías
existentes al taladrar los agujeros de montaje en la pared o
bien al atornillar
Figura 1
Figura 2
Figura 3
Figura 4
Figura 5
MANUAL DE INSTALACIÓN Y OPERACIÓN
SOL SV0805 P1 IP 44, SOL LV0805 P1 IP44, SOL SV0805 P2 IP44,
SOL LV0805 P2 IP44, SOL SV1205 P2 IP44, SOL LV1205 P2 IP44
043413 SOL SH_LH Doppelstrahler 17.05.13 18:47 Seite 23
24
Figura 6
Figura 7
Módulo solar:
El modulo solar es la fuente de energía principal de la lámpara
solar. Convierte la luz solar en electricidad y carga la batería.
Por favor, recuerde al montar el módulo solar, que la célula
solar necesita LUZ SOLAR lo más DIRECTA posible. Cuanto
más larga sea exposición de la célula solar a la luz solar di-
recta, más tiempo podrá estar en funcionamiento la lámpara.
El módulo solar debe orientarse, a ser posible, hacia el sur, a fin
de recibir luz solar directa. Evite cualquier tipo de sombreado.
En Europa central, se recomienda un ángulo de inclinación de
Utilice los tornillos adjuntos al paquete (posición 3 de la lista
de piezas), para la instalación en una superficie estable, por
ejemplo cemento. Deben utilizarse tornillos y clavijas adecua-
dos, en función de la superficie.
Figura 8
Figura 9
Figura 10
Figura 11
Figura 12
Pase ahora el cable de la célula solar a la unidad principal, y
conecte los cables de la unidad principal y de la célula solar
mediante conectores macho y hembra.
CONFIGURACIÓN Y PUESTA EN MARCHA
Después de la instalación correcta de la lámpara solar, usted
puede configurar el dispositivo mediante unos sencillos pasos.
Importante:
Asegúrese de que la lámpara solar haya sido cargada tal y
como se describe en la sección "Carga inicial de la lámpara
solar", antes de encender la lámpara.
En la unidad principal hay un interruptor con dos posiciones:
ON:
Posición para funcionamiento con detector de movimientos.
OFF:
Apaga el detector de movimientos / la luz LED. Posición
para la carga.
Configuración del detector de movimientos
Situé el interruptor después de la carga básica en la posición
ON. Disponga el detector de movimientos en la dirección desde
la que se desea detectar movimientos. Situé el
-regulador en
la parte posterior del detector movimientos en „mínimo“ (-) y
el regulador LUX en la posición de „luminosidad“ (
). Pruebe
el rango de detección, por caminando lentamente alrededor de
la zona a controlar. Si la lámpara solar no se enciende, como
usted desea, tendrá que ajustar la orientación del detector de
movimientos.
En el detector de movimientos hay dos reguladores:
(TIME) = Tiempo iluminación: Usted puede regular el tiempo
en que la luz permanece encendida después de la detección de
un movimiento, a un periodo de tiempo de entre 10 segundos y
TIME
LUX
043413 SOL SH_LH Doppelstrahler 17.05.13 18:47 Seite 24
25
1 minuto. Gire el regulador TIME en dirección (+) para aumentar
el tiempo de iluminación, o bien en dirección (-) para disminuirlo.
Atención:
El período establecido comienza después de la
activación del detector de movimientos. Con cada detección
sucesiva de un movimiento, comienza este período de nuevo.
/
(LUX) = Sensibilidad: Con el regulador LUX, se puede
ajustar la luminosidad del ambiente, con la que se pone en
funcionamiento. Así se evita que la lámpara comience a ilumi-
nar con luz diurna. En la posición (
) se enciende la lámpara
por el día y por la noche, mientras que en la posición (
) sólo
se enciende por la noche. Mediante el regulador LUX, puede
ajustar la intensidad de luz deseada con la que la unidad se
pone en funcionamiento.
REEMPLAZO DE LA BATERÍA
Atención:
Cuando cambie la batería, el interruptor de la uni-
dad de iluminación debe estar en OFF y el enchufe del módulo
solar debe estar desconectado de la unidad principal. Para
cambiar la batería, debe abrir la carcasa de la unidad principal,
tal y como está descrito en la sección „Unidad principal“, así
como en las figuras 1 y 2. Retire las baterías de su soporte y
cámbielas por otras nuevas. Si es posible, cargue las baterías
antes con un cargador estándar para baterías de 1.2V AA
Ni-MH. Cuando la carga no es posible con un cargador siga la
sección „PRIMERA CARGA DE LA LÁMPARA SOLAR“.
Vuelva a ensamblar la unidad en el orden inverso al desmontaje.
Atención:
Al insertar las baterías, fíjese, sin falta, en la
polaridad correcta. El dispositivo y las baterías podrían
dañarse debido a una polaridad incorrecta.
INDICACIONES GENERALES DE SEGURIDAD
1. No utilice un módulo solar diferente al suministrado. El uso
de otro módulo solar puede provocar lesiones o daños a la
lámpara y anular la garantía.
2. Tienda el cable de forma que esté bien asegurado y que no
pueda provocar peligros (por ejemplo riesgos de tropezar).
No continúe utilizando la lámpara solar si el cable está
dañado o defectuoso.
LIMPIEZA
Mantenga el detector de movimientos libre de polvo y de
depósitos, frotándolo de vez en cuando con un paño húmedo.
No utilice productos químicos o abrasivos para limpiar el
dispositivo. También debe asegúrese de mantener el módulo
solar siempre libre de suciedad y de depósitos. Una célula solar
sucia no está en condiciones para cargar la batería completa-
mente. Esto puede conducir al envejecimiento prematuro de la
batería y a un funcionamiento no fiable del dispositivo.
ALMACENAMIENTO
Siga estos pasos si desea almacenar su lámpara durante más de
dos o tres días dentro de casa, a fin de evitar daños en la batería:
1. Sitúe el interruptor en la posición OFF.
2. Almacene la lámpara y el módulo solar en lugares donde
pueda recibir a diario luz solar o artificial. La batería nece-
sita luz, para mantener la carga durante el almacenamiento.
3. Durante un almacenamiento prolongado, la unidad debe re-
cargarse totalmente cada cuatro meses. Para mantener la
máxima potencia, no la almacene durante períodos largos.
AVERÍAS
(AVERÍA / CAUSA
➔
REMEDIO)
La lámpara no se enciende con movimientos dentro de la
cobertura de vigilancia.
Posibles soluciones:
Asegúrese de que:
- el interruptor se encuentra en la posición „ON“.
- el regulador LUX no esté posicionado demasiado alejado en
la dirección (
).
- el detector de movimientos está ajustado de modo que se
puedan capturar movimientos.
- la célula solar está orientada de forma que reciba durante el
día la mayor cantidad posible de luz solar directa.
- la carga de la batería no esté demasiado baja (cargar
durante 3-4 días soleados, con el interruptor en OFF).
La lámpara se enciende durante el día.
Posibles soluciones:
Asegúrese de que el regulador LUX no esté posicionado
demasiado alejado en la dirección (
).
Para una información más detallada, le recomendamos la
sección Servicio / FAQ 's en nuestra página web
www.brennenstuhl.com.
DATOS TÉCNICOS:
Baterías:
SOL SV0805 P1 IP44, SOL LV0805 P1 IP44,
SOL SV0805 P2 IP44, SOL LV0805 P2 IP44:
3 x 1,2 V / 2200 mAh Ni-MH Baterías recargables
SOL SV1205 P2 IP44, SOL LV1205 P2 IP44:
3 x 1,2 V / 2500 mAh Ni-MH Baterías recargables
Módulo solar:
SOL SV0805 P1 IP44, SOL LV0805 P1 IP44:
190 x 115 mm
SOL SV0805 P2 IP44, SOL LV0805 P2 IP44,
SOL SV1205 P2 IP44, SOL LV1205 P2 IP44:
220 x 190 mm
Número de LEDs:
SOL SV0805 P1 IP44, SOL LV0805 P1 IP44,
SOL SV0805 P2 IP44, SOL LV0805 P2 IP44:
8 x 0,5 W
SOL SV1205 P2 IP44, SOL LV1205 P2 IP44:
12 x 0,5 W
Tiempo de iluminación:
ajustable, desde aprox.
10 segundos hasta 1 minuto
Ángulo de detección:
180º horizontal
Alcance:
máximo 10 metros
Sensibilidad:
ajustable de la luz del día a noche
Protección:
IP44
Temperatura ambiente:
-15 °C - +45 °C
ELIMINACIÓN
¡Desechar los dispositivos eléctricos de acuerdo con
las regulaciones ambientales! Los dispositivos eléctri-
cos no deben tirarse a la basura doméstica.
Según la Directiva europea 2012/19/UE sobre residuos de apa-
ratos eléctricos y electrónicos, los aparatos eléctricos desgas-
tados deben recogerse por separado y trasladarse a un
reciclaje sin riesgos para el medio ambiente. Para más informa-
ción acerca de las opciones de eliminación de dispositivos de-
teriorados, póngase en contacto con su municipio o
ayuntamiento.
¡La disposición inadecuada de pilas y baterías causa daño
ambiental!
Pilas y baterías no deben tirarse a la basura doméstica. Pueden
contener metales pesados tóxicos y son objeto de un trata-
miento especial. Por lo tanto, entregue las pilas usadas a un
punto de recogida local.
043413 SOL SH_LH Doppelstrahler 17.05.13 18:47 Seite 25
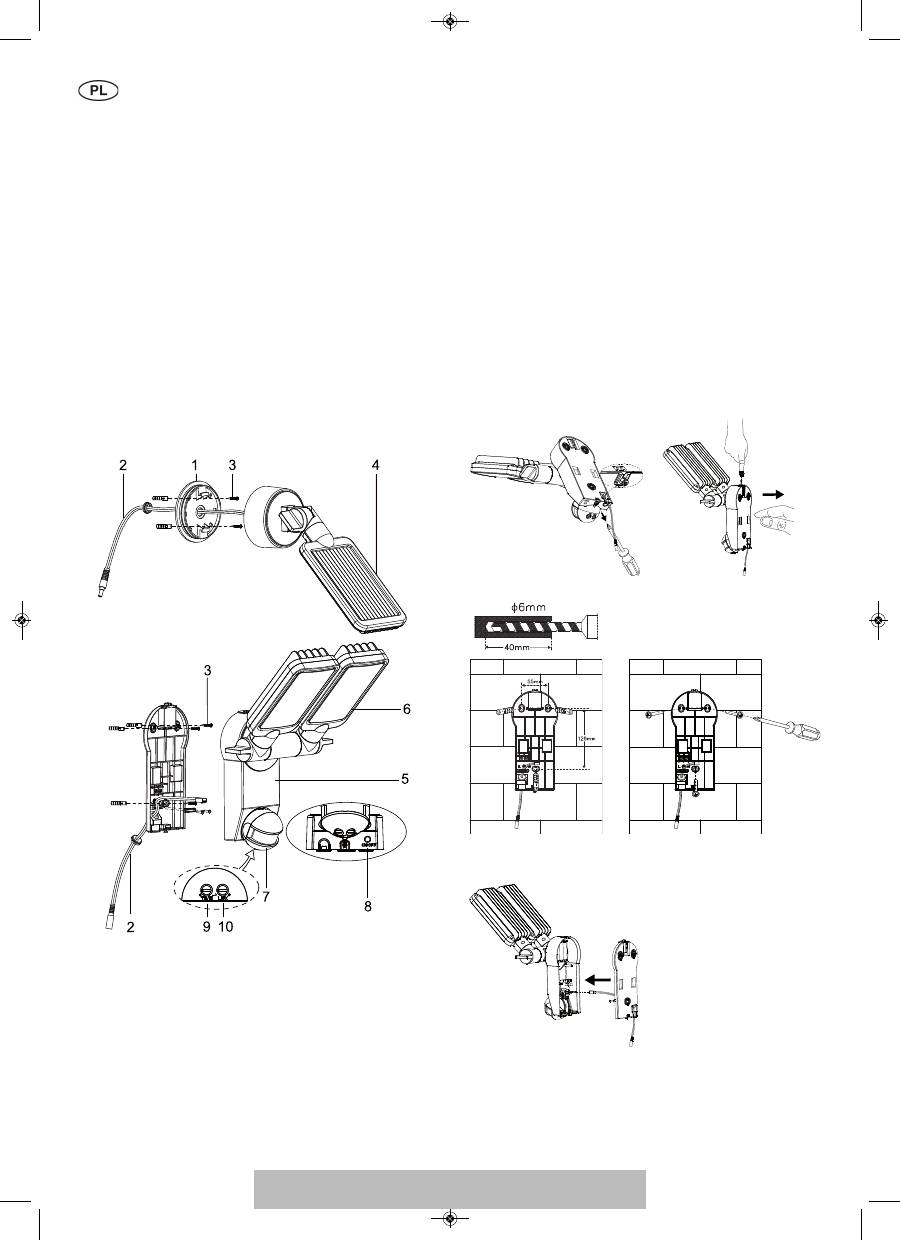
26
Dziękujemy za zdecydowanie się na zakup tego produktu.
Przed rozpoczęciem użytkowania produktu należy się z nim zapoznać.
W tym celu należy uważnie przeczytać poniższą instrukcję obsługi oraz
wskazówki bezpieczeństwa. Urządzenie może być użytkowane tylko
zgodnie z niniejszą instrukcją i w podanych obszarach zastosowań.
Instrukcję należy zachować. W razie przekazania urządzenia osobom
trzecim należy dołączyć do niego całą dokumentację.
WYKAZ CZĘŚCI
1 uchwyt panelu solarnego
2 kabel połączeniowy panelu solarnego
3 śruby montażowe modułu solarnego i jednostki głównej (5x)
4 moduł solarny
5 jednostka główna
6 lampa LED
7 czujnik ruchu
8 przełącznik ON / OFF
9 regulator czasu świecenia lampy
10 regulator czułości załączania lampy
PIERWSZE ŁADOWANIE LAMPY SOLARNEJ
Przed rozpoczęciem użytkowania lampy solarnej należy ją najpierw
naładować za pośrednictwem modułu solarnego.
W tym celu należy połączyć kabel modułu solarnego z jednostką
główną.
Przełącznik ON / OFF na jednostce głównej musi być ustawiony na
OFF. Moduł solarny należy umieścić w miejscu, które będzie
bezpośrednio nasłonecznione przez możliwie długi czas. Ponadto
należy uwzględnić wskazówki zawarte w kolejnym ustępie,
dotyczące miejsc odpowiednich do montażu.
W zależności od pory roku, pogody i pozycji modułu solarnego,
proces ładowania może potrwać nawet 4 dni, zanim możliwe będzie
rozpoczęcie użytkowania lampy.
MIEJSCA ODPOWIEDNIE DO MONTAŻU LAMPY SOLARNEJ I
MODUŁU SOLARNEGO
Jednostka główna:
Jednostka główna obejmuje lampę, czujnik ruchu oraz akumulator.
Podczas montażu jednostki głównej należy pamiętać o tym, że mo-
nitorowany przez czujnik ruchu obszar obejmuje - w zależności od
wysokości montażowej - maks. 180° przy maks. zasięgu 10 metrów.
Do montażu na stabilnym podłożu, np. murze, należy użyć dołączo-
nych do zestawu śrub (poz. 3 w wykazie części). W zależności od
podłoża należy zastosować odpowiednie śruby i kołki.
Montaż:
• Odkręcić śrubę (ilustr. 1) uchwytu ściennego
• Nacisnąć przycisk odblokowujący, który znajduje się na górze
(ilustr. 2), i otworzyć obudowę, pociągając za uchwycie ściennym
• Zwrócić uwagę, aby podczas wiercenia otworów montażowych
w ścianie lub przykręcania nie uszkodzić ukrytych kabli lub
przewodów
Ilustr.
1
Ilustr.
2
Ilustr.
3
Ilustr.
4
Ilustr.
5
INSTRUKCJA INSTALACJI I OBSŁUGI
SOL SV0805 P1 IP 44, SOL LV0805 P1 IP44, SOL SV0805 P2 IP44,
SOL LV0805 P2 IP44, SOL SV1205 P2 IP44, SOL LV1205 P2 IP44
043413 SOL SH_LH Doppelstrahler 17.05.13 18:47 Seite 26
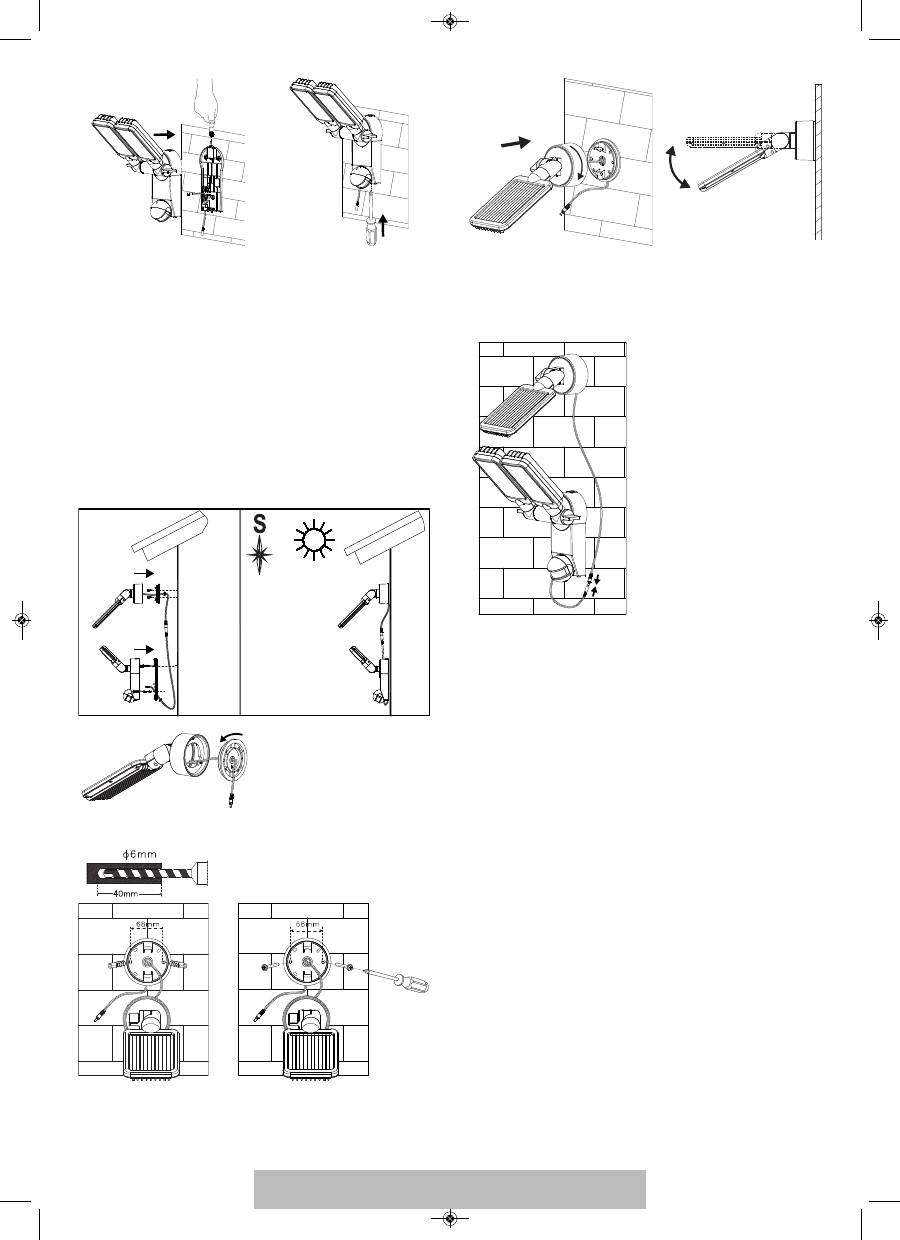
27
Ilustr.
6
Ilustr.
7
Moduł solarny:
Moduł solarny stanowi główne źródło zasilania lampy solarnej.
Zamienia on światło słoneczne w energię elektryczną i ładuje aku-
mulator. Przy montażu modułu solarnego należy pamiętać o tym,
że ogniwo solarne musi być w miarę możliwości BEZPOŚREDNIO
NASŁONECZNIONE. Im dłużej ogniwo solarne wystawione jest na
bezpośrednie światło słoneczne, tym dłużej lampa może pracować.
O ile jest to możliwe, moduł solarny powinien być skierowany na
południe, tak aby promienie słoneczne padały na niego
bezpośrednio. Należy unikać jakiegokolwiek zacienienia. Zalecany
w Europie Środkowej kąt nachylenia wynosi od ok. 30° do 40°. Do
zamontowania modułu solarnego na stabilnym podłożu, np. murze,
należy użyć dołączonych do zestawu śrub (poz. 3 w wykazie części).
W zależności od podłoża należy zastosować odpowiednie śruby i kołki.
Ilustr.
8
Ilustr.
9
Ilustr.
10
Ilustr.
11
Ilustr.
12
Poprowadzić kabel od ogniwa solarnego do jednostki głównej i
połączyć kabel jednostki głównej i ogniwa solarnego ze sobą za
pomocą wtyczki i gniazda.
USTAWIENIE I URUCHOMIENIE
Po zakończonej powodzeniem instalacji lampy solarnej można - za
pomocą kilku prostych czynności - dokonać ustawień urządzenia.
Ważne:
Przed włączeniem lampy solarnej należy upewnić się, że lampa
była ładowana zgodnie ze wskazówkami zawartymi w ustępie
"Pierwsze ładowanie lampy solarnej".
Na jednostce głównej znajduje się przełącznik z możliwością
ustawienia w dwóch pozycjach
:
ON:
ustawienie, w którym lampa pracuje z czujnikiem ruchu.
OFF:
wyłącza funkcję czujnika ruchu / lampy LED. Ustawienie,
w którym odbywa się ładowanie lampy.
Ustawianie czujnika ruchu
Po zakończeniu ładowania podstawowego przestawić przełącznik w
pozycję ON. Skierować czujnik ruchu w stronę, z której ma wykry-
wać ruch. Znajdujący się z tyłu czujnika ruchu regulator
ustawić
na „minimum“ (-), a regulator LUX przestawić w pozycję „jasno“
(
).
Przeprowadzić test obszaru objętego działaniem czujnika, przecho-
dząc powoli po terenie, który ma być monitorowany. Jeżeli lampa
solarna nie zapala się tak, jakbyśmy sobie tego życzyli, należy
odpowiednio skorygować ustawienie czujnika ruchu.
043413 SOL SH_LH Doppelstrahler 17.05.13 18:47 Seite 27

28
Na czujniku ruchu znajdują się dwa regulatory:
(TIME) = czas świecenia: Czas, przez który lampa pozostaje włą-
czona po tym, jak wykryje ruch, można ustawiać w zakresie od ok.
10 sekund do 1 minuty. Przekręcić regulator TIME w stronę (+) w
celu wydłużenia czasu świecenia lub w stronę (-) celem skrócenia
tego czasu.
Uwaga:
Czas ten zaczyna być liczony od momentu wykrycia ruchu
przez czujnik. Każde kolejne wykrycie ruchu powoduje, że czas
zaczyna być liczony od początku.
/
(LUX) = czułość załączania lampy: Za pomocą regulatora LUX
można ustawić jasność otoczenia, przy której nastąpi uruchomienie
lampy. Dzięki temu unikniemy sytuacji, w której lampa zacznie
świecić przy świetle dziennym. Przy ustawieniu w pozycji (
)
wł czenie lampy nast puje w dzie i w nocy, podczas gdy w
pozycji (
)
wyłącznie w nocy. Za pomocą regulatora LUX można
ustawić żądane natężenie światła, przy którym następuje uru-
chomienie lampy.
WYMIANA AKUMULATORA
Uwaga:
Podczas wymiany akumulatora przełącznik znajdujący się
na lampie musi być ustawiony w pozycji OFF, a wtyczka modułu so-
larnego odłączona od jednostki głównej. Aby wymienić akumulator,
należy otworzyć obudowę jednostki głównej zgodnie z ilustr. 1 i 2 w
ustępie "Jednostka główna". Wyjąć akumulatory z uchwytu i wymie-
nić je na nowe. Jeżeli istnieje taka możliwość, akumulatory powinno
się wcześniej naładować, używając do tego celu standardowej
ładowarki do baterii 1,2 V AA Ni-MH. Jeżeli nie można naładować
akumulatorów przy użyciu ładowarki, należy zastosować się do
wskazówek zawartych w ustępie "PIERWSZE ŁADOWANIE LAMPY
SOLARNEJ".
Ponownie złożyć urządzenie, postępując w odwrotnej kolejności.
Uwaga:
Podczas wkładania akumulatorów należy bezwzględnie
pamiętać o prawidłowym ułożeniu biegunów. W przypadku
nieprawidłowego ułożenia biegunów może dojść do uszkodzenia
urządzenia i akumulatorów.
OGÓLNE WSKAZÓWKI BEZPIECZEŃSTWA
1. Nie stosować innego modułu solarnego niż znajdujący się w
zestawie. Korzystanie z innego modułu solarnego może
spowodować obrażenia ciała lub doprowadzić do uszkodzenia
lampy i wygaśnięcia gwarancji.
2. Kabel należy ułożyć w taki sposób, aby był on dobrze zamoco-
wany i nie stanowił potencjalnego zagrożenia (np. niebezpie-
czeństwo potknięcia). Należy zaprzestać korzystania z lampy
solarnej, jeżeli kabel jest uszkodzony lub niesprawny.
CZYSZCZENIE
Czujnik ruchu należy czyścić z pyłu i osadów, przecierając go od
czasu do czasu wilgotną ściereczką. Do czyszczenia urządzenia nie
używać chemikaliów ani środków szorujących. Ponadto należy
zwrócić uwagę, aby moduł solarny był zawsze wolny od zabrudzeń i
osadów. Zanieczyszczone ogniwo solarne nie jest wstanie całkowi-
cie naładować akumulatora. Może to prowadzić do przedwczesnego
zużycia akumulatora i spowodować, że urządzenie będzie zawodne.
TIME
LUX
PRZECHOWYWANIE
Jeżeli chcą Państwo przechować lampę w budynku dłużej niż dwa
lub trzy dni, a jednocześnie uniknąć uszkodzenia baterii, należy
postępować zgodnie z poniższymi zaleceniami:
1. Ustawić przełącznik w pozycji OFF.
2. Lampę i moduł solarny należy przechowywać w miejscu, w
którym codziennie będzie na nie padać światło słoneczne lub
światło pochodzące z oświetlenia w pomieszczeniu. Akumulator
potrzebuje światła, aby móc się ładować w czasie przechowywania.
3. Gdy okres przechowywania jest dłuższy, należy co cztery mie-
siące całkowicie naładować jednostkę. W celu uzyskania pełnej
wydajności, nie należy jej przechowywać przez dłuższy okres.
ZAKŁÓCENIA PODCZAS EKSPLOATACJI
(ZAKŁÓCENIE / PRZYCZYNA
➔
SPOSÓB USUNIĘCIA)
Lampa nie włącza się mimo ruchu w monitorowanym obszarze.
Możliwe rozwiązania:
Upewnić się, że:
- przełącznik znajduje się w pozycji „ON“.
-
regulator LUX nie jest za bardzo przestawiony w stronę
(
).
- czujnik ruchu jest tak ustawiony, że może wykrywać ruch.
- ogniwo solarne jest tak ustawione, aby w ciągu dnia otrzymywać
maksimum bezpośredniego światła słonecznego.
- stopień naładowania akumulatora nie jest zbyt niski (ładować
przez 3-4 słoneczne dni z przełącznikiem ustawionym na OFF).
Lampa włącza się w ciągu dnia.
Możliwe rozwiązania:
Upewnić się, że regulator LUX nie jest za bardzo ustawiony w stronę
(
).
W celu uzyskania dalszych informacji zalecamy odwiedzenie
zakładki Serwis /FAQ na naszej stronie internetowej
www.brennenstuhl.com.
DANE TECHNICZNE:
Akumulator:
SOL SV0805 P1 IP44, SOL LV0805 P1 IP44,
SOL SV0805 P2 IP44, SOL LV0805 P2 IP44:
3 x 1,2 V / 2200 mAh Ni-MH baterie ładowalne
SOL SV1205 P2 IP44, SOL LV1205 P2 IP44:
3 x 1,2 V / 2500 mAh Ni-MH baterie ładowalne
Moduł solarny:
SOL SV0805 P1 IP44, SOL LV0805 P1 IP44:
190 x 115 mm
SOL SV0805 P2 IP44, SOL LV0805 P2 IP44,
SOL SV1205 P2 IP44, SOL LV1205 P2 IP44:
220 x 190 mm
Ilość diod LED:
SOL SV0805 P1 IP44, SOL LV0805 P1 IP44,
SOL SV0805 P2 IP44, SOL LV0805 P2 IP44:
8 x 0,5 W
SOL SV1205 P2 IP44, SOL LV1205 P2 IP44:
12 x 0,5 W
Czas świecenia:
możliwość regulacji w zakresie od
ok. 10 sekund do 1 minuty
Kąt monitorowania:
180º w poziomie
Zasięg:
maks. 10 metrów
Czułość załączenia lampy:
możliwość regulacji między światłem
dziennym i nocą
Stopień ochrony:
IP44
Temperatura otoczenia:
-15 °C - +45 °C
043413 SOL SH_LH Doppelstrahler 17.05.13 18:47 Seite 28

29
UTYLIZACJA
Sprzęt elektryczny należy utylizować w sposób
bezpieczny dla środowiska naturalnego Urządzenia elek-
tryczne to nie domowe śmieci czy odpadki.
Zgodnie z Dyrektywą Europejską 2012/19/UE w sprawie sprzętu
elektrycznego i elektronicznego, zużyty sprzęt elektryczny należy
gromadzić osobno i przekazywać do ponownego przetworzenia w
sposób bezpieczny dla środowiska naturalnego. O możliwościach
utylizacji wysłużonego urządzenia dowiedzą się Państwo w urzędzie
miasta lub gminy.
Niewłaściwa utylizacja baterii i akumulatorów powoduje szkody
w środowisku naturalnym!
Baterie i akumulatory to nie domowe śmieci czy odpadki. Mogą one
zawierać trujące metale ciężkie i jako śmieci muszą być w specjalny
sposób utylizowane. W związku z powyższym zużyte baterie i aku-
mulatory należy przekazać właściwym punktom zajmującym się ich
zbiórką.
043413 SOL SH_LH Doppelstrahler 17.05.13 18:47 Seite 29
Оглавление
- INSTRUKCJA INSTALACJI I OBSŁUGI
- NÁVOD K INSTALACI A POUŽÍVÁNÍ PŘÍSTROJE
- TELEPÍTÉSI ÉS KEZELÉSI UTASÍTÁS
- KURULUM VE KULLANMA KILAVUZU
- ΟΔΗΓΙΕΣ ΕΓΚΑΤΑΣΤΑΣΗΣ ΚΑΙ ΧΡΗΣΗΣ
