Olympus Stylus Verve: Taking still pictures
Taking still pictures: Olympus Stylus Verve
Taking still pictures
The following section describes how to take pictures using the monitor.
P
a
2272*1704
En
For details regarding the display on the monitor, please refer to the
Advanced manual (CD-ROM).
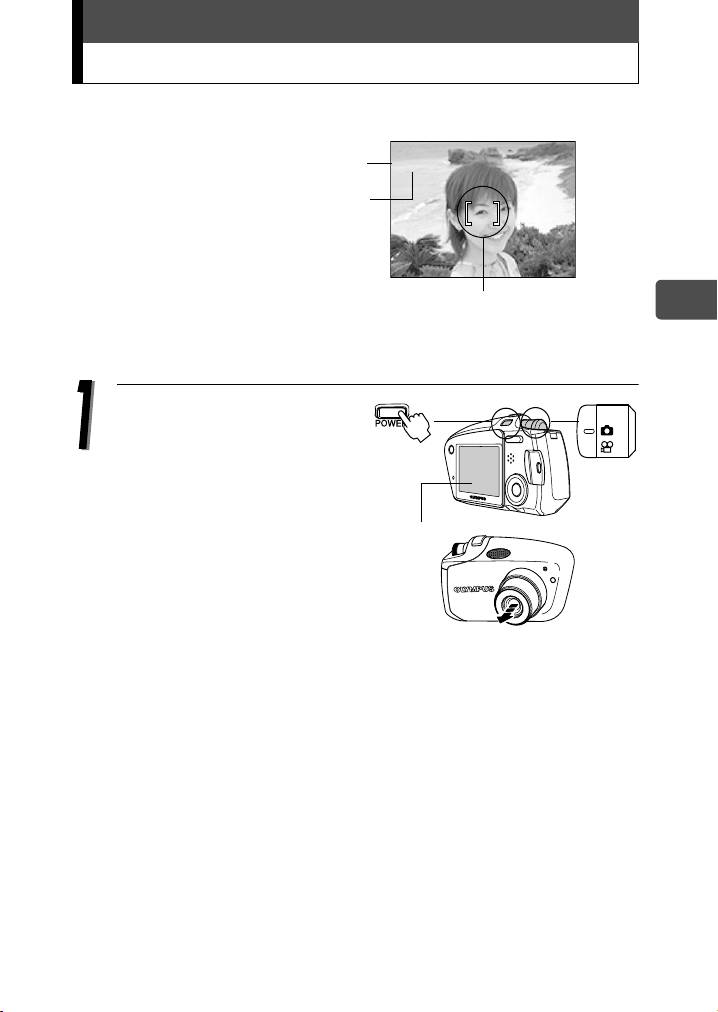
Set the mode dial to K,
then press the POWER
switch.
When power is turned on, the
lens barrier opens, the lens
extends, and the monitor turns
on automatically.
23
2272*1704
2020
20
HQ
HQ
000e_kisohen.book Page 23 Friday, July 30, 2004 7:06 PM
e
Green lamp
(
#
Flash stand-by/flash charging
AF target mark
Monitor
Taking still pictures
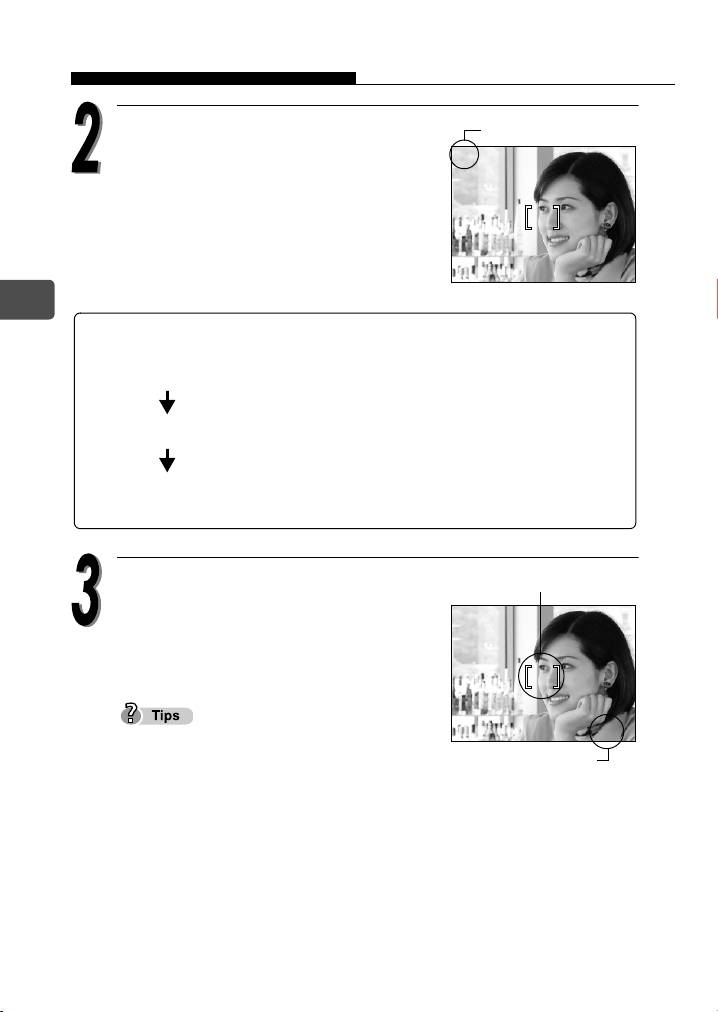
Confirm on the monitor that the
battery check indication is e
P
(green).
a
2272*1704
En
Place the AF target mark on the
subject.
The number of remaining pictures is
displayed on the monitor.
If the monitor is hard to see:
Bright light, such as direct sunlight, may
cause vertical lines to appear on the monitor
screen.
When you point the camera lens toward a bright subject, smears (lines like
beams of light) may appear on the image in the monitor. This does not affect
recorded pictures.
24
2272*1704
2020
20
HQ
HQ
Battery check
e
o
Battery check
The battery check indication changes as follows.
e Lights (Green) Pictures can be taken.
The battery is running low. Replace with a
f Lights (Red)
charged battery or charge the battery.
[BATTERY EMPTY]
The battery is exhausted. Replace with a
is displayed
charged battery or charge the battery.
P
a
2272*1704
2272*1704
2020
20
HQ
HQ
000e_kisohen.book Page 24 Friday, July 30, 2004 7:06 PM
AF target mark
e
o
Number of shootable
still pictures
Taking still pictures
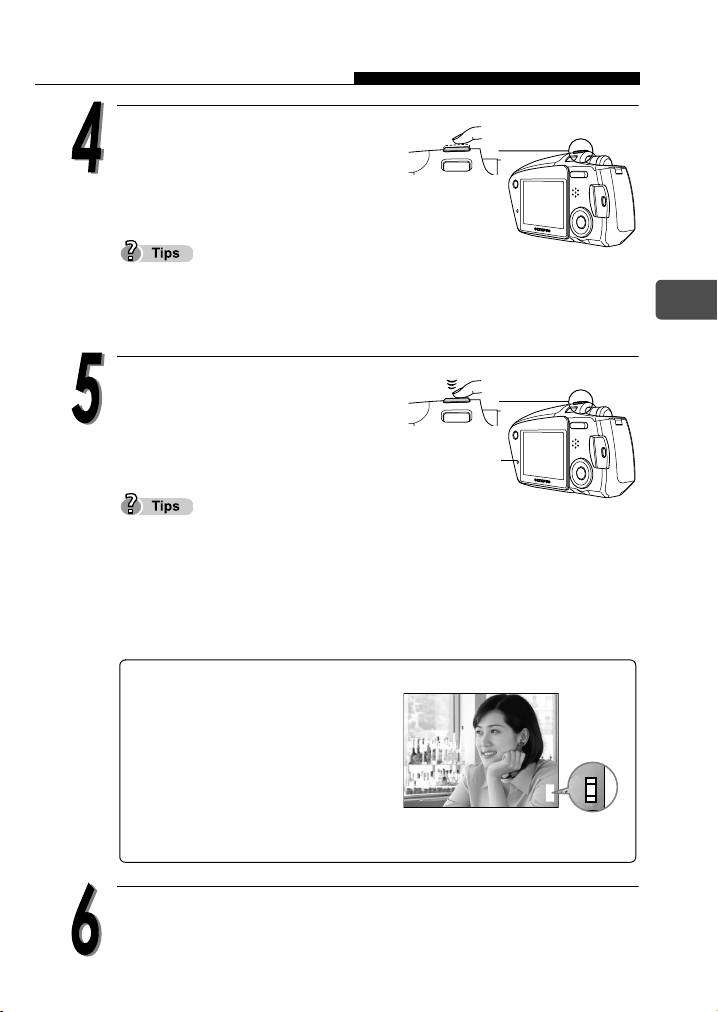
Press the shutter button half-way.
When the focus and exposure are
locked, the green lamp lights
steadily.
When the flash is going to fire, the flash standby lamp lights.
If the green lamp blinks, this means that the focus is not yet locked. Press
En
the shutter button half-way again.
Press the shutter button all the
way (fully) down to take the
picture.
Lamp
The picture is stored on the card.
The lamp on the camera blinks red while the picture is being stored on the
card.
Never open the card cover, or connect or disconnect the battery, AC adaptor
or power coupler while the lamp on the camera is blinking. The picture just
taken may not be stored and also the data of the pictures stored on the card
may be lost.
Memory gauge
The memory gauge lights up when
you take a picture. While the gauge
is lit, the camera is storing the
picture on the card. When the
$
memory gauge is fully lit (as shown
on right), no more pictures can be
taken. Wait until the gauge turns off
before taking the next picture.
Press the POWER switch to turn off the camera.
25
$
P
P
e
o
2272*1704
2272*1704
HQ
HQ
11
11
d
1111
000e_kisohen.book Page 25 Friday, July 30, 2004 7:06 PM
Memory gauge
Table of contents
- Contents
- Unpacking the box contents
- What can this camera do?
- Safety precautions
- Weatherproof feature
- Attaching the strap
- Charging the battery
- Loading and removing the battery
- Inserting and removing the picture card
- Power on/off
- Holding the camera correctly
- Taking still pictures
- Playing back still pictures
- Information on OLYMPUS Master
- Table des matières
- Déballage du contenu du carton
- Quelles sont les possibilités de cet appareil photo ?
- Consignes de sécurité
- Imperméabilité
- Fixation de la courroie
- Recharge de la batterie
- Mise en place et retrait de la batterie
- Insertion et retrait de la carte
- Mise en marche/arrêt
- La prise en main de l’appareil
- Prise de vues fixes
- Lecture d’images fixes
- Informations sur OLYMPUS Master
- Contenidos
- Desembalaje del contenido de la caja
- ¿Qué puede hacer esta cámara?
- Precauciones de seguridad
- Resistencia al agua
- Fijación de la correa
- Carga de la batería
- Cómo instalar y retirar la batería
- Cómo insertar y extraer la tarjeta fotográfica
- Encendido/apagado de la cámara
- Sujeción correcta de la cámara
- Toma de fotografías
- Reproducción de fotografías
- Información sobre OLYMPUS Master
- Inhalt
- Inhalt der Verpackung
- Funktionen der Kamera
- Vorsichtsmaßnahmen
- Spritzwasserbeständigkeit
- Anbringen des Trageriemens
- Aufladen des Akkus
- Einlegen und Herausnehmen des Akkus
- Einlegen und Herausnehmen der Karte
- Ein- und Ausschalten der Kamera
- Richtige Kamerahaltung
- Einzelbildaufnahme
- Wiedergabe von Einzelbildern
- Installieren der OLYMPUS Master-Software
- Indice
- Verifica del contenuto della confezione
- Funzionalità della fotocamera
- Precauzioni di sicurezza
- Progettata per qualsiasi condizione atmosferica
- Attacco della tracolla
- Caricamento della batteria
- Caricamento e rimozione della batteria
- Inserimento e rimozione della scheda di memoria
- Accensione/spegnimento
- Impugnatura corretta della fotocamera
- Scatto di fotografie
- Riproduzione di fotografie
- Informazioni su OLYMPUS Master
- Содержание
- Содержимое комплекта
- Возможности данной камеры.
- Меры безопасности
- Защищенный корпус
- Прикрепление ремешка
- Зарядка аккумулятора
- Установка и извлечение аккумулятора
- Установка и извлечение карты памяти
- Включение/выключение камеры
- Правильное положение камеры
- Фотосъемка
- Просмотр фотографий
- Информация по программному обеспечению OLYMPUS Master


