Olympus Stylus Verve: Charging the battery
Charging the battery: Olympus Stylus Verve
000e_kisohen.book Page 12 Friday, July 30, 2004 7:06 PM
Charging the battery
This camera uses an Olympus lithium ion battery (LI-30B). Do not use
any other type of battery.
The battery is not fully charged when the camera is purchased. Fully
charge the battery before first use.
Charging time Approx. 110 minutes
There are two types of the LI-30C battery charger, one is “AC cable type” and
the other is “plug-in type.” Depending on the region where you purchased the
En
camera, the included battery charger type differs. We explain here how to use
the AC cable type battery charger as an example. If you received the plug-in
type battery charger, plug it directly into an AC outlet.
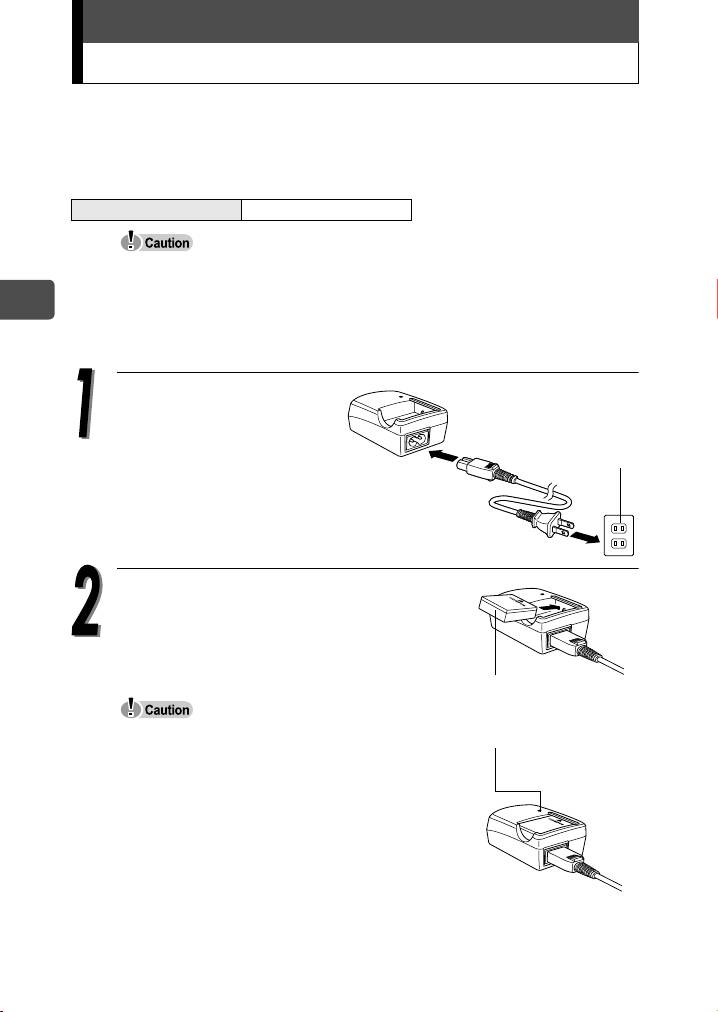
Plug in the AC cable in
the sequence indicated
c
by c and d.
AC wall outlet
d
Place the battery in the battery charger.
The indicator on the charger lights red
and charging begins. Charging is finished
when the indicator turns green.
Lithium ion battery
(LI-30B)
Use only the specified charger.
Charge indicator
Red: Charging
We recommend that you keep a spare battery (sold
Green: Charging is
separately) with you if you are planning to use the
finished.
camera for long periods or in a cold region.
The charger can be used within the range of
AC100V to AC240V (50/60Hz). Do not use voltage
converters sold in stores traveling overseas as this
could damage your charger.
When using the charger abroad, you may need a
plug adapter to convert the plug to the shape of the electric outlet. For
details, ask at your local electric shop or travel agent.
12
Table of contents
- Contents
- Unpacking the box contents
- What can this camera do?
- Safety precautions
- Weatherproof feature
- Attaching the strap
- Charging the battery
- Loading and removing the battery
- Inserting and removing the picture card
- Power on/off
- Holding the camera correctly
- Taking still pictures
- Playing back still pictures
- Information on OLYMPUS Master
- Table des matières
- Déballage du contenu du carton
- Quelles sont les possibilités de cet appareil photo ?
- Consignes de sécurité
- Imperméabilité
- Fixation de la courroie
- Recharge de la batterie
- Mise en place et retrait de la batterie
- Insertion et retrait de la carte
- Mise en marche/arrêt
- La prise en main de l’appareil
- Prise de vues fixes
- Lecture d’images fixes
- Informations sur OLYMPUS Master
- Contenidos
- Desembalaje del contenido de la caja
- ¿Qué puede hacer esta cámara?
- Precauciones de seguridad
- Resistencia al agua
- Fijación de la correa
- Carga de la batería
- Cómo instalar y retirar la batería
- Cómo insertar y extraer la tarjeta fotográfica
- Encendido/apagado de la cámara
- Sujeción correcta de la cámara
- Toma de fotografías
- Reproducción de fotografías
- Información sobre OLYMPUS Master
- Inhalt
- Inhalt der Verpackung
- Funktionen der Kamera
- Vorsichtsmaßnahmen
- Spritzwasserbeständigkeit
- Anbringen des Trageriemens
- Aufladen des Akkus
- Einlegen und Herausnehmen des Akkus
- Einlegen und Herausnehmen der Karte
- Ein- und Ausschalten der Kamera
- Richtige Kamerahaltung
- Einzelbildaufnahme
- Wiedergabe von Einzelbildern
- Installieren der OLYMPUS Master-Software
- Indice
- Verifica del contenuto della confezione
- Funzionalità della fotocamera
- Precauzioni di sicurezza
- Progettata per qualsiasi condizione atmosferica
- Attacco della tracolla
- Caricamento della batteria
- Caricamento e rimozione della batteria
- Inserimento e rimozione della scheda di memoria
- Accensione/spegnimento
- Impugnatura corretta della fotocamera
- Scatto di fotografie
- Riproduzione di fotografie
- Informazioni su OLYMPUS Master
- Содержание
- Содержимое комплекта
- Возможности данной камеры.
- Меры безопасности
- Защищенный корпус
- Прикрепление ремешка
- Зарядка аккумулятора
- Установка и извлечение аккумулятора
- Установка и извлечение карты памяти
- Включение/выключение камеры
- Правильное положение камеры
- Фотосъемка
- Просмотр фотографий
- Информация по программному обеспечению OLYMPUS Master


