Olympus FL-600R: instruction
Class: Video Audio Photo Equipment
Type:
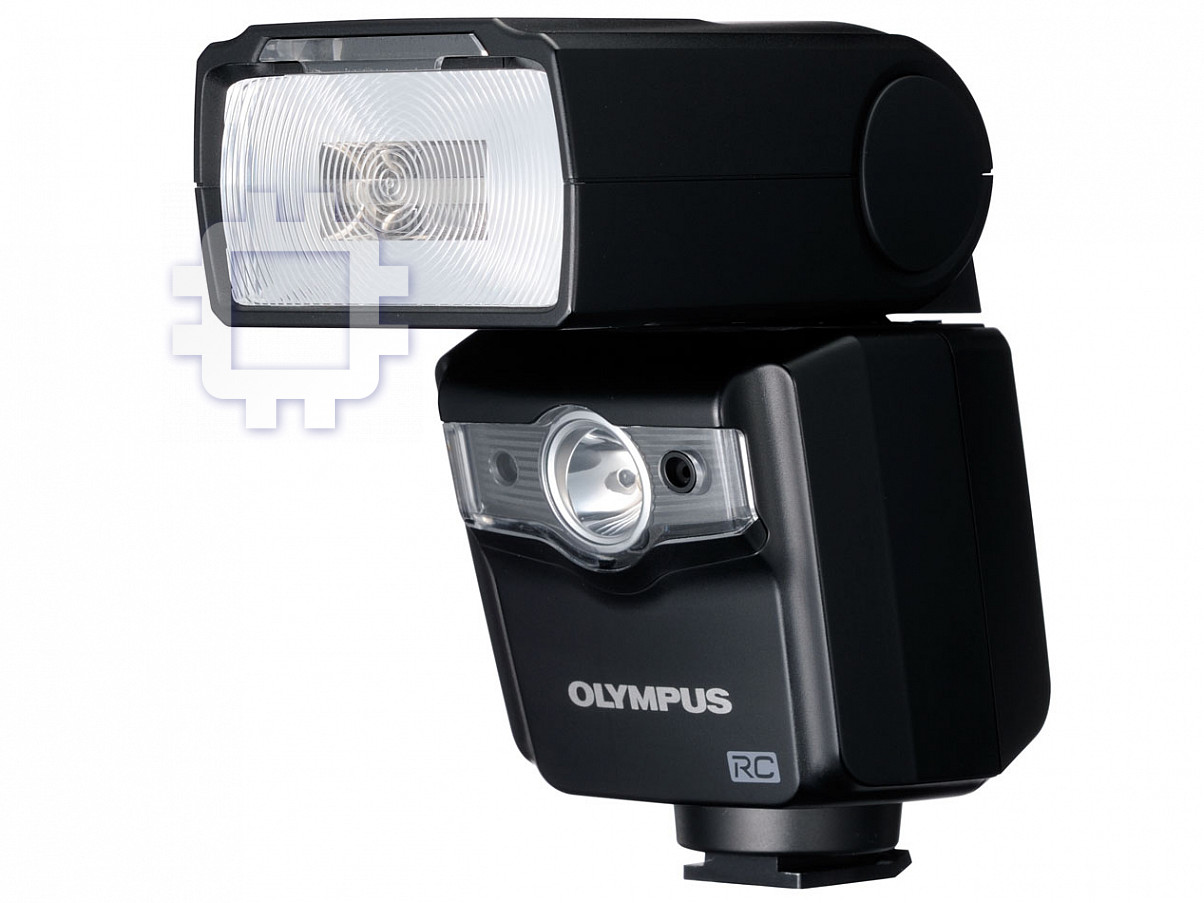
Manual for Olympus FL-600R

EN
INSTRUCTIONS
7
CS
NÁVOD K POUŽITÍ
25
DE
BEDIENUNGSANLEITUNG
43
ES
INSTRUCCIONES
61
FI
KÄYTTÖOHJEET
79
FR
MODE D’EMPLOI
97
NL
AANWIJZINGEN
115
PL
133
FL
-
600R
INSTRUKCJA
RU
ИНСТРУКЦИЯ
151
VM315001
© 2012
Printed in China
UK
ІНСТРУКЦІЯ
169
R219110LEurcover.indd1R219110LEurcover.indd1 2012/01/1016:33:262012/01/1016:33:26
MEMO
11
6
2
a
3
7
4
8
b
5
9
c
d
0
e
b
a
c
d
3 4
45678
1
2
3
c
d
90ab
R219110LEurcover.indd2R219110LEurcover.indd2 2012/01/1016:33:262012/01/1016:33:26

Information for Your Safety
IMPORTANT SAFETY
INSTRUCTIONS
When using your photographic equipment, basic safety precautions
should always be followed, including the following:
y Read and understand all instructions before using.
y Close supervision is necessary when any fl ash is used by or near
children. Do not leave fl ash unattended while in use.
y Care must be taken as burns can occur from touching hot parts.
5
bookR219110LEur.indb5bookR219110LEur.indb5 2012/01/1322:34:032012/01/1322:34:03

y Do not operate if the fl ash has been dropped or damaged - until it has
been examined by qualifi ed service personnel.
y Let fl ash cool completely before putting away.
y To reduce the risk of electric shock, do not immerse this fl ash in
water or other liquids.
y To reduce the risk of electric shock, do not disassemble this fl ash,
but take it to qualifi ed service personnel when service or repair
work is required. Incorrect reassembly can cause electric shock
when the fl ash is used subsequently.
y The use of an accessory attachment not recommended by the
manufacturer may cause a risk of fi re, electric shock, or injury to
persons.
SAVE THESE INSTRUCTIONS
6
bookR219110LEur.indb6bookR219110LEur.indb6 2012/01/1322:34:032012/01/1322:34:03

Thank you for purchasing this Olympus product. To ensure your safety, please read this
instruction manual before use, and keep it handy for future reference.
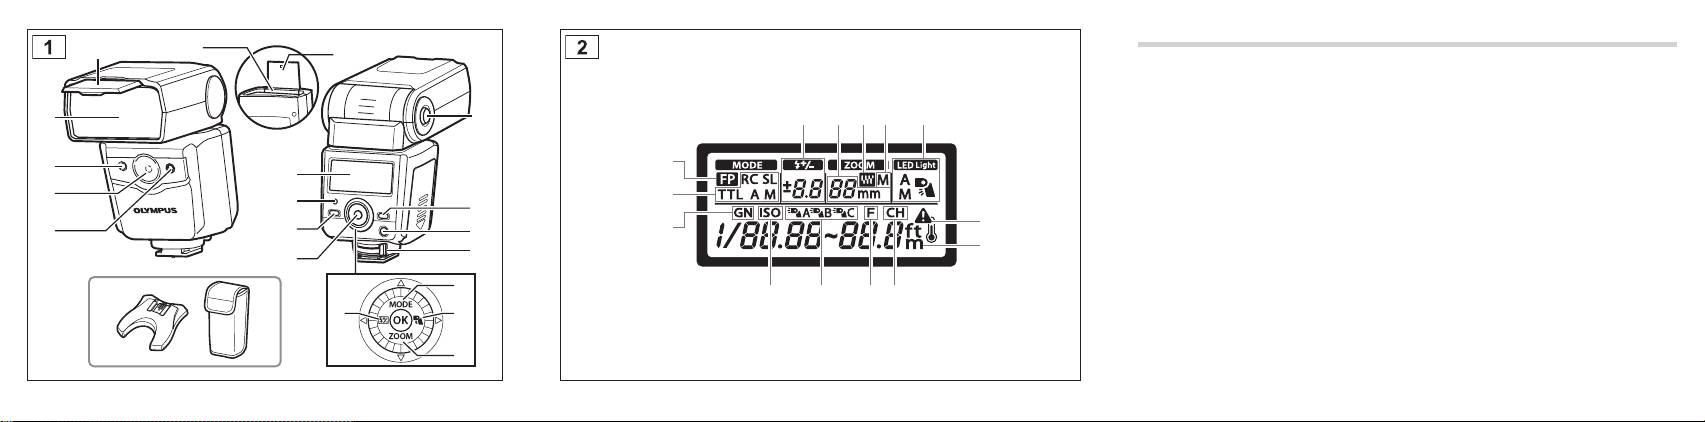
Names of Parts (Fig. Names of Parts (Fig. p. 3) p. 3)
Continuous FiringContinuous Firing
1 Wide panel 2 Light-emitting area
The fl ash may become hot when fi red many
3 Remote sensor 4 AF illuminator/LED
times in succession, resulting in damage
window 5 Auto light receptor 6 Catch light
or malfunction. The fl ash should be fi red
plate 7 Control panel 8 AUTO CHECK lamp
no more than 10 times in succession
9 TEST button/CHARGE lamp 0 OK button
at intervals of 2.5 seconds, after which
a Bounce lock release button b BACK LIGHT
it should be left unused for at least 10
button c ON/OFF button d Latch
minutes.
e Dial (a: fl ash compensation button; b: MODE
button; c: LED light button; d: ZOOM button)
Preparing a Battery (Preparing a Battery (Sold SeparatelySold Separately))
Control PanelControl Panel (Fig. (Fig. p. p. 44))
Choose from the below batteries:
• AA (R6) alkaline batteries (× 4)
XX Details Details ( (p.p. 11, 1811, 18))
• AA (R6) NiMH batteries (× 4)
1 Super FP fl ash 2 Flash control mode 3 Guide
number (GN) 4 Flash intensity control 5 Zoom
x
Note
position (angle of illumination) 6 FOUR THIRDS
AA (R6) manganese batteries cannot be
7 Zoom mode 8 LED light 9 ISO sensitivity
used.
0 RC mode group a Aperture (F) b RC mode
channel c Temperature warning d Distance units
EN 7
bookR219110LEur.indb7bookR219110LEur.indb7 2012/01/1322:34:032012/01/1322:34:03
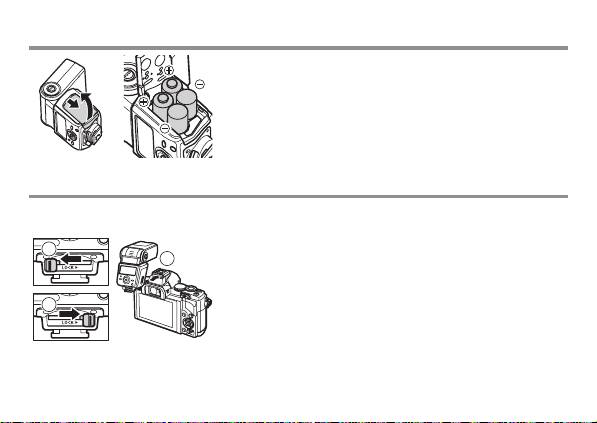
Loading BatteriesLoading Batteries
1
Open the battery compartment cover.
2
Insert the batteries with correct +/– polarity.
3
Close the battery compartment cover.
Attaching to the CameraAttaching to the Camera
Confi rm that both the camera and electronic fl ash are off. Attaching or removing the electronic
fl ash while either the fl ash or the camera is on may result in malfunction.
1
1
Slide the latch in the direction opposite to that
2
indicated by the [LOCKX] icon (
1
).
2
Slide the fl ash into the hot shoe until it clicks securely
3
into place (
2
).
3
Slide the latch to the [LOCKX] position (
3
).
• To remove the fl ash, slide the latch in the direction
opposite to the [
LOCKX] arrow and slide it from the shoe.
8 EN
bookR219110LEur.indb8bookR219110LEur.indb8 2012/01/1322:34:032012/01/1322:34:03
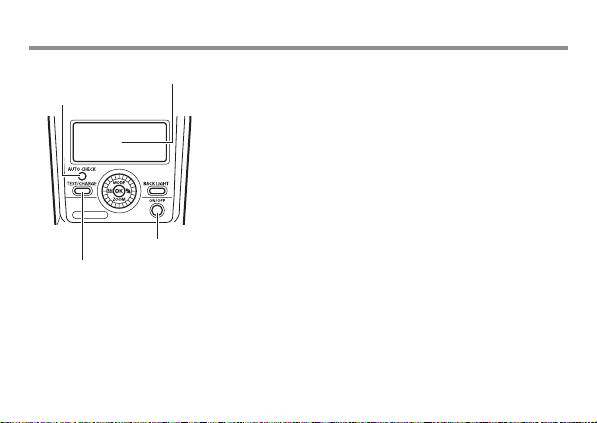
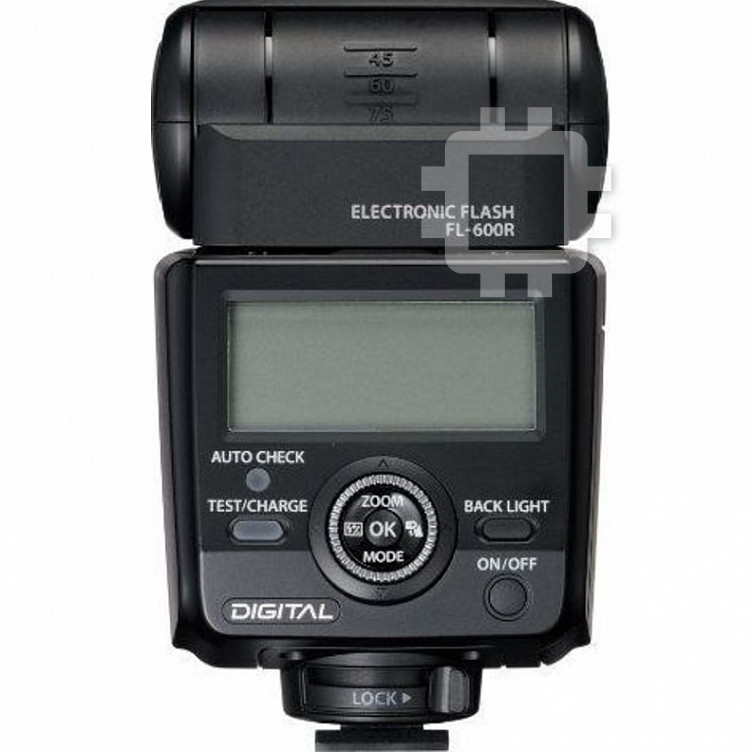
Turning on the Electronic FlashTurning on the Electronic Flash
Attach an electronic fl ash to the camera, and then turn the camera on.
Control panel
1
Press the ON/OFF button.
AUTO CHECK lamp
• The control panel display will turn on.
• To turn the fl ash off, press the ON/OFF button again.
• Replace the batteries if the CHARGE lamp does not light
after:
30 seconds (Alkaline batteries)
10 seconds (NiMH batteries)
• If the CHARGE lamp and AUTO CHECK lamp blink
simultaneously, batteries are running low. Replace the
batteries.
ON/OFF button
• The fl ash will enter sleep mode whenever the camera
enters sleep mode.
CHARGE lamp
• If no operations are performed for approximately 60
minutes, the fl ash will turn off automatically. Press the
ON/OFF button to turn it on.
EN 9
bookR219110LEur.indb9bookR219110LEur.indb9 2012/01/1322:34:042012/01/1322:34:04
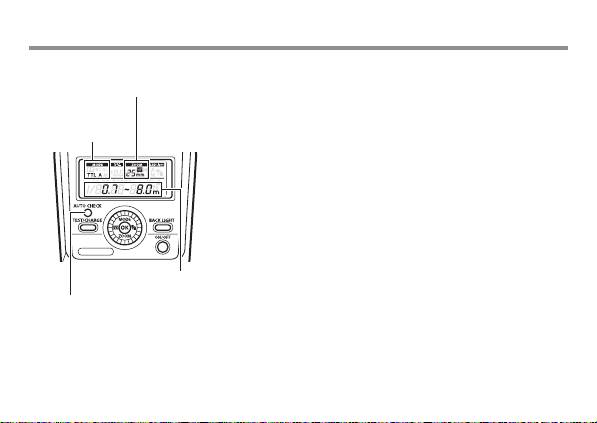
ShootingShooting
Firing angle
Displayed according to the
1
Use camera controls to choose the fl ash mode.
See the camera manual for details.
focal length of the lens.
2
Choose a fl ash control mode.
Flash control
g“Flash control mode” (p. 11)
mode
3
Press the shutter button halfway.
• The camera and fl ash will exchange shooting
information and the fl ash range will be displayed in the
control panel.
• Flash range varies with camera settings (ISO
sensitivity, aperture, and lens focal length).
4
Press the shutter button the rest of the way down to
take the picture.
Light control range
The AUTO CHECK lamp blinks for about 5 s after
AUTO CHECK lamp
shooting to indicate that the fl ash has fi red successfully.
• When using a fl ash, fl ash light may be blocked by the lens body, lens hood, etc.
• Use the wide panel to prevent overexposure at ranges of less than 1 m (3 ft.).
10 EN
bookR219110LEur.indb10bookR219110LEur.indb10 2012/01/1322:34:042012/01/1322:34:04
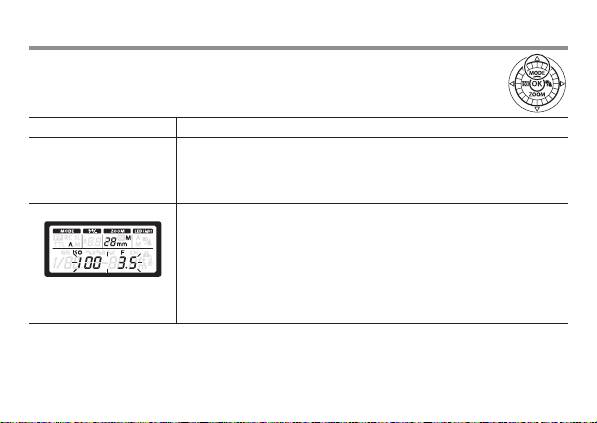
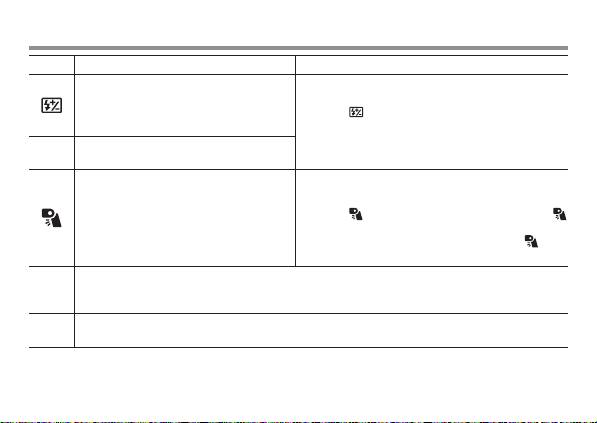
Flash Control ModeFlash Control Mode
Choose a fl ash control mode according to your subject and shooting conditions.
To select a mode, press the MODE (
F
) button and rotate the dial.
Control panel display Control operation
The flash light intensity is controlled automatically according
TTL-AUTO
to the camera’s setup. The flash will be adjusted based on the
brightness taken through the camera’s lens. Usually use this mode
with a camera with communication capability.
AUTO
The flash will be adjusted based on the brightness captured
by auto light receptor on the electronic flash. If the camera has
communication capability, this mode can be used only when the
Blinks: Out of fl ash control
camera is an AUTO-compatible model.
range
EN 11
bookR219110LEur.indb11bookR219110LEur.indb11 2012/01/1322:34:042012/01/1322:34:04
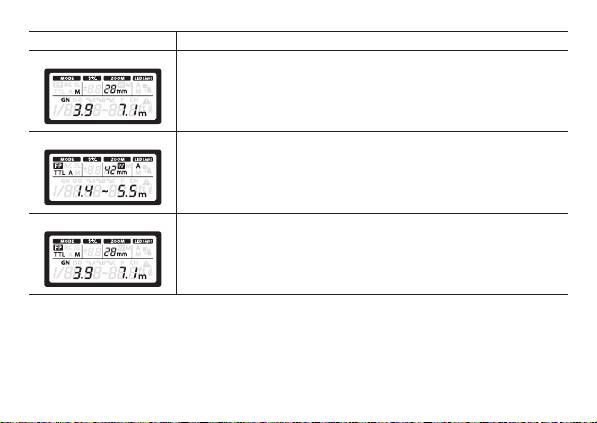
Control panel display Control operation
MANUAL
In this mode, the flash is emitted according to the guide number
setting. Rotate the dial to choose the guide number. The flash
displays the optimal range, which is calculated based on the guide
number and camera settings.
FP TTLAUTO
Super FP flash. This mode allows you to use flash photography
even at shutter speeds faster than the flash synchronization speed
of the camera. Flash level is set automatically. Maximum output
is reduced, resulting in a smaller flash range. Flash range also
diminishes with shutter speed.
FP MANUAL
The flash fires at the selected guide number. Rotate the dial to
choose the guide number. The flash displays the optimal range,
which is calculated based on the guide number and camera
settings.
12 EN
bookR219110LEur.indb12bookR219110LEur.indb12 2012/01/1322:34:042012/01/1322:34:04
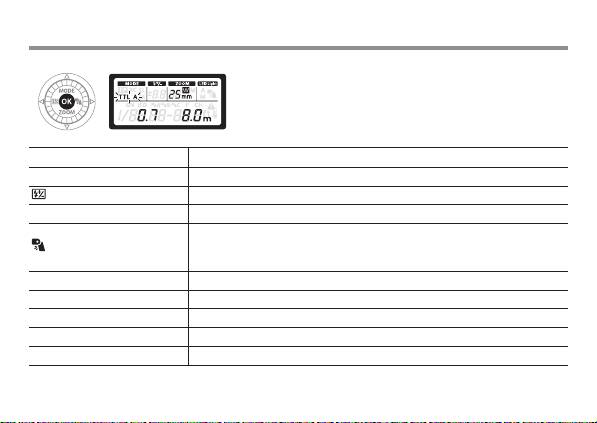
Button FunctionsButton Functions
Button Function Use
Adjust fl ash level by up to ±5 EV. This
value is combined with adjustments to
fl ash compensation made using the
1
Press (H) or ZOOM (G).
camera.
2
Rotate the dial.
Adjust the angle of illumination
ZOOM
manually. “M” appears in the display.
1
Before shooting, set the LED light to manual.
g “Other settings” (p. 17)
Manually turn the LED light on or off.
2
Press (I) to turn the LED light on. Press
(I) again to turn the LED light off. To view the
LED brightness setting, press and hold (I)
for 2 s while the LED light is on.
To fi re a test fl ash, press the TEST button while the CHARGE lamp is lit. The AUTO
TEST
CHECK lamp blinks for about 5 s to indicate that the fl ash has fi red successfully. If the
lamp does not blink, adjust settings or change the distance to the subject.
BACK
The control panel backlight lights for about 15 s. The backlight turns off when camera
LIGHT
controls are used.
EN 13
bookR219110LEur.indb13bookR219110LEur.indb13 2012/01/1322:34:052012/01/1322:34:05
Restoring Default SettingsRestoring Default Settings
1
Keeping the OK button pressed, press the BACK LIGHT button for 2 s.
The control panel will blink once when settings are reset.
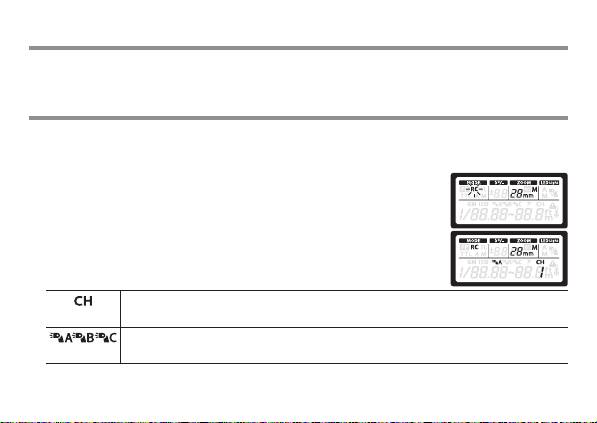
Wireless Flash SettingsWireless Flash Settings
Wireless control is available with Olympus digital cameras that support RC mode. The unit is
controlled by means of a fl ash mounted on the camera. It can also be mounted on a camera
for wireless control of multiple remote fl ash units. For information on cameras that support
this system, see the camera manual.
1
Set the camera and fl ash to RC mode.
Press MODE (
F
) and rotate the dial to select a fl ash control mode.
2
Use the fl ash to select the channel and group.
Press MODE (
F
) and use
FGHI
to highlight items and rotate
the dial to change.
Set the camera and fl ash to the same channel.
Channel
The camera can adjust fl ash settings
*
separately for up to 3 groups; choose the group
Group
to which the fl ash belongs.
* Including fl ash control mode, fl ash level, and fl ash compensation.
14 EN
bookR219110LEur.indb14bookR219110LEur.indb14 2012/01/1322:34:052012/01/1322:34:05
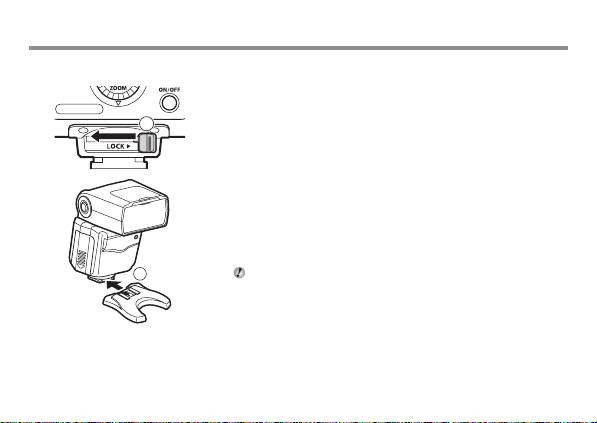
Placing Wireless Flash UnitsPlacing Wireless Flash Units
Since the communication is performed with the fl ash emission of the camera, the fl ash
positioning range varies with camera. See the camera manual for details.
1
Attach the stand provided.
• Slide the latch in the direction opposite to that indicated
1
by the [LOCKX] icon (1) and slide the fl ash onto the
stand until it clicks securely into place (2).
• Slide the latch to the [LOCKX] position to latch the fl ash
in place.
• To remove the fl ash, slide the latch in the direction
opposite to the [LOCKX] arrow and slide it from the
stand.
2
Position the fl ash with the remote sensor facing the
camera.
2
Take a test shot after positioning.
• We recommend using a single group of up to three
remote fl ash units.
• Flash may not fi re due to the angle or distance between
the camera and the object.
EN 15
bookR219110LEur.indb15bookR219110LEur.indb15 2012/01/1322:34:052012/01/1322:34:05
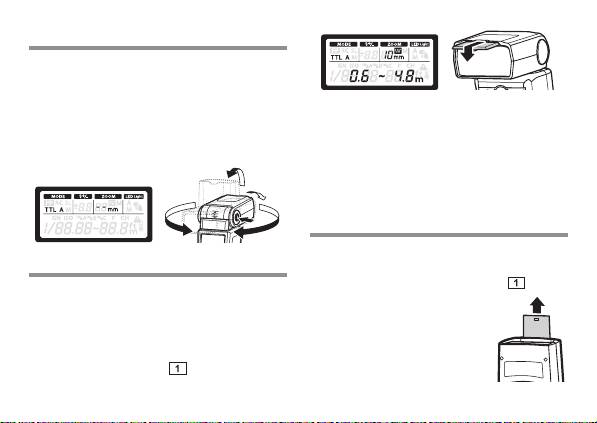
Fixing the Irradiation AngleFixing the Irradiation Angle
Point the fl ash head at a wall or ceiling
for bounce fl ash photography. The area
illuminated at ranges of 0.5–1.0 m (1.6–3.3 ft.)
will not be correct; point the fl ash down.
• The estimated range display changes when
1
Pressing the bounce lock release button, turn
the wide panel is used.
the light-emitting section up/down and left/
• The angle of illumination can be set to
right.
10 mm and 8 mm only.
90°
• Do not tilt the wide panel up.
7°
• The ZOOM display will blink if the lens has
180°
a focal length of 12 mm or more.
180°
Using the Catch Light PlateUsing the Catch Light Plate
The catch light plate refl ects light from the
Using the Wide PanelUsing the Wide Panel
fl ash to create a catch light effect.
Use for angles of illumination wider than
1
Slide out the catch light plate (Fig. p. 3).
12 mm (24 mm in 135 format). The ZOOM
Point the fl ash directly
display will blink if the lens focal length is
upward with the plate toward
the subject.
under 12 mm.
1
Slide out the wide panel and place it on the
light-emitting area (Fig. p. 3).
16 EN
bookR219110LEur.indb16bookR219110LEur.indb16 2012/01/1322:34:052012/01/1322:34:05
Other SettingsOther Settings
The following options can be selected in the control panel.
1
Press the OK button.
An item will blink in the control panel.
2
Press
FGHI
to highlight items.
3
Rotate the dial to change the highlighted item.
Option Description
MODE (fl ash control mode) p. 11
(fl ash compensation) p. 13
ZOOM (angle of illumination) p. 13
Choose whether the LED lights automatically or manually.
(LED light)
A: Lights automatically as required.
M: Lights when the LED light button is pressed.
GN (guide number) Adjust fl ash level.
ISO sensitivity Adjust ISO sensitivity.
Group Choose a group for RC mode (p. 14).
Aperture Adjust aperture.
Channel Choose a channel for RC mode (p. 14).
EN 17
bookR219110LEur.indb17bookR219110LEur.indb17 2012/01/1322:34:062012/01/1322:34:06
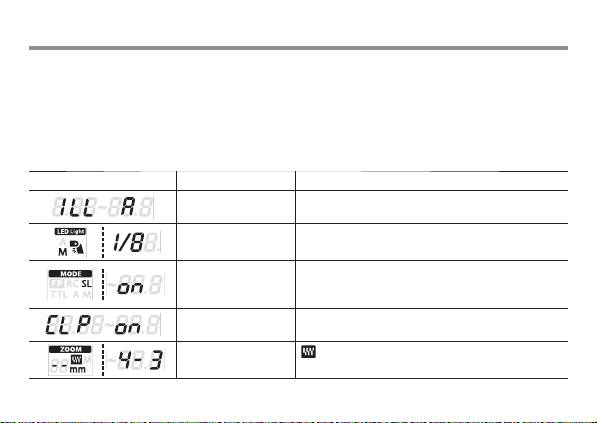
Custom SettingsCustom Settings
Customize settings for improved ease of use.
1
Press the OK button for more than 2 s.
The fl ash will enter custom settings mode.
2
Press
FG
to highlight items.
3
Rotate the dial to change the highlighted item.
4
Press the OK button for more than 2 s to save changes.
Control panel Option Description
AF illuminator
A: Controlled by camera.
OFF: Does not light.
LED brightness 1/1–1/16: Adjust LED brightness.
ON: Flash control display shows slave mode.
Slave fl ash
OFF: Flash control display does not show slave
mode.
Flash cable
ON: Flash cable not used.
OFF: Flash cable used.
Zoom display
: Display values for FOUR THIRDS lenses.
OFF: Display 135 format equivalent values.
18 EN
bookR219110LEur.indb18bookR219110LEur.indb18 2012/01/1322:34:062012/01/1322:34:06

Control panel Option Description
ON: Flash detects position of wide panel. Angle
Wide panel detection
of illumination adjusted automatically.
OFF: Flash does not detect wide panel position.
Distance units
m: Distances displayed in meters.
ft: Distances displayed in feet.
Guide number
ON: Flash output is shown as a guide number.
display
OFF: Flash output is shown as a relative value.
ON: Show the fl ash range calculated by the
Auto light sensing
camera in AUTO fl ash control mode.
OFF: Show the current aperture and ISO
sensitivity.
25–3200: Display the ISO sensitivity when AUTO
Auto ISO display
is selected as the fl ash control mode for cameras
that can not communicate with the fl ash unit.
EN 19
bookR219110LEur.indb19bookR219110LEur.indb19 2012/01/1322:34:072012/01/1322:34:07

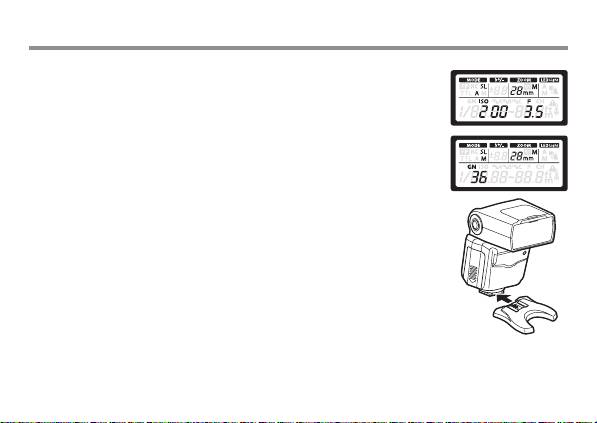
Cameras That Do Not Communicate with the FlashCameras That Do Not Communicate with the Flash
AUTOAUTO
Set aperture and ISO sensitivity to the values selected with the camera.
1
Set the fl ash control mode to AUTO.
g “Flash control mode” (p. 11)
2
Match the zoom position to the focal length of the lens.
g “ZOOM” (p. 13)
3
Adjust aperture and ISO sensitivity.
g “Other settings” (p. 17)
If the selected values are out of the fl ash control range, [ISO] and [F] will blink in the display.
The AUTO CHECK lamp blinks for about 5 s after the shutter is released to show that the
fl ash has fi red successfully.
MANUALMANUAL
Choose the guide number.
1
Set the fl ash control mode to MANUAL.
g “Flash control mode” (p. 11)
2
Adjust fl ash level.
g “Other settings” (p. 17)
20 EN
bookR219110LEur.indb20bookR219110LEur.indb20 2012/01/1322:34:082012/01/1322:34:08
Slave ModeSlave Mode
The fl ash can be fi red remotely in sync with any fl ash fi red by other units.
1
Set the fl ash control mode to SL AUTO or SL MANUAL.
g “Flash control mode” (p. 11)
Adjust other fl ash settings as for AUTO or MANUAL mode.
g “Cameras That Do Not Communicate with the Flash” (p. 20)
2
Position the fl ash.
See the camera manual for more information.
• The fl ash can not be used with cameras that require a pre-fl ash.
• The fl ash may fi re in response to fl ash units used by other
photographers.
EN 21
bookR219110LEur.indb21bookR219110LEur.indb21 2012/01/1322:34:082012/01/1322:34:08

Safety precautionsSafety precautions
Read WARNINGS and CAUTIONS thoroughly to ensure safe usage. These safety
precautions protect the users and others and prevent property damage.
Failure to observe the precautions indicated by this symbol may result in
WARNING
injury or death.
• Do not use fl ash in places where it may be exposed to fl ammable or explosive gas.
Otherwise, fi re ignition or explosion may result.
• Do not directly solder the product or modify, remodel, or disassemble.
• Do not cover the light emitting area of the fl ash with your hand, and do not touch the light
emitting area after continuous fi ring. It may burn your skin.
• Water and foreign matter inside of the device may cause fi re or electric shock. If the device
is immersed in or exposed to water or foreign matter is found inside of the device, turn off
the power immediately and remove batteries with care. Contact your dealer or consult an
Olympus Authorized Service Station.
• To prevent a traffi c accident, do not direct the fl ash at a person operating a motor vehicle.
• Do not use the fl ash or AF illuminator in close proximity to others (especially infants). Keep
the fl ash out of reach of children. Light from the fl ash can cause visual impairment.
• Do not use batteries that are not specifi ed for use.
• Do not mix old and new batteries, or batteries made by different manufacturers.
• Do not connect substances such as metal to the (+) or (–) of batteries.
22 EN
bookR219110LEur.indb22bookR219110LEur.indb22 2012/01/1322:34:082012/01/1322:34:08


