Elta 6740: OPERATING INSTRUCTIONS PREPARATION OF THE REMOTE CONTROL
OPERATING INSTRUCTIONS PREPARATION OF THE REMOTE CONTROL: Elta 6740
27.
GRAPHIC USER INTERFACE
Information and settings can be displayed on the screen of the TV set or DVD player.
PREPARATION
Turn on the TV set and select the video input mode.
OPERATING INSTRUCTIONS PREPARATION OF THE REMOTE CONTROL
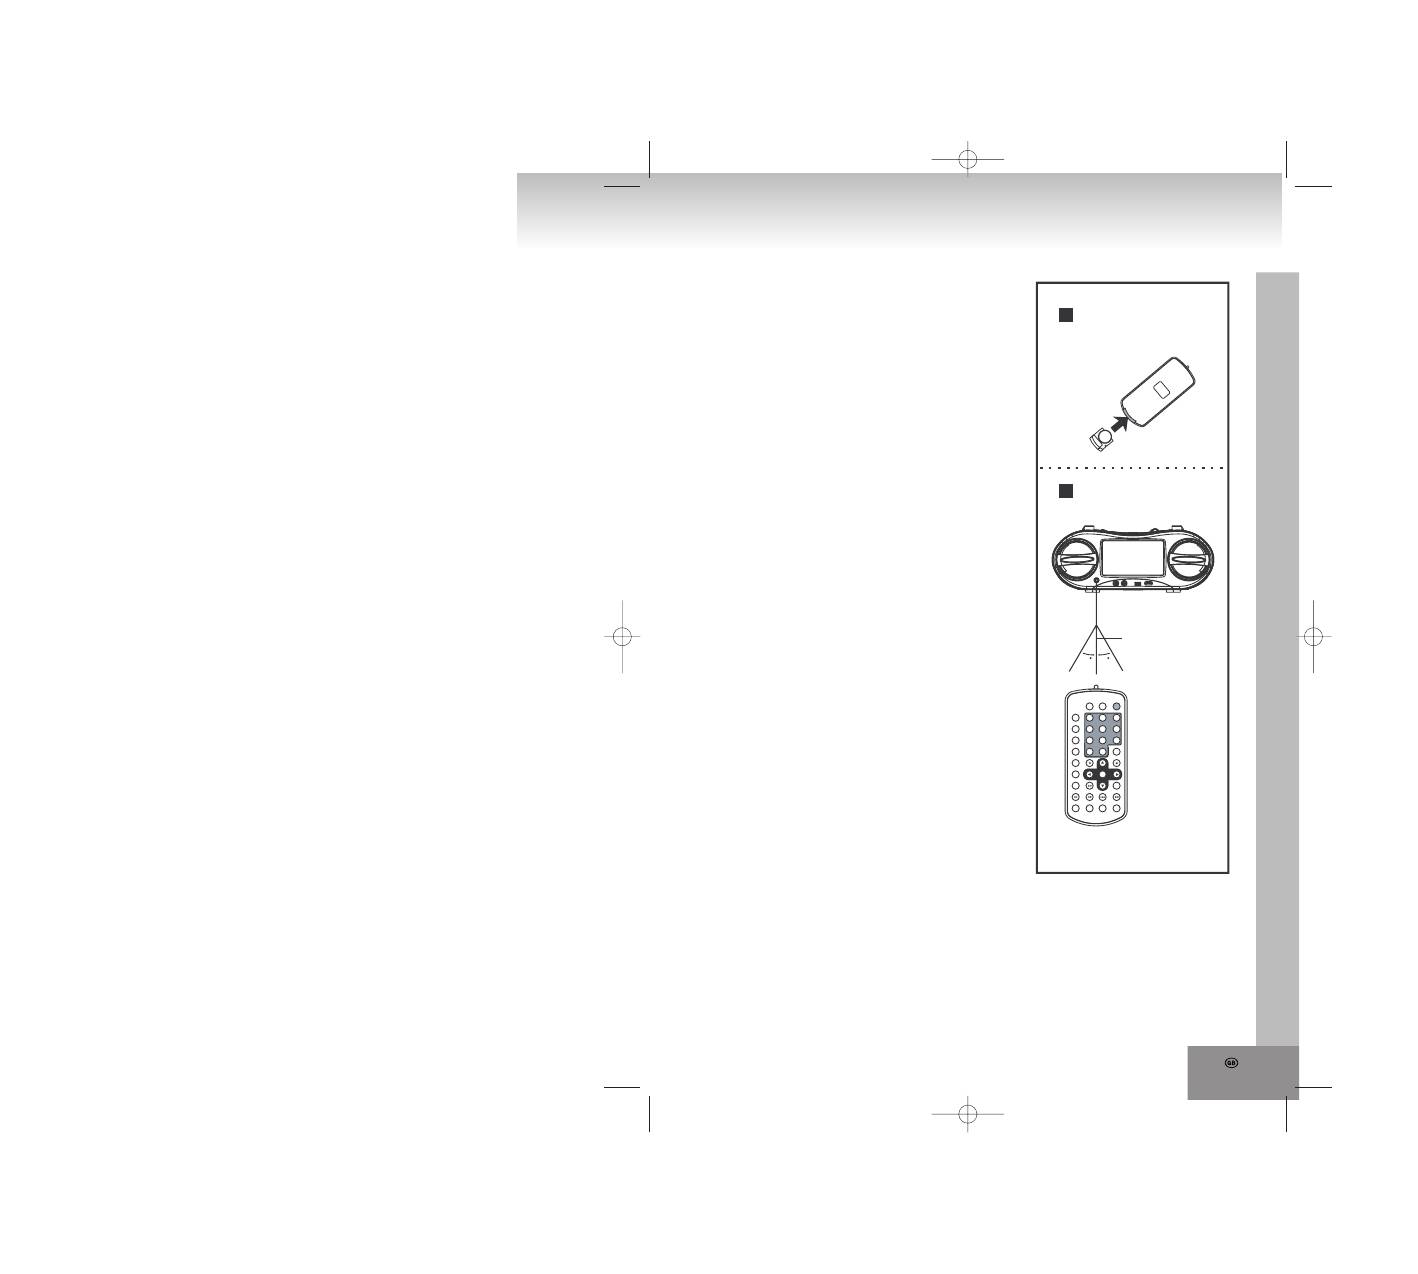
Installation of the battery
A
Insert the battery while observing the correct (+) and (-)
polarity as illustrated at the right side.
Notes about the remote control
• Use one CR2025 lithium button cell.
• The battery usually will work for about one year; this depends
on how often the remote control unit is used.
• If the remote control unit fails to work even when it is
operated near the player, replace the battery.
• Do not attempt to recharge, short-circuit, disassemble, warm
up or throw the battery into the fire.
• Do not drop, step on or otherwise impact the remote control.
This may lead to malfunction.
• If the remote control unit is not going to be used for a long
time, remove the battery.
Remote control operation range
B
Direct the remote control unit from no more than about 7 m
from the remote control sensor and within an angle about 60°
towards the sensor window on the front of the player.
Notes about the operation range of the remote control:
• Do not direct bright lamps towards the sensor.
• The operation range depends on the brightness of the room.
• Objects between the remote control and sensor window
block the transmission.
• Do not use the remote control at the same time with remote
controls of other devices.
SENSOR OF THE REMOTE CONTROL
A B
++
lle
C
m
ui
ht
iL
5
2
0
2r
C
V
3
2
cs
+10
0
7
4
1
8
5
2
9
6
3
1/ALL
TITLE
AUDIO
F.BWD
ANGLE
ZOOM
F.FWD
PREV
NEXT
SEARCH
PROGRAM
PAUSE/STEP
SLOW
SELECT
DISPLAY
SETUP
MUTE
REPEAT
MENU
SUBTITLE
PLAY
STOP
CLEAR
A-B
P/N
30
7 m
30

28.
OPERATION
1. Turn on the player.
2. Open the CD tray.
3. Place a CD with the labeled side upwards on the black mounting plate with the 3 retaining tie-clips.
4. Close the CD tray again and the playback starts automatically.
5. When a menu screen appears on the TV set, select the desired track with the arrow keys or the numeric
keys and start the playback with SELECT on the remote control or with PLAY/PAUSE on the device.
SETTING OF THE VOLUME LEVEL
Adjust the volume at the device with the VOLUME rotary control between MIN and MAX.
ACTIVATION OF THE BASS INTENSIFICATION
Press the BBS key at the device. The bass sounds out more fully and more strongly. Renewed pressing of the
BBS key turns off the bass intensification.
CHAPTER/TRACK FORWARD OR BACKWARD
DVD:
During the playback you can skip to the next or previous chapter with the NEXT or PREV keys.
VCD/CD:
During the playback you can skip to the next or previous track with the NEXT or PREV keys.
FAST FORWARD AND BACKWARD
By pressing of the F.FWD or F. BWD keys on the remote control or FF or FR buttons on the player several
times you can scan the CD forward or backward at X2, X4, X8, X20 or normal speed.
During the scan operation the volume level is lowered.
Press the PLAY key to resume the normal playback.
PAUSE OR FRAME PLAYBACK (CD/MP3)
During playback, press PAUSE/STEP on the remote control to pause. Continue the normal playback with
PLAY.
PAUSE OR FRAME PLAYBACK (VCD/DVD)
In the pause mode the player goes on one frame with each key press on PAUSE/STEP on the remote control.
Continue the normal playback with PLAY or press PAUSE/STEP again.
STOP PLAYBACK
During playback press the STOP button on the remote control or on the player to stop the playback. The player
activates its resume function if STOP is pressed once. Press the PLAY button again to start the playback at the
location it stopped previously. Open the CD tray or press the STOP button a second time to clear the resume
function.
29.
SLOW MOTION
VCD/DVD only
During the playback press the SLOW button on the
remote control. First the disc will be played with half
speed. Each further pressing of the button reduces
the playback speed (up to 1/7 of the normal speed).
Continue the normal playback with PLAY.
REPEAT ONCE/REPEAT ALL
During playback press the key REPEAT 1/ALL on
the remote control.
DVD
One or all chapters/titles will be repeated.
VCD/CD
One or all tracks will be repeated.
NOTE: With a VCD REPEAT 1/ALL works only if
PBC is turned off.
SEARCH FOR A PREFERRED SCENE
1. During playback press the SEARCH key on the
remote control and highlight the item to be played
back (title, chapter or chapter time).
2. Enter the desired number or time with the
numeric keys.
3. Confirm with the SELECT key and the playback of
the found scene starts.
4. To exit the search menu, press the SEARCH key.
REPEAT A-B
1. During the playback press the REPEAT A-B key
to set the start point (A) for repetition.
2. Press this key again to set the end point (B). The
player automatically starts to repeat the section
between point A and B.
3. Press this key once again to resume the normal
playback.
PROGRAMMED PLAYBACK (UP TO 16 MEMORY
LOCATIONS)
1. During the playback press PROGRAM to invoke
the program menu.
2. Select memory location(s) with the arrow keys
and then enter the desired titles/chapters
numbers with the numeric keys.
Note: The input of a leading zero is not
necessary. Enter with the +10 key on the remote
control the tenth of the chapter/title/track number.
If the chapter/title/track number is larger than 10,
press first the +10 key and then the unit digit. The
input of numbers larger than the total number of
title/chapter/track numbers on the CD is useless.
Example:
To enter track 3, press "3".
To enter track 12, press "+10" and then "2".
To enter track 21, press "+10" twice and then "1".
3. Start the programmed playback with PLAY in the
menu or on the remote control. By pressing
PROGRAM again you can complete the
programming mode.
4. To delete the programmed items, select the items
and then press the CLEAR key on the remote
control. To clear all items, select the <CLEAR> in
the menu and then press the SELECT key on
remote control.
5. You can also finish the program mode by deleting
all the items in the program menu.
ZOOM (VCD/DVD)
By continued pressing of ZOOM on the remote control
you can zoom out 2, 3 and 4 times and zoom in 1/2,
1/3, 1/4 of the normal size of the picture.
If the picture is at 1/4 of its size, a further pressing of
the ZOOM key returns to the normal displaying size.
In the enlarged picture you can move with the arrow
keys.
ON SCREEN DISPLAY INFORMATION
When the player is turned on, press the DISPLAY key
on the remote control continuously. On the top of the
screen an information banner (current CD type, title
number, chapter number, playtime, audio language,
audio type, subtitle language and multi angle, etc.) is
displayed.
CHANGING THE AUDIO SOUNDTRACK
LANGUAGE (DVD/VCD)
You can change the initial adjusted audio language to
another language (Only possible with discs, which
contain several audio languages).
DVD
During the playback of a DVD press the AUDIO key.
The next audio language will be switched over and will
be displayed in the information banner on the screen.
Note: Audio can be played back in 8 languages
(depending on the DVD).
VCD
Pressing the AUDIO button during the playback of a
VCD changes the audio output mode: MONO L,
MONO R or STEREO.
NOTE: If no audio language is recorded this key
does not have any function.
30.
MULTI-ANGLE VIEWING (DVD ONLY)
During the playback press the ANGLE key to display
the number of recorded perspectives and select the
desired perspective of the scene.
Note: Only with DVD’s with multi perspectives of a
scene this function is applicable. Selection of scenes,
which were recorded from different perspectives
(limited by on the DVD stored camera angles).
CHANGING OF THE SUBTITLE LANGUAGE (DVD
ONLY)
During the playback of a DVD press SUBTITLE. The
subtitle language shown on the screen will change
with each pressing of the key.
As soon as the desired subtitle language is displayed
in the information banner release the key and the
subtitles are shown in this language.
Note: This function works only with DVD’s, which were
recorded with subtitles in several languages.
Subtitles can be displayed in maximally 32 languages
(depending on the disc).
VCD PLAYBACK WITH THE PBC FUNCTION
After loading a VCD 2.0/1.0 with PBC the screen
displays the disc format and afterwards a menu.
Select the desired track with the numeric keys: Press
for track 1 to 9 the appropriate key of the numeric
block 1 - 9. With the key “0” select track 10. If the track
number exceeds 10, press first the key +10 and then a
numeric key 1 - 9.
Turn on or off the PBC by pressing the MENU key. If
the PBC mode is turned off only 9 preview pictures are
shown.
DVD
In order to return to the main menu during the
playback, press the MENU key.
TITLE:
Playback of the title of a DVD.
MP3/MPEG 4 PLAYBACK
1. Place a Mp3/MPEG 4 CD into the CD tray. The
screen displays after some seconds all folders on
the CD.
NOTE: If there are titles in the root folder, the
playback of the first file starts automatically.
2. Select with the arrow keys a folder and confirm with
SELECT.
3. The files in this folder will be shown and with the
arrow keys a file can be selected. With SELECT you
can start the playback.
4. With NEXT and PREV you can select a file directly.
5. Change with REPEAT 1/ALL the playback mode:
REP 1 – Repeat one file.
REP DIR - Repeat all files in the current folder.
REP ALL – Repeat all files on the current CD.
OFF – Cancel all repeating modes.
PLAYBACK OF KODAK PICTURE CD/JPEG CD
After inserting a Kodak a Picture CD a slideshow
starts automatically.
After loading the folders of a JPEG CD are displayed
on the screen. Select with the arrow keys the desired
folder and confirm with the SELECT key.
The files of this folder will be displayed and you are
able to select your favorite picture with the arrow keys
up/down. With SELECT the playback will be started.
A preview of the picture will be shown by scrolling
through the file names.
OPERATION OF KODAK PICTURE CD/JPEG CD
1. REPEAT MODES
During the playback press the 1/ALL key to change
the repetition mode.
REP 1- Repeat the current picture.
REP DIR- Repeat all pictures of the current folder.
REP ALL- Repeat all pictures of the current CD.
OFF- Cancel all repeating modes.
To invoke the preview mode during the playback
press STOP.
2. SKIP TO NEXT/PREVIOUS PICTURE
Press NEXT or PREV to skip to the next or
previous picture.
If no key is pressed for a few seconds, it will be
skipped to next picture automatically
3. ROTATE A PICTURE
With the right arrow key you can turn the picture
90° clockwise and with the left arrow key
counterclockwise.
4. MIRROR A PICTURE
Mirror the picture vertically with the up arrow key.
Mirror the picture horizontally with the down arrow
key.
5. ZOOM A PICTURE IN/OUT
By the continued pressing of ZOOM on the remote
control you can zoom out 2, 3 and 4 times and
zoom in 1/2, 1/3, 1/4 of the normal size of the
picture.
If the picture is at 1/4 of the size of the picture, a
further pressing of the ZOOM key returns to the
normal displaying size.
In order to display covered areas in the enlarged
picture, you can move with the arrow keys inside
the displayed section.
Оглавление
- ACHTUNG
- ANSICHT DER BEDIENELEMENTE / ANSCHLÜSSE
- Tasten auf der Fernbedienung und ihrer FunktionINSTALLATION UND ANSCHLUSS
- Batterien:
- ANSCHLUSS VON MIKROFON UND KOPFHÖRER
- BEDIENUNG VORBEREITUNG DER FERNBEDIENUNG
- GRUNDEINSTELLUNGEN
- RADIOBETRIEB
- FEHLERSUCHE
- TECHNISCHE SPEZIFIKATIONEN
- GARANTIE UND KUNDENDIENST
- CAUTION
- LOCATION OF CONTROLS / CONNECTIONS
- Buttons on the remote control an their functionsINSTALLATION AND CONNECTION
- Batteries:
- CONNECTION OF MICROPHONE AND HEADPHONES
- OPERATING INSTRUCTIONS PREPARATION OF THE REMOTE CONTROL
- BASIC SETTINGS
- RADIO OPERATION
- TROUBLE SHOOTING
- TECHNICAL DATA
- GUARANTEE AND CUSTOMER SERVICE
- AVERTISSEMENT
- LOCALISATION DES CONTROLES : CONNECTIONS
- Boutons de la télécommande et leur fonction INSTALLATION ET CONNEXION
- Piles :
- CONNEXION DU MICROPHONE ET DES ECOUTEURS
- INSTRUCTIONS D’OPERATION PREPARATION DE LA TELECOMMANDE
- REGLAGES DE BASE
- FONCTIONNEMENT DE LA RADIO
- GUIDE DE DEPANNAGE
- DONNEES TECHNIQUES
- GARANTIE ET SERVICE CLIENT
- FIGYELEM
- SZABÁLYOZÓK/CSATLAKOZÁSOK ELHELYEZKEDÉSE
- A távirányító gombjai és funkcióikÜZEMBE HELYEZÉS ÉS CSATLAKOZTATÁS
- Elemek:
- MIKROFON ÉS FEJHALLGATÓ CSATLAKOZTATÁSA
- HASZNÁLATI UTASÍTÁS TÁVIRÁNYÍTÓ ELŐKÉSZÍTÉSE
- ALAPVETŐ BEÁLLÍTÁSOK
- RÁDIÓ HASZNÁLATA
- HIBAKERESÉS
- MŰSZAKI ADATOK
- GARANCIA ÉS VEVŐSZOLGÁLAT
- ATTENZIONE
- Pulsanti sul telecomando e funzioni relativeINSTALLAZIONE E CONNESSIONE
- Batterie:
- CONNECTION OF MICROPHONE AND HEADPHONES
- ISTRUZIONI D’USO PREPARAZIONE DEL TELECOMANDO
- IMPOSTAZIONI DI BASE
- FUNZIONAMENTO RADIO
- RISOLUZIONE DI GUASTI
- DATI TECNICI
- GARANZIA E SERVIZIO CLIENTI
- ADVERTENCIA
- UBICACIÓN DE LOS CONTROLES / CONEXIONES
- Botones del control remoto y sus funciones INSTALACIÓN Y CONEXIÓN
- Baterías:
- CONEXIÓN DE MICRÓFONO Y DE AURICULARES
- INSTRUCCIONES DE FUNCIONAMIENTO PREPARACIÓN DEL CONTROL REMOTO
- FUNCIONAMIENTO DE LA RADIO
- SOLUCIONES
- DATOS TÉCNICOS
- GARANTÍA Y SERVICIO AL CONSUMIDOR
- CUIDADO
- LOCALIZAÇÃO DOS CONTROLOS/LIGAÇÕES
- Botões no controlo remoto e respectivas funçõesINSTALAÇÃO E LIGAÇÃO
- Pilhas:
- LIGAÇÃO DO MICROFONE E DOS AUSCULTADORES
- INSTRUÇÕES DE FUNCIONAMENTO PREPARAÇÃO DO CONTROLO REMOTO
- DEFINIÇÕES BÁSICAS
- FUNCIONAMENTO DO RÁDIO
- RESOLUÇÃO DE PROBLEMAS
- DADOS TÉCNICOS
- GARANTIA E SERVIÇO AO CLIENTE
- UWAGA
- ROZMIESZCZENIE UKŁADU STEROWANIA / POŁĄCZENIA
- Przyciski na pilocie zdalnego sterowania i ich funkcje MONTAŻ I PODŁĄCZENIE
- Baterie:
- PODŁĄCZENIE MIKROFONU I SŁUCHAWEK
- INSTRUKCJA OBSŁUGI PRZYGOTOWANIE PILOTA ZDALNEGO STEROWANIA
- PODSTAWOWE USTAWIENIA
- OBSŁUGA RADIA
- ROZWIĄZYWANIE PROBLEMÓW
- DANE TECHNICZNE
- GWARANCJA I CENTRUM OBSŁUGI KLIENTA
- OPGELET
- WAAR ZIT WAT
- De knoppen op de afstandbediening en hun functies INSTALLATIE EN AANSLUITING
- Batterijen:
- AANSLUITING VAN DE MICROFOON EN KOPTELEFOON
- BEDIENINGSAANWIJZINGEN HET VOORBEREIDEN VAN DE AFSTANDBEDIENING
- BASISINSTELLINGEN
- DE BEDIENING VAN DE RADIO
- PROBLEEMOPLOSSING
- TECHNISCHE GEGEVENS
- GARANTIE EN KLANTENSERVICE
- UPOZORNĚNÍ
- UMÍSTĚNÍ OVLÁDACÍCH PRVKŮ / PŘÍPOJEK
- Tlačítka na dálkovém ovládání a jejich funkceINSTALACE A PŘIPOJENÍ
- Baterie:
- PŘIPOJENÍ MIKROFONU A SLUCHÁTEK
- NÁVOD K OBSLUZE PŘÍPRAVA DÁLKOVÉHO OVLÁDAČE
- ZÁKLADNÍ NASTAVENÍ
- OVLÁDÁNÍ RÁDIA
- ŘEŠENÍ PROBLÉMŮ
- TECHNICKÉ ÚDAJE
- ZÁRUKA A ZÁKAZNICKÝ SERVIS
- UYARI
- DÜĞMELERİN YERLERİ/ BAĞLANTILAR
- UZAKTAN KUMANDANIN DÜĞMELERİ VE İŞLEVLERİKURULUM VE BAĞLANTILAR
- Piller:
- MİKROFON VE KULAKLILARIN TAKILMASI
- ÇALIŞTIRMA TALİMATLARI UZAKTAN KUMANDANIN KULLANILMASI
- TEMEL AYARLAR
- RADYONUN KULLANILMASI
- SORUN GİDERME
- TEKNİK BİLGİLER
- GARANTİ VE MÜŞTERİ SERVİSİ
- ATENTIE
- POZITIA TASTELOR DE CONTROL / CONEXIUNI
- Tastele telecomenzii si functiunile lorINSTALARE SI CONECTARE
- Baterii:
- CONECTAREA MICROFONULUI SI CASTILOR
- INSTRUCTIUNI DE OPERAREPREGATIREA TELECOMENZII
- SETARI STANDARD
- UTILIZAREA RADIOULUI
- PROBLEME APARUTE IN UTILIZARE
- SPECIFICATII TEHNICE
- GARANTIA SI SERVICIILE PENTRU CLIENTI
- ВНИМАНИЕ
- МЕСТОНАХОЖДЕНИЕ НА КОПЧЕТАТА/КОНЕКТОРИТЕ
- Копчета върху дистанционното управление и техните функцииИНСТАЛИРАНЕ И СВЪРЗВАНЕ
- Батериите:
- СВЪРЗВАНЕ НА МИКРОФОН И СЛУШАЛКИ
- НАПЪТСТВИЯ ЗА РАБОТА ПОДГОТОВКА НА ДИСТАНЦИОННОТО УПРАВЛЕНИЕ
- ОСНОВНИ НАСТРОЙКИ
- РАБОТА С РАДИОТО
- ОСНОВНИ ПРОБЛЕМИ И РЕШЕНИЕТО ИМ
- ТЕХНИЧЕСКИ ДАННИ ПОЧИСТВАНЕ И ПОДДРЪЖКА НА ДИСКОВЕТЕ
- ГАРАНЦИЯ И ОБСЛУЖВАНЕ НА КЛИЕНТИТЕ
- ВНИМАНИЕ
- КНОПКИ УПРАВЛЕНИЯ / РАЗЪЕМЫ
- Кнопки на пульте дистанционного управленияУСТАНОВКА И ПОДКЛЮЧЕНИЕ
- Батарейки:
- ПОДКЛЮЧЕНИЕ МИКРОФОНА И НАУШНИКОВ
- УКАЗАНИЯ ПО ЭКСПЛУАТАЦИИ ПОДГОТОВКА ПУЛЬТА ДИСТАНЦИОННОГО УПРАВЛЕНИЯ
- ОСНОВНЫЕ НАСТРОЙКИ
- РАБОТА РАДИО
- УСТРАНЕНИЕ НЕИСПРАВНОСТЕЙ
- СПЕЦИФИКАЦИЯ
- ГАРАНТИЙНОЕ ОБСЛУЖИВАНИЕ
