Bang & Olufsen BeoLab 4 PC - User Guide: Cable connections
Cable connections: Bang & Olufsen BeoLab 4 PC - User Guide

6
Cable connections
The loudspeakers are intended
for use with a personal computer.
The sockets and the switch are
They may also be used with
located in the base of each
LINE IN
~
non-Bang & Olufsen audio or
loud speaker.
LINE IN MODE
video systems.
AUTO ON
About the LINE IN MODE switch …
The switch has two settings: ON
and AUTO. We recommend that
Connection to personal
you set the switch to the same
computers
Connection to audio or video
position on each loudspeaker.
Use the enclosed connector to
systems
connect the computer sound card
Connect the system to the LINE IN
When set to ON, the loud speakers
out put to each of the loud speakers.
socket on each loudspeaker (mini-
will not auto matically switch to
jack – mono).
standby when the sound signal
As the sound signal from a computer
disappears. In this case, we
may vary (not constantly on),
Set the LINE IN MODE switch to
recommend that you switch off at
we recommend that you set the
AUTO.
the mains supply, when not using
LINE IN MODE switch to ON. This
the system. When set to AUTO, the
will prevent the loudspeakers from
loudspeakers automatically switch
switching off and on every few
on when you switch on the system.
minutes.
When you switch off the system,
the loudspeakers will, after a few
minutes, switch to standby.
The supplied plug and mains cord
are specially designed for the
product. Do not change the plug
and if the mains cord is damaged,
you must buy a new one from your
Bang & Olufsen retailer.
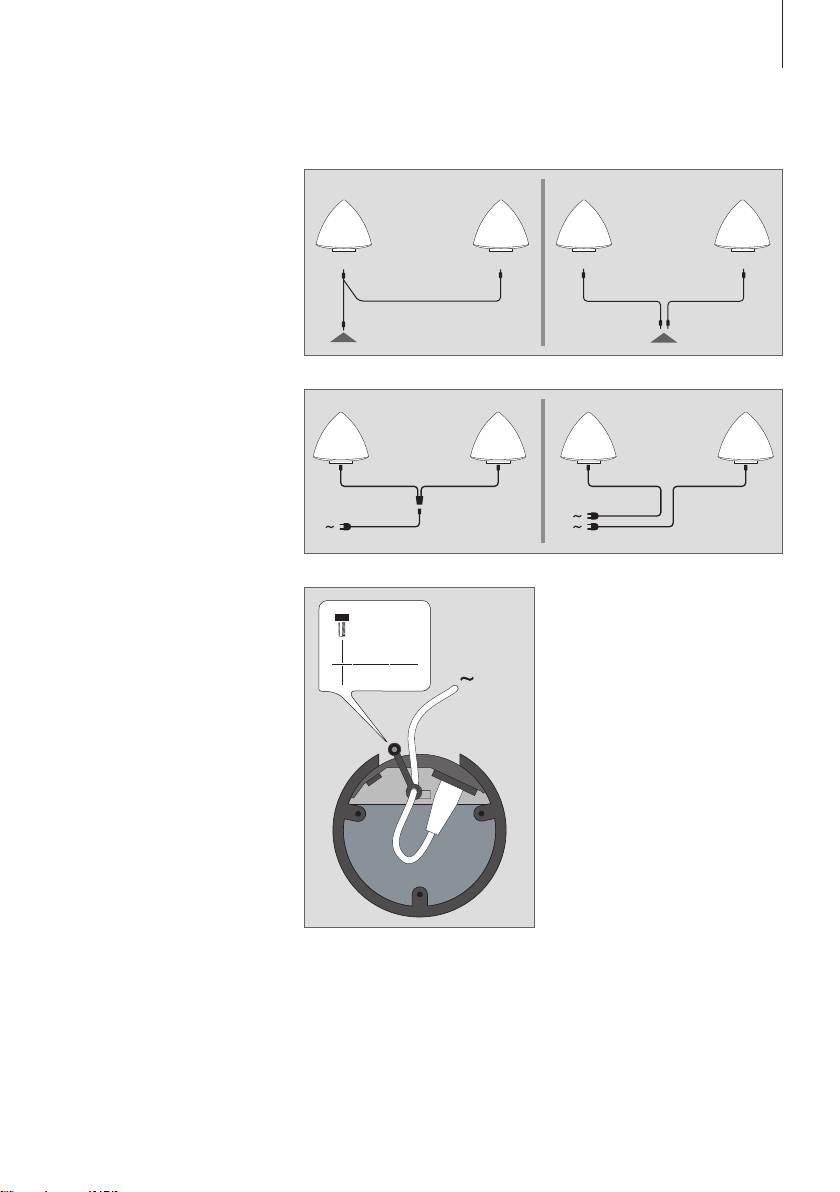
LINE IN connections: Output
from computer sound cards often
carry both the left and right sound
channels in one socket. Therefore,
use the enclosed connector when
connecting the loudspeakers to a
personal computer (fig 1). Connect
the plug marked L to the left loud-
speaker, and the plug marked R to
the right loudspeaker.
If you connect the loudspeakers to,
for example, a non-Bang & Olusen
audio or video system with separate
connections for the left and right
sound channels, make the
connections as shown in fig. 2.
Mains connections: Depending on
the type of mains supply connector
Cable Clamp: For safety reasons,
enclosed with your loud speakers,
the mains lead to each loud speaker
connect each loudspeaker to the
must be secured with the cable
mains as shown in either fig. 3 or
clamp provided.
fig. 4.
LR
LR
7
1 2
3 4
Оглавление
- WARNING: To reduce the risk 警告:为了降低 火 灾或 触电危险, of fire or electric shock, do 请勿让本电器淋雨或受潮。请勿 not expose this appliance to 将液体滴溅在本设备上,并确保 rain or moisture. Do not 本设备上未放置任何装有液体 expose this equip ment to 的物品,例如花瓶。 dripping or splashing and 若要将本设备与交流电源完全 ensure that no objects filled 断开,请将电源线从交流电源 with liquids, such as vases, are 插座上拔出。 placed on the equipment.
- English
- Set up the loudspeakers
- Cable connections
- Dansk
- Opsætning af højttalerne
- Kabeltilslutninger
- Deutsch
- Die Lautsprecher aufstellen
- Kabel anschließen
- Español
- Configuración de los altavoces
- Conexión de los cables
- Français
- Installer les enceintes
- Connexions des câbles
- Italiano
- Configurazione dei diffusori
- Collegamenti dei cavi
- Nederlands
- De luidsprekers instellen
- Kabelaansluitingen
- Português
- Configurar as colunas
- Ligações dos cabos
- Suomi
- Kaiuttimien käyttöönotto
- Kaapelikytkennät
- Svenska
- Installera högtalarna
- Kabelanslutningar
- Ελληνικά
- Εγκατάσταση των ηχείων
- Συνδέσεις καλωδίων
- Русский
- Установка акустических колонок
- Подсоединение кабелей
- 繁體中文
- 安裝揚聲器
- 連接纜線
- 简体中文
- 安装扬声器
- 连接缆线
- 한국어
- 라우드스피커 설치
- 케이블 연결
- 日本語
- スピーカーの設置
- ケーブルの接続
- Important information
