Ardo CO3012BA-S: I GB Russo
I GB Russo: Ardo CO3012BA-S
12
126
I GB Russo
POSIZIONAMENTO E MESSA IN OPERA
POSITIONING AND INSTALLATION
êÄáåÖôÖçàÖ à ÇÇéÑ Ç ùäëèãìÄíÄñàû
êÄáåÖôÖçàÖ à ÇÇéÑ Ç ùäëèãìÄíÄñàû
êÄáåÖôÖçàÖ à ÇÇéÑ Ç ùäëèãìÄíÄñàû
êÄáåÖôÖçàÖ à ÇÇéÑ Ç ùäëèãìÄíÄñàû
êÄáåÖôÖçàÖ à ÇÇéÑ Ç ùäëèãìÄíÄñàû
2
c
2
b
2
a
A
B
2b
2a
2c
1)
When unpacked, check that the mains voltage is the same as that indicated on the
data plate.
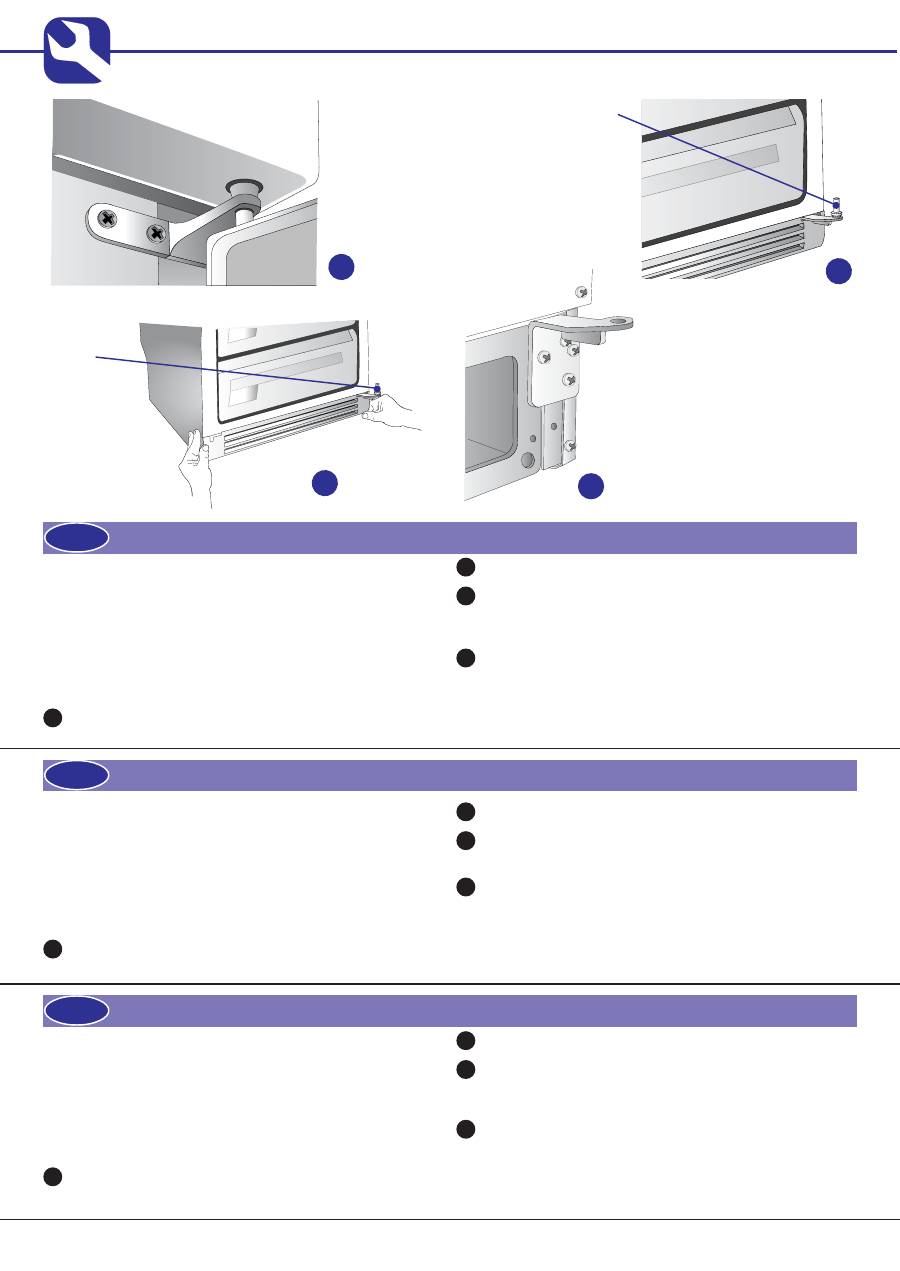
2)
If the door opening is as required, pass to Point 3. If not, invert the hinge points. It is
advisable to position the appliance horizontally for this operation, carefully and
very gently placing it on its back, using special stoppers to prevent squashing the
condenser and damaging the compressor unit.
Dismount the central hinge and simultaneously remove the upper door and the lower
door, close the slot using the cover positioned on the oposide side.
Remove the pin “A” and the washer of the lower hinge.
Dismount the lower plinth pulling lightly on the whole surface, cover the slot “B” of
the hinge with the cap supplied and remove the opposite cap.
Remove the lower hinge and remount the one supplied on the opposite side.
1)
Una volta sballato controllare che la tensione di rete sia la stessa indicata sulla
targhetta caratteristiche.
2)
Se l’apertura delle porte è secondo l’esigenza passare al Punto 3.
In caso contrario invertire i punti di incernieramento. Per questa operazione è
consigliabile posizionare l’elettrodomestico in orizzontale adagiandolo molto deli-
catamente sullo schienale, usando appositi spessori per evitare lo schiacciamento
del condensatore e il danneggiamento del gruppo compressore.
Smontare la cerniera centrale e togliere simultaneamente la porta superiore e la
porta inferiore, chiudere l’asola utilizzando il coperchio posizionato sul lato opposto.
Togliere il perno “A” e la rondella dalla cerniera inferiore.
Smontare lo zoccolo inferiore esercitando una lieve trazione sù tutta la superficie,
coprire l’asola “B” della cerniera con il tappo in dotazione ed estrarre il tappo
opposto.
Togliere la cerniera inferiore e rimontare sul lato opposto quella fornita in dotazio-
ne.
1)
ê‡ÒÔ‡ÍÓ‚‡‚ ÔË·Ó Û·Â‰ËÚÂÒ¸, ˜ÚÓ ÒÂÚ‚Ó ̇ÔflÊÂÌË ÒÓÓÚ‚ÂÚÒÚ‚ÛÂÚ
Á̇˜ÂÌ˲, Û͇Á‡ÌÌÓÏÛ Ì‡ Ô‡ÒÔÓÚÌÓÈ Ú‡·Î˘ÍÂ.
2)
ÖÒÎË ÒÚÓÓ̇ ÓÚÍ˚‚‡ÌËfl ‰‚ÂÂÈ Ç‡Ò ÛÒڇ˂‡ÂÚ, ÚÓ Ç˚ ÏÓÊÂÚ ÔÂÂÈÚË
Í ÔÛÌÍÚÛ 3. Ç ÔÓÚË‚ÌÓÏ ÒÎÛ˜‡Â Ç‡Ï ÌÂÓ·ıÓ‰ËÏÓ ÔÓÏÂÌflÚ¸ ÏÂÒÚ‡ÏË ÔÂÚÎË.
ÑÎfl ‚˚ÔÓÎÌÂÌËfl ‰‡ÌÌÓÈ ÓÔ‡ˆËË ÂÍÓÏẨÛÂÚÒfl ÛÒÚ‡ÌÓ‚ËÚ¸ ÔË·Ó ‚
„ÓËÁÓÌڇθÌÓ ÔÓÎÓÊÂÌËÂ, ÓÒÚÓÓÊÌÓ ÔÓÎÓÊË‚ Â„Ó Ì‡ Á‡‰Ì˛˛ ÒÚÂÌÍÛ Ë
ÔÓÎÓÊË‚ ÒÔˆˇθÌ˚ ÔӉͷ‰ÍË ‚Ó ËÁ·ÂʇÌË ‡Á‰‡‚ÎË‚‡ÌËfl
ÍÓ̉ÂÌÒ‡ÚÓ‡ Ë ÔÓ‚ÂʉÂÌËfl ÍÓÏÔÂÒÒÓÌÓÈ „ÛÔÔ˚.
ê‡Á·ÂËÚ ˆÂÌڇθÌÛ˛ ÔÂÚβ Ë Ó‰ÌÓ‚ÂÏÂÌÌÓ ÒÌËÏËÚ ‚ÂıÌ˛˛ Ë
ÌËÊÌ˛˛ ‰‚ÂË, Á‡Í˚‚ ÔÓÛ¯ËÌÛ ÔË ÔÓÏÓ˘Ë Í˚¯ÍË, ÛÒÚ‡ÌÓ‚ÎÂÌÌÓÈ Ì‡
ÔÓÚË‚ÓÔÓÎÓÊÌÓÈ ÒÚÓÓÌÂ.
ëÌËÏËÚ ÓÒ¸ “Ä” Ë ¯‡È·Û Ò ÌËÊÌÂÈ ÔÂÚÎË.
ëÌËÏËÚ ÌËÊÌËÈ ˆÓÍÓθ, Ò΄͇ ÔÓÚflÌÛ‚ Â„Ó ÔÓ ‚ÒÂÈ ÔÓ‚ÂıÌÓÒÚË,
Á‡ÍÓÈÚ ÔÓÛ¯ËÌÛ ÔÂÚÎË“Ç” ÔË ÔÓÏÓ˘Ë ÔË·„‡ÂÏÓÈ Á‡„ÎÛ¯ÍË Ë
ËÁ‚ÎÂÍËÚ ÔÓÚË‚ÓÔÓÎÓÊÌÛ˛ Á‡„ÎÛ¯ÍÛ.
ëÌËÏËÚ ÌËÊÌ˛˛ ÔÂÚβ Ë ÛÒÚ‡ÌÓ‚ËÚ ̇ ÔÓÚË‚ÓÔÓÎÓÊÌÛ˛ ÒÚÓÓÌÛ
‰Û„Û˛, ‚ıÓ‰fl˘Û˛ ‚ ÍÓÏÔÎÂÍÚ ÔÂÚβ.
2
d
2d
2b
2a
2c
2d
2b
2a
2c
2d
Оглавление
- I GB Russo
- PL CZ SK UK SR
- I GB Russo
- PL CZ SK UK SR
- I GB Russo
- PL CZ SK UK SR
- I GB Russo
- PL CZ SK UK SR
- I GB Russo
- PL CZ SK UK SR
- I GB Russo
- PL CZ SK UK SR
- I GB Russo
- PL CZ SK UK SR
- I GB Russo
- PL CZ SK UK SR
- I GB Russo
- PL CZ SK UK SR
- I GB Russo
- PL CZ SK UK SR
- I GB Russo
- PL CZ SK UK SR
- I GB Russo
- PL CZ SK UK SR
- I GB Russo
- PL CZ SK UK SR
- I GB Russo
- PL CZ SK UK SR
- I GB Russo
- PL CZ SK UK SR
- I GB Russo
- PL CZ SK UK SR
- I GB Russo
- PL CZ SK UK SR
