Acer X1163N: Getting Started
Getting Started: Acer X1163N
7
English
Getting Started
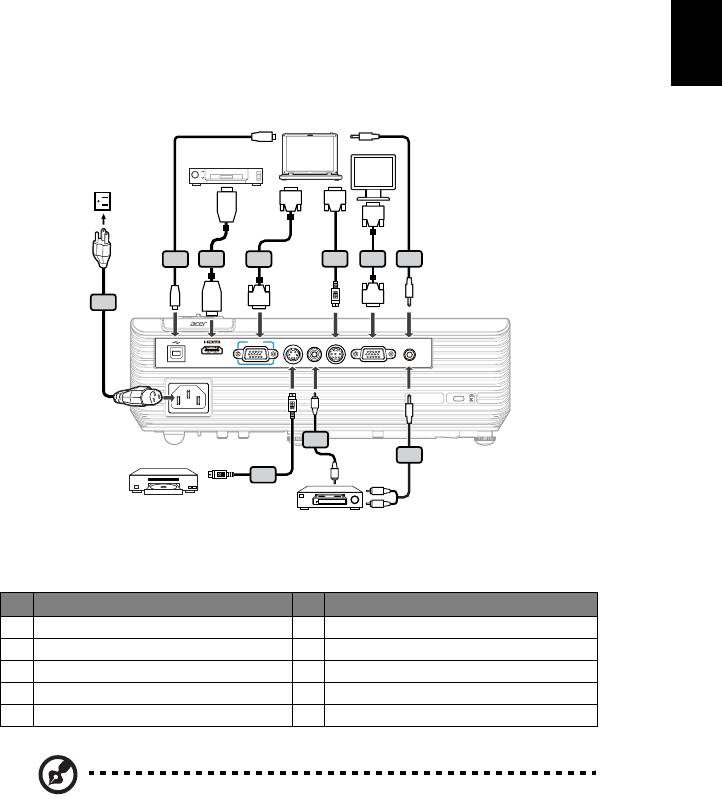
Connecting the Projector
VGA
USB
DVD player
HDMI
D-Sub
RS232
D-Sub
2
3
4
5
4
6
D-Sub
1
USB
HDMI
D-Sub
VGA IN S -VIDEO VIDEO RS232 VGA OUT AUDIO IN
Y
8
9
7
Y
W
R
S-Video output
Video output
# Description # Description
1 Power cord 6 Audio cable jack/jack
2 USB cable 7 S-Video cable
3 HDMI cable 8 Composite video cable
4 VGA cable 9 Audio cable jack/RCA
5 RS232 cable
Note: To ensure the projector works well with your computer,
please make sure the timing of the display mode is compatible
with the projector.
Note: Connector interface is subject to model's specifications.
Note: USB cable needs powered extender if the length is over 5 m.
8
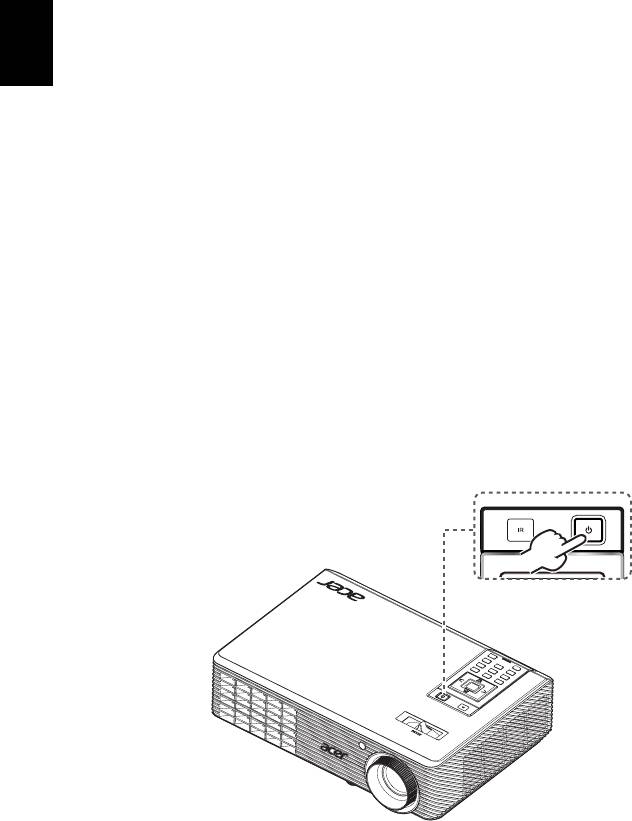
Turning the Projector On/Off
English
Turning on the Projector
1 Ensure that the power cord and signal cable are securely connected. The
Power indicator LED will flash red.
2 Turn on the projector by pressing "Power" button on the control panel,
and the Power indicator LED will turn blue.
3 Turn on your source (computer, notebook, video player ,etc.). The
projector will detect your source automatically.
• If the screen displays "Lock" and "Source" icons, it means the
projector is locked onto a specific source type and there is no such
type of input signal detected.
• If the screen displays "No Signal", please make sure the signal cables
are securely connected.
• If you connect to multiple sources at the same time, use the "Source"
button on the remote control to switch between inputs.
Power button
9
English
Turning the projector off
1 To turn the projector off, press the power button. This message appears:
"Please press the power button again to complete the shutdown process."
Press the power button again.
2 The LED power indicator will turn RED and blink rapidly after the projector
is turned off, and the fan(s) will continue to operate for about 2 minutes to
ensure that the system cools properly. (only supported under "Instant
Resume" mode)
3 As long as the power cord remains plugged in, you can press the power
button to turn the projector immediately back on anytime during the 2-
minute shutdown process. (only supported under "Instant Resume" mode)
4 Once the system has finished cooling, the LED power indicator will stop
blinking and turn solid red to indicate standby mode.
5 It is now safe to unplug the power cord.
Warning indicators:
• "Projector Overheated. Lamp will automatically turn off soon."
This onscreen message indicates that the projector has overheated.
The lamp with automatically turn off, the projector will automatically
shut down, and the LED temp indicator will turn solid red. Contact
your local dealer or service center.
• "Fan failed. Lamp will automatically turn off soon."
This onscreen message indicates that the fan has failed. The lamp will
automatically turn off, the projector will automatically shut down,
and the LED temp indicator will blink. Contact your local dealer or
service center.
Note: Whenever the projector automatically shuts down and the
LED lamp indicator turns solid red, contact your local reseller or
service center.
10
Adjusting the Projected Image
English
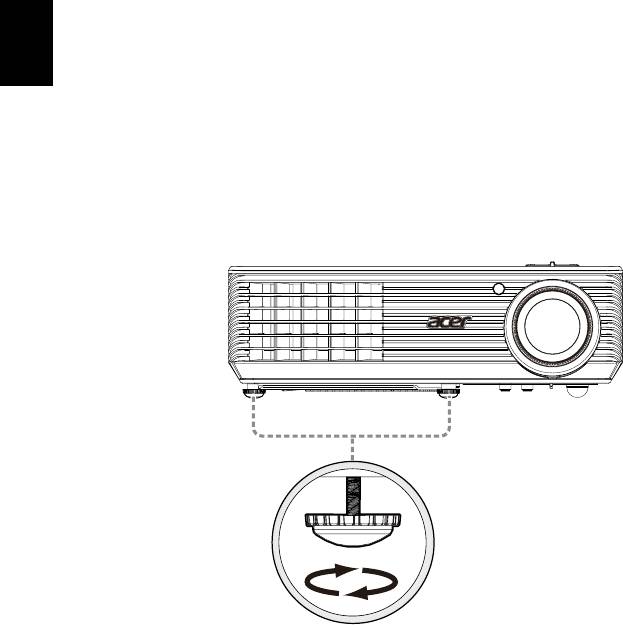
Adjusting the Height of Projected Image
The projector is equipped with elevator feet for adjusting the height of image.
To raise/lower the image:
Use Tilt adjusting wheel to fine-tune the display angle.
Tilt adjusting wheel
11
English
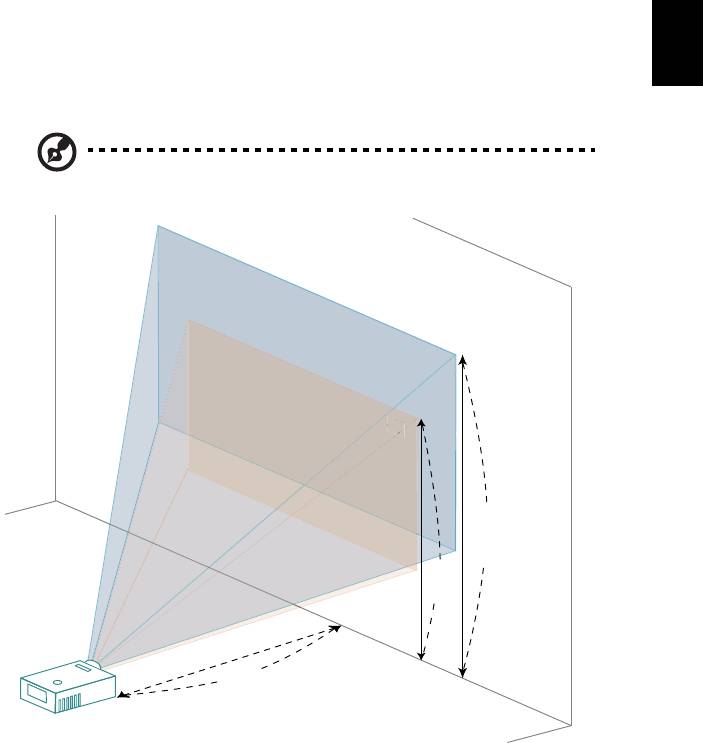
How to optimize image size and distance
Consult the table below to find the optimal image sizes achievable when the
projector is positioned at a desired distance from the screen. Example: If the
projector is 2.0 m from the screen, good image quality is possible for image sizes
between 46" and 50".
Note: Remind as below figure, the space of 88 cm height is
required when located at 2.0 m distance.
50"
46"
Figure: Fixed distance with different zoom and screen size.
46"
6
M
a
x
s
c
r
e
e
n
s
i
z
e
M
i
n
s
c
r
e
e
n
s
i
z
e
B
Height: 88 cm
from base to
top of image
Height:
80 cm
C
A
2.0 m
Desired Distance
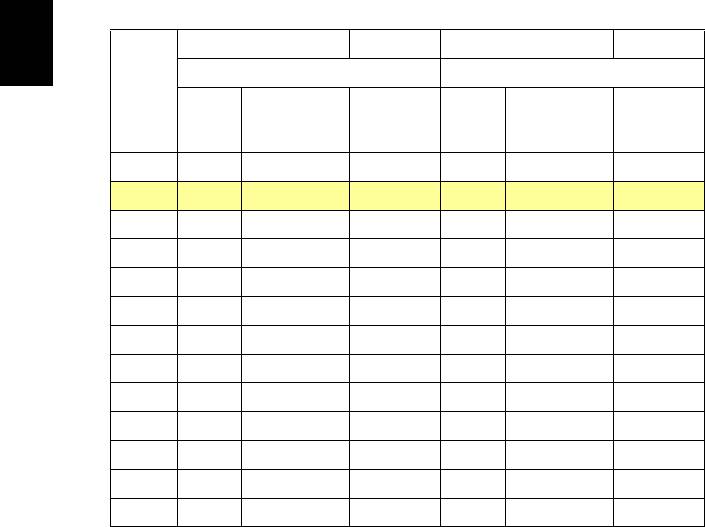
12
Screen size
Top
Screen size
Top
Desired
English
(Min zoom) (Max zoom)
Distance
(m)
From base
From base to
Diagonal
Diagonal
<A>
to top of
top of image
(inch)
W (cm) x H (cm)
(inch)
W (cm) x H (cm)
image (cm)
(cm)
<B>
<B>
<C>
<C>
1 23 47 x 35 40 25 51 x 38 44
2 46 93 x 70 80 50 103 x 77 88
2.5 57 116 x 87 100 63 128 x 96 111
3 69 140 x 105 120 76 154 x 115 133
3.5 80 163 x 122 140 88 179 x 135 155
4 92 186 x 140 160 101 205 x 154 177
4.5 103 209 x 157 181 114 231 x 173 199
5 114 233 x 174 201 126 256 x 192 221
6 137 279 x 209 241 151 308 x 231 265
7 160 326 x 244 281 177 359 x 269 310
8 183 372 x 279 321 202 410 x 308 354
9 206 419 x 314 361 227 462 x 346 398
10 229 465 x 349 401 252 513 x 385 442
Zoom Ratio: 1.1x
13
English
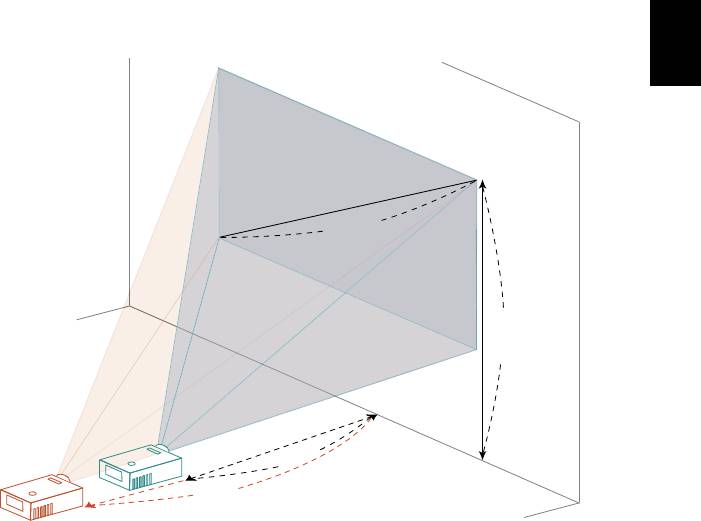
How to get a preferred image size by adjusting
distance and zoom
A
50"
Desired
image size
D
Height
from base to
top of image
2.0 m
B
2.2 m
C
Desired Distance
The table below shows how to achieve a desired image size by adjusting either
the position or the zoom ring. For example: to obtain an image size of 50" set
the projector at a distance 2.0 m and 2.2 m from the screen and adjust the zoom
level accordingly.
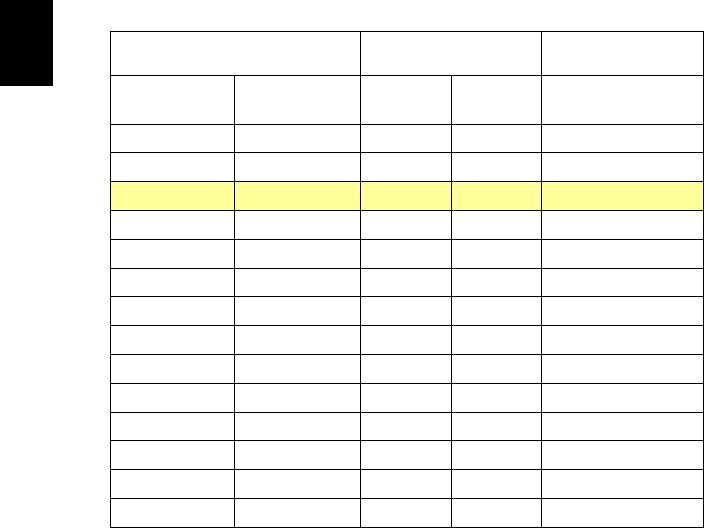
14
Desired Image Size Distance (m) Top (cm)
English
From base to top of
Diagonal (inch)
Max zoom
Min zoom
W (cm) x H (cm)
image
<A>
<B>
<C>
<D>
30 61 x 46 1.2 1.3 53
40 81 x 61 1.6 1.7 70
50 102 x 76 2.0 2.2 88
60 122 x 91 2.4 2.6 105
70 142 x 107 2.8 3.1 123
80 163 x 122 3.2 3.5 140
90 183 x 137 3.6 3.9 158
100 203 x 152 4.0 4.4 175
120 244 x 183 4.8 5.2 210
150 305 x 229 5.9 6.6 263
180 366 x 274 7.1 7.9 315
200 406 x 305 7.9 8.7 351
250 508 x 381 9.9 10.9 438
300 610 x 457 11.9 526
Zoom Ratio: 1.1x
