Acer P1341W: User Controls
User Controls: Acer P1341W
15
English
User Controls
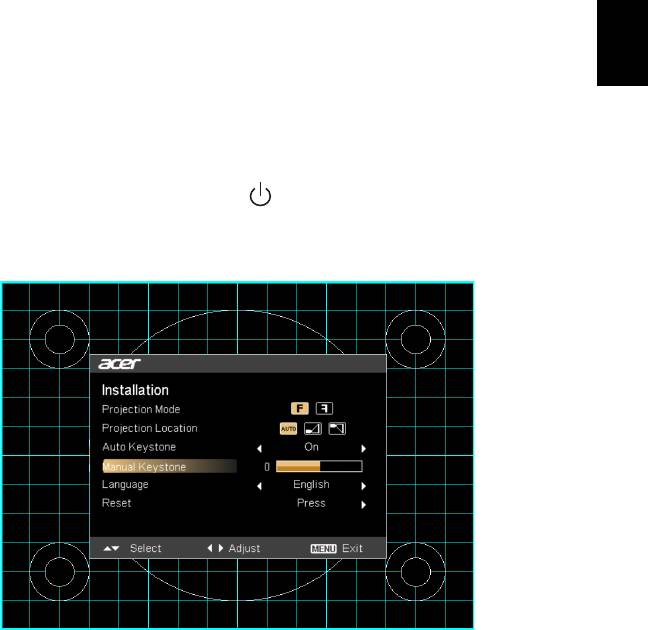
Installation Menu
The Installation menu provides an onscreen display (OSD) for projector
installation and maintenance. Use the OSD only when the message "No
signal" is displayed on the screen.
1 Turn on the projector by pressing (POWER) on the control panel or
remote control.
2 Press "MENU" on the control panel or remote control to launch the
OSD for projector installation and maintenance.
3 The background pattern acts as a guide to adjusting the calibration
and alignment settings, such as screen size and distance, focus and
more.
4 The Installation menu includes the following options:
• Projection mode
• Projection Location
• Auto keystone
• Manual keystone
• Language settings
• Reset to factory default functions
Use the up and down arrow keys to select an option, the left and right arrow keys to
adjust selected option settings, and the right arrow key to enter a submenu for
feature setting. The new settings will be saved automatically upon exiting the menu.
5 Press "MENU" anytime to exit the menu and return to the Acer
welcome screen.
16
English
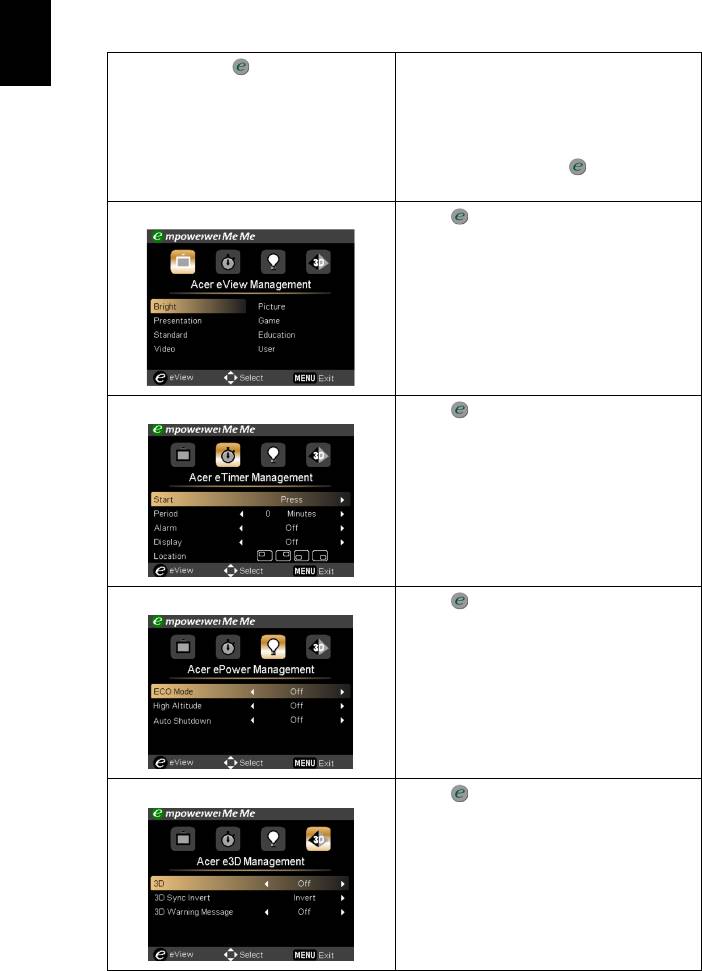
Acer Empowering Technology
Empowering Key
Acer Empowering Key provides four
Acer unique functions: "Acer eView
Management", "Acer eTimer
Management", "Acer ePower
Management" and "Acer e3D
Management". Press " " repeatly to
cycle through these functions.
Acer eView Management
Press " " to launch "Acer eView
Management".
"Acer eView Management" is for
display mode selection. Please refer to
the "Onscreen Display (OSD) Menus"
section for more details.
Acer eTimer Management
Press " " to launch "Acer eTimer
Management".
"Acer eTimer Management" provides
the reminding function for
presentation time control. Please refer
to the "Onscreen Display (OSD) Menus"
section for more details.
Acer ePower Management
Press " " to launch "Acer ePower
Management".
"Acer ePower Management"provides
you one shortcut to save the lamp and
projector’s life. Please refer to the
"Onscreen Display (OSD) Menus"
section for more details.
Acer e3D Management
Press " " to launch "Acer e3D
Management".
"Acer e3D Management" provides you
one shortcut to adjust 3D settings.
Please refer to the "Onscreen Display
(OSD) Menus" section for more details.
17
English
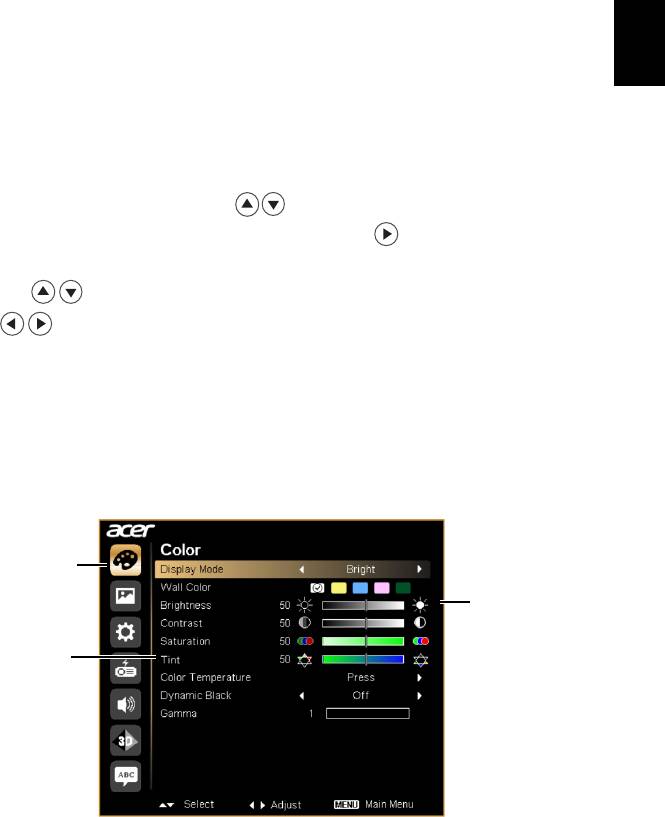
Onscreen Display (OSD) Menus
The projector has multilingual Onscreen Display (OSD) menus that allow
you to make image adjustments and change a variety of settings.
Using the OSD menus
• To open the OSD menu, press "MENU" on the control panel or remote
control.
• When the OSD is displayed, use to select an item in the main menu.
After selecting the desired main menu item, press to enter a submenu
for feature setting.
• Use to select the desired item and adjust the settings by using
.
• Select the next item to be adjusted in the submenu and adjust as described
above.
• Press "MENU" on the control panel or remote control, the screen will
return to the main menu.
• To exit the OSD menu, press "MENU" on the control panel or remote
control again. It will close and the projector will automatically save the
new settings.
Main menu
Setting
Submenu
18
English
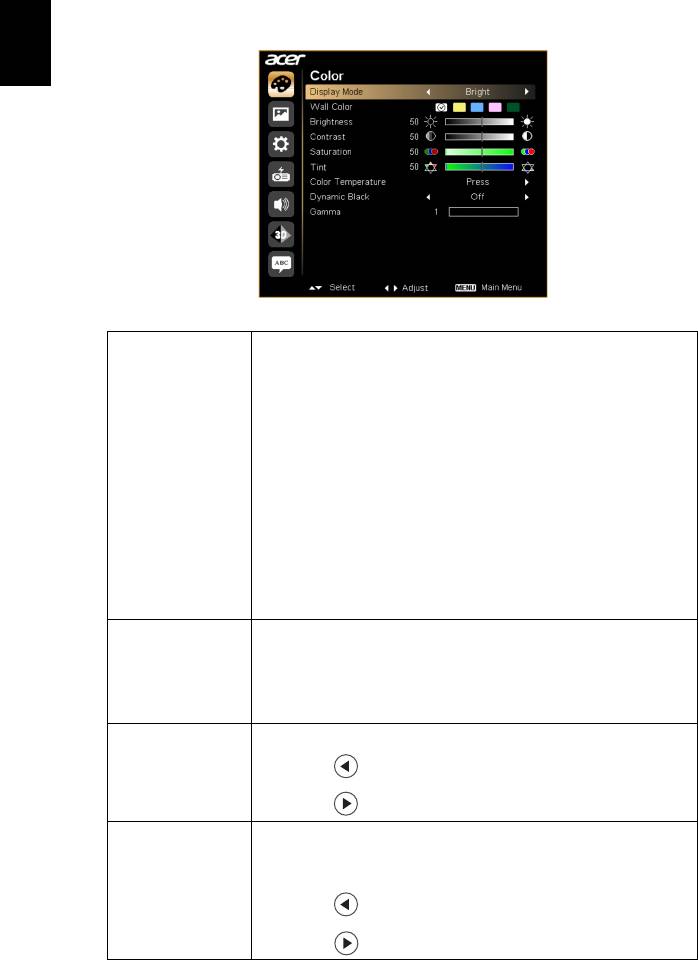
Color
There are many factory presets optimized for various types
of images.
• Bright: For brightness optimization.
• Presentation: For meeting presentation with higher
brightness.
• Standard: For common environment.
Display Mode
• Video: For playing video in a bright environment.
• Picture: For graphic picture.
• Game: For game content.
• Education: For education environment.
• User: Memorize user’s settings.
Use this function to choose a proper color according to the
wall. There are several choices, including White, Light
Wall Color
Yellow, Light Blue, Pink and Dark Green. It will
compensate the color deviation due to the wall color to
show the correct image tone.
Adjusts the brightness of the image.
Brightness
• Press to darken the image.
• Press to lighten the image.
Controls the degree of difference between the lightest
and darkest parts of the picture. Adjusting the contrast
changes the amount of black and white in the image.
Contrast
• Press to decrease the contrast.
• Press to increase the contrast.
19
English
Adjusts a video image from black and white to fully
saturated colors.
• Press to decrease the amount of color in the
Saturation
image.
• Press to increase the amount of color in the
image.
Adjusts the color balance of red and green.
• Press to increase the amount of green in the
Tint
image.
• Press to increase the amount of red in the image.
Adjusts the color temperature. At higher color
Color
temperatures, the screen looks colder; at lower color
Temperature
temperatures, the screen looks warmer.
If turned on, the projector dynamically adjusts the power
consumption of the lamp according to the brightness of
Dynamic Black
the image being projected. When projecting darker
images the power consumption will be reduced and the
contrast of the image will also be enhanced.
Effects the representation of dark scenery. With greater
Gamma
gamma value, dark scenery will look brighter.
Note: "Saturation" and "Tint" functions are not supported under computer
mode.
20
English
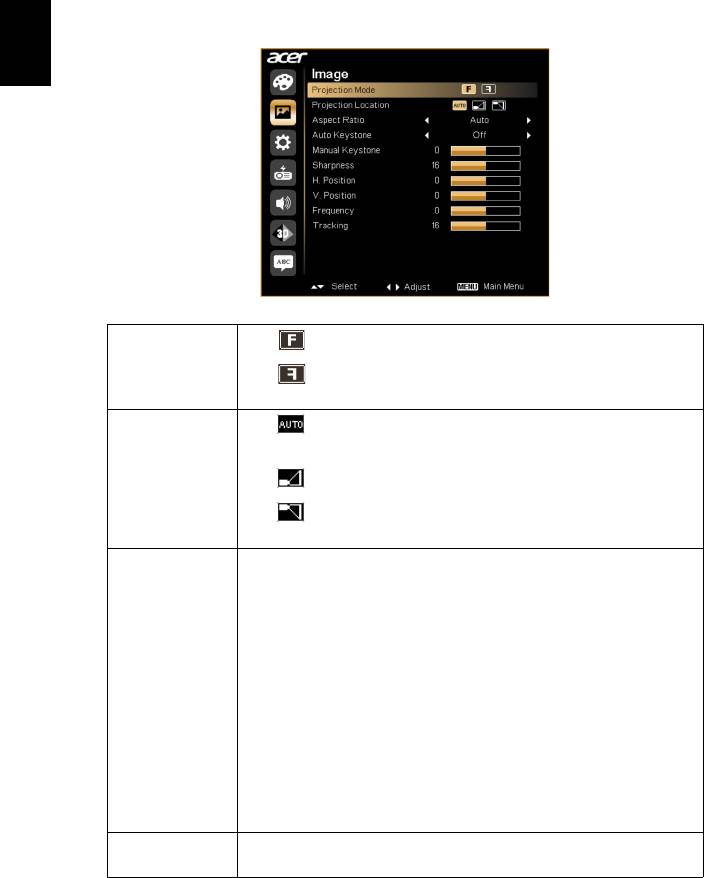
Image
• Front: The factory default setting.
Projection
Mode
• Rear: Reverses the image so you can project from
behind a translucent screen.
• Auto: Automatically adjusts projection location of
image.
Projection
• Desktop
Location
• Ceiling: Turns the image upside down for ceiling-
mounted projection.
Use this function to choose your desired aspect ratio.
• Auto: Keeps the image with original width-height ratio
and maximizes the image to fit native horizontal or
vertical pixels.
• Full (X1340W): The image will be displayed making full
use of the horizontal and vertical pixels.
Aspect Ratio
• 4:3: The image will be scaled to fit the screen and
displayed using a 4:3 ratio.
• 16:9: The image will be scaled to fit the screen and
displayed using a 16:9 ratio.
• L.Box (X1340W): Keeps the original signal aspect ratio
and zooms in by 1.333 times.
Auto Keystone Automatically adjusts image distortion caused by tilting
projection (±40 degrees).

21
English
Manually adjusts image distortion caused by tilting
projection (±40 degrees).
Manual
Keystone
<Note> The Manual Keystone function is unavailable under
Auto Keystone setting to "On".
Adjusts the sharpness of the image.
Sharpness
• Press to decrease the sharpness.
• Press to increase the sharpness.
H. Position
• Press to move the image left.
(Horizontal
Position)
• Press to move the image right.
V. Position
• Press to move the image down.
(Vertical
Position)
• Press to move the image up.
Changes the projector’s refresh rate to match the frequency
of your computer’s graphics card. If you experience a vertical
Frequency
flickering bar in the projected image, use this function to
correct it.
Synchronizes the signal timing of the display with the
Tracking
graphics card. If you experience an unstable or flickering
image, use this function to correct it.
Note: "H. Position", "V. Position", "Frequency" and "Tracking" functions
are not supported under video mode.
Note: "Sharpness" function is not supported under computer mode.
22
English
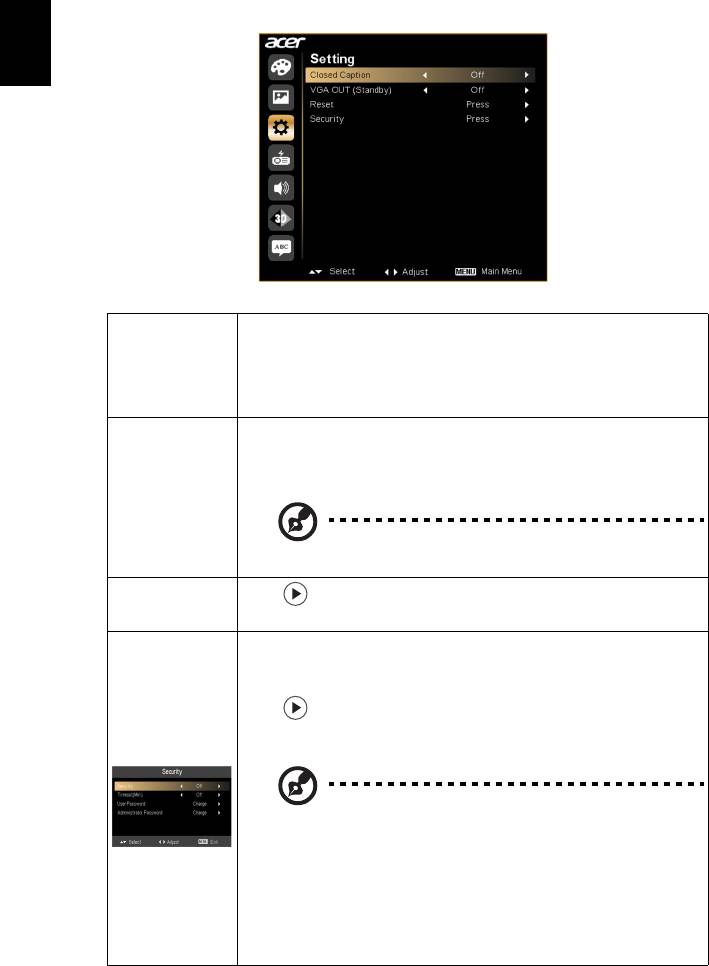
Setting
Selects a preferred closed captioning mode from CC1, CC2,
CC3, CC4, (CC1 displays captions in the primary language in
Closed Caption
your area). Select "Off" to turn off the captioning feature.
This function is only available when a composite video or S-
Video input signal is selected and its system format is NTSC.
Selecting "On" enables the function. The projector can output
a VGA signal when it is in standby mode and the VGA IN (or
VGA IN 1) and VGA OUT sockets are correctly connected to the
VGA OUT
devices.
(Standby)
Enabling this function slightly increases the standby
power consumption.
Press after choosing "Yes" to return the display
Reset
parameters on all menus to the factory default settings.
Security
This projector provides a useful security function for the
administrator to manage the projector.
Press to change the "Security" setting. If the security
function is enabled, your must enter "Administrator
Security
Password" first before changing the security setting.
The factory default of "Administrator Password" is
"1234".
• Select "On" to enable the security function. You have to
enter password depending on the "Security Mode".
Please refer to "User Password" section for details.
• If "Off" is selected, you can switch on the projector
without password.
23
English
Timeout (Min.)
Once "Security" is set to "On", you can set timeout function.
• Press to select timeout duration.
• The range is from 10 to 990 minutes.
• When time is up, the projector will request you to enter
the password again.
• The factory default setting of "Timeout (Min.)" is "Off".
• Once the security function is enabled, the projector will
request you to enter password when switching on the
projector. Both "User Password" and "Administrator
Password" can be accepted for this dialogue.
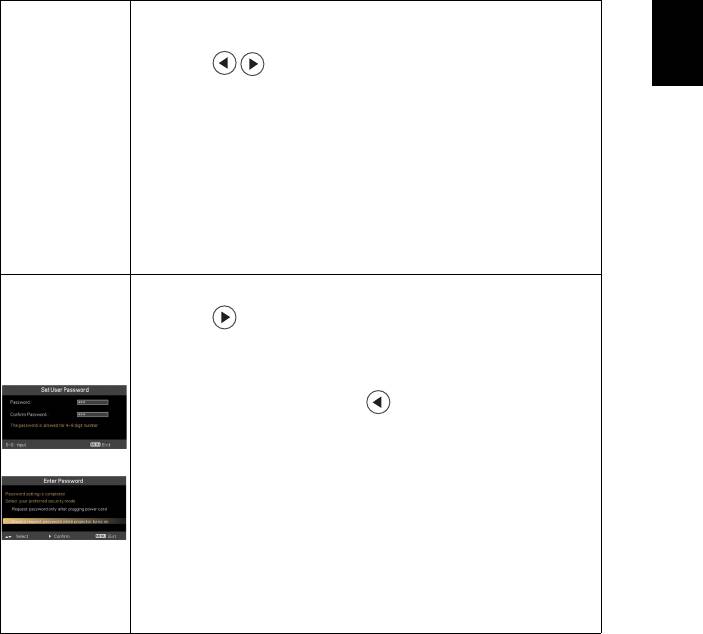
User Password
• Press to set up or change "User Password".
• Use the numerical keys on the remote control to set the
password and press "MENU" to confirm.
• To delete the digits, Press .
• Enter the password again when you see "Confirm
Password" displayed.
• The password should be 4~8 digits in length.
• If you select "Request password only after plugging
power cord", you are requested to input the password
every time the power cord is plugged.
• If you select "Always request password while projector
turns on", you are requested to input the password every
time the projector is turned on.

24
English
Administrator Password
You can enter "Administrator Password" when the "Enter
Administrator Password" or "Enter Password" dialogue box
displays.
• Press to change "Administrator Password".
• The factory default of "Administrator Password" is
"1234".
If you forget your administrator password, do the following
to retrieve the administrator password:
• Enter the unique 6-digit "Universal Password" which is
printed on the Security Card that came with your
projector. This unique password will be accepted by the
projector no matter what the administrator password is.
• If the Security Card is lost, please contact your local Acer
service center.
Management
Choose "On" to dim the projector lamp, which will also
ECO Mode
lower the power consumption, reduce noise, and extend
the lamp life. Choose "Off" to return to the normal mode.
Choose "On" to turn on the High Altitude mode. When
this function is turned on, the projector fans operate at full
High Altitude
speed continuously to cool down the projector’s
temperature.
25
English
• Instant Off: Enables you to turn off the projector
immediately without fan cooling process by pressing
Turn Off Mode
the power button twice.
• Instant Resume: Enables you to restart the projector
immediately within 2 minutes after turning it off.
Auto Shutdown
The projector will automatically shut down while there is
(Minutes)
no signal input detected after the setting time.
Lamp Hour Elapse Displays the lamp’s elapsed operating time (in hours).
Choose this function to show or hide warning message
Lamp Reminding
when the changing lamp message is displayed. The
message will show up 30 hours before end of life.
Press after choosing "Yes" to turn the lamp hour
Lamp Hour Reset
counter to 0 hours.
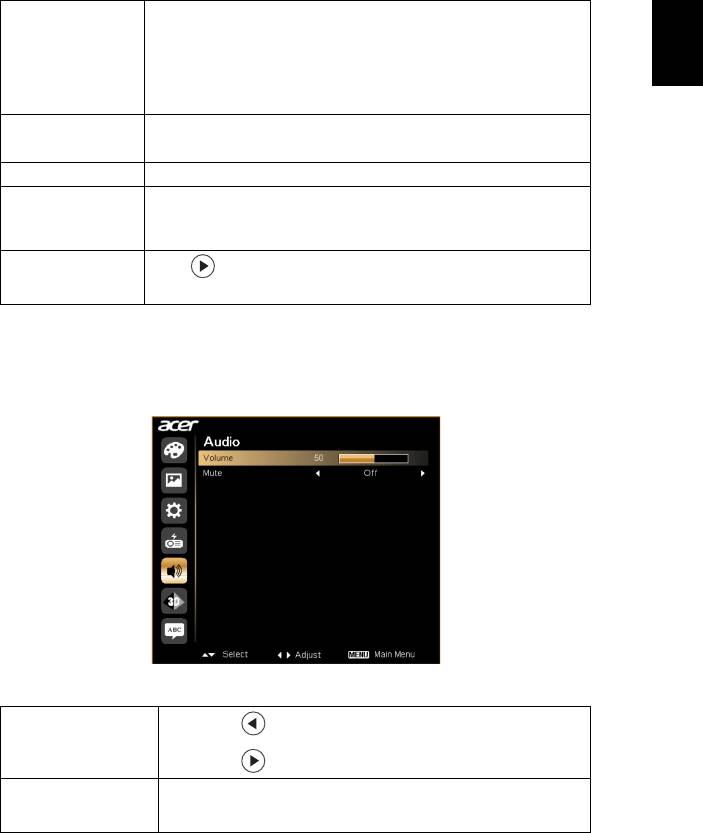
Audio
• Press to decrease the volume.
Volume
• Press to increase the volume.
• Choose "On" to turn mute on.
Mute
• Choose "Off" to turn mute off.
26
English
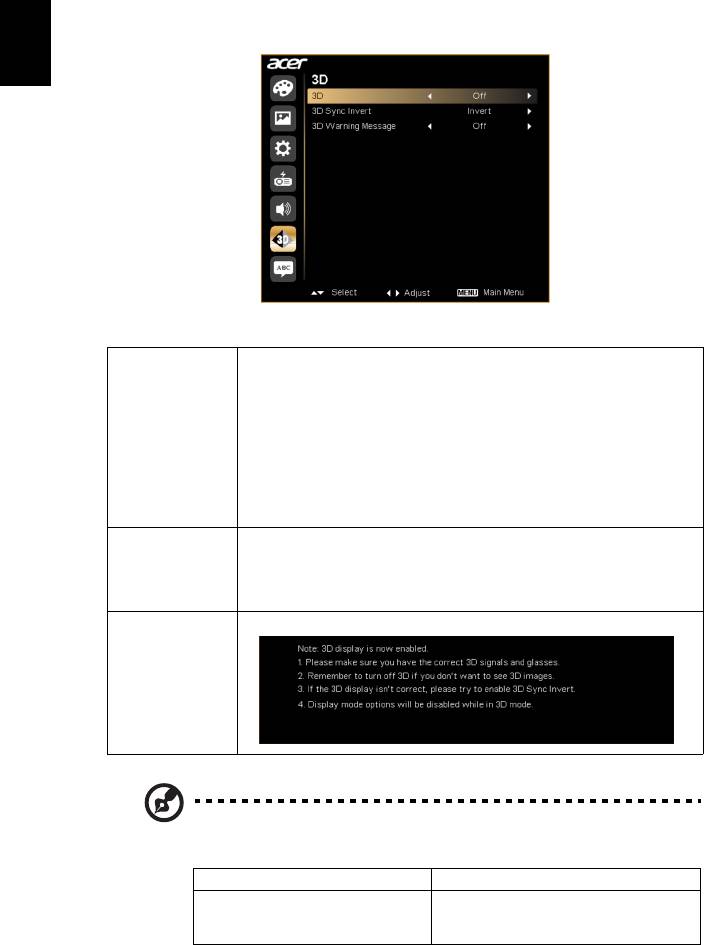
3D
Selects "On" to enable the 3D function supported by TI DLP
3D technology.
• On
Select this item while using DLP 3D glasses, quad buffer
3D
(NVIDIA/ATI...) graphics card and HQFS format file or DVD
with corresponding SW player.
• Off
Turns off the 3D mode.
If you see a discrete or overlapping image while wearing DLP
3D glasses, you may need to execute "Invert" to get best
3D Sync Invert
match of left/right image sequence to get the correct image
(for DLP 3D).
Choose "On" to display the 3D warning message.
3D Warning
Message
Note: Supported 3D signal timings:
Signal source type Supported timing
VGA 640 x 480@100Hz, 640 x 480@120Hz,
800 x 600@100Hz, 800 x 600@120Hz,
1024 x 768@100Hz, 1024 x 768@120Hz
27
English
It needs correct settings on graphics card 3D application program for correct
3D display.
The SW players, such as Stereoscopic Player and DDD TriDef Media Player
can support 3D format files. You can download these players on the web
page below.
- Stereoscopic Player (Trial): http://www.3dtv.at/Downloads/Index_en.aspx
- DDD TriDef Media Player (Trial): http://www.tridef.com/download/TriDef-
3-D-Experience-4.0.2.html
Note: "3D Sync Invert" is only available when 3D is enabled.
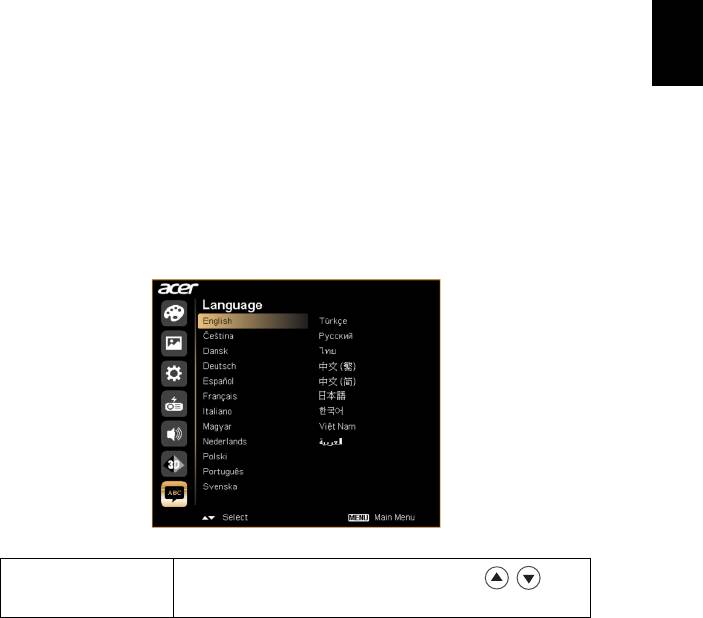
Language
Sets a language for the OSD menus. Use to
Language
select your preferred language.
