ZyXEL Communications 3G Wireless Router NBG410W3G: V If you cannot connect to the Internet with your 3G connection, check your
V If you cannot connect to the Internet with your 3G connection, check your : ZyXEL Communications 3G Wireless Router NBG410W3G
ENGLISH
Congratulations, you have set up your 3G Internet access. Open a web browser such as
Internet Explorer and browse to your favorite website.
V If you cannot connect to the Internet with your 3G connection, check your
3G connection status in the HOME screen. If your 3G connection status is
down, check your 3G settings are correctly configured and the SIM card is
correctly inserted. See the User’s Guide for more suggestions.
4 Set Up a Wi-Fi Wireless Network
This section shows you how to configure wireless settings on your NBG41xW3G, then how
to connect a wireless device, such as your laptop, to your wireless network.
4.1 Configure Wireless Settings on the NBG41xW3G
1 Click WIRELESS > Wi-Fi in the NBG41xW3G’s navigation menu.
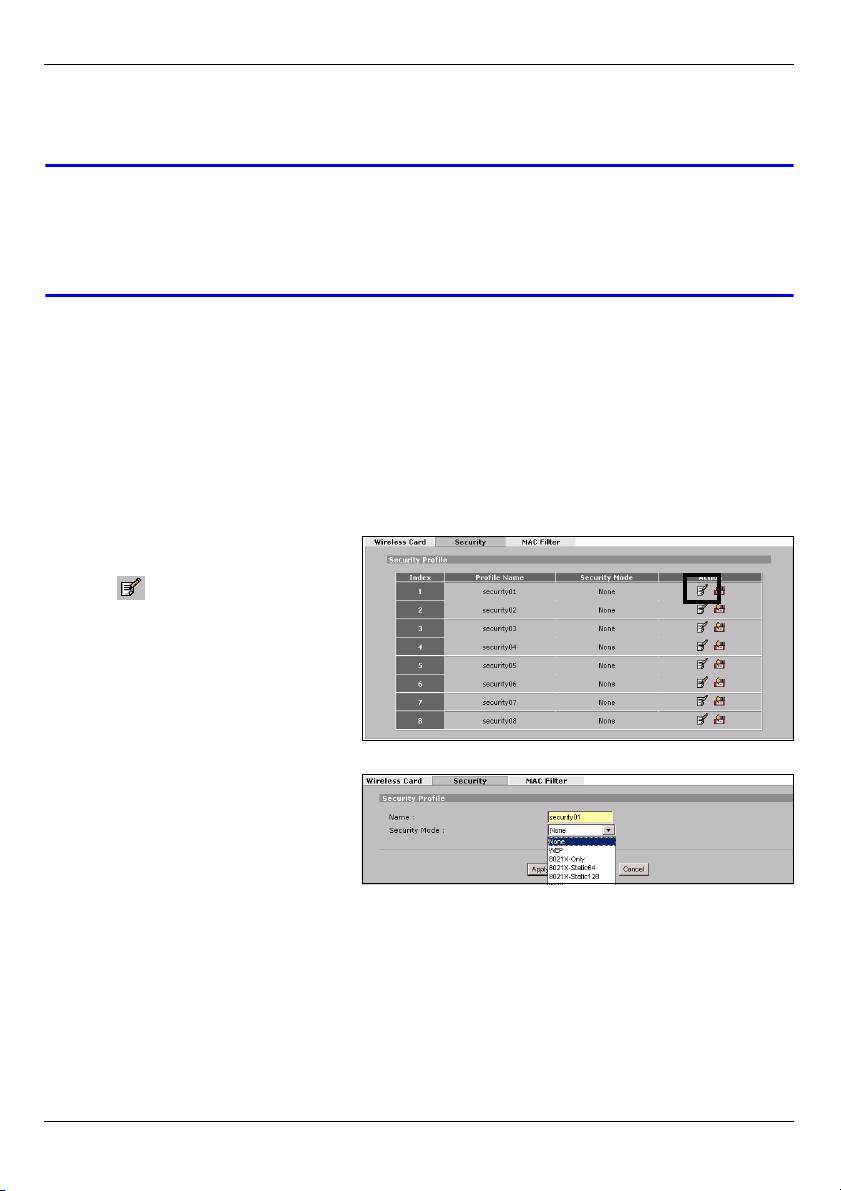
2 To apply wireless security, click
the Security tab. Then click the
Edit ( ) icon.
It is strongly recommended you
apply wireless security!
3 Click the Security Mode drop-
down list. The drop-down list
displays the security methods in
increasing order of strength.
Select the highest level of security
supported by the other devices on
your wireless network.The recommended level of security for a typical home network is
WPA2-PSK. Choose WPA2-PSK-MIX if some devices on your network support WPA2-
PSK and others support WPA-PSK.
8
ENGLISH
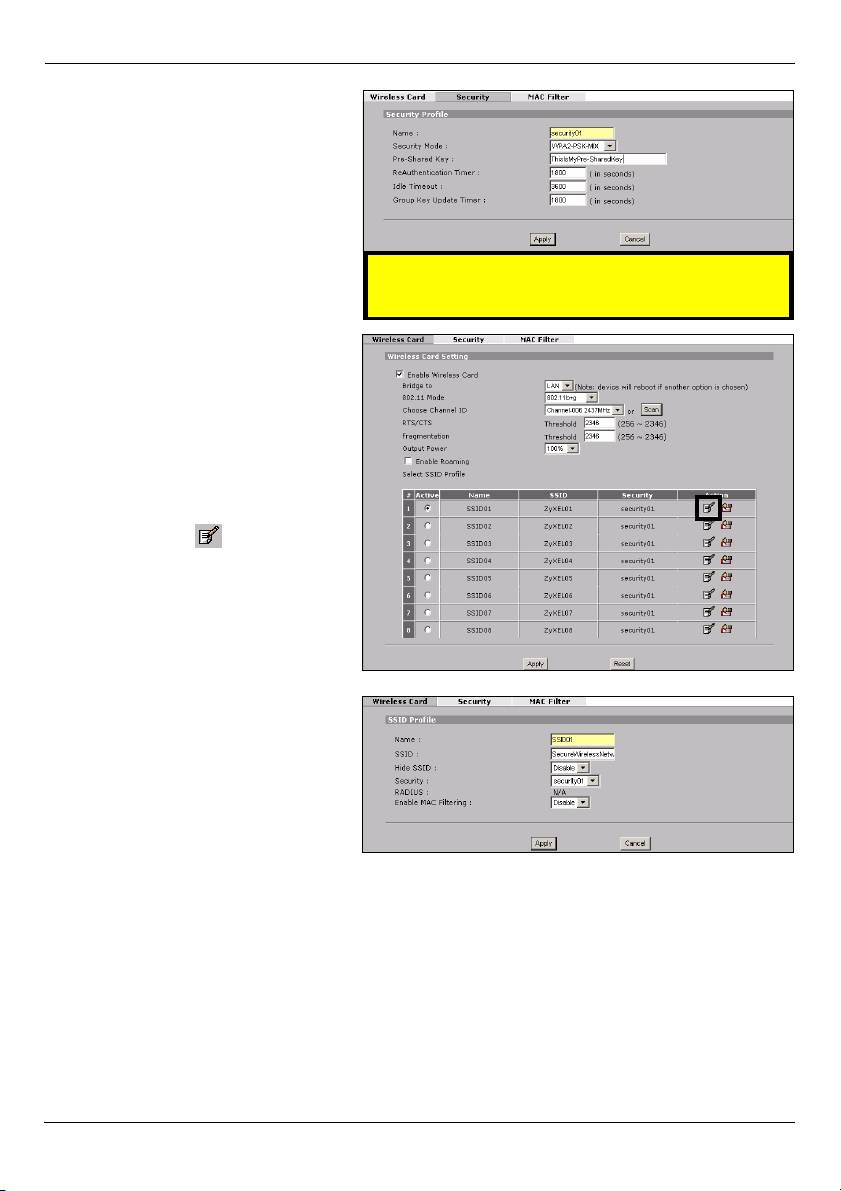
4 If you choose WPA(2) or WPA(2)-
PSK, type a Pre-Shared Key
using 8~63 English upper or
lower case letters (A~Z, a~z) or
numbers (0~9).
5 Write it down as you will need it
later to connect your computer to
the wireless network.
6 Click Apply.
Write down the Pre-Shared Key!
7 Click on the Wireless Card tab to
show the following screen.
8 Select Enable Wireless Card.
9 Leave other settings at their
defaults to quickly set up a
wireless network. See the User’s
Guide for detailed information on
these fields.
10 Click the Edit ( ) icon.
11 SSID: Enter a unique network
name for the wireless network.
12 Security: Select the security
setting you set up in the WiFi >
Security screen.
13 Leave other settings at their
defaults to quickly set up a
wireless network. Otherwise, see
the User’s Guide for detailed information on these fields. Click Apply and then click
Apply in the Wireless Card screen.
Congratulations, you are now ready to connect a wireless device such as your notebook to
your wireless network.
9
ENGLISH
4.2 Connect Your Computer to the NBG41xW3G Wirelessly
You can now connect wirelessly to your NBG41xW3G from your computer and access the
Internet. You will need the Network Name (SSID) and also the Pre-Shared Key if you set
up security in the previous section. The connection procedure is shown here using
Windows XP as an example.
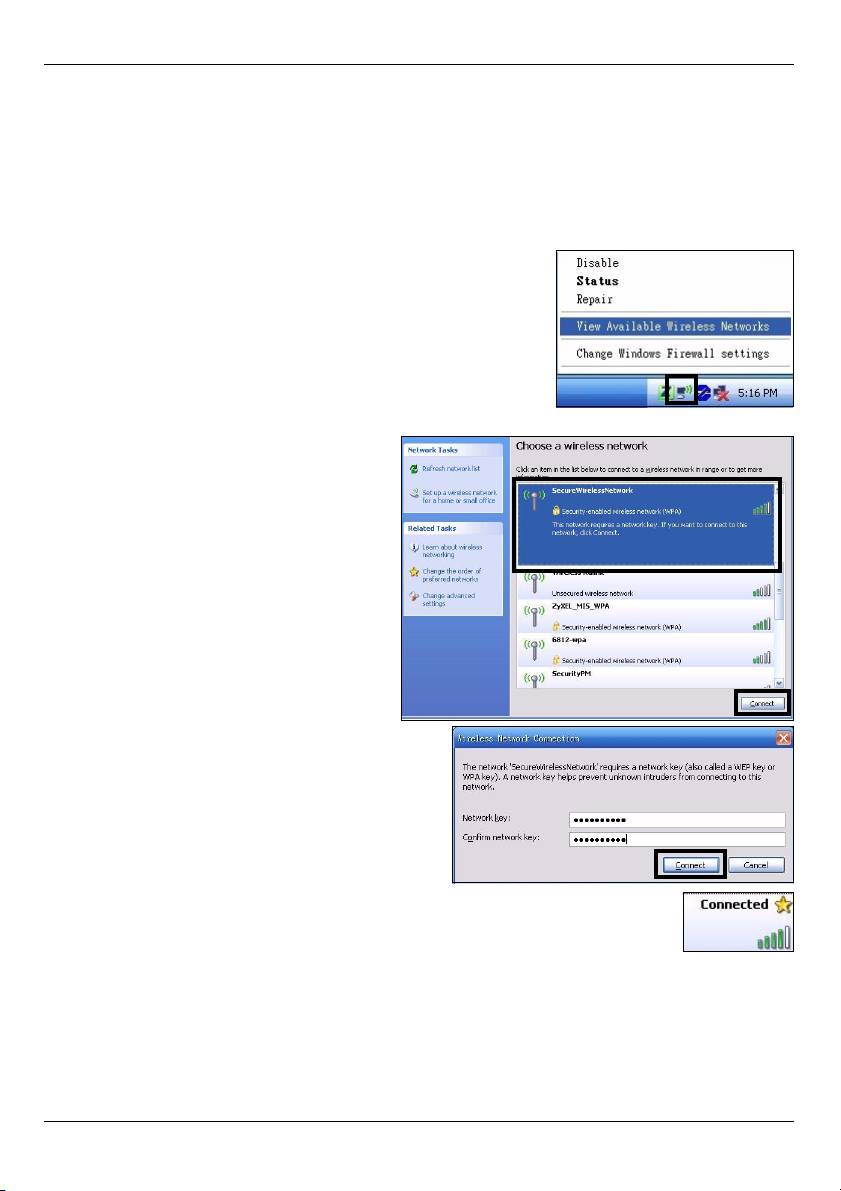
1 Right-click the wireless adapter icon which appears in
the bottom right of your computer monitor. Click View
Available Wireless Networks.
2 Select the SSID name you gave the
NBG41xW3G and click Connect (A).
The SSID “SecureWirelessNetwork”
is given here as an example.
A
3 If you have set up wireless security,
you are prompted to enter a password.
Enter the Pre-Shared Key you set up in the
previous section and click Connect (B).
4 You may have to wait several minutes while
your computer connects to the wireless
B
network.
5 You should now be securely connected
wirelessly to the NBG41xW3G.
Congratulations! You are now ready to connect to the Internet wirelessly
through your NBG41xW3G.
10
Оглавление
- V Check your connections if the power () or LAN () light does not
- V If the login screen does not display, make sure your computer is set to
- V If you cannot connect to the Internet with your 3G connection, check your
- V If you cannot connect wirelessly to the NBG41xW3G, check you have
- V If you cannot access the Internet when your computer is connected to one
- V Prüfen Sie die Anschlüsse, wenn die Betriebsanzeige-LED ( ) oder LAN-
- V Wenn das Login-Fenster nicht angezeigt wird, stellen Sie sicher, dass der
- V Wenn Sie über Ihre 3G-Verbindung keine Verbindung zum Internet
- V Wenn Sie drahtlos keine Verbindung zum NBG41xW3G herstellen können,
- V Wenn Sie keine Verbindung zum Internet herstellen können, während der
- V Compruebe las conexiones si la luz de alimentación () o LAN
- V Si la pantalla de inicio de sesión no aparece, asegúrese de que su
- V Si no puede conectarse a Internet con su conexión 3G, compruebe el
- V Si no puede conectarse de forma inalámbrica al NBG41xW3G, compruebe
- V Si no puede acceder a Internet cuando su ordenador está conectado a uno
- V Vérifiez vos connexions si le voyant d'alimentation () ou du LAN
- V Si l'écran de connexion ne s'affiche pas, vérifiez que votre ordinateur est
- V Si vous n'arrivez pas à vous connecter à Internet avec votre connexion 3G,
- V Si vous ne pouvez pas vous connecter sans fil au NBG41xW3G, vérifiez
- V Si vous n'arrivez pas à accéder à Internet quand votre ordinateur est
- V Se le spie di alimentazione () o LAN () non si accendono,
- V Se la schermata di login non viene visualizzata, verificare che il computer
- V Se non è possibile connettersi a Internet con la connessione 3G, controllare
- V Se non è possibile connettersi wireless all'NBG41xW3G, controllare di aver
- V Se non è possibile accedere a Internet quando il computer è connesso a
- V Проверьте проводные подключения если индикатор(ы) POWER ()
- V Если окно входа не систему не появляется, то проверьте установку
- V Если 3G-подключение к Интернет не работает, проверьте его
- V В случае если подключение к NBG41xW3G не удается установить,
- V Если вы не можете войти в Интернет с вашего компьютера,
- V 如果電源 () 或 LAN ( ) 指示燈沒有亮,請檢查連線情況。如
- V 如果無法利用 3G 連線連接網際網路,請在 HOME ( 首頁 ) 畫面中檢查 3G 連
- V 如果無法無線連接 NBG41xW3G,請檢查 SSID 是否選取正確以及安全密鑰是
- V 如果電腦連接至 NBG41xW3G 任一個 LAN 埠時無法存取網際網路,請檢查連
