Brennenstuhl Solar LED External Light SOL 14 black: Installations- and Operating Instructions Solar LED outdoor lamp SOL 14 PLUS
Installations- and Operating Instructions Solar LED outdoor lamp SOL 14 PLUS: Brennenstuhl Solar LED External Light SOL 14 black
Installations- and Operating Instructions
Solar LED outdoor lamp SOL 14 PLUS
IMPORTANT: READ ALL INSTRUCTIONS CAREFULLY BEFORE USE AND KEEP FOR
FUTURE REFERENCE!
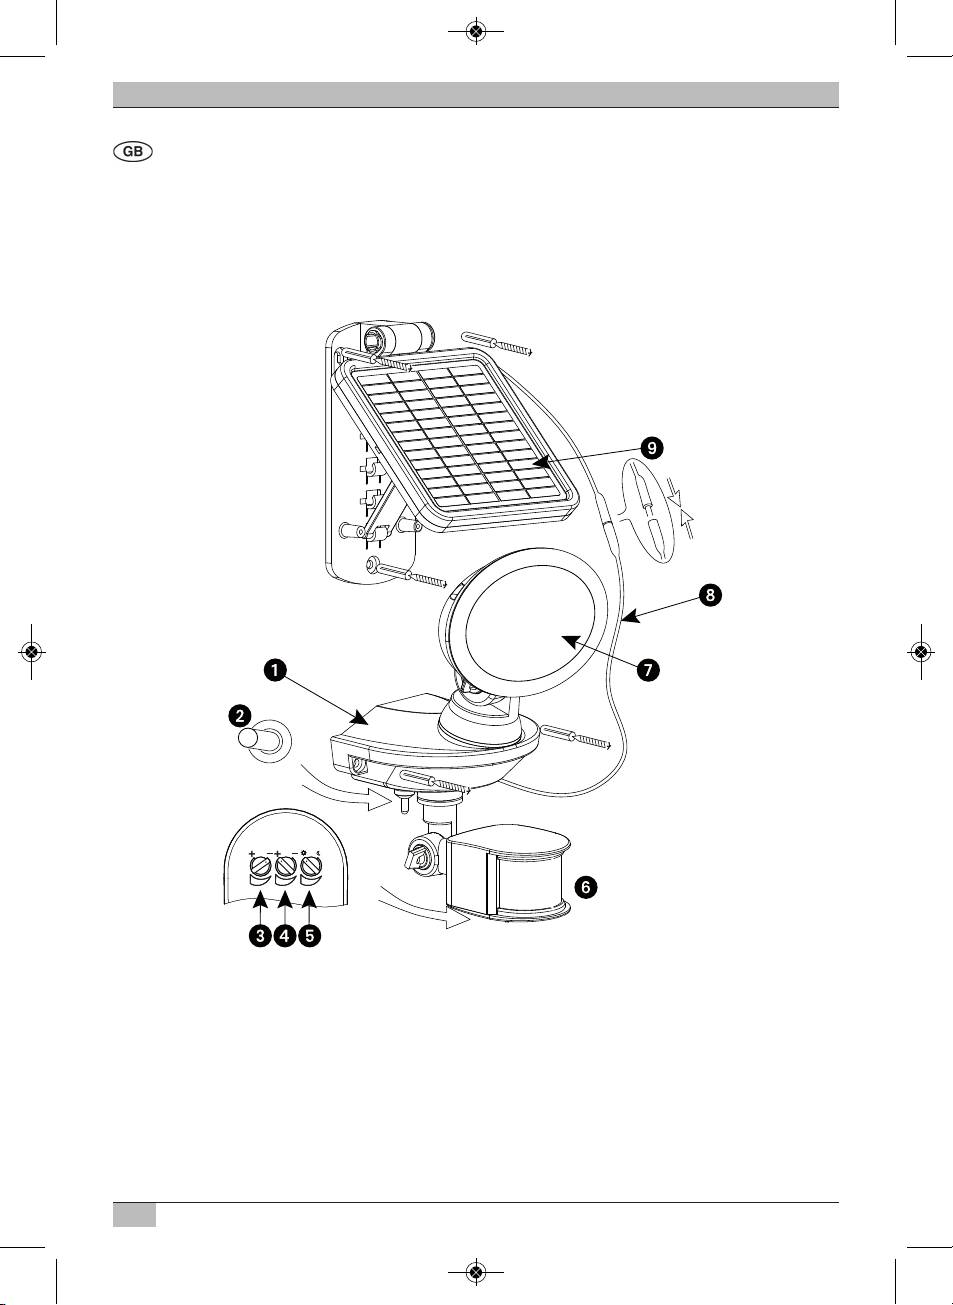
Parts included:
u Battery unit
v Switch
w Selector dial for setting light duration
x Selector dial for setting sensitivity
y Selector dial for setting response sensitivity
z Motion detector
{ Light cover
| Power cord
} Solar module
8
OFF AUTO
TIME SENS LUXTIME SENS LUX
015109 Solar-Aussenleuchte SOL 14_015109 Solar-Aussenleuchte SOL 14 Bed.-Anl. 05.12.12 17:22 Seite 8
Solar LED outdoor lamp SOL 14 PLUS
S
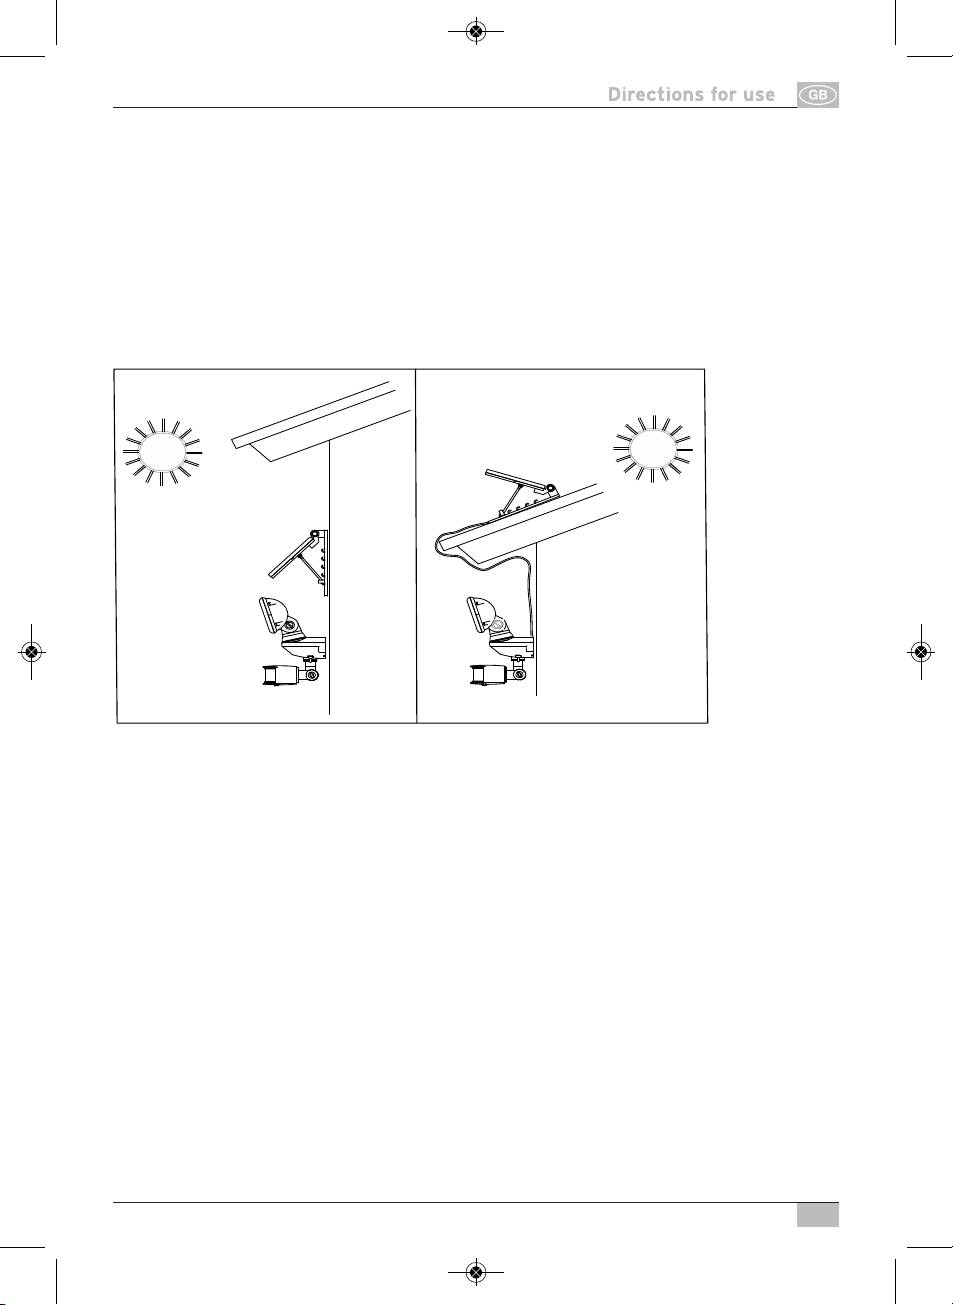
ELECTING THE MOUNTING LOCATION FOR YOUR SOLAR MODULE AND LAMP
This solar lamp is shipped with a separate solar module. The solar module must be placed
in a location where it will receive at least 4-6 hours per day of direct sunlight, in order to
assure optimal function and a longer operational lifetime. To the greatest extent possible,
the solar module should be aimed to the southern sky in order to maximize exposure to
direct sunlight. If the solar module is placed in a shady location, the battery cannot be
completely charged. This reduces the number of hours that the light can burn at night.
When deciding where to install your light, remember that the motion detector which
activates this light has a monitoring area of 180º (horizontal) at a maximum distance of
10 metres.
South
South
INSTALLATION OF SOLAR MODULE AND LIGHT
Carefully remove all parts from their protective packaging. Connect the solar module with
the lamp by connecting the solar module with the cord attached to the light.
Turn the cable a little while pressing it together in order to get a tight connection.
Both the lamp and the solar module can be attached vertically or horizontally on a solid,
stable surface. Ideally, sunlight should hit the solar module at a vertical angle as much as
possible. In central Europe, an angle of inclination approximately 30° to 40°is recom-
mended. You can adjust the angle of the solar module, by using another latching position
to adjust the solar module.
PRIOR TO FIRST USE OF YOUR SOLAR LIGHT
1. Make sure that the switch on the lamp is set to OFF.
In this position the solar cell charges the battery without activating the light.
2.Leave the switch in this position for at least 3-4 sunny days to make sure that the
battery is fully charged before the final set-up and later normal use. This insures that
your solar light’s battery is completely charged before setting up the motion detector
and beginning normal operation. Alternately, you can charge the battery with a
standard battery charger.
9
015109 Solar-Aussenleuchte SOL 14_015109 Solar-Aussenleuchte SOL 14 Bed.-Anl. 05.12.12 17:22 Seite 9
Solar LED outdoor lamp SOL 14 PLUS
S
ETTING UP YOUR SOLAR LAMP
After charging the battery, set the switch to „AUTO“-position.
Your solar lamp is now ready to operate.
Testing the monitoring area
Aim the motion detector in the direction from which you wish to detect motion. Set the
TIME-selector dial on the underside of the motion detector to “Minimum” (-) and the
LUX-selector dial to the “bright” (
) position. Test the monitored area by walking around
the area to be monitored slowly. If the solar lamp does not come on as desired, the mo-
tion sensor’s aim needs to be adjusted.
There are three selector dials on the motion detector: TIME / SENS / LUX.
With these 3 selector dials you can adjust these settings:
Setting the Light Duration (TIME) = Light duration: You can set the time that the light
stays on after motion has been detected to a period of between around 10 seconds and
4 minutes. Turn the TIME-selector dial in toward (+) to increase the light duration and
toward (-) to reduce the light duration.
Note: The time period set begins after the motion detector has been triggered. Each time
motion is detected, this period begins again.
Setting the motion detector’s sensitivity (SENS)
The motion detector’s sensitivity depends on the ambient temperature. The lower the
temperature, the greater the motion detector’s sensitivity. Use the SENS-selector dial in
order to set (or adjust) the motion detector’s sensitivity and compensate for changes in
the ambient temperature. The sensor is most sensitive when SENS-selector dial is com-
pletely turned counter-clockwise toward (+).
Setting the response sensitivity (LUX)
With the LUX-selector dial, you can set the ambient light level at which the device acti-
vates. This keeps the lights from coming on in daylight. To set the response sensitivity,
proceed as follows: Turn the LUX-selector dial completely (as far as it will go) clockwise
(
). Wait until natural daylight is at the level at which you want your solar light to activate.
Turn the LUX-selector dial slowly counter-clockwise (
), until the solar light comes on
when motion is detected.
REPLACING THE RECHARGEABLE BATTERY
When the battery’s charging capacity decreases, you can replace the battery with three
new rechargeable AA Ni-MH 1.2 V rechargeable batteries. Follow the steps below when
replacing batteries.
10
015109 Solar-Aussenleuchte SOL 14_015109 Solar-Aussenleuchte SOL 14 Bed.-Anl. 05.12.12 17:22 Seite 10

Solar LED outdoor lamp SOL 14 PLUS
1. First, disassemble the lighting unit.
2.Set the switch to OFF-position.
3. Remove both of the screws from the battery cover on the back of the main unit.
4.Pull out the battery cartridge.
5.Remove the old batteries from the battery cartridge and replace them with three new
rechargeable AA Ni-MH 1.2 V batteries. Make sure that you connect the +/- poles
correctly.
WARNING: Inserting the batteries in the wrong direction can damage the unit.
6.Screw the battery cover back on.
7. Mount your solar light back in its original location.
8.Repeat the steps in the section „PRIOR TO THE FIRST USE OF YOUR SOLAR LIGHT“, to
make sure that your new batteries get completely charged.
GENERAL SAFETY TIPS
1. Do not use any other solar module than the one provided. Using another solar module
can cause injuries or damage to the light and termination of the warranty.
2.Lay the cable such that it is secured and cannot create any kind of hazard (e.g. hazard
of tripping). Discontinue use of the solar light if the cable is damaged or defective.
MAINTENANCE TIPS
Keep the motion detector free of dust and deposits by occasionally cleaning it with a dry
cloth or wiping it off with warm, soapy water. Also, make sure that the solar module is
always free of dirt and deposits. A dirty solar cell cannot completely charge the battery.
This can cause premature aging in the battery and lead to unreliable function in the de-
vice.
STORAGE
If you want to store your light indoors for more than one or two days, the switch must be
set in the OFF-position, in order to prevent damage to the batteries. To preserve optimal
performance, we recommend that you do not store your solar light for long periods with
the batteries still inside.
11
2
1
3
u 3 x Ni-MH rechargeable batteries
v Battery cartridge
w Battery cover
015109 Solar-Aussenleuchte SOL 14_015109 Solar-Aussenleuchte SOL 14 Bed.-Anl. 05.12.12 17:22 Seite 11

Solar LED outdoor lamp SOL 14 PLUS
T
ROUBLESHOOTING
Problem: Light does not activate when there is motion in the monitored area.
Possible Solutions: Make sure that:
• The switch is in the “AUTO” position.
• The LUX-selector dial is not set too far in toward (
).
• The motion detector is set such that movements can be detected.
• The solar cell is aimed so that it can receive as much direct sunlight as possible during
the day.
• The battery’s charge is not insufficient (charge for 3-4 sunny days with the switch set
to OFF).
• The solar collector is not installed too close to light sources that burn at night, such as
street lamps.
• If the rechargeable batteries need to be replaced
Problem: Light comes on during the day.
Possible Solutions: Make sure that the LUX-selector dial is not set too far toward (
).
Problem: Light flickers.
Possible Solution:
• Weak battery. Charge the solar light for 3-4 sunny days, during which the switch must
be set to OFF.
Problem
Light activates for no apparent reason.
Possible Solutions
• The LUX-selector dial could be set too far toward (
).
• Trees, vehicular traffic, house pets or birds may have come into the monitored area. You
may need to re-aim the motion detector.
• If there are reflective objects such as windows, water or white walls in the monitored
area, you may need to re-aim the motion detector.
12
015109 Solar-Aussenleuchte SOL 14_015109 Solar-Aussenleuchte SOL 14 Bed.-Anl. 05.12.12 17:22 Seite 12
Solar LED outdoor lamp SOL 14 PLUS
T
echnical Data:
Batteries: 3x AA 1,2 V / 600 mAh
Number of LEDs: 2 x 0,5 W
Light duration: adjustable from about 10 seconds to 4 minutes
Monitored angle: 180º
Range: max. 10 metres
Response sensitivity: adjustable from daylight to night
Protection Class: IP44
DISPOSAL
Dispose of electronic devices in an eco-friendly fashion! Electronic devices do not
belong in your household waste. Compliant with European Guideline 2002/96/EG
for electric and electronic devices, used electronic devices must be collected sepa-
rately and taken in for environmentally sound re-cycling. Options for disposing of used
devices may be obtained from your township, city or municipal government
.
Incorrect disposal of batteries rechargeable batteries can harm the environment!
Batteries and rechargeable batteries do not belong in the household waste. They
can contain poisonous heavy metals and are subject to treatment as hazardous
wastes. Take your used batteries to a municipal collection site.
13
015109 Solar-Aussenleuchte SOL 14_015109 Solar-Aussenleuchte SOL 14 Bed.-Anl. 05.12.12 17:22 Seite 13
Оглавление
- Installations- und Bedienungsanleitung Solar LED-Außenleuchte SOL 14 PLUS
- Installations- and Operating Instructions Solar LED outdoor lamp SOL 14 PLUS
- Instructions d’installation et d’utilisation Lampe à LED à énergie solaire pour l'extérieur SOL 14 PLUS
- Installatie- en bedieningshandleiding LED-zonnecellamp voor buitenhuis SOL 14 PLUS
- Installations- och bruksanvisning Solcell-LED-Utomhusbelysning SOL 14 PLUS
- Manual de instalación y funcionamiento Luz solar de exterior LED SOL 14 PLUS
- Manual de instalação de instruções Luz exterior solar por LEDs SOL 14 PLUS
- Istruzioni d’installazione e d’uso Lampada esterna a LED solare SOL 14 PLUS
- Instrukcja instalacji i obsługi Zewnętrzna lampa solarna LED SOL 14 PLUS
- Οδηγίες εγκατάστασης και χρήσης Ηλιακός προβολέας LED για εξωτερικούς χώρους SOL 14 PLUS
- Kurulum ve kullanma kılavuzu Solar LED-Dış Lamba SOL 14 PLUS
- Инструкция по эксплуатацииРуководство по эксплуатации и установке солнечный СИД-светильник уличного освещения SOL 14 PLUS
- Asennus- ja käyttöohje Aurinkoenergialla toimiva LED-ulkovalaisin SOL 14 PLUS
