Ardo HX 080 X: A C F D B
A C F D B: Ardo HX 080 X
GB
2. DESCRIPTION OF THE APPLIANCE
HX060X
A
C
F
D
B
HX063X - HX080X
AC
E
D
B
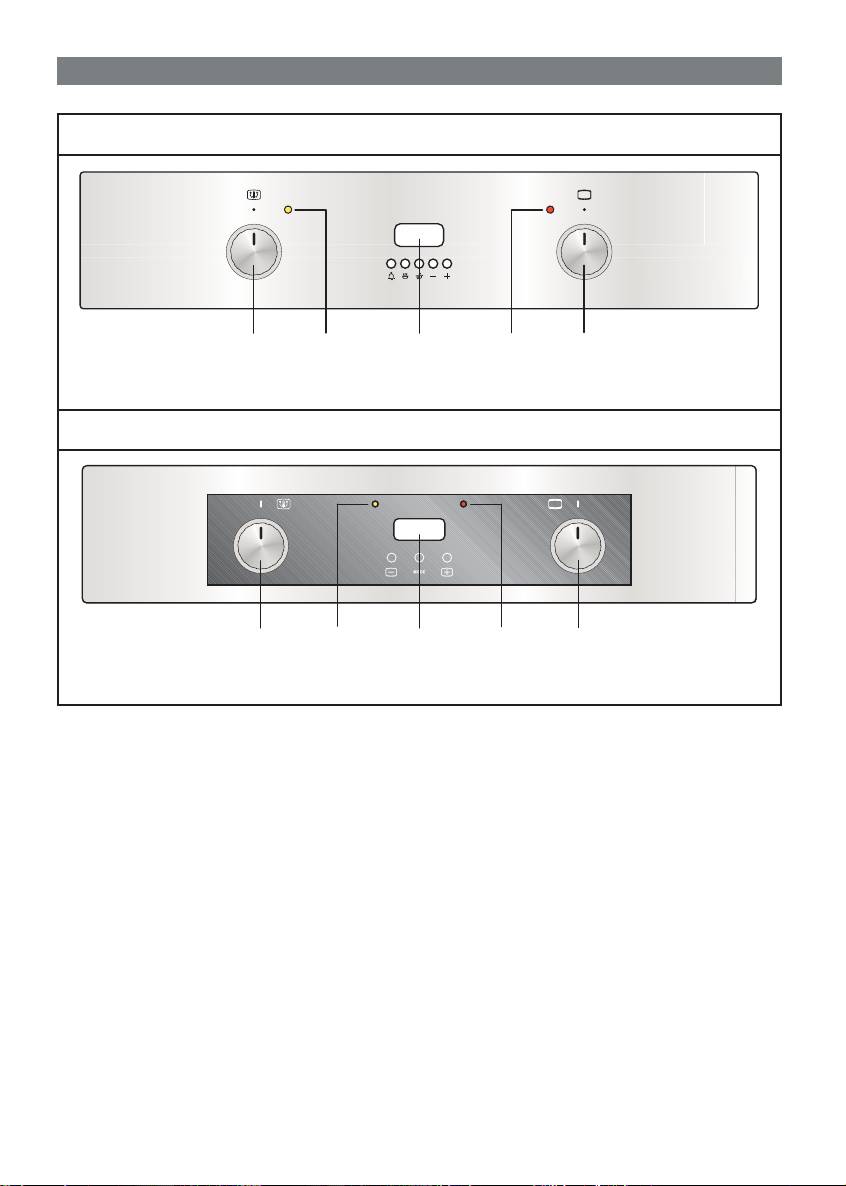
CONTROL PANELS
A. Oven thermostat knob
B. Function selector knob
C. Warning light indicating oven thermostat activation
D. Warning ight indicating oven electrical components activation
E. Electronic programmer "TOUCH"
F. Electronic programmer
6
461306975 (RS-000)
GB2. DESCRIPTION OF THE APPLIANCE
CONTROLS
A
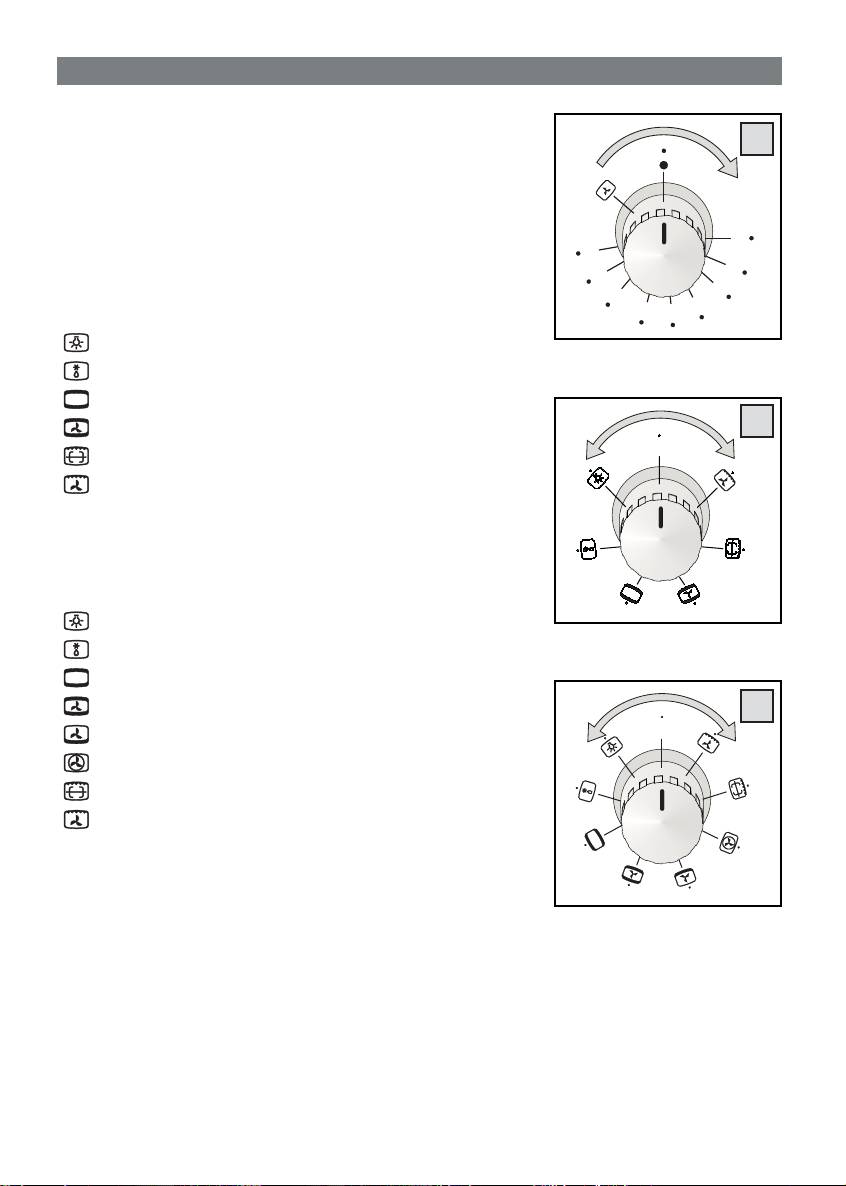
OVEN THERMOSTAT KNOB (ref. A)
Turning the oven knob clockwise selects and sets the oven baking
temperature (50°C to maximum heat).
Max
SIX FUNCTION SELECTOR KNOB (ref. B)
50
225
Turning the oven knob either clockwise or anti-clockwise, the following
75
200
function symbols are available:
100
175
125
150
0
= Oven off
= Oven lights on (stays lit with all functions)
= Fan on
= Top and bottom heating elements on
B
= Top and bottom heating elements on plus fan
0
= Grill heating element on
= Grill heating element on plus fan
EIGHT FUNCTION SELECTOR KNOB (fi g. B)
Turning the oven knob either clockwise or anti-clockwise, the following
function symbols are available:
0 = Oven off
= Oven lights on (stays lit with all functions)
= Fan on
= Top and bottom heating elements on
= Top and bottom heating elements on plus fan
B
0
= Bottom heating element on plus fan
= Rear heating element on plus fan
= Grill heating element on
= Grill heating element on plus fan
WARNING LIGHT INDICATING THERMOSTAT ACTIVATION (ref. C)
When lit it indicates that the oven or the grill is in use. During cooking
time the led turns off each time the temperature set is reached. It is
therefore common that the led/yellow light turns on and off several times
according to re-heating process.
WARNING LIGHT INDICATING OVEN ELECTRICAL COMPONENTS
ACTIVATION (ref. D)
When lit, it indicates that an electric component is inserted
7
461306975 (RS-000)
GB
2. DESCRIPTION OF THE APPLIANCE
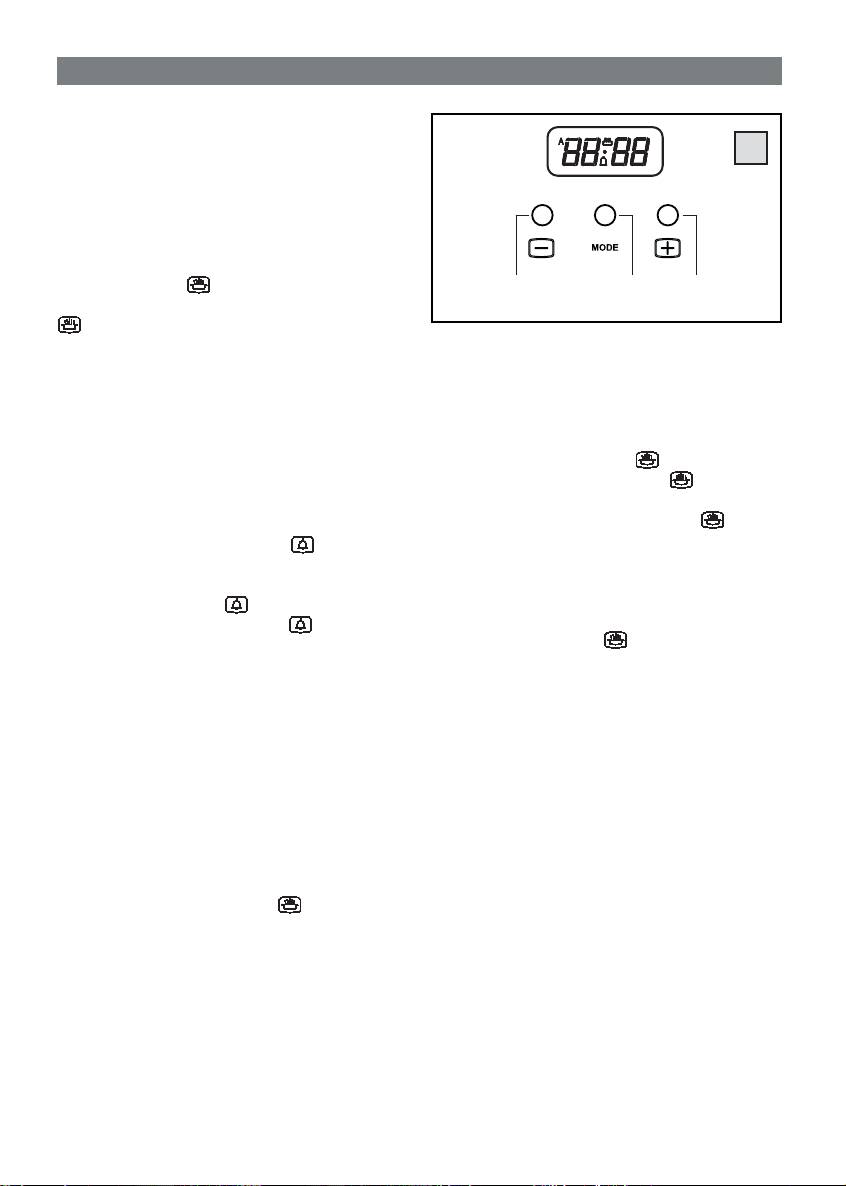
ELECTRONIC PROGRAMMER "TOUCH" (ref. E)
E
Setting the time.
After connecting to mains or after a power cut, symbol
“A” and “0,00” will both fl ash simultaneously on the
display.
Keep pressed for some seconds simultaneously + and
- buttons or just MODE button, till when symbol “A”
turn off and symbol
turn on.
BCA
Time can be set just when the dot beneath the symbol
fl ashes.
Time cannot be adjusted during cooking program run.
If time is selected while a automatic cooking program
3. Fully automatic program with Duration and End
is running, this is deleted.
time
Select with + and - buttons the duration and the
Program selection
end time. The time of the day turns off, symbol “A”
Keep pressed for some seconds MODE button
and “End” fl ash. Symbol
turns off and the
and pressing it in turns, the following programs are
symbol “A” turns on. The symbol
is illuminated
selected:
again when the cooking starts. At the end of the set
time, the buzzer will start, the symbol
turns off
1. Minute Minder
and the symbol “A” fl ashes. To turn off the buzzer
The time turns off, the symbol
turns on and
press MODE button.
with + and - buttons is possible to select the time
Now the oven is off. To set the programmer on
alarm. At the end of the set time, the buzzer will
manual operation keep pressed for some seconds
start and the symbol
fl ashes. To turn off the
simultaneously + and - buttons or just MODE
buzzer and turn off the symbol
keep pressed
button and the symbol
is illuminated.
for some seconds MODE button.
The minute minder program runs independently of
Changing/Clearing programs
other cooking programs.
Each program can be cleared keeping pressed for
some seconds simultaneously + and - buttons. Symbol
2. Semiautomatic Program with Duration or End
“A” turns off.
Time
Each program can be changed keeping pressed for
Select with + and - buttons the duration. The time
some seconds MODE button and then pressing it in
of the day turns off, symbol “A” and “dur” fl ash. At
turns to the function to be changed. The adjustment
the end of the set time, the buzzer will start and the
can be done with + and - buttons.
symbol “A” fl ashes. To turn off the buzzer press
Is it possible to check whenever the progress of
MODE button.
program keeping pressed for some seconds MODE
Now the oven is off. Keep pressed for some
button and then pressing in turns to the function to be
seconds simultaneously + and - buttons or just
checked.
MODE button and the symbol
is illuminated.
8
461306975 (RS-000)
GB2. DESCRIPTION OF THE APPLIANCE
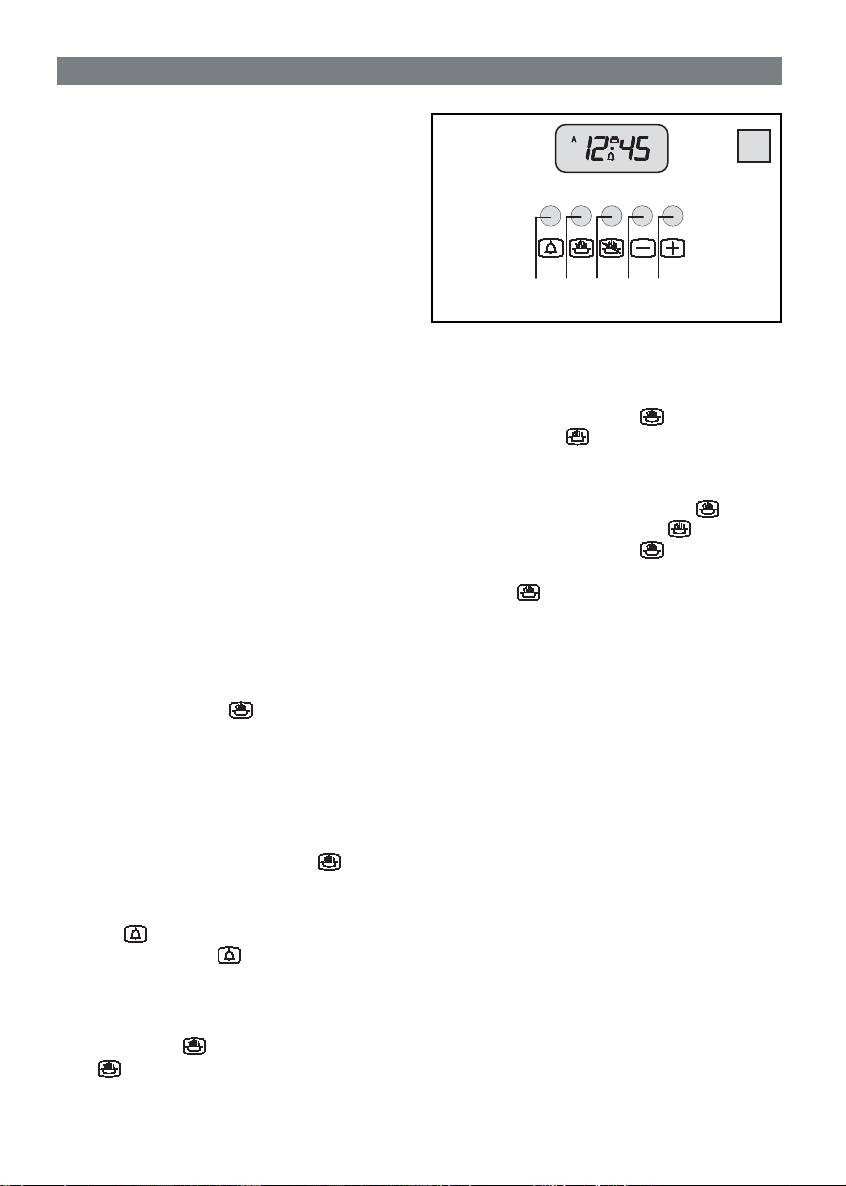
ELECTRONIC PROGRAMMER (ref. F)
This accessory operates the following features:
F
- Clock (set by keys 2 and 3)
- Timer (set by key 1)
- Cooking time (set by key 2)
- End of cooking time (set by key 3)
- Manual operation settings (set by keys 2 and 3)
- Setting time backwards (set by key 4)
1
2345
- Setting time forward (set by key 5)
The digital display always shows the time and can be
Semi-automatic working order (setting end of
set to show cooking time or end of cooking count-down
cooking from 0,01 to 23,59 = hh,mm)
simply by pressing the corresponding key.
Press key 3 and set the end of your cooking session
Please Note: When the cooking session is over the
by key 5; both symbols “A” and turn on. Once the
programme automatically turns off the oven (except
set hour is reached, turns off, “A” fl ashes and the
for the timer). Should you wish to proceed manually
buzzer rings.
next time you use the oven, make sure you set the
Automatic operation (with a delayed start)
manual operation function (see instructions further
Set the cooking period fi rst ( “A” and turn on)
on).
then set the end of cooking time ( turns off) as
Time setting ( 0:01 to 24:00 = hh,mm)
previously described. Symbol turns on again
When plugging in the appliance the fi rst time or
when at the start of cooking session. When cooking
subsequent a power cut, the display shows both “A”
time is over, turns off, “A” fl ashes and the buzzer
and “0.00” (or the minutes past the power failure) signs
will advice cooking completion.
fl ashing.
Buzzer
To reset the time push keys 2 and 3 simultaneously
The buzzer starts ringing when a cooking session has
then press key 4 or 5 till you reach the exact current
reached its completion or the timer countdown is over.
time. When done, the “A” symbol turns off and the
It can ring up to 7 minutes. Press any function key to
manual operation symbol is lit.
make it stop beforehand.
Manual operation
Programme start and control
Each time the time is set, the programme
The programme starts immediately after setting.
sets automatically on manual working order.
To check settings of the programme press the
The only other case when this occurs is when an
corresponding key.
automatic programme reaches completion, or has
been cancelled by pressing keys 2 and 3 at the same
Modify or Cancel programme setting
time. The “A” symbol disappears and the turns on.
In case the current time displayed on the clock is
within the cooking period set, an error in the automatic
Timer setting ( 0:01 to 0:59 = hh,mm)
function occurs, and both the buzzer ring and the
Press key 1 and select cooking time by pushing key 4 or
fl ashing «A» draw your attention. Such error in the set
5. Symbol turns on. Once the time set is expired the
up can be amended by varying the cooking time length
acoustic alarm rings and turns off.
or its end. Any programme set can be modifi ed at any
Semi-automatic working order (cooking period
time by pressing fi rst its corresponding programme key
from 0:01 to 23:59 = hh,mm)
and then key 4 or 5. To cancel a programme, correct
Press key 2 and set cooking time by keys 4 or 5; both
the time set bringing it to a value of “0.00”. When
symbols “A” and are lit. Once the set period is
functioning time is cancelled the end of functioning
over, turns off, “A” fl ashes and the buzzer rings.
is cancelled too and vice versa. The oven turns off
automatically and the “A” symbol fl ashes.
9
461306975 (RS-000)
GB 3. USER INSTRUCTIONS
GENERAL DESCRIPTION
1
With our electric multifunction ovens (6 - 8 functions)
you can choose the heating method most suited to the
food you are cooking.
6
5
To prevent the oven from overheating it has been
4
equipped with a safety temperature device, which
3
automatically turns on in case the main thermostat fails
2
to work. In such an event, the electricity is temporarily
1
cut off: do not try to fi x the failure yourself, instead
turn the appliance off and report to your local
Dealer or Service Centre.
Furthermore, the appliance is equipped with a fan or
2
tangent to cool the front control panel, the knobs, the
oven door handle and the electrical components.
5
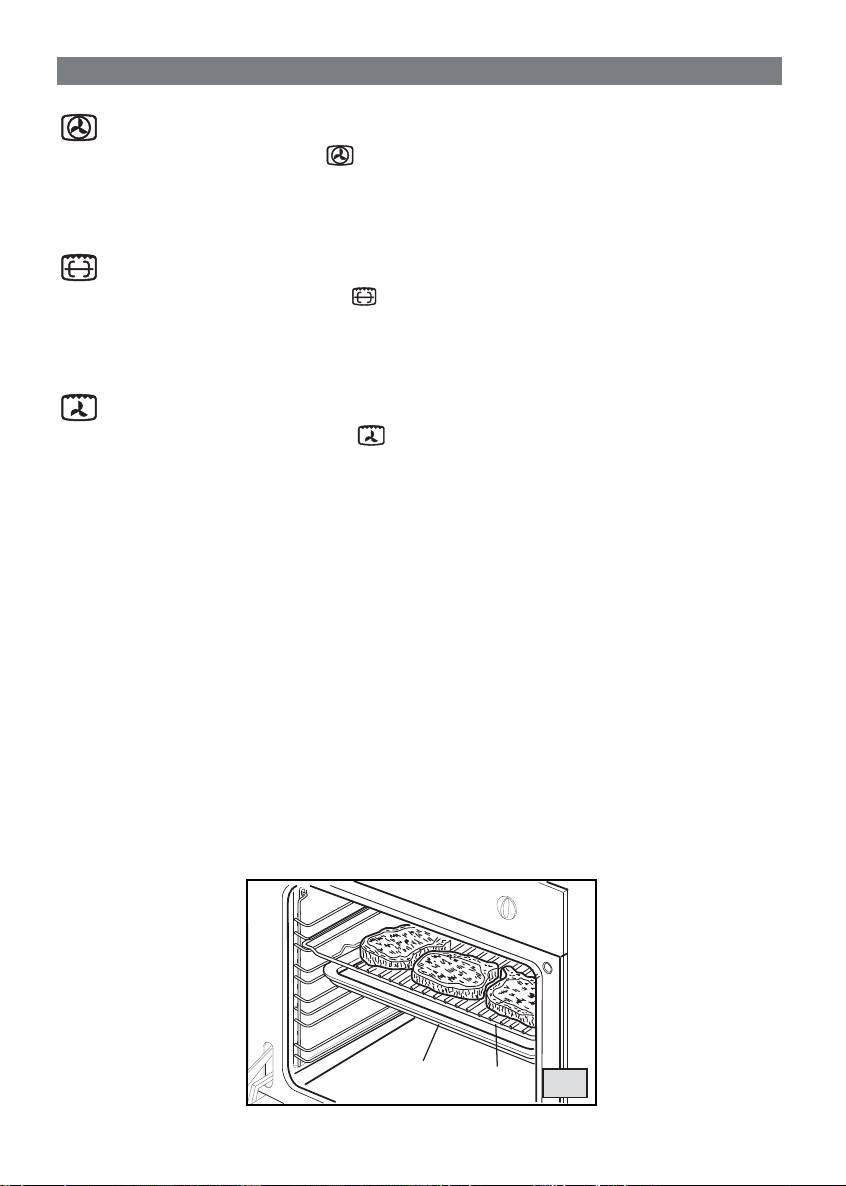
The oven can either be fi tted with fi xed (fi g. 1) or
4
telescopic (fi g. 2) guide bars for housing a number
3
of accessories. The type and the quantity of
2
accessories vary according to the model (fi g. 3):
• Oven / grill shelf (A)
1
• Drip tray or drip pan (B)
• Cake or pizza tray (C)
For the best baking results and correct position of the
B
3
oven shelf (A), see the recommended cooking tables
on page 15.
C
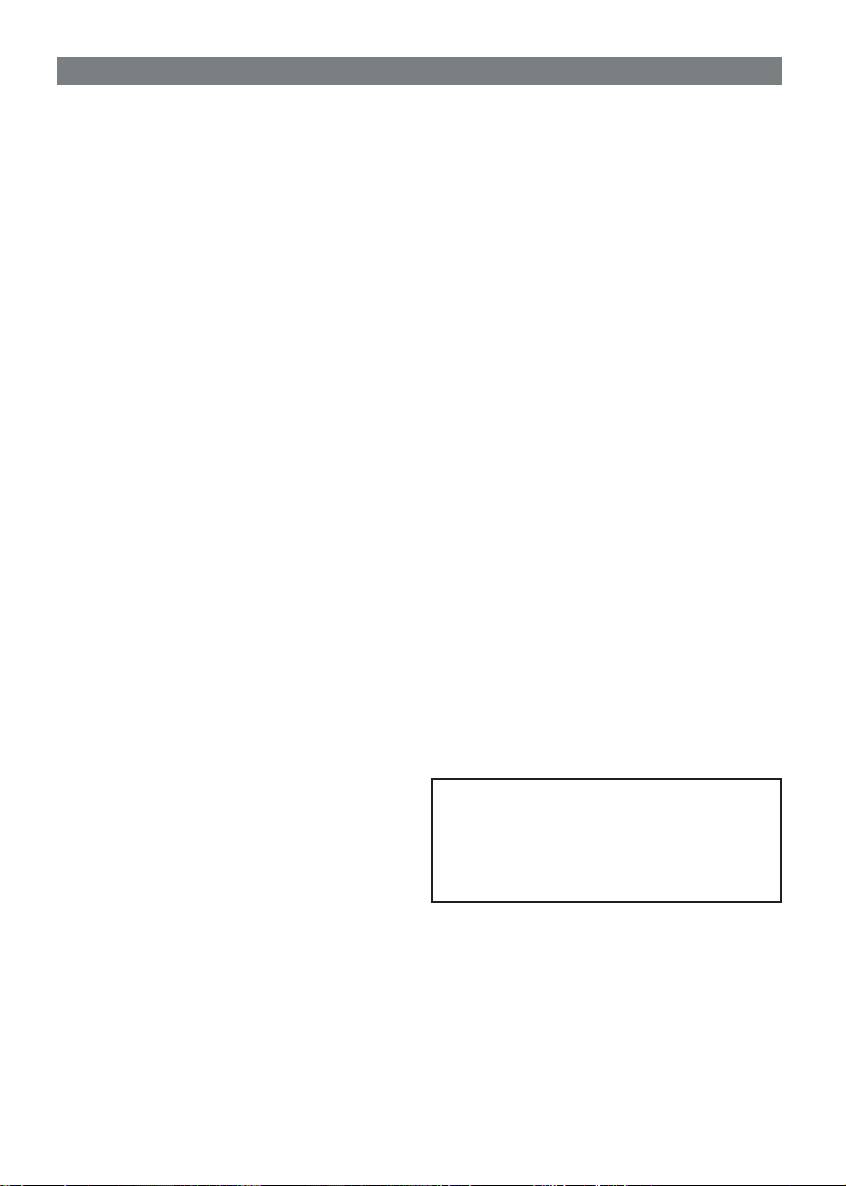
The oven is fi tted with “push-push” knobs (push-in/
push-out knobs)
A
To use the oven, push the knobs out to bring them into
the operating position (see fi g. 4).
When using the oven, make sure that the knobs
are pushed out to prevent overheating.
4
10
461306975 (RS-000)
GB3. USER INSTRUCTIONS
GENERAL NOTES ON SAFETY
• Do not leave the oven unattended during baking. Ensure that children do not play with the appliance.
• Always grip the centre of the oven door when opening. DO NOT practice excessive pressures on the
door when it is open.
• Do not worry if condensation forms on the door and on the inside walls of the oven during use. This
does not affect its working order.
• Mind hot steam when opening the oven door
• The appliance becomes very hot during use. Do not touch the heating elements inside the oven. Wear
oven gloves when placing or removing pans from the oven.
• In placing foods into or removing them from the oven, make sure sauces do not drip to the hot plate
of the oven (overheated oils and fats can easily ignite).
• Use only ovenware resistant to the temperatures indicated on the thermostat knob.
• During baking, avoid cover the bottom plate of the oven or its grills with tin foil or other material. Pans,
moulds, etc., must always be placed on the oven shelf.
• When using the grill, always place the dripping plate to collect sauces and fats as suggested in the
“USEFUL COOKING TIPS” section.
• After use of the appliance, make sure that all the controls are set to the off position and closed.
• IMPORTANT WARNING: During and after use the oven crystal door and all surfaces may be very hot.
Keep children away from the oven!
IMPORTANT!! The oven door must stay closed when using both the oven and the grill.
HOW TO USE THE OVEN FOR THE FIRST TIME
Before cooking for the fi rst time, make sure the cooking programme is set to manual mode, then heat the
empty oven at maximum temperature for 2 hours, door closed, to allow dispersion of all packaging smells. During
this time do not stay in the room and keep windows open.
When done, leave the oven to cool down and then clean its interior with hot water and a mild detergent. All
accessories should be washed prior to use (grill, tray, drip pan, spit..).
Before proceeding with any cleaning, disconnect the appliance from the mains.
11
461306975 (RS-000)

GB 3. USER INSTRUCTIONS
HOW TO USE THE MULTIFUNCTION OVEN
DEFROSTING AT ROOM TEMPERATURE
Turn the selector knob (B) to the symbol
and place the food you want to defrost inside the oven.
The length of time required depends on the quantity and type of food. Selecting this function will only activate the
fan. Mild air circulation around frozen food will slowly defrost it. It is particularly suitable for fruit and cakes.
TRADITIONAL COOKING
Turn the selector knob (B) to the symbol
and set the thermostat knob (A) to the desired temperature.
If pre-heating is recommended wait till the thermostat yellow led turns off before placing foods inside the oven.
This option turns on both bottom and top heating units, evenly distributing heat on your foods.
This type of cooking is ideal for all kind of foods (meats, fi sh, bread, pizzas, cakes..).
COMBINED TRADITIONAL + FAN COOKING
Turn the selector knob (B) to the symbol
and set the thermostat knob (A) to the desired temperature. If
pre-heating is recommended wait till the thermostat yellow led turns off before placing foods inside the oven. This
option turns on both bottom and top heating units, and heat is distributed by fan ventilation.
This combination is suitable for rapid cooking and allows for the use of more plates positioned on the different
levels of the oven (fi g. 5).
DEFROSTING + WARM UP BY HOT AIR (only for ovens with 8 functions)
Turn the selector knob (B) to the symbol
and set the thermostat knob (A) to the desired temperature,
then place the food inside the oven. Selecting this function will activate the bottom heating unit and its heat is
distributed by the fan. This function is particularly recommended to defrost and warm up ready-made meals.
5
12
461306975 (RS-000)
3. USER INSTRUCTIONS
GB
FAN + REAR HEATING COMBINED COOKING (only for ovens with 8 functions)
Turn the selector knob (B) to the symbol
and set the thermostat knob (A) to the desired temperature, then
place your food the oven. If oven needs pre-heating wait till the thermostat yellow led turns off before placing
foods inside it. This function activates the rear heating unit and the fan distributes the heat produced. This
combination allows for a fast and even cooking of several different foods placed on the diverse levels of the
oven (fi g. 5).
CONVETIONAL GRILL COOKING
Turn the selector knob (ref. B) to the symbol
and set the thermostat knob (ref. A) to the desired temperature.
Selecting this function the top central heating element turns on and heat is distributed directly on food surface (fi g.
6). Apart from grilling, this function is ideal to add a golden roast to your recipes or to toast bread slices.
When you use the grill, do not forget to place the drip pan beneath it to collect any sauce dripping, as
suggested in the “COOKING TIPS “ section.
FAN GRILL COOKING
Turn the selector knob (ref.B) to the symbol
and set the thermostat (ref. A) to the desired temperature.
Selecting this function the top central heating element turns on and heat is distributed by the fan. This procedure
mitigates the direct heat on food surface and uses milder temperatures. It is therefore recommended for an even
golden and crispy fi nish touch, ideal for whole fi sh and poultry.
When you use the grill, do not forget to place the drip pan beneath it to collect any sauce dripping, as
suggested in the “COOKING TIPS “ section.
V
6
G
13
461306975 (RS-000)
GB 3. USER INSTRUCTIONS
USEFUL COOKING TIPS
Meat:
• If, when cooking meat, the time needed is more
Cakes and bread:
than 40 minutes, turn the oven off 10 minutes before
• Heat the oven for at least 15 minutes before you
the end of cooking time to exploit the residual heat
start cooking bread or cakes.
(energy saving).
• Do not open the door during baking because the
• Your roast will be juicier if cooked in a closed pan; it
cold air would stop the yeast from rising.
will be crispier if cooked without a lid.
• When the cake is cooked turn the oven off and
• Normally white meat, poultry and fi sh need medium
leave it in for about 10 minutes.
temperatures (less than 200°C).
• Do not use the enamelled oven tray or drip pan,
• To cook “rare” red meats, high temperatures (over
supplied with the oven, to cook cakes in.
200°C) and short cooking times are needed.
• How do you know when the cake is cooked? About
• For a tasty roast, lard and spice the meat.
5 minutes before the end of cooking time, put a cake
• If your roast is tough: the next time leave the meat
tester or skewer in the highest part of the cake. If it
to ripen longer.
comes out clean the cake is cooked.
• If your roast is too dark on top or underneath: the
• And if the cake sinks? The next time use less liquids
next time put it on a higher or lower shelf, lower the
or lower the temperature 10°C.
temperature and cook longer.
• If the cake is too dry: Make some tiny holes with a
• Your roast is underdone? Cut it in slices, arrange
toothpick and pour some drops of fruit juice or spirits
the slices on a baking tray with the gravy and fi nish
on it. The next time, increase the temperature 10°C
cooking it.
and set a shorter cooking time.
• If the cake is too dark on top: the next time put the
Grilling:
cake on a lower shelf, cook it at a lower temperature
• Sparingly grease and fl avour the food before grilling
and longer.
it.
• If the top of the cake is burnt: cut off the burnt layer
• Always use the drip pan to catch any dripping from
and cover with sugar or decorate it with cream, jam,
the meat during grilling. Slide it in one of the levels
confectioner’s cream, etc..
underneath the grill (fi g. 6) or place it at the bottom
• If the cake is too dark underneath: the next time
of the oven. Always pour a little water in the drip
place it on a higher shelf and cook it at a lower
pan. It will prevent grease and sauces from burning
temperature.
avoiding burnt smells and smoke. Add more water
• If the cake or bread is cooked nicely outside but is
during cooking to compensate for evaporation.
still uncooked inside: the next time use less liquids,
• Turn the food half way through cooking.
cook at a lower temperature and longer.
• If the cake will not come out of the tin: slide a knife
The aluminium can be easily corroded if it comes
around the edges, place a damp cloth over the
into contact with organic acids present in the
cake and turn the tin upside down. The next time
foods or added during baking (vinegar, lemon
grease the tin well and sprinkle it with fl our or bread
juice). Therefore it is advised not to put directly
crumbs.
the foods on aluminium or enamelled trays, but
• If the biscuits will not come away from the baking
ALWAYS use the proper oven paper.
tray: put the tray back in the oven for a while and
lift the biscuits up before they cool. The next time
use a sheet of baking parchment to prevent this
happening again.
14
461306975 (RS-000)
3. USER INSTRUCTIONS
GB
COOKING / BAKING TIMETABLE
Position of the oven shelf
TRADITIONAL OVEN COMBINED OVEN (fan ventilated)
Weight
Pan or
from the bottom
FOODS
Baking
Temperature
Cooking/Baking
Temperature
Cooking/Baking
kg
tray
5 guide bars 6 guide bars
in °C
Time (in minutes)
in °C
Time (in minutes)
MEAT LOAFS
Roasted Veal
1
1
2
2 or 3
200-220
100-90
200-220
100-90
Roasted Pork
1
1
2
2 or 3
200-220
120-100
200-220
120-100
Roastbeef
1,15
1
1 or 2
1 or 2
220
60
=
=
Roasted Lamb
2
1
1 or 2
1 or 2
230
165
=
=
POULTRY
Roasted Chicken
1
1
2
2 or 3
200-220
100-90
=
=
Roasted Turkey
6
1
2
2 or 3
220
150
=
=
Roasted Duckling
1,5
1
2
2 or 3
=
=
200-220
150-120
FISH
Roasted whole fi sh
1
1
2
2 or 3
200
30-35
=
=
Sea bass
0,6
1
1 or 2
1 or 2
220
30
=
=
1,15
1
1 or 2
1 or 2
220
45
=
=
PIZZA
1
1
2
3
225-Max
25-30
200-220
25-35
1 x 2
2
1 and 3
1 and 4
=
=
220
20
BREAD
1 1 2 2 or 3 200-220 27-20 = =
PATISSERY
Biscuits / Cookies
1
2
3
180
20-25
190
15
Biscuits
2
1 and 3
1 and 4
=
=
170-190
18-15
Coconut biscuits
2
1 and 3
1 and 4
=
=
170-190
25-20
Lemon biscuits
2
1 and 3
1 and 4
=
=
170-190
27-23
Muffi ns
2
1 and 3
1 and 4
180
30-35
160-170
30-25
Sweet “bun” rolls
1
2
3
225
18
=
=
Sweet “bun” rolls
2
1 and 3
1 and 4
=
=
200
16
CAKES/FLANS
Angel Cake/Sponge
0,8
1
2
3
190
52
190
45
Apple fl an
=
1
2
3
190
60
=
=
Fruit jam tart/fl an
=
1
2
3
=
=
190
45
Fruit jam tart/fl an
=
2
1 and 3
1 and 4
=
=
175-190
50-40
Strudel
=
2 or 3
1
1
180-190
60-50
=
=
Quiche
=
2 or 3
1
1
=
=
200-210
55-45
Values indicated in the tables (temperatures and cooking times) are approximate and may vary according to each person’s
cooking habits.
GRILLING TIMETABLE
TRADITIONAL OVEN COMBINED OVEN (fan ventilated)
Position of the oven shelf
Weight
from the bottom
Cooking/Baking
Cooking/Baking
FOODS
Temperature
Time (in minutes)
Temperature
Time (in minutes)
kg
in °C
in °C
5 guide bars 6 guide bars
st
nd
st
nd
1
side 2
side 1
side 2
side
MEAT
T-bone steak
0,50
4 or 5
5 or 6
225-Max
12-15
12-15
200
15
10
Steak
0,15
4 or 5
5 or 6
200-225
5
5
=
=
=
Chicken (cut in half )
1
3 or 4
4 or 5
225
20
20
=
=
=
FISH
Trout
0,42
4
5
=
=
=
200
10
10
Sea bass
0,40
4 or 5
5 or 6
=
=
=
200
10-12
10-12
Sole
0,20
4 or 5
5 or 6
=
=
=
200
8-9
8-9
Values indicated in the tables (temperatures and cooking times) are approximate and may vary according to each person’s
cooking habits. More specifi cally, when grilling meat cuts the values are subject to the thickness of the slice or loaf and to
personal taste as well.
15
461306975 (RS-000)
GB
3. USER INSTRUCTIONS
CLEANING AND MAINTENANCE
OVEN SEAL
The condition of the oven seal is vital for the correct
• Prior to any maintenance work or cleaning,
functioning and performance of the oven.
disconnect the appliance from the electricity
We recommend you:
mains.
• Clean it, avoiding abrasive tools or products.
• Do not use a steam cleaner to clean this
• Check its condition occasionally.
appliance.
• Do not wash the parts if they are still hot
• Never use abrasive powders, pads or corrosive
In case the seal has stiffened or presents
spray products.
damages, contact your nearest Service centre
• Do not leave vinegar, coffee, milk, salty water
and avoid using the oven until it has been
or the juice of lemon or tomato on the surface
repaired.
for any length of time.
INTERNAL OVEN DOOR GLASS
EXTERIOR PARTS
One of the features of our ovens is that the internal
All the parts of the oven exterior (stainless steel, side
oven door glass can be easily removed for cleaning
panels, door glass) must be cleaned frequently with a
without the aid of specialized personnel.
mild detergent and a little water and then dried with a
Just open the oven door and extract the support to
soft cloth.
which is attached the glass (see fi g. 7).
Do not use rough or abrasive materials or sharp metal
scrapers to clean the oven glass doors as they could
scratch and cause the glass to break.
ATTENTION!! This operation can also be carried
On painted or stainless steel surfaces, do not use
out while the door is assembled on the appliance,
aromatic or aliphatic solvents to remove spots or label
however in this case, with the door horizontally
adhesive.
hinged take the utmost care when extracting
the glass upwards, the force of the hinges can
INTERIOR PARTS
suddenly snap the door shut.
We recommend cleaning the oven after every use
to remove all residues of food, grease and sugar,
which may burn with subsequent use, causing
permanent stains and unpleasant smells. Always
clean the oven when slightly warm with soapy water.
Rinse and dry all surfaces thoroughly. Always wash all
accessories used.
Do not spray or wash the electric heating
elements nor the thermostat with acid-based
detergents (check the information label on the
product you are using). The manufacturer cannot
be held responsible for any damages caused by
incorrect cleaning.
7
16
461306975 (RS-000)
3. USER INSTRUCTIONS
GB
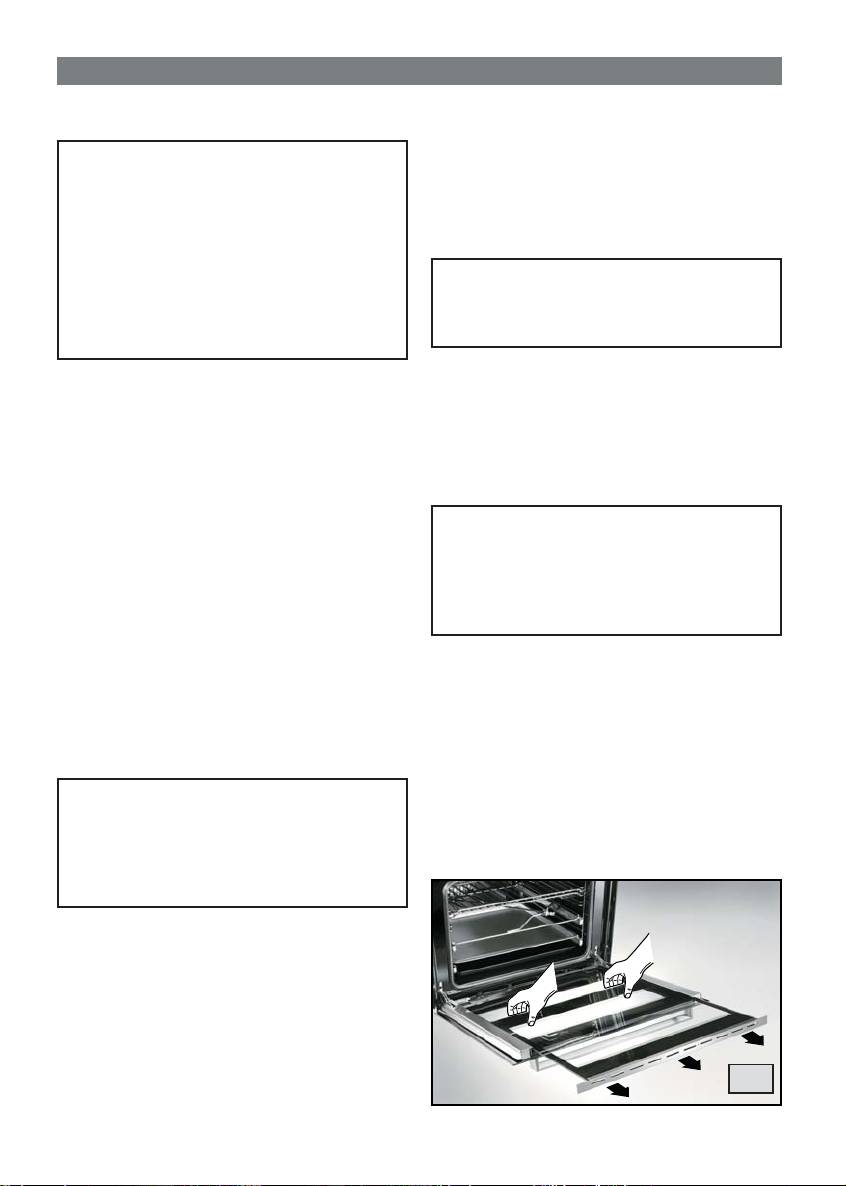
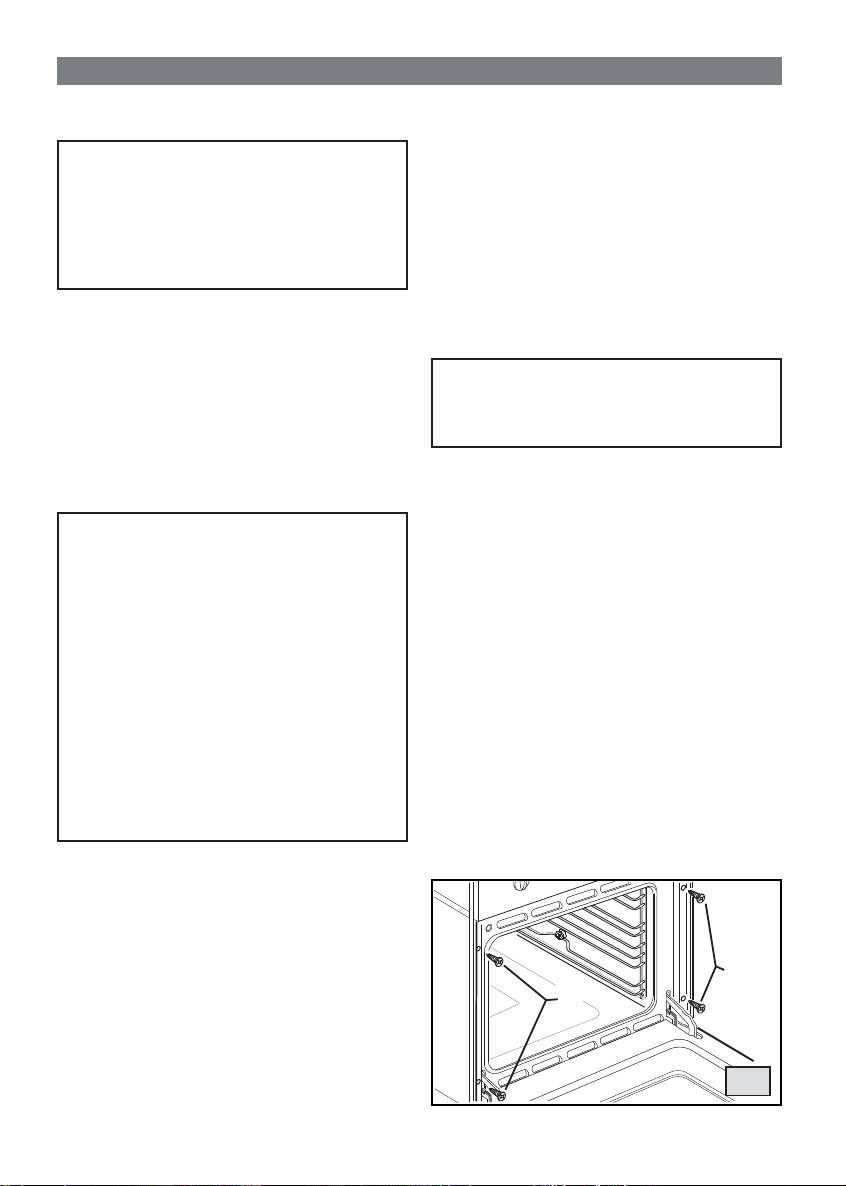
OVEN SIDEWALL GRIDS (fi g. 8)
8
To allow for a better cleaning of the side grids, you can
extract them this way:
• Push with a fi nger on the last of the slots to release
2
1
the grid from its hold.
• Lift it towards the top and extract the grid.
To put them back into place, reverse the order of this
operation.
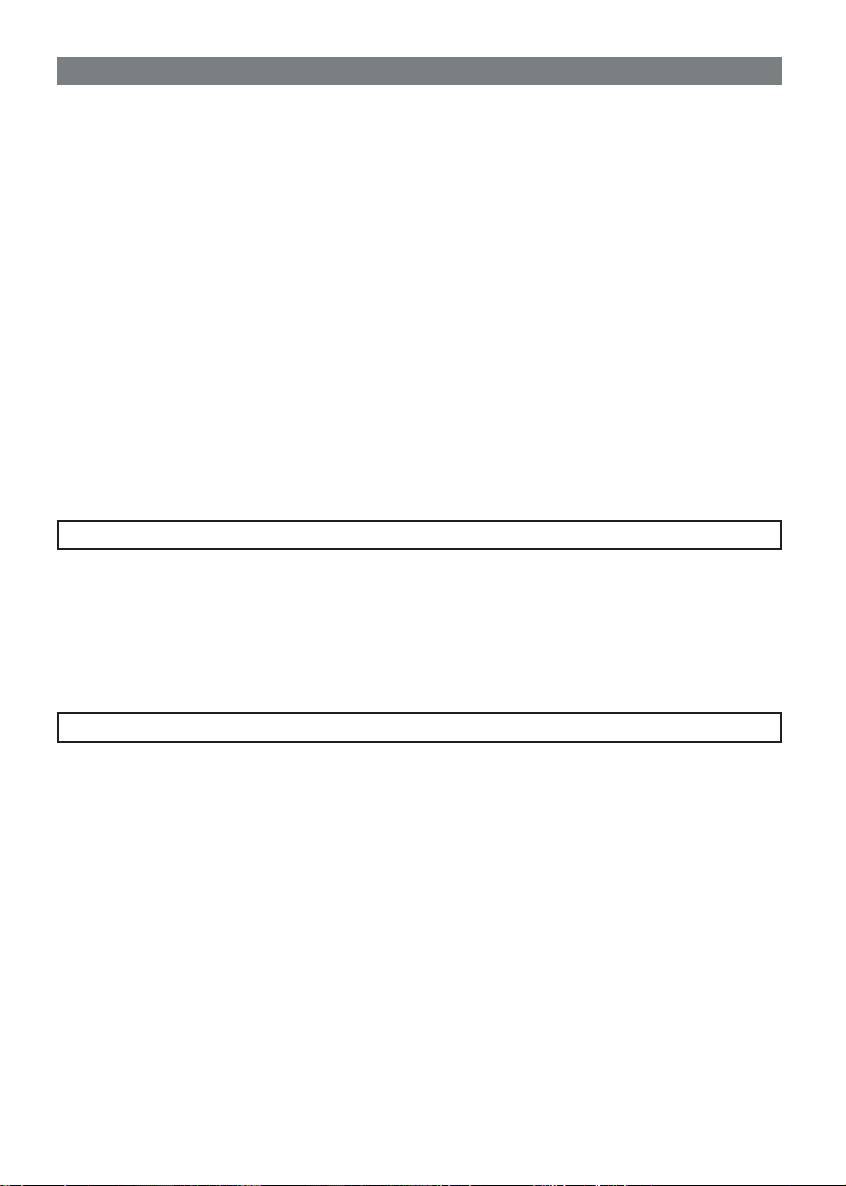
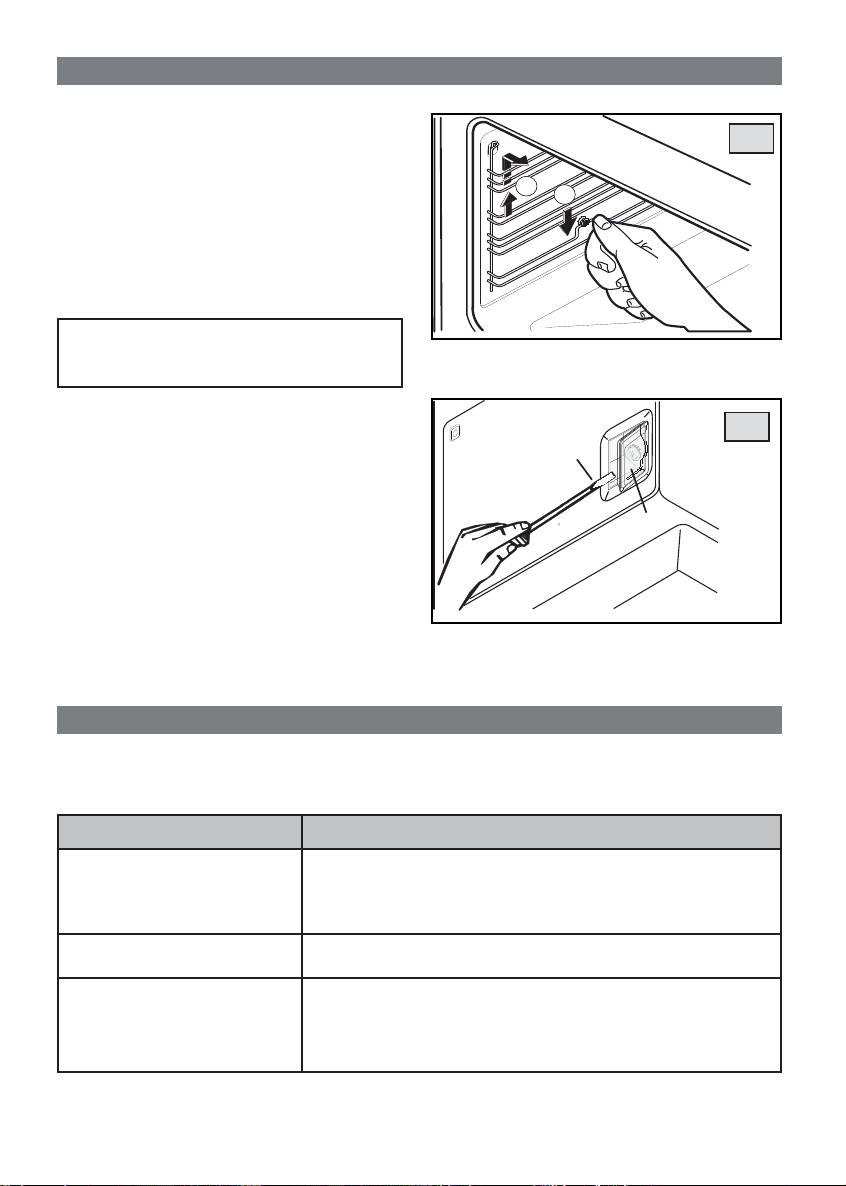
CHANGING THE OVEN LAMP (fi g. 9)
Attention!! Ensure the appliance is switched
off before replacing the lamp to avoid the
possibility of electric shock.
If the oven lamp needs replacing the new lamp must
9
have the following characteristics:
15 W - 230 Vac - 50 Hz - E 14 - resistant to high
C
temperatures (300°C).
To substitute the bulbs follow these instructions:
• Extract the side grids as indicated in the previous
paragraph.
V
• Remove protection cap (V) from bulb holder by
lifting it with a screwdriver (C) against the inside wall
of the oven.
• Substitute the bulb and reposition all elements back
by following the operation in reverse order.
4. TROUBLESHOOTING
Some problems can be caused either as the results of simple maintenance operations or by incorrect selection
of settings. Prior to contacting a Service Engineer please check the following chart.
PROBLEM occurring SOLUTION envisaged
The oven does not work • Check that the plug is connected.
• Check that the programmer / clock is set for manual operation.
• Check the electrical system (fuse electricity board). If there is failure in
the system call an electrician.
During cooking the thermostat led
• Turn the thermostat round to a hotter temperature.
does not turn back on
• Turn the selector round to a different function.
The oven light does not switch on • Turn the selector round to a different function
• Check that the oven bulb is properly fi tted
• If it has blown, buy a bulb specifi cally for high temperatures at a
Service Centre and fi t it following the instructions given on page 17.
17
461306975 (RS-000)
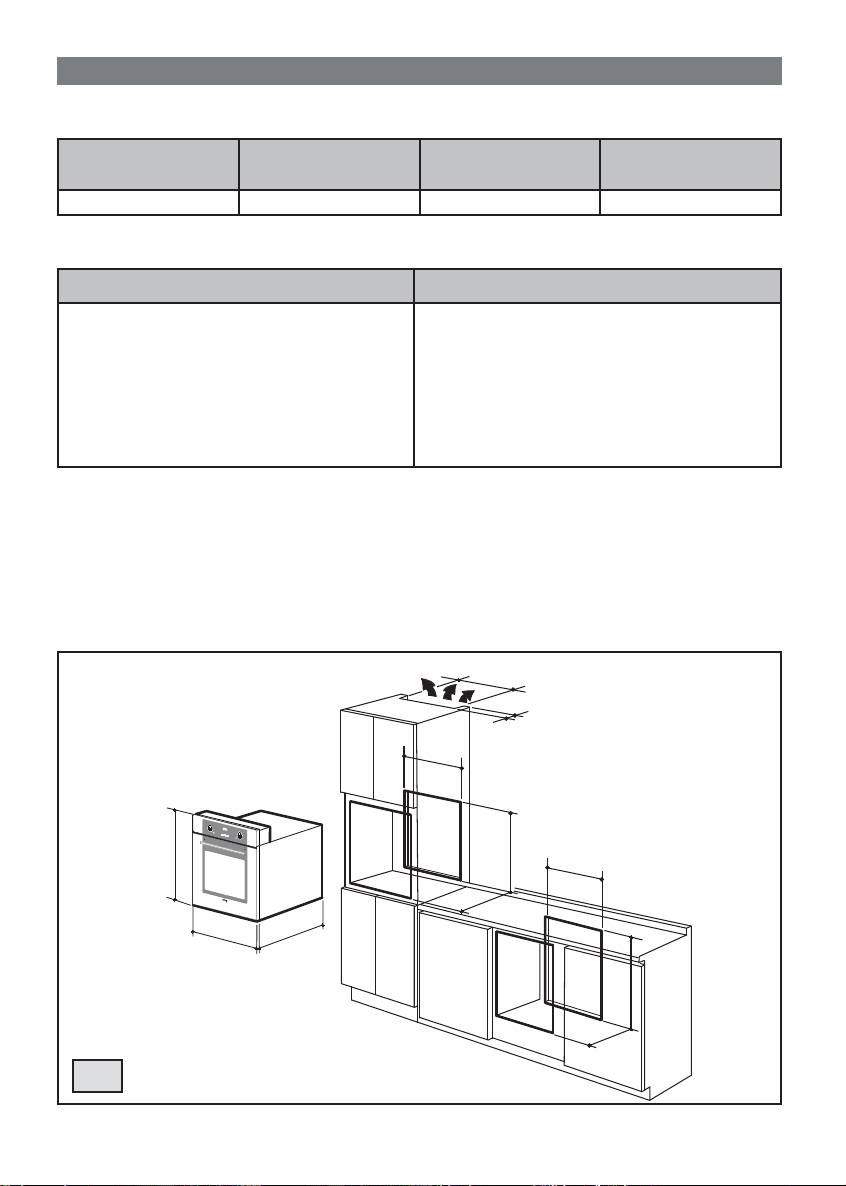
GB 5. TECHNICAL FEATURES
MINIMUM DIMENSIONS OF THE UNIT TO HOUSE THE OVEN (fi g. 10)
HEIGHT
WIDTH
DEPTH
VOLUME
3
mm
mm
mm
dm
570 560 550 51
ELECTRICAL COMPONENTS
Description Nominal data
Lower heating element of the oven
170 + 800 W
Top heating element of the oven-grill
800+1800 W
Rear heating element of the oven
2000 W
Grill heating element
1800 W
Oven lamp
15 W - E 14 - T 300
Tangential or cooling fan
18..22 W
Fan of the rear heating element
25..29 W
2
Supply cable
H05 RR-F 3 x 1.5 mm
560
40
560
A
570
560
597
550
595
540
A
570
550
10
18
461306975 (RS-000)
GB6. INSTALLER INSTRUCTIONS
TECHNICAL INFORMATION
INSTALLING AND FIXING THE OVEN
The oven can be housed into a cabinet or into a base
All instructions related to installation and
module, making room for its volumes as shown in
maintenance operations listed in this section
fi g . 1 0 .
must be carried out only by authorised
personnel.
To guarantee proper aeration of the heat remove
The manufacturer cannot be held responsible
the rear panel of the base module or make an
for any damage to persons or property resulting
escape opening (A), as shown in fi g. 10.
from an incorrect installation of the appliance.
Fit the appliance in place and secure it with the screws
UNPACKING YOUR APPLIANCE
supplied (V) (fi g. 11).
• Once the packaging has been removed, thoroughly
check that the appliance is in perfect condition. If you
have any doubts do not use the appliance and call our
The oven must stand on a solid platform that
Service Centre.
will withstand its full weight, as screws are only
• Do not move the appliance by the handles.
used to secure the appliance inside its cabinet
• Some parts mounted on the appliance are protected
housing.
by a plastic fi lm. This protection must be removed
before using the appliance. We recommend slitting the
plastic fi lm along the edges with a sharp knife or pin.
All packaging materials used (cardboard boxes,
bags, polystyrene foam, nails, etc.) must be
kept out of the reach of children, as they are a
potential hazard source. All packaging materials
used are environmentally-friendly and recyclable
(wooden bits are free from chemicals, cardboard
is 80-100% recycled, protective bags are made in
polyethylene (PE), bands in polypropylene (PP)
and padding in polystyrene foam (PS) without
chloro-fl uoro-carbides. Waste materials can
undergo treatment and be recycled saving on
new raw materials and on the amount wasted
volumes. For this purpose we suggest you take
the packaging material back to the shop you
bought the appliance or to a collecting service.
Ask your local service for the nearest service.
WARNINGS
• As this is a built-in oven, please ascertain that
the walls or panels surrounding the appliance
can withstand a temperature of over 70 K.
• Also make sure that the glue that joins the
laminated plastic coat to the unit can withstand
V
a temperature of around 150°C, to avoid the
V
laminated coat to unglue.
11
19
461306975 (RS-000)
GB 6. INSTALLER INSTRUCTIONS
ELECTRICAL CONNECTION
MAINTENANCE
Electrical connection must be carried out
Before replacing any spare parts it is vital to
in accordance with current standards and
disconnect the appliance from the electricity
normative.
mains.
Before connecting the oven check out the
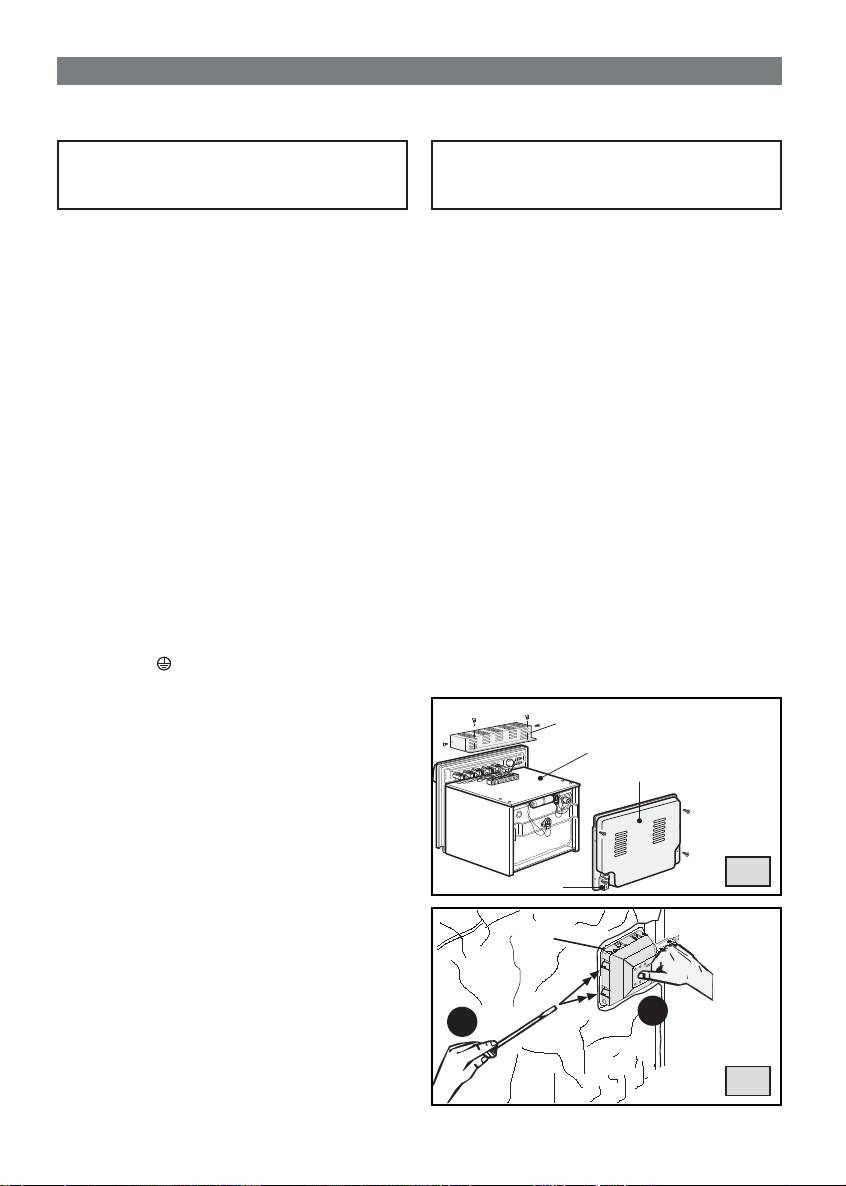
REPLACING ELECTRICAL COMPONENTS
following list:
• To replace the oven lamp please refer to instructions
on page 17.
• The system and electrical sockets amperage is
• To access other electrical components the oven
adequate for the appliance maximum power (see
will have to be removed from its housing unit by
data label affi xed on the side of the oven and in the
unscrewing it (V) (see fi g. 11). Oven extraction
appliance handbook)
allows access to the terminal board (T) (fi g. 12).
• The socket or system has an effective earth
• If the power cable needs replacing always keep
connection in accordance with current standards
the earth wire longer than the phase wires
and prescriptions of the law. All responsibility is
and do follow all instructions given in the
disclaimed if this is not complied with.
«ELECTRICAL CONNECTION» section.
• When positioning the appliance, make sure that the
• Remove the rear protection panel (Q) to have
plug or multipolar switch are easily accessible.
access to the gear motor, heating elements and
When connecting to the mains with a socket:
temperature limiting device (fi g. 12).
• Fit a standard plug, suitable for the load, which is
• To change lamp holder (P), remove the superior
indicated on the rating plate, to the power cable.
protection (A) and the side panel, then use a
Connect the wires making sure they match the
screwdriver to push the two locking tabs (fi g. 13) and
indications below. Pay attention to the earth wire,
remove the lamp holder from the inside of the oven.
which must be longer than the phase wires:
• To replace the thermostat, the commutator, the
programmer and the indicator lights, remove
letter
L
(phase) = brown wire
protection box (S) (fi g. 12). Remove the knobs and
letter
(neutral) = blue wire
undo the screws underneath to front panel to free
N
the components that need replacing.
symbol (earth) = green/yellow wire
• The power cable must be laid far from heat sources
and its temperature should stay below 75°C.
S
• Avoid using adapters or shunts as they could cause
A
false contacts resulting in hazardous overheating.
Q
When connecting directly to the mains:
• Install a multipolar switch that can withstand the
appliance’s load, with a minimum opening between
the contacts of 3 mm. Remember that the earth wire
must not be cut out by the switch.
12
T
P
2
1
13
20
461306975 (RS-000)
TARTALOMJEGYZÉK
HU
1. FONTOS MEGJEGYZÉSEK ÉS TUDNIVALÓK A KÉSZÜLÉK HASZNÁLATÁVAL KAPCSOLATBAN 4-5
2. A KÉSZÜLÉK LEÍRÁSA 6-9
3. HASZNÁLATI UTASÍTÁSOK 10-17
4. TENNIVALÓK, HA VALAMI NEM MŰKÖDIK
17
5. MŰSZAKI JELLEMZŐK
18
6. UTASÍTÁSOK A BESZERELÉSHEZ
19-20
SZERVIZSZOLGÁLAT ÉS PÓTALKATRÉSZEK
Ezt a készüléket, mielőtt elhagyta a gyárat, szakképzett és specializált szakemberek minőségellenőrzésnek
vetették alá és beállították, úgy, hogy a készülék a lehető legjobb eredménnyel működjön.
Minden javítást vagy beállítást, mely ezt követően szükségessé válna, a legnagyobb gondossággal és
fi gyelemmel szakképzett személynek kell végeznie.
Ebből az okból kifolyólag az ajánljuk, forduljon mindig a legközelebbi szervizközpontunkhoz megjelölve a márkát,
a típust, a gyári számot, a probléma jellegét, és az Ön birtokában levő készülék modelljét. A vonatkozó adatok a
készülék oldalán elhelyezett jelzőcímkére vannak nyomtatva, és szerepelnek a kézikönyvben.
Megjegyzés: a lenti üres helyre illessze be a címkét, úgy, hogy ezek az adatok mindig a keze ügyében
legyenek.
Ezek az információk lehetővé teszik, hogy a technikus beszerezze a megfelelő pótalkatrészeket, és így garantálja
a rendkívül gyors, és célzott beavatkozás elvégzését.
Az eredeti pótalkatrészek és az opcionális kiegészítők csak a mi Szervizszolgálati Központjainkban és engedéllyel
rendelkező viszonteladóknál szerezhetők be.
A JELZŐCÍMKE ELHELYEZÉSÉRE SZOLGÁLÓ HELY
3
461306975 (RS-000)
HU 1. FONTOS MEGJEGYZÉSEK ÉS ELŐVIGYÁZATOS HASZNÁLAT
A készüléket az EN 60 335-1 és EN 60 335-2-6 európai normák és a vonatkozó módosítások szerint
tervezték és gyártották.
A készülék megfelel a lent megjelölt Európai Direktíváknak:
• EGK 2006/95 a villamossági biztonságosságról (Kisfeszültségű direktíva).
• EGK 89/336 + 92/31 + 93/68, az elektromágneses kompatibilitásról (EMC)
és a jelzőcímkén és a csomagoláson szerepel a
szimbólum.
A sütő kiegészítői, melyek érintkezésbe kerülhetnek az élelmiszerekkel, olyan anyagokból készültek,
melyek megfelelnek a 88/12/21 EGK 89/109 direktíva előírásainak.
Ez a termék megfelel az EU 2002/96/EK direktívának.
A készüléken szereplő áthúzott szemétkosár szimbólum azt jelzi, hogy a terméket, élettartamának
végén, mivel a háztartási hulladéktól különállóan kell kezelni, elektromos és elektronikus készülékek
elkülönített szemétgyűjtő helyére kell szállítani, vagy pedig vissza kell szolgáltatni a viszonteladónak
egy ennek megfelelő új készülék megvásárlásakor.
A használó felelős a lejárt élettartamú készülék megfelelő gyűjtőközpontba szállításáért, amit a
hulladékokról szóló hatályos jogszabályok szankcionálnak.
A megfelelő, elkülönített szemétgyűjtés a már nem használt készülék ezt követő, újrafelhasználásra,
feldolgozására és a környezetvédelemmel összeegyeztethető ártalmatlanítására való irányításáért
hozzájárul ahhoz, hogy elkerüljük az esetleges negatív környezeti és egészségügyi hatásokat, illetve
elősegíti azoknak az anyagoknak az újrafelhasználását, melyekből a termék áll.
Az elérhető gyűjtőrendszerekről való részletesebb információkért forduljon a helyi hulladék
ártalmatlanító szolgálathoz, vagy a bolthoz, melyben a készüléket vásárolta.
A gyártók és az importőrök betartják felelősségüket az újrafelhasználásért, a hulladék feldolgozásért,
és a környezetvédelemmel összeegyeztethető ártalmatlanításért mind közvetlenül, mind pedig részt
vállalva egy közös rendszerben.
4
461306975 (RS-000)

1. FONTOS MEGJEGYZÉSEK ÉS ELŐVIGYÁZATOS HASZNÁLAT
HU
Ön megvásárolta egy termékünket, és ezt szívből
• Mielőtt csatlakoztatja a készüléket, ellenőrizze,
köszönjük. meg vagyunk arról győződve, hogy ez az új
hogy az adattábla adatai megfelelnek a villamos
készülék, mely modern, funkcionális és praktikus, és
hálózat adatainak (lásd „5. MŰSZAKI JELLEMZŐK”
elsőrangú anyagokból gyártották, a lehető legjobban
szakasz).
kielégíti igényeit. Ezt a készüléket könnyű használni,
Bármilyen elektromos készülék használata néhány
ugyanakkor mielőtt felszerelik és működésbe helyezik,
alapvető szabály betartásával jár:
fontos fi gyelmesen elolvasni ezt a könyvecskét,
# Ne érjen a készülékhez vizes vagy nedves kézzel.
mely útmutatást nyújt a felszerelés, a használat és a
# Ne használja a készüléket mezítláb.
karbantartás biztonságosságának terén. Őrizze meg
# Ne húzza a tápvezetéket azért, hogy a villásdugót
ezt az útmutatót a további tanulmányozás céljából.
kihúzza a csatlakozó aljzatból.
A Gyártó Cég fenntartja a jogot arra, hogy saját
# Ne hagyja a készüléket a légköri hatásoknak kitéve
termékein olyan módosításokat hajtson végre,
(eső, napsugárzás ...).
melyeket szükségesnek vagy hasznosnak ítél, a
# Ne hagyja, hogy a készüléket felügyelet nélkül,
használó érdekében is, anélkül, hogy veszélyeztetné
hogy gyermekek vagy arra alkalmatlan személyek
a lényeges működési és biztonsági jellemzőket.
használják.
Nem vállalja a felelősséget a jelen használati
• Mielőtt először használja a készüléket, jó, ha üresen
utasításban szereplő pontatlanságokért, melyeket
zárt ajtóval felmelegíti a maximális hőmérsékletre
sajtóhiba vagy átírási hiba okoz. Megjegyzés: a
körülbelül két óra hosszat, abból a célból, hogy
használati utasításban szereplő ábrák grafi kája
megszüntesse a jellegzetes szagot, melyet az
kizárólag tájékoztató jellegű.
üveggyapot szigetelés okoz. Szellőztesse a szobát
• A felszerelést és a karbantartást kizárólag
a művelet alatt.
szakképzett személyek végezhetik (lásd „6.
• A használat alatt és utána a sütő ajtajának üvege,
UTASÍTÁSOK A BESZERELÉSHEZ” szakasz).
és a hozzáférhető részek nagyon fel lehetnek
• A készüléket csak arra a rendeltetésre lehet
forrósodva, ezért távol kell tartani a gyermekeket a
használni, melyre tervezték, azaz a házi használatú
készüléktől.
sütésre. A készülék minden egyéb működtetése
• Tartsa jól tisztán a készüléket. Az ételmaradványok
helytelen és veszélyes.
tűzveszély kockázatát jelenthetik.
• A gyártót nem lehet felelősnek tekinteni a készülék
• Kerülje el a kikapcsolt sütő használatát ételek, vagy
téves használatából, vagy helytelen felszereléséből
edények tárolására szolgáló helyként. Véletlen
vagy karbantartásából eredő esetleges dologi vagy
bekapcsolódás esetén ez a viselkedés károkat és
személyi károkért.
baleseteket okozhat.
• Miután eltávolította a külső csomagolást, és a
• Ha a készülék közelében levő csatlakozó aljzatot
különféle mozgó részek belső csomagolását,
használ, győződjön meg arról, hogy a háztartási
győződjön meg a készülék épségéről. Ha kétség
gépek vezetékei, melyeket használ, ne érjenek a
merül fel, ne használja, hanem lépjen érintkezésbe
készülékhez, és elég távol legyenek annak meleg
szakképzett szakemberrel.
részeitől.
• A csomagolóanyagok (karton, zsákok, polisztirol,
• Miután a készüléket használta, ellenőrizze, hogy az
szögek stb.) potenciális veszélyforrást jelentenek,
összes kezelőgomb kikapcsolt vagy zárt állásban
ezért tartsuk távol a gyerekektől.
legyen.
A környezet védelmének érdekében az összes
• Mielőtt bármilyen tisztítási vagy karbantartási
felhasznált csomagolóanyag környezetbarát, és
műveletet végezne, kapcsolja le a készüléket az
újra felhasználható.
elektromos hálózatról.
• Ez a készülék akkor tekinthető villamos szempontból
• Meghibásodás és/vagy rossz működés esetén,
biztonságosnak, ha az helyesen egy jó földeléshez
kapcsolja ki és kapcsolja le a készüléket az
van csatlakoztatva, amit a hatályos biztonsági
elektromos hálózatról, és ne végezzen rajta
előírások betartásával végeznek el. A gyártó minden
illetéktelen beavatkozást. Minden javítást
felelősséget elhárít ezeknek a rendelkezéseknek a
vagy beállítást a legnagyobb gondossággal és
fi gyelmen kívül hagyása esetén. Kételyek esetén
fi gyelemmel, szakembernek kell végeznie. Ebből az
kérje a berendezés alapos ellenőrzését egy
okból kifolyólag az ajánljuk, forduljon a legközelebbi
szakképzett szakember részéről.
szervizközpontunkhoz megjelölve a probléma
jellegét, és az Ön birtokában levő készülék
modelljét.
5
461306975 (RS-000)
