EXFO Photonic Solutions Div. EPM-ELS-50: 4 Measuring Power or Loss (EPM-50)
4 Measuring Power or Loss (EPM-50): EXFO Photonic Solutions Div. EPM-ELS-50

Measuring Power or Loss (EPM-50) 8
4 Measuring Power or Loss
(EPM-50)
Nulling Electrical Offsets
Temperature and humidity variations affect the performance of electronic circuits
and optical detectors. Nulling the electrical offsets eliminates these effects. You r unit
has been designed not to require offset nulling under normal operation, but you
should perform it whenever environmental conditions change significantly or when
measuring very low power values.
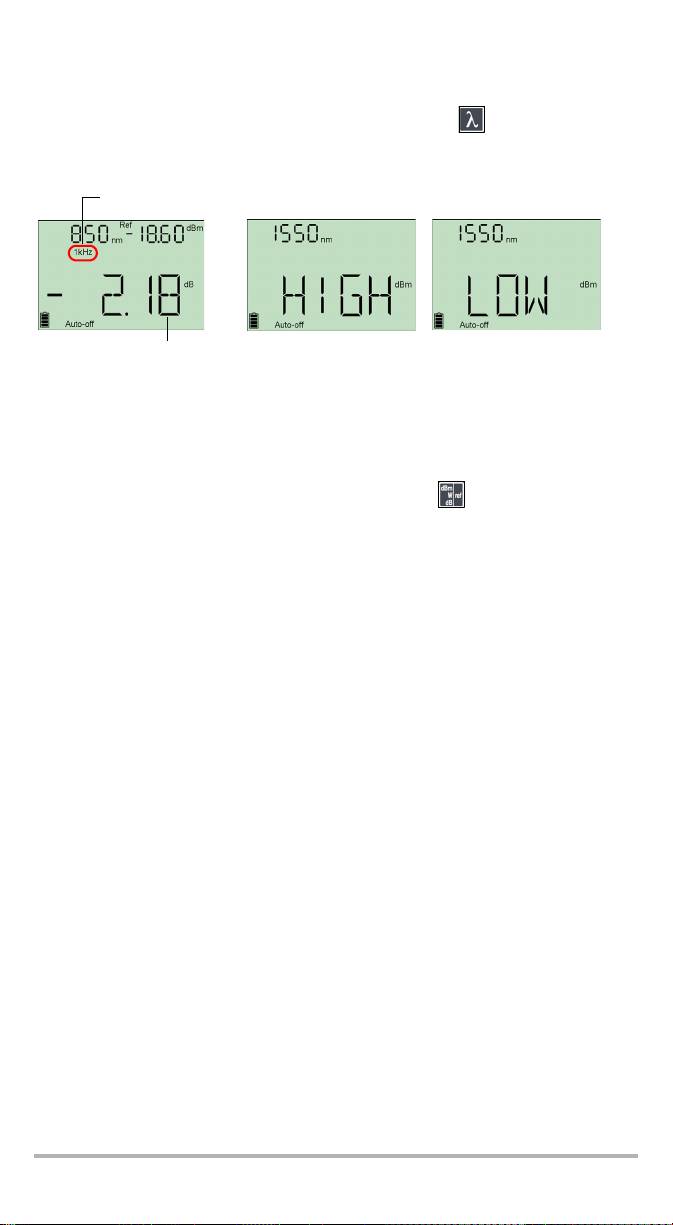
IMPORTANT
If light reaches the detector when nulling offsets, LIGH appears on
the display and the nulling is not performed. You will need to press a
key to return to the previous display.
Note: Factory-defined values will be reinstated when you turn off the unit.
To perform an offset nulling:
Hold down and a few seconds. The unit
displays NULL while nulling the offsets, then returns to
normal mode.
Note: Keypad is disabled during the operation.
Referencing Your Power Meter to a Source
In reference mode, your unit displays the loss created by the fiber under test only,
since a reference value is subtracted from the measured power.
Note: You must set a reference value separately for each wavelength.
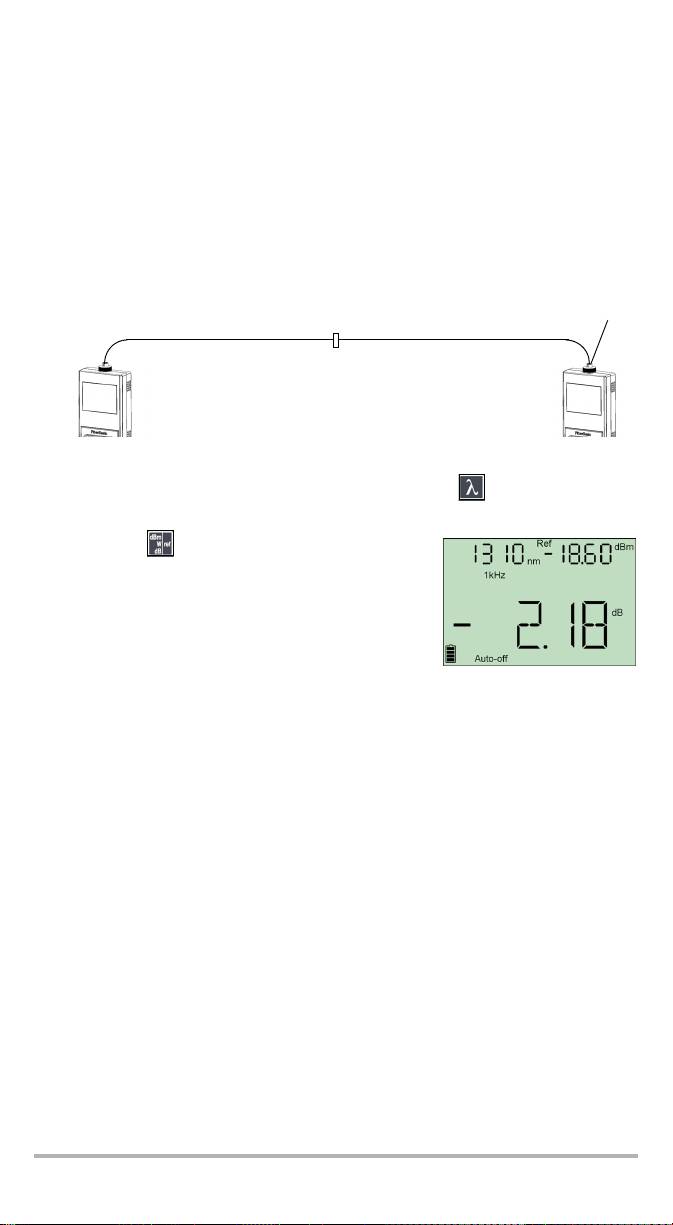
To reference the power meter to a source manually:
1. Using the proper adapter, connect a light source (such as ELS-50) to the
detector port of your power meter.
Reference
AdapterReference
test jumper
test jumper
Bulkhead
connector
Light
Power
source
meter
2. Activate the source at the desired wavelength.
3. Match the source and power meter wavelenghts using .
Wavelength is displayed in the top left corner.
4. Hold down for a few seconds. The power meter
stores the currently detected power as the new
reference power.
Reference power is displayed in the top right corner
(in dBm) and current loss reading is automatically
switched to dB.
5. Repeat the procedure for each wavelength you want to reference.
Note: Once all desired wavelengths have been referenced, do not disconnect
the Reference Test Jumper from the source port until all measurements
have been done.
EPM-50/ELS-50 9
Measuring Power or Loss (EPM-50) 10
Measuring Power or Loss
Measuring absolute power is done the same way as referencing the power meter to
a source, except for the referencing step.
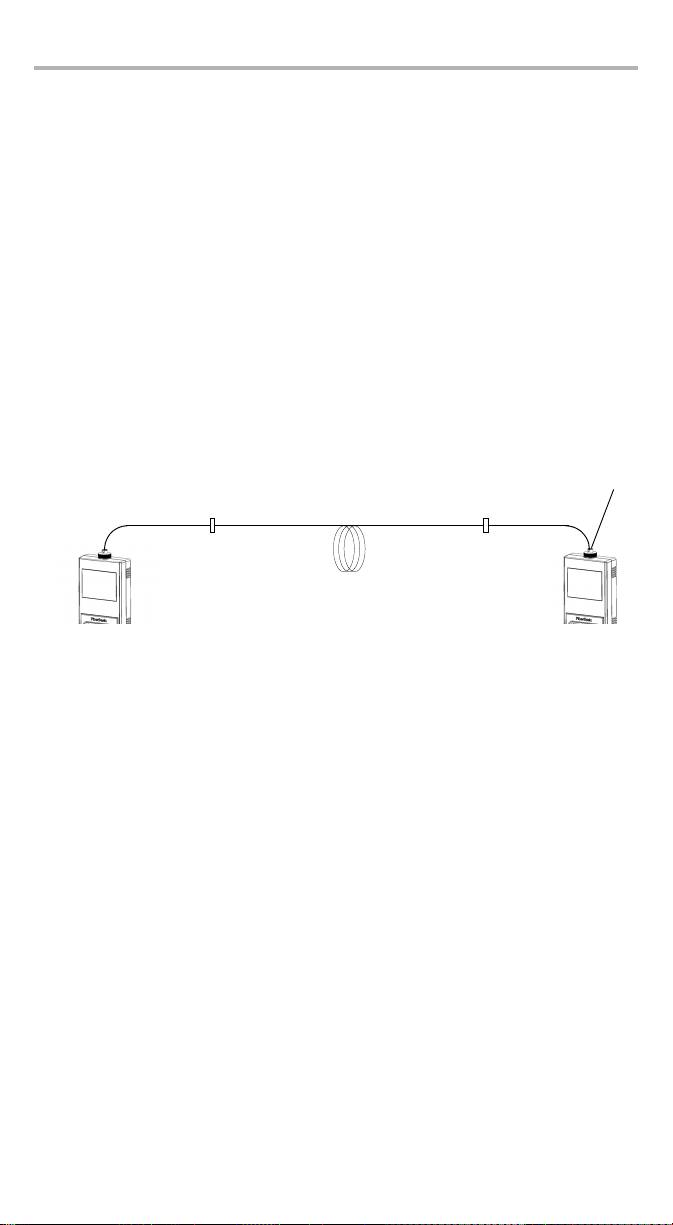
To perform power or loss measurements:
1. If necessary, perform an offset nulling (see Nulling Electrical Offsets on page 8).
2. Check and clean your fibers appropriately for optimum performance
(see Cleaning and Connecting Optical Fibers on page 7).
3. For loss measurements, reference your power meter to a light source
(see Referencing Your Power Meter to a Source on page 9), then deactivate the
light source.
4. Using the proper adapter and test jumpers, connect a fiber under test to a light
source (such as ELS-50) and to the detector port of your unit.
Note: If you have referenced your power meter to a source, simply connect a
fiber under test to the test jumpers used for referencing.
Adapter
Tes t
Tes t
jumper
jumper
Bulkhead
Bulkhead
connector
connector
Fiber under test
Light
Power
source
meter
5. Activate the source at the desired wavelength.
6. Match the source and power meter wavelengths using .
Modulation detected
Actual power
When power or loss is outside power limits
or loss
(see Technical Specifications on page 27)
of fiber under test
When the unit detects a modulated signal, it displays the modulation value and
average measured power or loss (see left illustration above). You may notice a
slightly unstable last digit.
7. If necessary, change the displayed units by pressing .
8. Repeat the procedure for other wavelengths.
EPM-50/ELS-50 11
Оглавление
- 1 Introducing the EPM-50/ELS-50
- 2 Safety Information
- 3 Getting Started
- 4 Measuring Power or Loss (EPM-50)
- 5 Using a Light Source (ELS-50)
- 6 Maintenance
- 7 Troubleshooting
- 8 Warranty
- A Technical Specifications
- 1 Présentation du EPM-50/ELS-50
- 2 Informations relatives à la sécurité
- 3 Initiation
- 4 Mesure de la puissance ou de la perte (EPM-50)
- 5 Utilisation d’une Source lumineuse (ELS-50)
- 6 Entretien
- 7 Dépannage
- 8 Garantie
- A Caractéristiques techniques
- 1 EPM-50/ELS-50 简介
- 2 安全信息
- 3 入门
- 4 测量功率或损耗 (EPM-50)
- 5 使用光源 (ELS-50)
- 6 维护
- 7 故障排除
- 8 保修
- A 技术规格
- 1 Presentación del EPM-50/ELS-50
- 2 Información de seguridad
- 3 Primeros pasos
- 4 Medición de potencia o pérdida (EPM-50)
- 5 Uso de una fuente de luz (ELS-50)
- 6 Mantenimiento
- 7 Resolución de problemas
- 8 Garantía
- A Especificaciones técnicas
- 1 Apresentação do EPM-50/ELS-50
- 2Informações de segurança
- 3 Iniciar
- 4 Medição da potência ou perda (EPM-50)
- 5 Utilizar fonte de luz (ELS-50)
- 6 Manutenção
- 7 Resolução de avarias
- 8 Garantia
- A Especificações técnicas
- 1 Общие сведения о EPM-50/ELS-50
- 2 Информация о безопасности
- 3 Начало работы
- 4 Измерение мощности или потерь (EPM-50)
- 5 Использование источника света (ELS-50)
- 6 Обслуживание
- 7 Поиск и устранение неисправностей
- 8 Гарантия
- A Технические характеристики
