Yamaha RX-497: PLAYING AND RECORDING Playing a source
PLAYING AND RECORDING Playing a source: Yamaha RX-497
Table of contents
- CAUTION: READ THIS BEFORE OPERATING YOUR UNIT.
- CONTENTS
- FEATURES SUPPLIED ACCESSORIES
- CONTROLS AND FUNCTIONS
- CONTROLS AND FUNCTIONS
- Front panel display
- Rear panel
- Remote control
- CONTROLS AND FUNCTIONS
- Installing batteries in the remote control Using the remote control
- CONNECTIONS
- Connecting speakers
- Connecting the AM and FM antennas
- Connecting the AM loop antenna
- Connecting the power supply cord Turning on and off this unit
- PLAYING AND RECORDING Playing a source
- Adjusting the tonal quality
- Recording a source
- Using the sleep timer
- Muting the sound output
- FM/AM TUNING Automatic tuning
- Manual tuning
- Automatic preset tuning
- Customized automatic preset tuning
- Manual preset tuning
- Selecting preset stations Exchanging preset stations
- RADIO DATA SYSTEM (EUROPE MODEL ONLY) Receiving Radio Data System stations Changing the Radio Data System mode
- PTY SEEK function
- EON function
- ADVANCED SETUP Changing the ADVANCED SETUP menu parameters
- Switching the remote control ID
- ZONE 2 Connecting the Zone 2 components
- Controlling Zone 2
- REMOTE CONTROL FEATURES Control area
- Controlling other components
- Setting remote control codes
- General TROUBLESHOOTING
- Tuner
- Remote control
- SPECIFICATIONS
PLAYING AND RECORDING
15
BA
S
IC
OPE
R
A
T
IO
N
English
l
Extreme caution should be exercised when you play back CDs encoded in DTS.
If you play back a CD encoded in DTS on a DTS-incompatible CD player, you will only hear some unwanted noise that may damage
your speakers. Check whether your CD player supports CDs encoded in DTS. Also, check the sound output level of your CD player
before you play back a CD encoded in DTS.
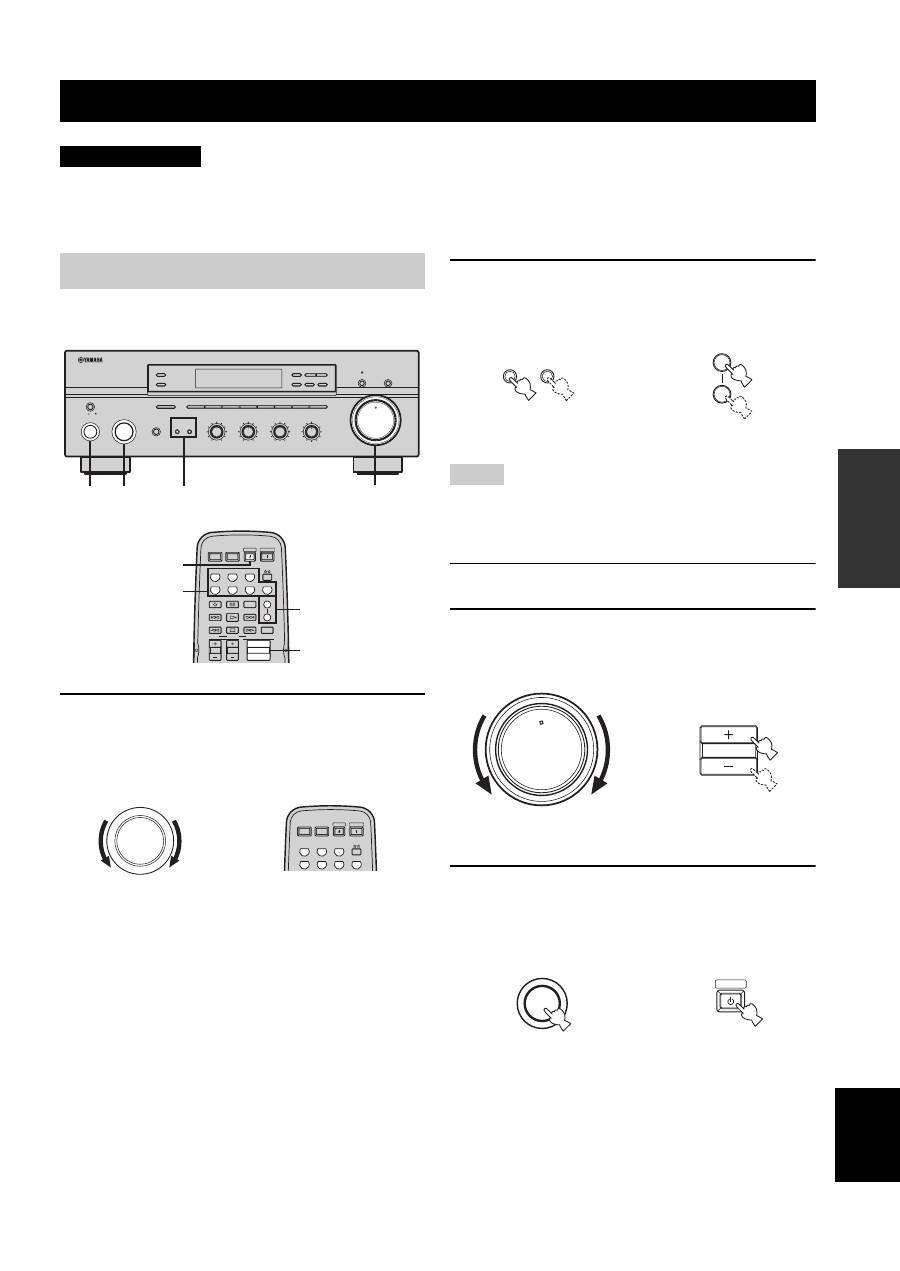
1
Rotate the INPUT selector on the front panel
(or press one of the input selector buttons on
the remote control) to select the desired
input source.
2
Press SPEAKERS A and/or SPEAKERS B on
the front panel or on the remote control to
select speakers A and/or speakers B.
• Both SPEAKERS A and B can be selected.
• Make sure that the IMPEDANCE SELECTOR switch is
correctly set (see page 11).
3
Play the source.
4
Rotate VOLUME on the front panel (or press
VOLUME +/– on the remote control) to adjust
the sound output level.
5
Press MAIN ZONE ON/OFF on the front panel
again (or press STANDBY on the remote
control) to finish using this unit and set it to
the standby mode.
PLAYING AND RECORDING
CAUTION
Playing a source
ON/OFF
INPUT
MAIN ZONE
PHONES
BASS
MASTER
SPEAKERS
ON
OFF
MD/TAPE MONITOR
PURE DIRECT
5
5
1
0
1
4
4
2
2
3
3
+
–
VOLUME
l
TUNING
h
ZONE 2 ON/OFF
ZONE CONTROL
FM/AM
EDIT
A/B/C/D/E
1
2
3
4
5
6
7
8
MEMORY
MAN'L/AUTO FM
TUNING MODE
AUTO/MAN'L
B
A
TREBLE
5
5
1
0
1
4
4
2
2
3
3
+
–
BALANCE
5
5
1
0
1
4
4
2
2
3
3
R
L
LOUDNESS
5
7
1
FLAT
6
4
8
2
10
–30dB
3
9
1
2
5
4
0
12
12
2
8
4
∞
20
20
60
60
26
26
40
40
16
16
-dB
-dB
STANDBY
POWER
CD
MD/TAPE
TUNER
PHONO
DVD
SLEEP
A
B
POWER
POWER
REC
CODE SET
VOLUME
DISC SKIP
EON
FREQ/TEXT
START
MODE
PTY SEEK
AV
TV
VCR
DTV/CBL
SPEAKERS
TV VOL
TV CH
2
4
1
5
INPUT
STANDBY
POWER
CD
MD/TAPE
TUNER
PHONO
DVD
POWER
POWER
AV
TV
VCR
DTV/CBL
Front panel
Remote control
or
Notes
SPEAKERS
B
A
A
B
SPEAKERS
or
Front panel
Remote control
0
12
12
2
8
4
∞
20
20
60
60
26
26
40
40
16
16
-dB
-dB
VOLUME
VOLUME
Remote control
Front panel
or
ON/OFF
MAIN ZONE
STANDBY
Remote control
Front panel
or
