Yamaha RX-497 – page 2
Manual for Yamaha RX-497
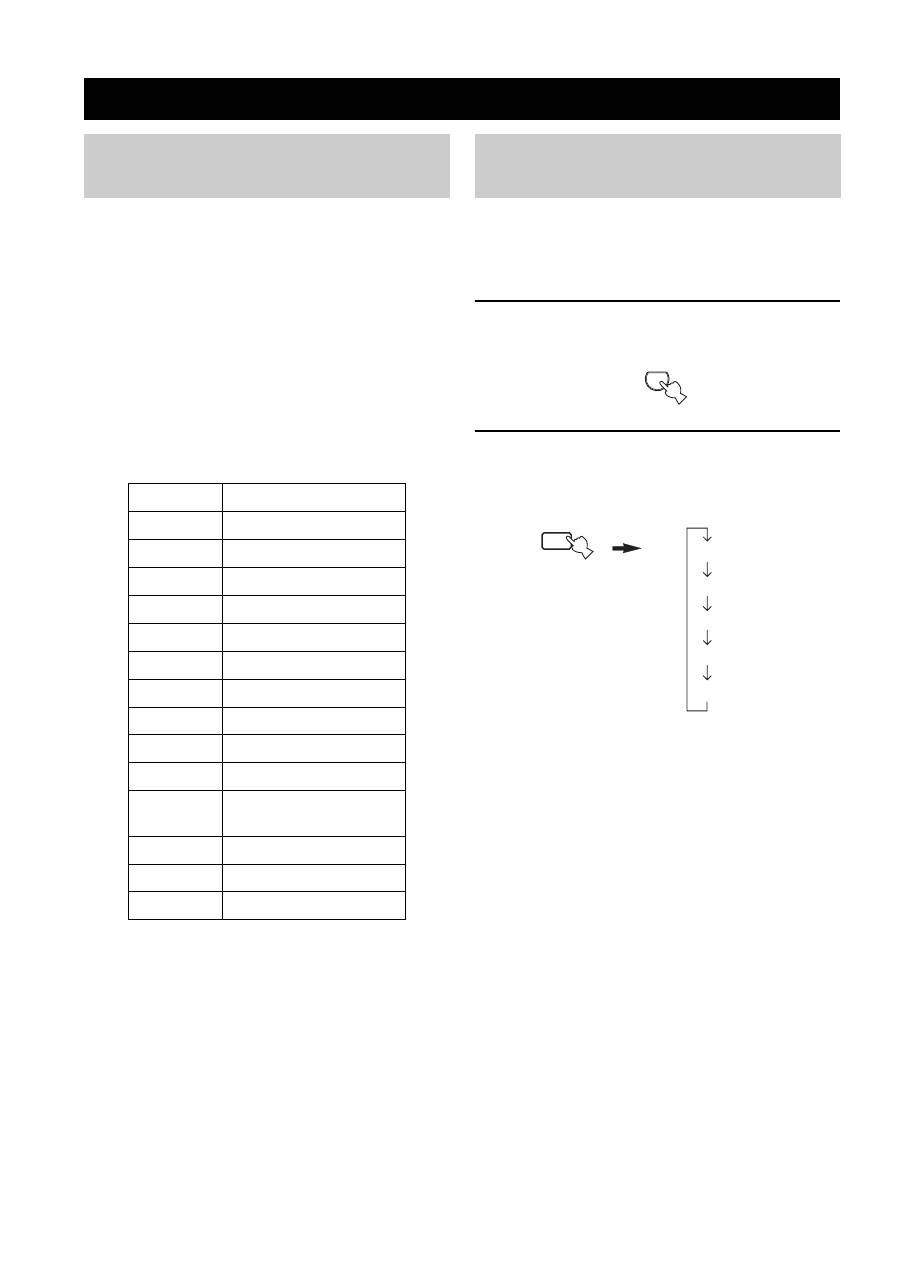
Table of contents
- CAUTION: READ THIS BEFORE OPERATING YOUR UNIT.
- CONTENTS
- FEATURES SUPPLIED ACCESSORIES
- CONTROLS AND FUNCTIONS
- CONTROLS AND FUNCTIONS
- Front panel display
- Rear panel
- Remote control
- CONTROLS AND FUNCTIONS
- Installing batteries in the remote control Using the remote control
- CONNECTIONS
- Connecting speakers
- Connecting the AM and FM antennas
- Connecting the AM loop antenna
- Connecting the power supply cord Turning on and off this unit
- PLAYING AND RECORDING Playing a source
- Adjusting the tonal quality
- Recording a source
- Using the sleep timer
- Muting the sound output
- FM/AM TUNING Automatic tuning
- Manual tuning
- Automatic preset tuning
- Customized automatic preset tuning
- Manual preset tuning
- Selecting preset stations Exchanging preset stations
- RADIO DATA SYSTEM (EUROPE MODEL ONLY) Receiving Radio Data System stations Changing the Radio Data System mode
- PTY SEEK function
- EON function
- ADVANCED SETUP Changing the ADVANCED SETUP menu parameters
- Switching the remote control ID
- ZONE 2 Connecting the Zone 2 components
- Controlling Zone 2
- REMOTE CONTROL FEATURES Control area
- Controlling other components
- Setting remote control codes
- General TROUBLESHOOTING
- Tuner
- Remote control
- SPECIFICATIONS
19
PLAYING AND RECORDING
BA
S
IC
OPE
R
A
T
IO
N
English
1
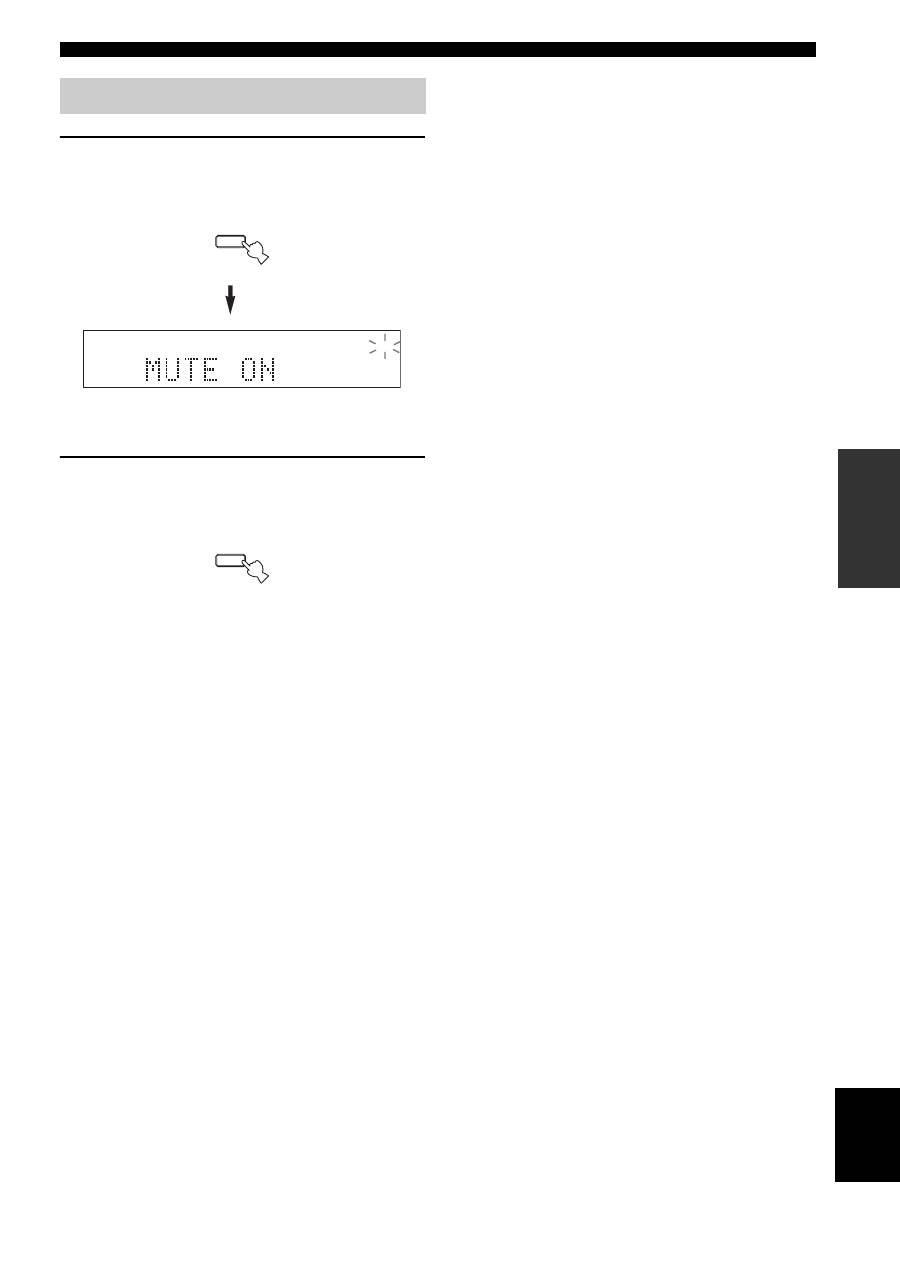
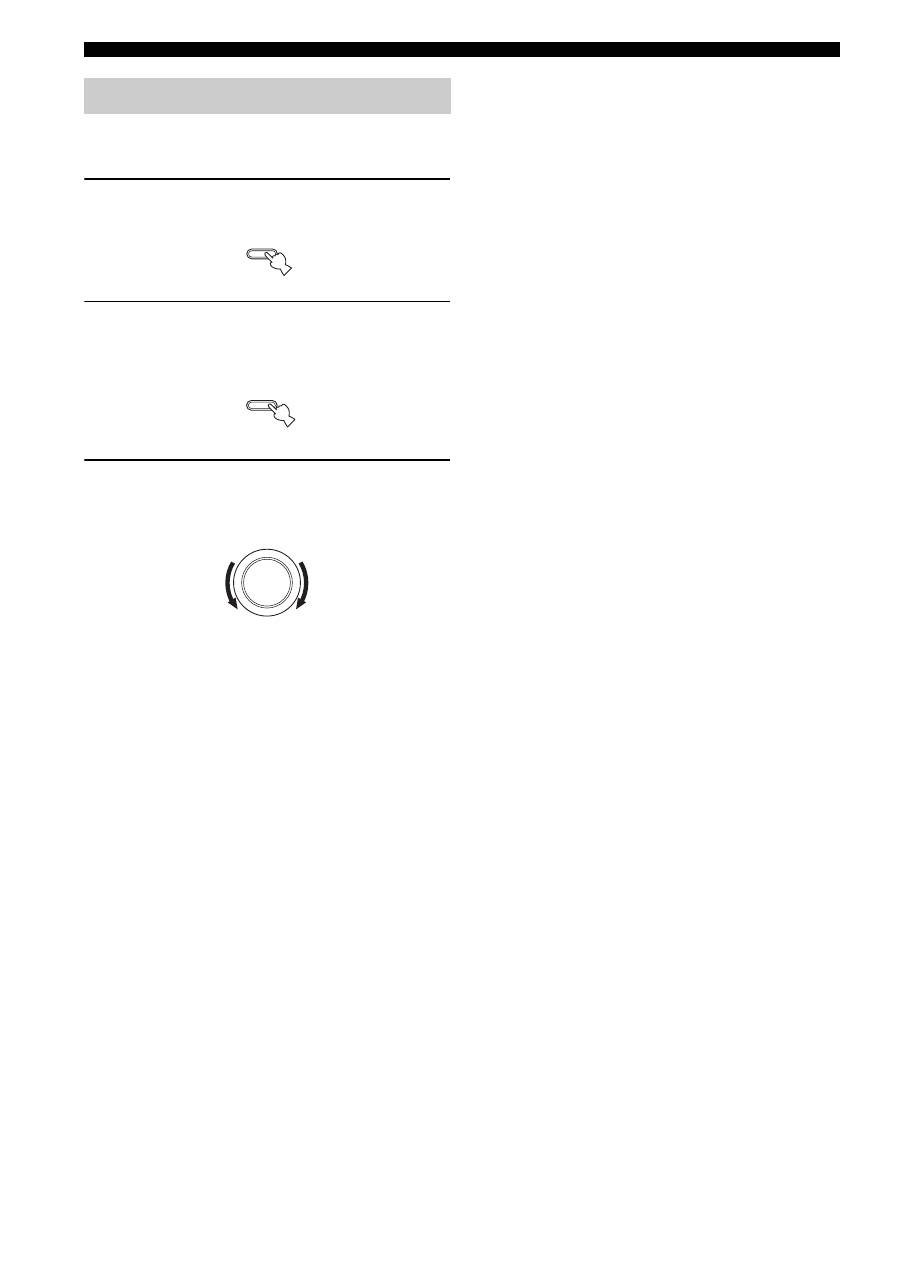
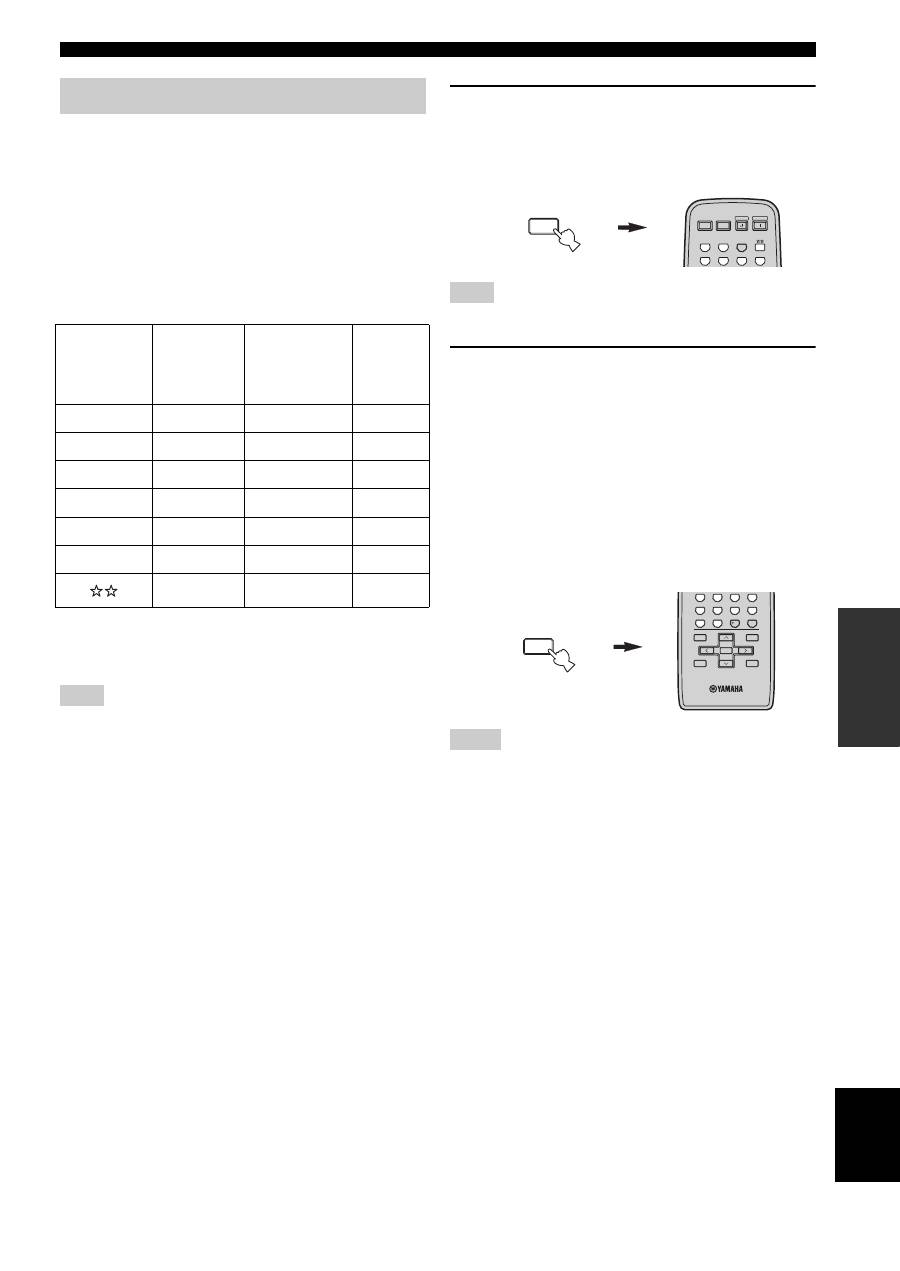
Press MUTE on the remote control to mute
the sound output.
The MUTE indicator flashes in the front panel
display.
After a few seconds, MUTE ON disappears from the
front panel display.
2
Press MUTE on the remote control again to
resume the sound output.
The MUTE indicator disappears from the front panel
display.
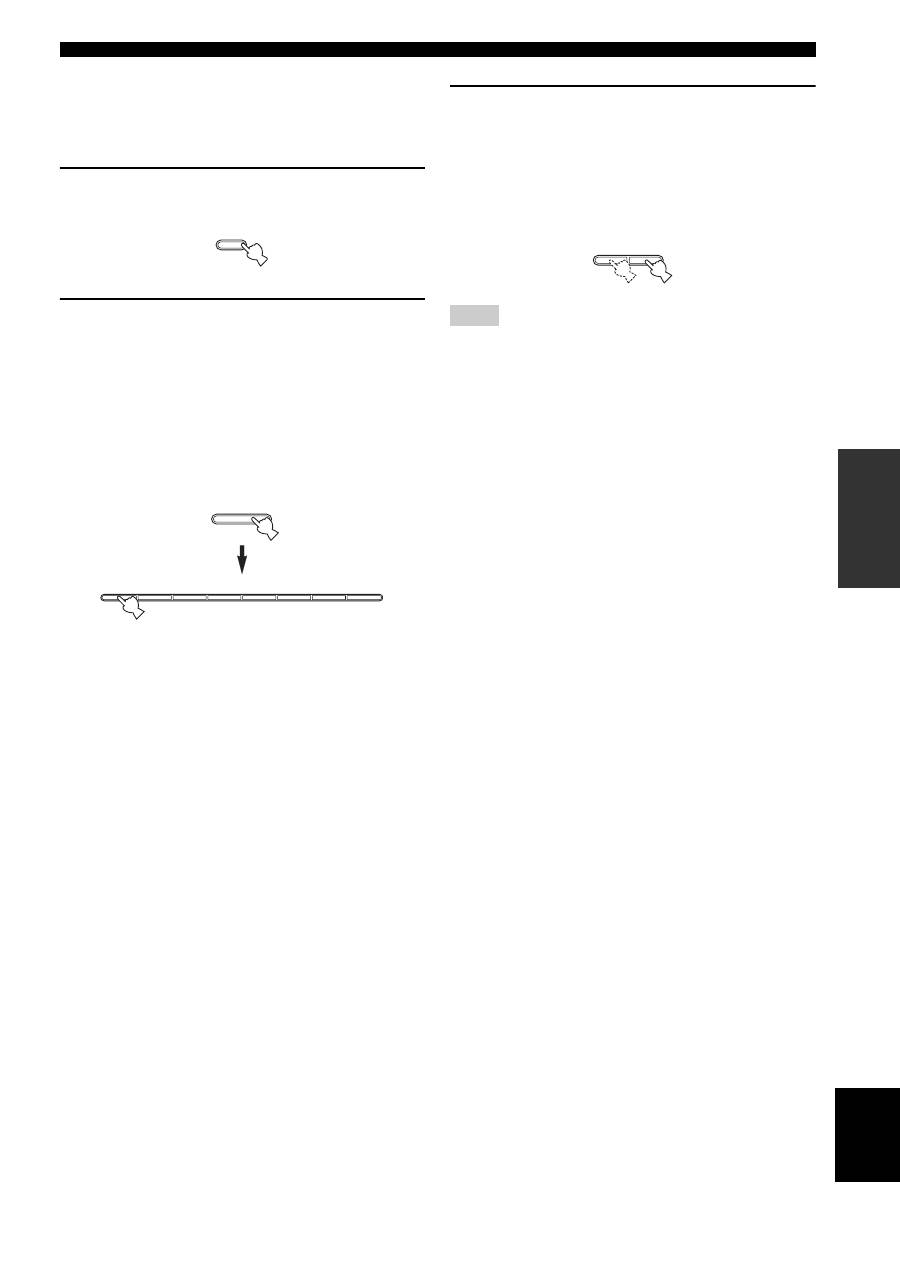
Muting the sound output
MUTE
MUTE
MUTE
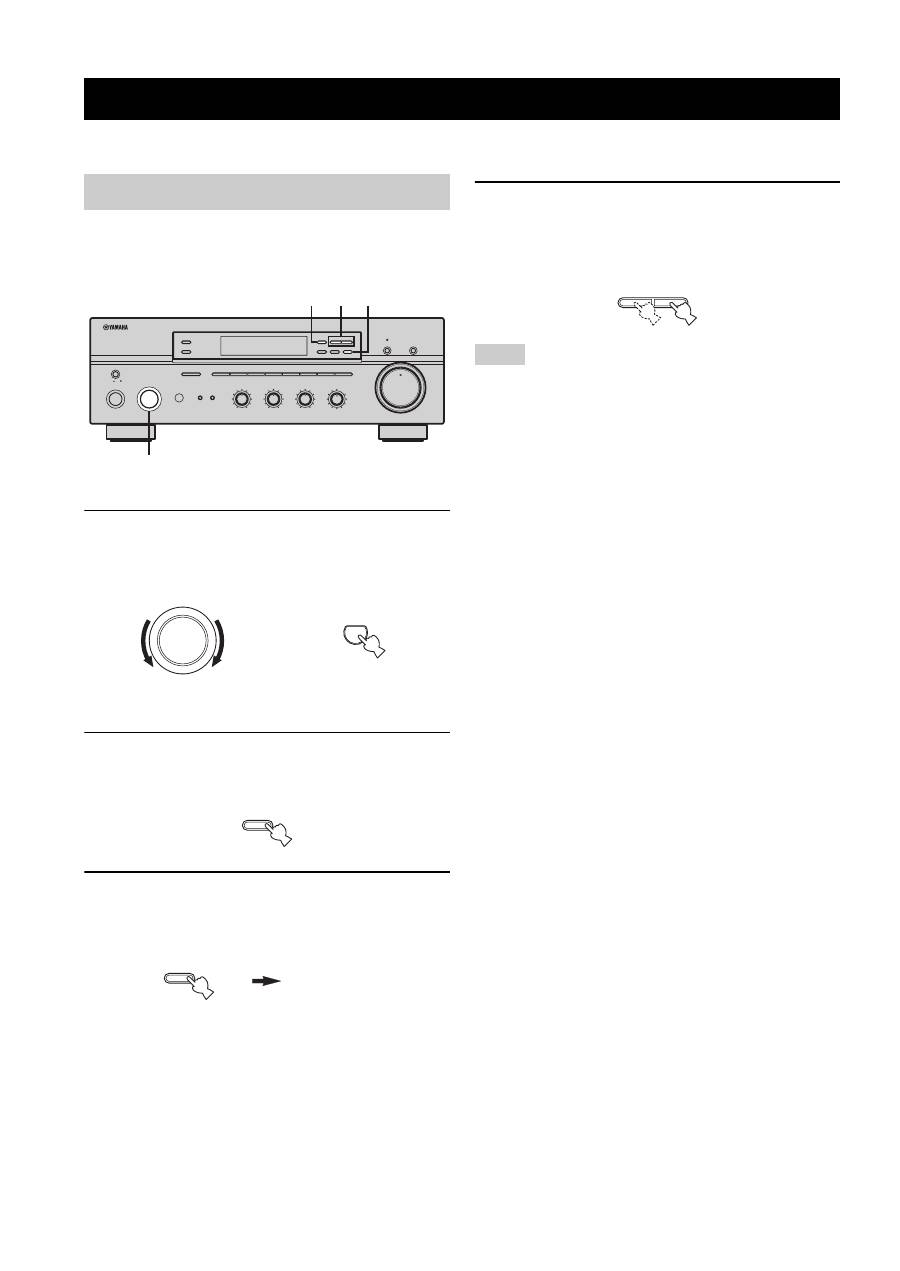
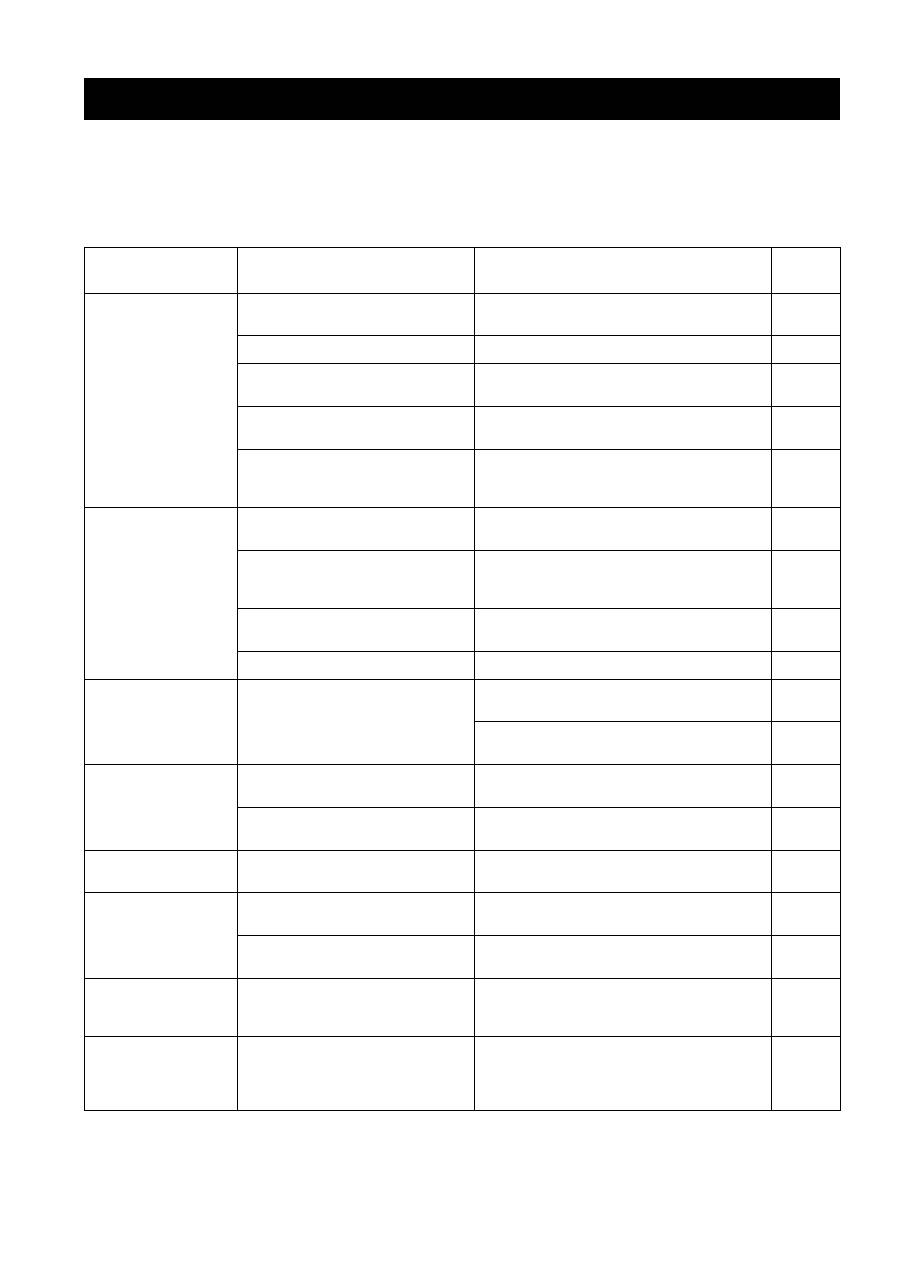
FM/AM TUNING
20
There are 2 tuning methods; automatic and manual. Select either method according to your preference and the strength of
station signals.
Automatic tuning is effective when station signals are
strong and there is no interference.
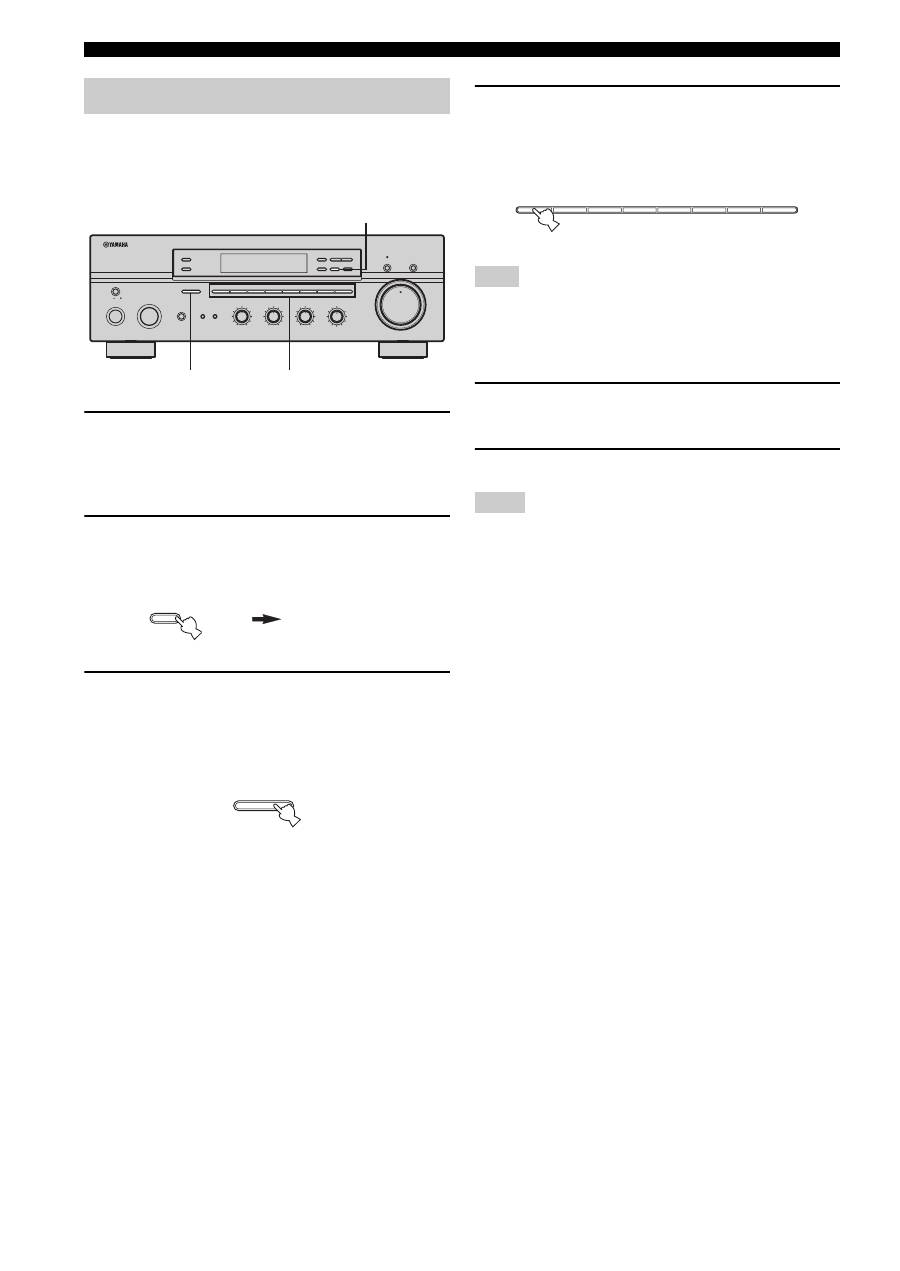
1
Rotate the INPUT selector (or press TUNER
on the remote control) to select TUNER as
the input source.
2
Press FM/AM on the front panel to select the
reception band (FM or AM).
FM or AM appears in the front panel display.
3
Press TUNING MODE on the front panel so
that the AUTO indicator lights up in the front
panel display.
4
Press TUNING
l
/
h
once to begin
automatic tuning.
Press
h
to tune into a higher frequency.
Press
l
to tune into a lower frequency.
• When you tune into a station, the frequency of the received
station is shown in the front panel display.
• To search for another station, press TUNING
l
/
h
once more.
• If the tuning search does not stop at the desired station because
the station signals are weak, try using the manual tuning
method.
FM/AM TUNING
Automatic tuning
ON/OFF
INPUT
MAIN ZONE
BASS
MASTER
ON
OFF
MD/TAPE MONITOR
PURE DIRECT
5
5
1
0
1
4
4
2
2
3
3
+
–
VOLUME
l
TUNING
h
ZONE 2 ON/OFF
ZONE CONTROL
FM/AM
EDIT
A/B/C/D/E
1
2
3
4
5
6
7
8
MEMORY
MAN'L/AUTO FM
TUNING MODE
AUTO/MAN'L
TREBLE
5
5
1
0
1
4
4
2
2
3
3
+
–
BALANCE
5
5
1
0
1
4
4
2
2
3
3
R
L
LOUDNESS
5
7
1
FLAT
6
4
8
2
10
–30dB
3
9
SPEAKERS
B
A
2 4 3
1
0
12
12
2
8
4
∞
20
20
60
60
26
26
40
40
16
16
-dB
-dB
INPUT
TUNER
or
Front panel
Remote control
FM/AM
TUNING MODE
AUTO/MAN'L
AUTO
Lights up
Notes
l
TUNING
h
21
FM/AM TUNING
BA
S
IC
OPE
R
A
T
IO
N
English
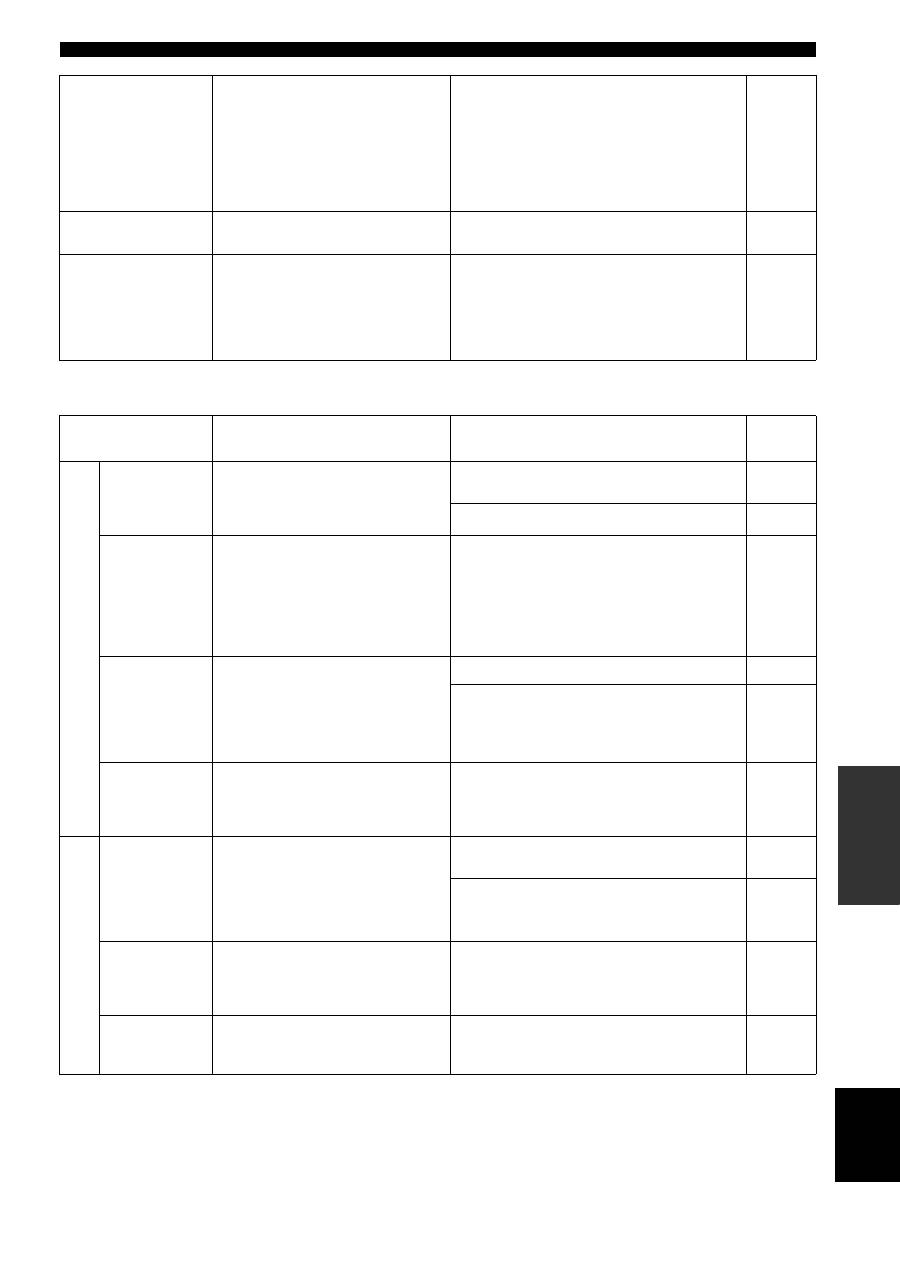
Manual tuning is effective when station signals are weak.
1
Rotate the INPUT selector (or press TUNER
on the remote control) to select TUNER as
the input source.
2
Press FM/AM on the front panel to select the
reception band (FM or AM).
FM or AM appears in the front panel display.
3
Press TUNING MODE on the front panel so
that the AUTO indicator disappears from the
front panel display.
4
Press TUNING
l
/
h
to manually tune into
the desired station.
Hold down the button to continue tuning search.
• When you tune into a station, the frequency of the received
station is shown in the front panel display.
• If you tune into an FM station, it is automatically received in the
monaural mode to increase signal quality.
Manual tuning
ON/OFF
INPUT
MAIN ZONE
BASS
MASTER
ON
OFF
MD/TAPE MONITOR
PURE DIRECT
5
5
1
0
1
4
4
2
2
3
3
+
–
VOLUME
l
TUNING
h
ZONE 2 ON/OFF
ZONE CONTROL
FM/AM
EDIT
A/B/C/D/E
1
2
3
4
5
6
7
8
MEMORY
MAN'L/AUTO FM
TUNING MODE
AUTO/MAN'L
TREBLE
5
5
1
0
1
4
4
2
2
3
3
+
–
BALANCE
5
5
1
0
1
4
4
2
2
3
3
R
L
LOUDNESS
5
7
1
FLAT
6
4
8
2
10
–30dB
3
9
SPEAKERS
B
A
2 4 3
1
0
12
12
2
8
4
∞
20
20
60
60
26
26
40
40
16
16
-dB
-dB
INPUT
TUNER
or
Front panel
Remote control
FM/AM
TUNING MODE
AUTO/MAN'L
AUTO
Disappears
Notes
l
TUNING
h
22
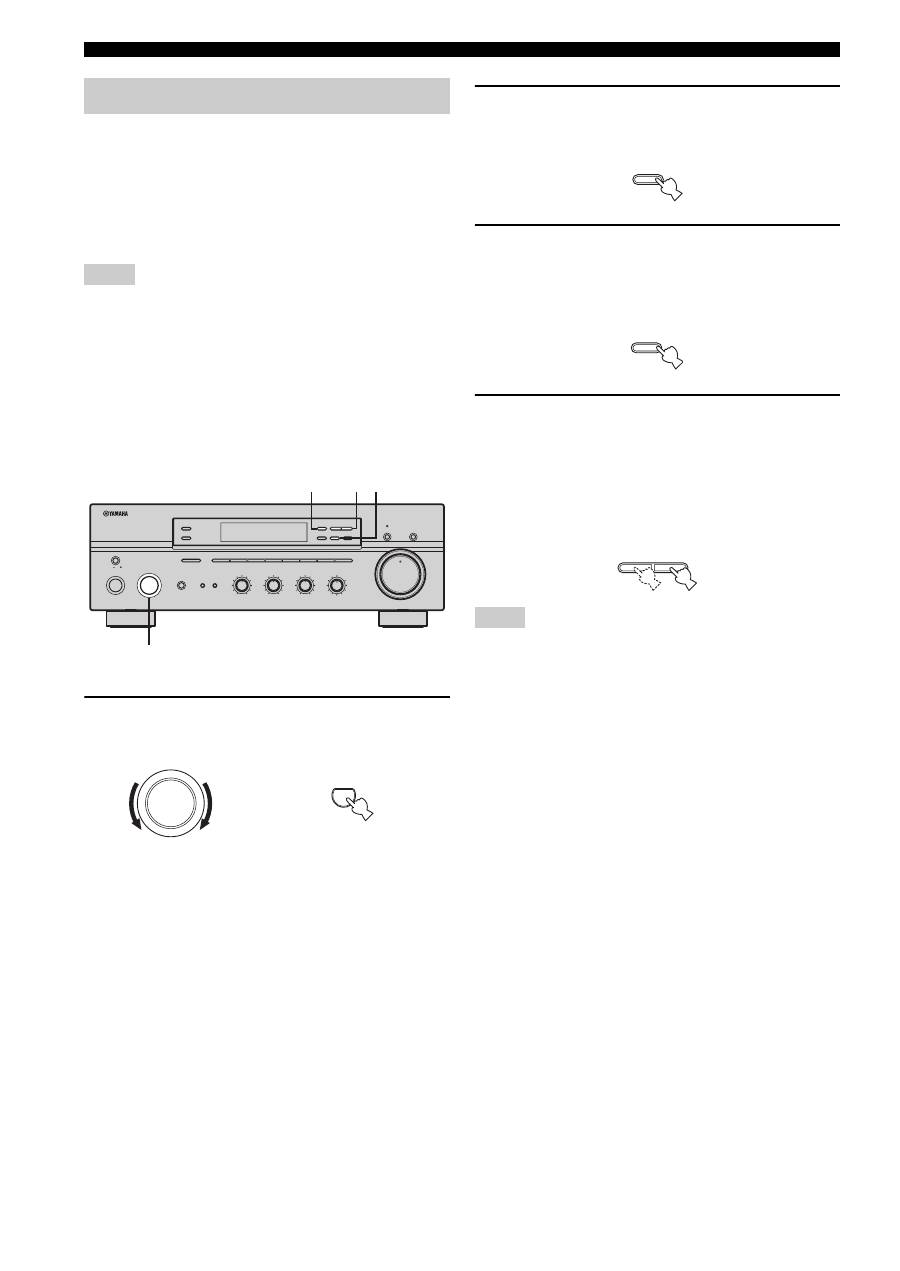
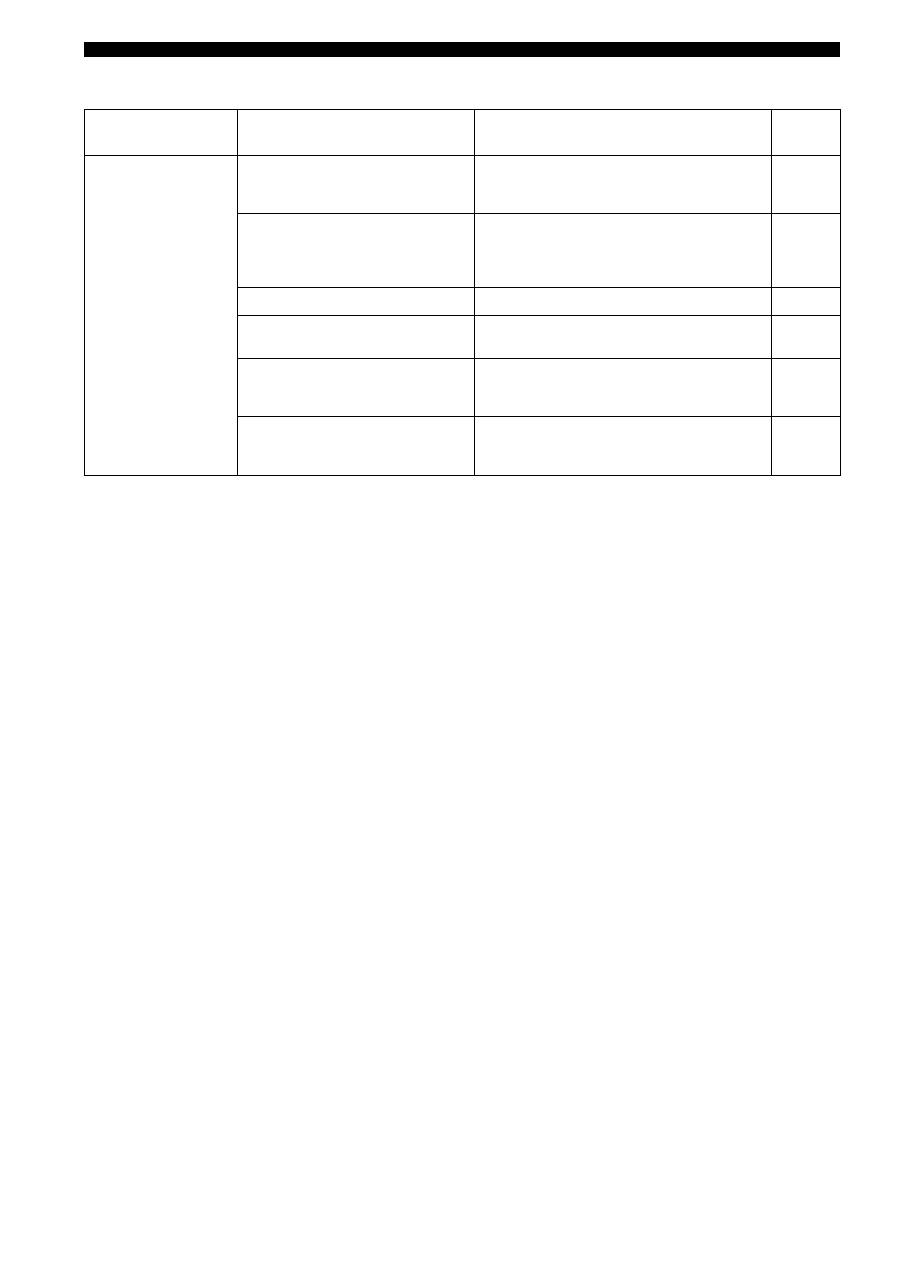
FM/AM TUNING
You can use the automatic preset tuning method to
automatically store FM stations. This function enables this
unit to automatically tune into FM stations with strong
signals and store up to 40 (8 stations in each of the 5
groups, A1 to E8) of those received stations in order. You
can then easily recall any preset stations by selecting the
preset station numbers where they are stored.
• Any station data stored under a preset station number is cleared
when you store a new station under that preset station number.
• If the number of received stations does not reach 40 (E8),
automatic preset tuning automatically stops once searching all
available stations are tuned into and stored.
• Only FM stations with sufficient signal strength are stored
automatically by automatic preset tuning. If the station you
want to store is weak in signal strength, try using the manual
preset tuning method.
1
Rotate the INPUT selector (or press TUNER
on the remote control) to select TUNER.
2
Press FM/AM on the front panel to select FM
as the reception band.
FM appears in the front panel display.
3
Press and hold MEMORY on the front panel
for more than 3 seconds.
The preset station group and the MEMORY and
AUTO indicators flash in the front panel display.
4
Press TUNING
l
/
h
once to begin
automatic preset tuning.
Press
h
to tune into higher frequencies.
Press
l
to tune into lower frequencies.
When automatic preset tuning is complete, the
frequency of the last preset station is shown in the
front panel display.
• If TUNING
l
/
h
is not pressed within approximately 5
seconds while the MEMORY and AUTO indicators are
flashing, automatic preset tuning automatically begins from the
currently displayed frequency and proceeds toward higher
frequencies.
• Received stations are sequentially programmed to 8 stations in
each preset station group. If 8 stations are all programmed in a
preset station group, another 8 stations are sequentially
programmed in the next preset station group.
Automatic preset tuning
Notes
ON/OFF
INPUT
MAIN ZONE
PHONES
BASS
MASTER
ON
OFF
MD/TAPE MONITOR
PURE DIRECT
5
5
1
0
1
4
4
2
2
3
3
+
–
VOLUME
l
TUNING
h
ZONE 2 ON/OFF
ZONE CONTROL
FM/AM
EDIT
A/B/C/D/E
1
2
3
4
5
6
7
8
MEMORY
MAN'L/AUTO FM
TUNING MODE
AUTO/MAN'L
TREBLE
5
5
1
0
1
4
4
2
2
3
3
+
–
BALANCE
5
5
1
0
1
4
4
2
2
3
3
R
L
LOUDNESS
5
7
1
FLAT
6
4
8
2
10
–30dB
3
9
SPEAKERS
B
A
2
1
3 4
0
12
12
2
8
4
∞
20
20
60
60
26
26
40
40
16
16
-dB
-dB
INPUT
TUNER
or
Front panel
Remote control
Notes
FM/AM
MEMORY
MAN'L/AUTO FM
l
TUNING
h
23
FM/AM TUNING
BA
S
IC
OPE
R
A
T
IO
N
English
■
Customized automatic preset tuning
You can specify a preset station group and a preset station
number from which this unit stores the FM stations
received by automatic preset tuning.
1
Press and hold MEMORY on the front panel
for more than 3 seconds.
2
Press A/B/C/D/E and then press one of the
preset station number buttons on the front
panel to select the preset station group and
the preset station number where the first
received station will be stored.
For example, if you select C5, the first received
station is automatically programmed to C5 and the
next received stations are sequentially programmed
to C6, C7, etc.
3
Press TUNING
l
/
h
on the front panel to
begin automatic preset tuning.
Press
h
to tune into higher frequencies.
Press
l
to tune into lower frequencies.
When automatic preset tuning is complete, the
frequency of the last preset station is shown in the
front panel display.
Automatic preset tuning stops when the received stations have all
been stored up to E8.
MEMORY
MAN'L/AUTO FM
A/B/C/D/E
1
2
3
4
5
6
7
8
Note
l
TUNING
h
24
FM/AM TUNING
You can also manually store up to 40 stations (8 stations in
each of the 5 groups, A1 to E8). You can then easily recall
any preset stations by selecting the preset station numbers
where they are stored.
1
Repeat steps 1 to 4 in “Automatic tuning” or
in “Manual tuning” to tune into a station.
When you tune into a station, the frequency of the
received station is shown in the front panel display.
2
Press MEMORY on the front panel.
The MEMORY indicator flashes in the front panel
display for approximately 5 seconds.
3
Press A/B/C/D/E on the front panel
repeatedly to select a preset station group (A
to E).
The selected preset station group is shown in the front
panel display.
4
Press one of the preset station number
buttons on the front panel to select a preset
station number (1 to 8) where you want to
store the station.
This operation must be done within 5 seconds while the
MEMORY indicator is flashing in the front panel display.
Otherwise, the manual preset tuning process is automatically
canceled.
5
Press MEMORY on the front panel to store
the station.
6
Repeat steps 1 to 5 to store other stations.
• Any station data stored under a preset station number is cleared
when you store a new station under that preset station number.
• The reception mode (stereo or monaural) is stored along with
the station frequency.
Manual preset tuning
ON/OFF
INPUT
MAIN ZONE
PHONES
BASS
MASTER
ON
OFF
MD/TAPE MONITOR
PURE DIRECT
5
5
1
0
1
4
4
2
2
3
3
+
–
VOLUME
l
TUNINGH
h
ZONE 2 ON/OFF
ZONE CONTROL
FM/AM
EDIT
A/B/C/D/E
1
2
3
4
5
6
7
8
MEMORY
MAN'L/AUTO FM
TUNING MODE
AUTO/MAN'L
TREBLE
5
5
1
0
1
4
4
2
2
3
3
+
–
BALANCE
5
5
1
0
1
4
4
2
2
3
3
R
L
LOUDNESS
5
7
1
FLAT
6
4
8
2
10
–30dB
3
9
SPEAKERS
B
A
3
4
2
0
12
12
2
8
4
∞
20
20
60
60
26
26
40
40
16
16
-dB
-dB
MEMORY
MAN'L/AUTO FM
MEMORY
Flashes
A/B/C/D/E
Note
Notes
1
2
3
4
5
6
7
8
25
FM/AM TUNING
BA
S
IC
OPE
R
A
T
IO
N
English
You can tune into the desired station simply by selecting
the preset station number where it is stored.
1
Press A/B/C/D/E on the front panel
repeatedly (or press A/B/C/D/E
j
/
i
on the
remote control) to select a preset station
group (A to E).
The selected preset station group is shown in the front
panel display.
2
Press one of the preset station number
buttons on the front panel (or
PRESET
j
/
i
on the remote control) to select
a preset station number (1 to 8).
The preset station number appears in the front panel
display along with the reception band and the
frequency.
You can exchange the assignment of two preset stations
with each other. The following procedure describes an
example where a preset station E1 is exchanged with
another preset station A5.
1
Repeat steps 1 and 2 in “Selecting preset
stations” to select a preset station E1.
2
Press EDIT on the front panel.
E1 and the MEMORY indicator flash in the front
panel display.
3
Repeat steps 1 and 2 in “Selecting preset
stations” to select another preset station A5.
A5 and the MEMORY indicator flash in the front
panel display.
4
Press EDIT on the front panel again.
E1-A5 appears in the front panel display, indicating
that the two preset station assignments have been
exchanged.
Selecting preset stations
ON/OFF
INPUT
MAIN ZONE
PHONES
BASS
MASTER
ON
OFF
MD/TAPE MONITOR
PURE DIRECT
5
5
1
0
1
4
4
2
2
3
3
+
–
VOLUME
l
TUNING
h
ZONE 2 ON/OFF
ZONE CONTROL
FM/AM
EDIT
A/B/C/D/E
1
2
3
4
5
6
7
8
MEMORY
MAN'L/AUTO FM
TUNING MODE
AUTO/MAN'L
TREBLE
5
5
1
0
1
4
4
2
2
3
3
+
–
BALANCE
5
5
1
0
1
4
4
2
2
3
3
R
L
LOUDNESS
5
7
1
FLAT
6
4
8
2
10
–30dB
3
9
SPEAKERS
B
A
1
2
0
12
12
2
8
4
∞
20
20
60
60
26
26
40
40
16
16
-dB
-dB
A/B/C/D/E
A/B/C/D/E
A/B/C/D/E
PRESET/CH
ENTER
Front panel
or
Remote control
1
2
3
4
5
6
7
8
A/B/C/D/E
A/B/C/D/E
PRESET/CH
ENTER
or
Front panel
Remote control
Exchanging preset stations
ON/OFF
INPUT
MAIN ZONE
PHONES
BASS
MASTER
ON
OFF
MD/TAPE MONITOR
PURE DIRECT
5
5
1
0
1
4
4
2
2
3
3
+
–
VOLUME
l
TUNING
h
ZONE 2 ON/OFF
ZONE CONTROL
FM/AM
EDIT
A/B/C/D/E
1
2
3
4
5
6
7
8
MEMORY
MAN'L/AUTO FM
TUNING MODE
AUTO/MAN'L
TREBLE
5
5
1
0
1
4
4
2
2
3
3
+
–
BALANCE
5
5
1
0
1
4
4
2
2
3
3
R
L
LOUDNESS
5
7
1
FLAT
6
4
8
2
10
–30dB
3
9
SPEAKERS
B
A
2,4
0
12
12
2
8
4
∞
20
20
60
60
26
26
40
40
16
16
-dB
-dB
EDIT
MEMORY
Flashes
MEMORY
Flashes
EDIT
RADIO DATA SYSTEM (EUROPE MODEL ONLY)
26
Radio Data System is a data transmission system used by FM
stations in many countries. The Radio Data System function is
carried out among the network stations.
This unit can receive various Radio Data System data such as PS
(Program Service name), PTY (Program Type), RT (Radio Text),
CT (Clock Time), EON (Enhanced Other Networks) when
receiving Radio Data System broadcasting stations.
■
PS (Program Service name) mode
The name of the Radio Data System station being received
is displayed.
■
PTY (Program Type) mode
There are 15 program types to classify Radio Data System
stations.
■
RT (Radio Text) mode
Information about the program (such as the title of the
song or name of the singer) on the Radio Data System
station being received is displayed using a maximum of 64
alphanumeric characters, including the umlaut symbol. If
other characters are used for RT data, they are displayed
with an underbar (_).
■
CT (Clock Time) mode
The current time is displayed and updated every minute.
If the data are accidentally cut off, “CT WAIT” may appear.
■
EON (Enhanced Other Networks)
See “EON function” on page 28.
Four modes are available for displaying Radio Data
System data. The PS, PTY, RT and/or CT indicators that
correspond to the Radio Data System data services offered
by the station light up in the front panel display.
1
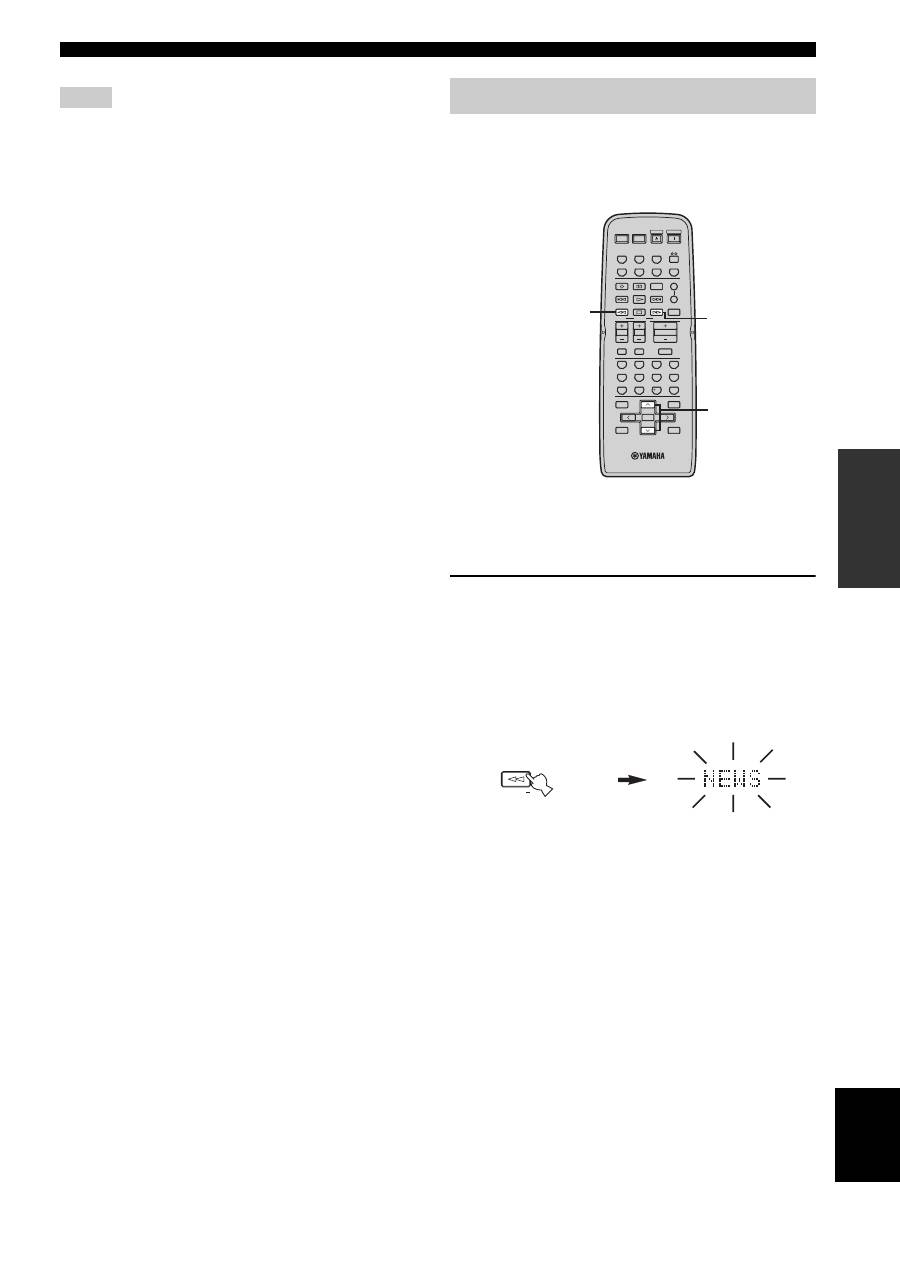
Press TUNER on the remote control to set
this unit to tuner mode.
2
Press FREQ/TEXT repeatedly on the remote
control to display the various Radio Data
System data offered by the transmitting
station.
RADIO DATA SYSTEM (EUROPE MODEL ONLY)
Receiving Radio Data System stations
NEWS
News
AFFAIRS
Current affairs
INFO
General information
SPORT
Sports
EDUCATE
Education
DRAMA
Drama
CULTURE
Culture
SCIENCE
Science
VARIED
Light entertainment
POP M
Pops
ROCK M
Rock
M.O.R. M
Middle-of-the-road music
(easy-listening)
LIGHT M
Light classics
CLASSICS
Serious classics
OTHER M
Other music
Changing the Radio Data System mode
TUNER
FREQ/TEXT
b
PS
PTY
RT
CT
Frequency display
Remote control
27
RADIO DATA SYSTEM (EUROPE MODEL ONLY)
BA
S
IC
OPE
R
A
T
IO
N
English
• Do not press FREQ/TEXT until a Radio Data System indicator
lights up in the front panel display. You cannot change the mode
if you press the button prior to this. This is because this unit has
not finished receiving all of the Radio Data System data from
the station.
• Radio Data System data not offered by the station cannot be
selected.
• This unit cannot utilize the Radio Data System data source if
the signal received is not strong enough. In particular, the RT
mode requires a large amount of data, so it is possible that the
RT mode may not be displayed even if other Radio Data System
modes (PS, PTY, etc.) are displayed.
• Radio Data System data may not be received under poor
reception conditions. In such cases, press TUNING MODE
(AUTO/MAN’L MONO) so that the AUTO indicator
disappears from the front panel display. Although this will
change the reception mode to manual, Radio Data System data
may be displayed when you change the display to Radio Data
System mode.
• If the signal strength is weakened by external interference
during the reception of a Radio Data System station, the Radio
Data System data service may be cut off suddenly and
“...WAIT” will appear in the front panel display.
If you select the desired program type, this unit
automatically searches all preset Radio Data System
stations that are broadcasting a program of the required
type.
y
When performing this operation with the remote control, first
press TUNER to set the remote to tuner mode.
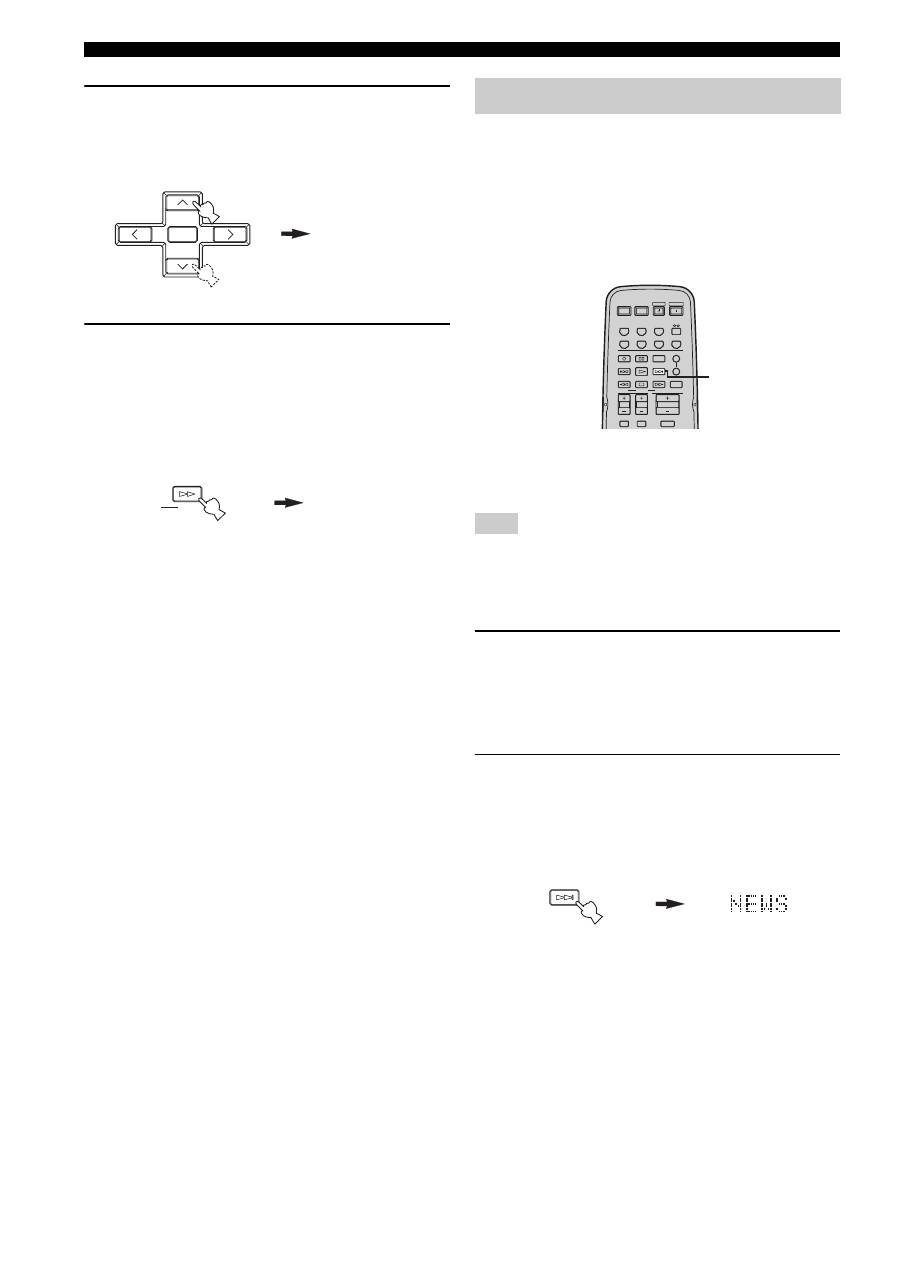
1
Press PTY SEEK MODE on the remote
control to set this unit in the PTY SEEK
mode.
The program type of the station being received or
“NEWS” flashes in the front panel display.
To exit from the PTY SEEK mode, press PTY SEEK
MODE again.
Notes
PTY SEEK function
STANDBY
POWER
CD
MD/TAPE
TUNER
PHONO
DVD
SLEEP
A
B
POWER
POWER
REC
CODE SET
MUTE
MENU
TITLE
VOLUME
DISC SKIP
EON
FREQ/TEXT
START
MODE
PTY SEEK
BAND
A/B/C/D/E
A/B/C/D/E
PRESET/CH
4
3
2
1
8
10
7
0
9
6
5
ENT.
DISPLAY
RETURN
TV MUTE
TV INPUT
AV
TV
ENTER
VCR
DTV/CBL
SPEAKERS
TV VOL
TV CH
3
2
1
MODE
PTY SEEK
Remote control
Flashes
28
RADIO DATA SYSTEM (EUROPE MODEL ONLY)
2
Press PRESET/CH
u
/
d
on the remote
control to select the desired program type.
The selected program type appears in the front panel
display.
3
Press PTY SEEK START on the remote
control to begin searching all preset Radio
Data System stations.
The selected program type flashes and the PTY
HOLD indicator lights up in the front panel display
while searching for stations.
To cancel searching, press PTY SEEK START again.
• The unit stops searching when it finds a station
broadcasting the selected type of program.
• If the found station is not the one you desire, press
PTY SEEK START again. This unit resumes
searching for another station broadcasting the same
type of program.
This function uses the EON data service on the Radio
Data System station network. If you select the desired
program type (NEWS, INFO, AFFAIRS or SPORT), this
unit automatically searches for all preset Radio Data
System stations that are scheduled to broadcast the
selected type of program and switches from the station
currently being received to the new station when the
broadcast starts.
y
When performing this operation with the remote control, first
press TUNER to set the remote to tuner mode.
This function can only be used when a Radio Data System station
that offers the EON data service is being received. When such a
station is being received, the EON indicator lights up in the front
panel display.
1
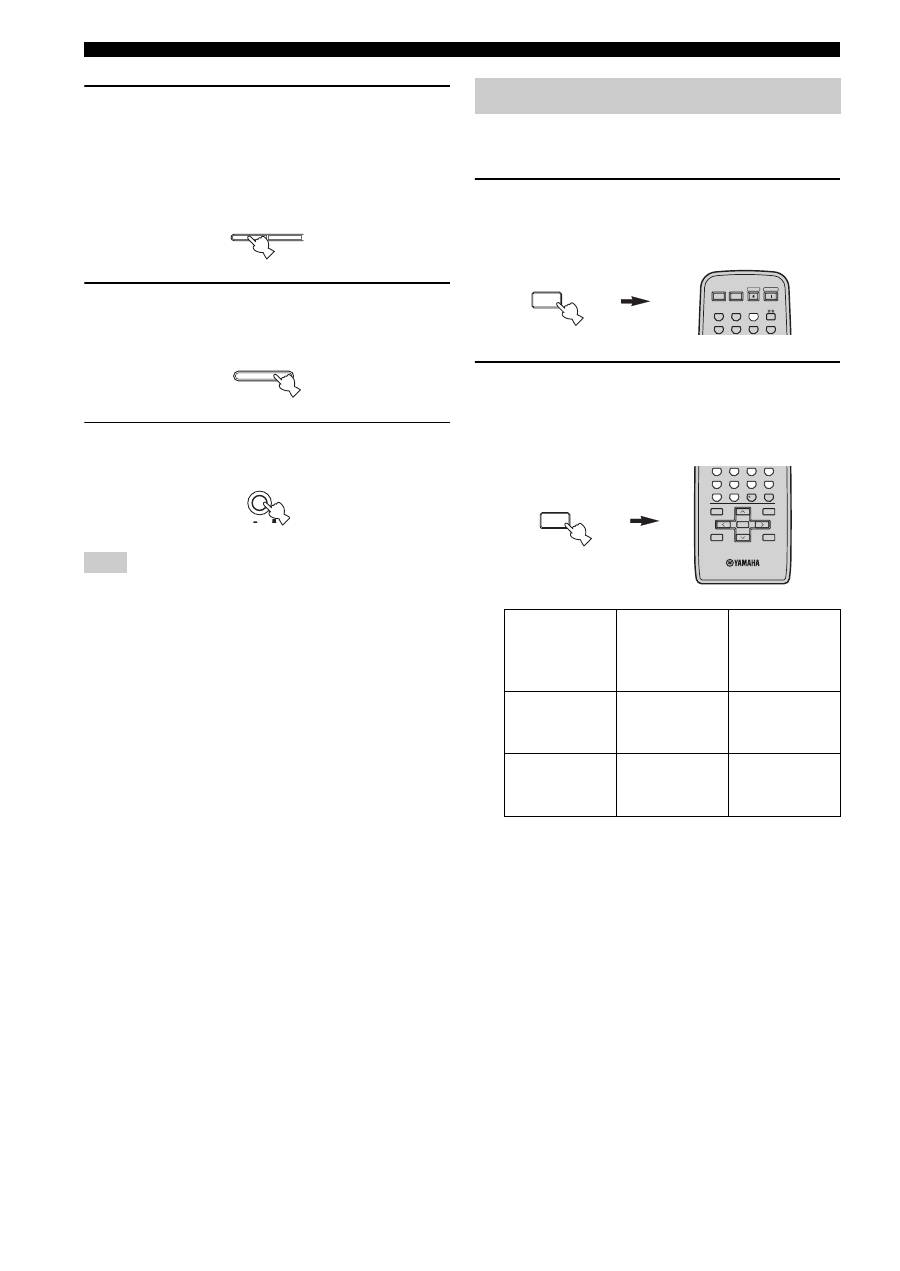
Check that the EON indicator is lit in the front
panel display.
If the EON indicator is not lit up, tune into another
Radio Data System station so that the EON indicator
lights up.
2
Press EON repeatedly on the remote control
to select the desired program type (NEWS,
INFO, AFFAIRS or SPORT).
The selected program type name appears in the front
panel display.
• If a preset Radio Data System station type starts
broadcasting the selected type of program, the unit
automatically switches from the program being
received to that program. (The EON indicator
flashes.)
• When broadcasting of the selected program ends,
the unit returns to the previous station (or another
program on the same station).
■
To cancel this function
Press EON repeatedly until no program type name is
shown in the front panel display.
POP M
A/B/C/D/E
A/B/C/D/E
PRESET/CH
ENTER
START
PTY SEEK
PTY HOLD
Remote control
Lights up
EON function
Note
STANDBY
POWER
CD
MD/TAPE
TUNER
PHONO
DVD
SLEEP
A
B
POWER
POWER
REC
CODE SET
MUTE
VOLUME
DISC SKIP
EON
FREQ/TEXT
START
MODE
PTY SEEK
TV MUTE
TV INPUT
AV
TV
VCR
DTV/CBL
SPEAKERS
TV VOL
TV CH
2
EON
Remote control

ADVANCED SETUP
29
AD
V
A
NCED
OP
ERA
T
IO
N
English
■
ADVANCED SETUP menu parameters
Change the initial settings (indicated in bold under each
parameter) to reflect the needs of your listening
environment.
Factory presets
PRESET
Use to reset all parameters to the factory presets.
Choices:
CANCEL
, RESET
• Select CANCEL if you do not want the parameters of
this unit to be initialized when you reset the factory
presets.
• Select RESET if you want all of the parameters of this
unit to be initialized when you reset the factory presets.
• This setting does not affect the parameters in the ADVANCED
SETUP menu.
• The resetting process starts next time you turn on the power of
this unit.
Remote
REMOTE
Use to switch the remote control ID of this unit.
Choices: ID1,
ID2
• Select ID1 to operate this unit using an alternative
code.
• Select ID2 to operate this unit using the default code.
You must also make settings for the remote control (see page 30).
Tuner
TU
(Asia and General models only)
Use to switch the frequency step selection according to the
frequency spacing in your area.
Choices:
AM10/FM100
, AM9/FM50
• North, Central and South America:
AM10/FM100 (kHz)
• Other areas: AM9/FM50 (kHz)
The ADVANCED SETUP menu is displayed in the front
panel display.
y
• During the ADVANCED SETUP procedure, audio output is
muted.
• During the ADVANCED SETUP procedure, only MASTER
ON/OFF, A/B/C/D/E and the preset station number buttons (1
and 2) on the front panel are operational.
1
Press MASTER ON/OFF on the front panel to
release it outward to the OFF position.
2
Press and hold A/B/C/D/E on the front panel
and then press MASTER ON/OFF inward to
the ON position.
The power of this unit is turned on, and the
ADVANCED SETUP menu appears in the front
panel display.
ADVANCED SETUP
Notes
Note
Changing the ADVANCED SETUP menu parameters
ON/OFF
INPUT
MAIN ZONE
PHONES
BASS
MASTER
ON
OFF
MD/TAPE MONITOR
PURE DIRECT
5
5
1
0
1
4
4
2
2
3
3
+
–
VOLUME
l
TUNING
h
ZONE 2 ON/OFF
ZONE CONTROL
FM/AM
EDIT
A/B/C/D/E
1
2
3
4
5
6
7
8
MEMORY
MAN'L/AUTO FM
TUNING MODE
AUTO/MAN'L
TREBLE
5
5
1
0
1
4
4
2
2
3
3
+
–
BALANCE
5
5
1
0
1
4
4
2
2
3
3
R
L
LOUDNESS
5
7
1
FLAT
6
4
8
2
10
–30dB
3
9
SPEAKERS
B
A
2,4
3
1,2,5
0
12
12
2
8
4
∞
20
20
60
60
26
26
40
40
16
16
-dB
-dB
MASTER
ON
OFF
While holding down,
press
A/B/C/D/E
MASTER
ON
OFF
30
ADVANCED SETUP
3
Press the preset station number buttons (1
and 2) on the front panel repeatedly to move
through the menu and select the parameter
you want to adjust.
See page 29 for a complete list of available
parameters.
4
Press A/B/C/D/E on the front panel
repeatedly to toggle between the available
parameters.
5
Press MASTER ON/OFF to release it outward
to the OFF position to confirm your setting.
The settings you made are reflected next time you turn on the
power of this unit.
You can select the unit you want to operate with the
remote control by switching the remote control ID.
1
Press and hold CODE SET on the remote
control and then press TUNER on the remote
control.
2
While holding down CODE SET on the
remote control, use the numeric buttons on
the remote control to enter the three-digit
code number listed in the table below.
*
When you change the remote control ID, you must switch
the remote control ID of this unit (see page 29).
When using multiple YAMAHA receivers or
amplifiers with the same default code setting, you
may unwantedly operate those components
simultaneously. In this case, set one of the alternative
codes for this unit to operate this unit separately.
Note
1
2
A/B/C/D/E
MASTER
ON
OFF
Switching the remote control ID
Remote
control ID
*
(this unit’s
setting)
Function
Code number
ID1
To operate this
unit using an
alternative code.
801
ID2
(default setting)
To operate this
unit using the
default code.
802
MENU
CODE SET
STANDBY
POWER
CD
MD/TAPE
TUNER
PHONO
DVD
POWER
POWER
AV
TV
VCR
DTV/CBL
MENU
CODE SET
MENU
TITLE
BAND
A/B/C/D/E
A/B/C/D/E
PRESET/CH
4
3
2
1
8
10
7
0
9
6
5
ENT.
DISPLAY
RETURN
ENTER
ZONE 2
31
AD
V
A
NCED
OP
ERA
T
IO
N
English
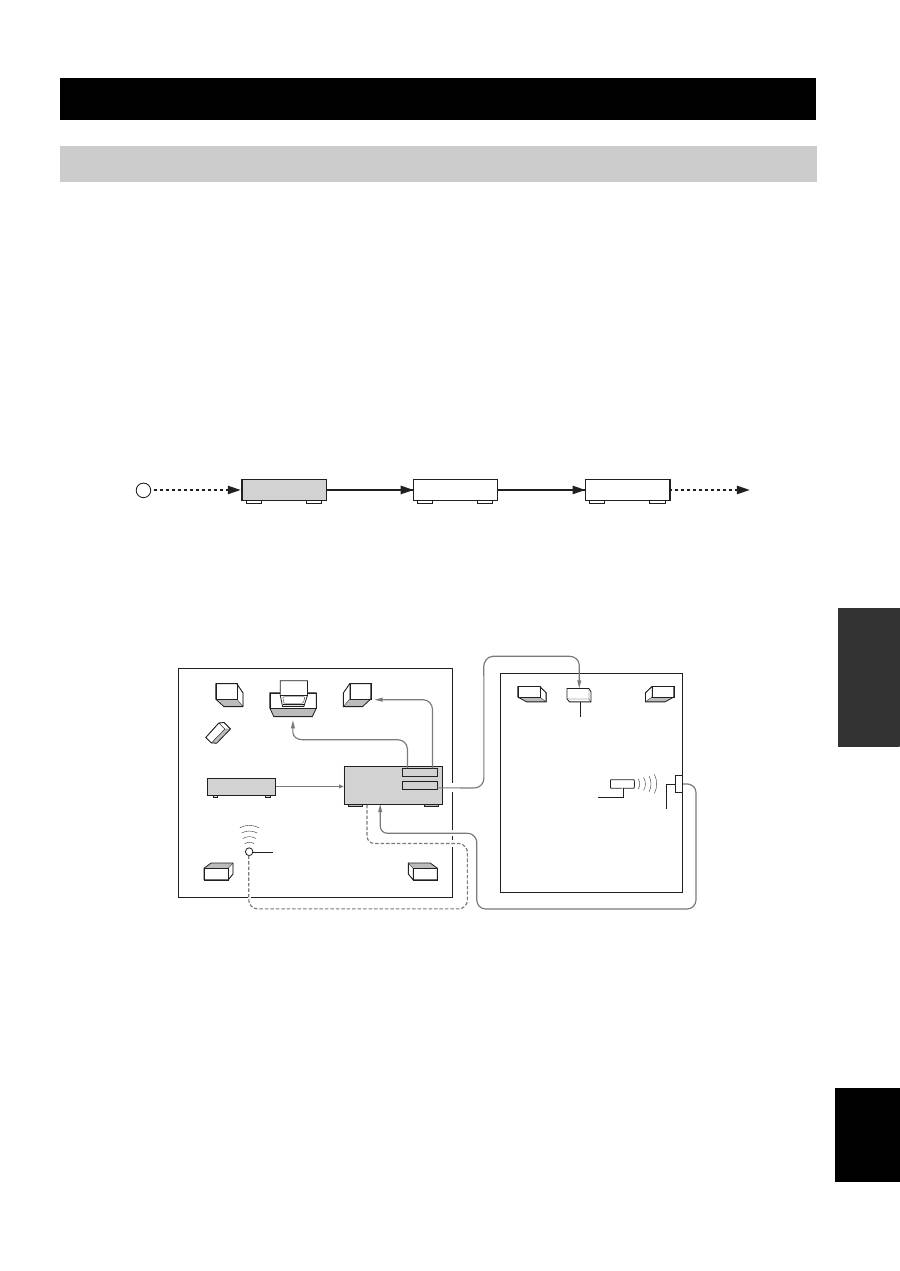
This unit allows you to configure a multi-room audio and video system. The Zone 2 feature enables you to set this unit to
reproduce separate input sources in the main room and in Zone 2 (the second room) simultaneously. You can also control
this unit from the second room using the Zone 2 remote control (sold separately).
You need the following additional equipment to use the multi-room system of this unit:
• Zone 2 remote control
• An infrared signal receiver for the second room
• An infrared emitter for the main room. This emitter transmits the infrared signals sent by the Zone 2 remote control in
Zone 2 to the components in the main room.
• An amplifier and speakers for the second room
y
Some YAMAHA models are able to connect directly to the REMOTE OUT jack on the rear panel of this unit. If you own these
products, you may not need to use an infrared emitter. Up to six YAMAHA components can be connected as shown below.
■
Multi-room configuration and connections
The following illustration shows an example of the multi-room system configuration and connections.
y
Since there are many possible ways to connect and use this unit in a multi-room configuration, we recommend that you consult with
your nearest authorized YAMAHA dealer or service center for the Zone 2 connections that best meet your requirements.
ZONE 2
Connecting the Zone 2 components
OUT
OUT
IN
REMOTE
IN
REMOTE
OUT
IN
REMOTE
REMOTE
This unit
YAMAHA
component
YAMAHA
component
Infrared signal
receiver
REMOTE OUT
VIDEO IN
MONITOR OUT
SPEAKERS
REMOTE IN
ZONE 2 AUDIO OUT
MAIN
ZONE 2
AUDIO IN
Infrared emitter
DVD player
(or other components)
Amplifier
Zone 2
remote control
Infrared signal
receiver
Second room
(Zone 2)
Main room
(Main Zone)
This unit
32
ZONE 2
You can control the input source of Zone 2 independently
of the listening conditions in the main room.
1
Press ZONE 2 ON/OFF on the front panel to
turn on Zone 2.
2
Press ZONE 2 CONTROL on the front panel
The ZONE 2 indicator flashes in the front panel
display.
3
While the ZONE 2 indicator is flashing, rotate
the INPUT selector on the front panel to
select the input source of Zone 2.
y
• You can also select the input source by using the Zone 2 remote
control (sold separately). Press POWER on the Zone 2 remote
control to turn on Zone 2, and then press one of the input
selector buttons to select the input source.
• You can mute the sound output to Zone 2 by pressing MUTE on
the ZONE 2 remote control. Press again to restore the sound
output.
Controlling Zone 2
ZONE 2 ON/OFF
ZONE CONTROL
INPUT
REMOTE CONTROL FEATURES
33
AD
V
A
NCED
OP
ERA
T
IO
N
English
■
Controlling this unit
The shaded areas below can be used to control this unit.
■
Controlling other components
The shaded areas below can be used to control other
audio and video components made by YAMAHA and
other manufacturers. Each button has a different
function depending on the selected component. Select
the component you want to control by pressing one of
the input selector buttons. The name of the selected
component appears in the front panel display.
y
You can use the
button to control other components
regardless of whether they are connected to this unit.
REMOTE CONTROL FEATURES
Control area
STANDBY
POWER
CD
MD/TAPE
TUNER
PHONO
DVD
SLEEP
A
B
POWER
POWER
REC
CODE SET
MUTE
MENU
TITLE
VOLUME
DISC SKIP
EON
FREQ/TEXT
START
MODE
PTY SEEK
BAND
A/B/C/D/E
A/B/C/D/E
PRESET/CH
4
3
2
1
8
10
7
0
9
6
5
ENT.
DISPLAY
RETURN
TV MUTE
TV INPUT
AV
TV
ENTER
VCR
DTV/CBL
SPEAKERS
TV VOL
TV CH
The buttons inside the
dotted lines control this
unit in any mode
(POWER, STANDBY,
SLEEP, the input
selector buttons,
VOLUME +/– and
MUTE).
STANDBY
POWER
CD
MD/TAPE
TUNER
PHONO
DVD
SLEEP
A
B
POWER
POWER
REC
CODE SET
MUTE
MENU
TITLE
VOLUME
DISC SKIP
EON
FREQ/TEXT
START
MODE
PTY SEEK
BAND
A/B/C/D/E
A/B/C/D/E
PRESET/CH
4
3
2
1
8
10
7
0
9
6
5
ENT.
DISPLAY
RETURN
TV MUTE
TV INPUT
AV
TV
ENTER
VCR
DTV/CBL
SPEAKERS
TV VOL
TV CH
REC
CODE SET
MENU
TITLE
DISC SKIP
EON
FREQ/TEXT
START
MODE
PTY SEEK
BAND
A/B/C/D/E
A/B/C/D/E
PRESET/CH
4
3
2
1
8
10
7
0
9
6
5
ENT.
DISPLAY
RETURN
TV MUTE
TV INPUT
ENTER
TV VOL
TV CH
Component
control area
You can control up
to 7 different
components by
setting the
appropriate remote
control codes (see
page 35).
The input selector
buttons switch the
function of the
component control
area below.
34
REMOTE CONTROL FEATURES
In addition to controlling this unit, you can also control
other audio and video components made by YAMAHA
and other manufacturers using the supplied remote
control. To control other components, you must set the
appropriate remote control codes.
*1
This button functions only when the original remote control of the component has the POWER button.
*2
These buttons function for Europe model only.
Controlling other components
STANDBY
POWER
CD
MD/TAPE
TUNER
PHONO
DVD
SLEEP
A
B
POWER
POWER
REC
CODE SET
MUTE
VOLUME
DISC SKIP
EON
FREQ/TEXT
START
MODE
PTY SEEK
TV MUTE
TV INPUT
AV
TV
VCR
DTV/CBL
SPEAKERS
TV VOL
TV CH
MUTE
MENU
TITLE
BAND
A/B/C/D/E
A/B/C/D/E
PRESET/CH
4
3
2
1
8
10
7
0
9
6
5
ENT.
DISPLAY
RETURN
TV MUTE
TV INPUT
ENTER
1
6
7
8
9
0
A
B
C
D
2
3
4
5
DVD player
VCR
Digital TV/
Cable TV
TV
CD player
Tape deck
MD recorder
Tuner
1
AV POWER
Power *
1
Power *
1
Power *
1
VCR power
Power *
1
Power *
1
Power *
1
Power *
1
2
TV POWER
TV power
TV power
TV power
Power *
1
TV power
TV power
TV power
TV power
3
ll
Search backward
Search backward
VCR search
backward
VCR search
backward
Search backward
Search backward
Search backward
PTY MODE *
2
hh
Search forward
Search forward
VCR search
forward
VCR search
forward
Search forward
Search forward
Search forward
PTY START *
2
b
Skip backward
Skip backward
Direction A
Skip backward
FREQ/TEXT *
2
a
Skip forward
Skip forward
Direction B
Skip forward
EON *
2
REC/
DISC SKIP
Disc skip
Rec
VCR rec
VCR rec
Disc skip
Rec
Rec
s
Stop
Stop
VCR stop
VCR stop
Stop
Stop
Stop
e
Pause
Pause
VCR pause
VCR pause
Pause
Deck A/B
Pause
h
Play
Play
VCR play
VCR play
Play
Play
Play
4
TV VOL +
TV volume +
TV volume +
TV volume +
Volume +
TV volume +
TV volume +
TV volume +
TV volume +
TV VOL –
TV volume –
TV volume –
TV volume –
Volume –
TV volume –
TV volume –
TV volume –
TV volume –
5
TV CH +
TV channel +
Channel +
Channel +
Channel +
TV channel +
TV channel +
TV channel +
TV channel +
TV CH –
TV channel –
Channel –
Channel –
Channel –
TV channel –
TV channel –
TV channel –
TV channel –
6
TV MUTE
TV mute
TV mute
TV mute
Mute
TV mute
TV mute
TV mute
TV mute
7
TITLE
Title
Title
Title
Title
Band
8
ENTER
Menu enter
Menu select
Menu select
PRESET/CH
u
Menu up
Menu up
Menu up
Preset up
(1 to 8)
PRESET/CH
d
Menu down
Menu down
Menu down
Preset down
(1 to 8)
A/B/C/D/E
j
Menu left
Menu left
Menu left
Preset down
(A to E)
A/B/C/D/E
i
Menu right
Menu right
Menu right
Preset up
(A to E)
9
RETURN
Return
Return
Return
Return
0
TV INPUT
TV input
TV input
TV input
Input
TV input
TV input
TV input
TV input
A
1-9, 0, +10
Numeric buttons
Numeric buttons
Numeric buttons
Numeric buttons
Numeric buttons
Numeric buttons
Preset stations (1-8)
B
ENT.
Enter
Enter/recall
Enter/
numeric button
Index
C
MENU
Menu
Menu
Menu
D
DISPLAY
Display
Display
Display
Display
Display
35
REMOTE CONTROL FEATURES
AD
V
A
NCED
OP
ERA
T
IO
N
English
You can control other components by setting the
appropriate remote control codes. Codes can be set up for
each input source. For a complete list of available remote
control codes, refer to “LIST OF REMOTE CONTROL
CODES” at the end of this manual.
The following table show the default component category
(library) and the remote control code for each input
source.
Remote control code default settings
*
You can only set the TV remote control codes for the DTV/
CBL button. However, other remote control codes can be set
for any input selector buttons except DTV/CBL.
You may not be able to operate your other YAMAHA
components even if the YAMAHA remote control code is
initially set as listed above. In this case, try setting other
YAMAHA remote control codes.
1
Press and hold CODE SET on the remote
control and then press one of the input
selector buttons on the remote control to
select the input source you want to set up.
You must press and hold CODE SET throughout this operation.
2
While holding down CODE SET on the
remote control, use the numeric buttons on
the remote control to enter the three-digit
remote control code for the selected input
source.
When the setting succeeds, “PRESET OK” appears;
however, when it does not, “PRESET NG” appears in
the front panel display.
To reset the code, enter the default code for each
input source listed in the remote control code default
settings table.
• If the manufacturer of your component has more than one code,
try setting each of them until you find the correct one.
• You can only assign one remote control code to each input
selector button.
Setting remote control codes
Input
source
Default
component
category
(library)
Manufacturer
Default
YAMAHA
code
CD
CD
YAMAHA
199
MD/TAPE
TAPE
YAMAHA
499
DVD
DVD
YAMAHA
699
DTV/CBL
*
—
—
—
VCR
—
—
—
PHONO
—
—
—
—
—
—
Note
Note
Notes
MENU
CODE SET
STANDBY
POWER
CD
MD/TAPE
TUNER
PHONO
DVD
POWER
POWER
AV
TV
VCR
DTV/CBL
MENU
CODE SET
MENU
TITLE
BAND
A/B/C/D/E
A/B/C/D/E
PRESET/CH
4
3
2
1
8
10
7
0
9
6
5
ENT.
DISPLAY
RETURN
ENTER
TROUBLESHOOTING
36
Refer to the chart below if this unit does not function properly. If the problem you are experiencing is not listed below or
if the instructions below do not help, set this unit to the standby mode, disconnect the power cord, and contact the nearest
authorized YAMAHA dealer or service center.
■
General
TROUBLESHOOTING
Problem
Cause
Remedy
See
page
This unit fails to turn
on.
The power supply cord is not connected or
the plug is not completely inserted.
Connect the power supply cord firmly.
—
The impedance setting is incorrect.
Set the impedance to match your speakers.
11
The protection circuitry has been activated
because of a short circuit, etc.
Check that the speaker wires are not touching each
other and then turn the power of this unit back on.
11
The IMPEDANCE SELECTOR switch on
the rear panel is not set to either end.
Set the IMPEDANCE SELECTOR switch to either
end when the power of this unit is turned off.
11
This unit has been exposed to a strong
external electric shock (such as lightning
or strong static electricity).
Set this unit to the standby mode, disconnect the
power supply cord, plug it back in after 30 seconds,
then use it normally.
—
No sound
Incorrect input or output cable
connections.
Connect the cables properly. If the problem persists,
the cables may be defective.
10
No appropriate input source has been
selected.
Select an appropriate input source with the INPUT
selector on the front panel (or one of the input
selector buttons on the remote control).
15
The SPEAKERS A/B switches are not set
properly.
Turn on the corresponding SPEAKERS A or
SPEAKERS B.
15
Speaker connections are not secure.
Secure the connections.
11
The sound suddenly
goes off.
The protection circuitry has been activated
because of a short circuit, etc.
Check that the IMPEDANCE SELECTOR setting is
correct.
11
Check that the speaker wires are not touching each
other and then turn the power of this unit back on.
11
Only the speaker on
one side can be
heard.
Incorrect cable connections.
Connect the cables properly. If the problem persists,
the cables may be defective.
10
Incorrect setting for the BALANCE
control.
Set the BALANCE control to the appropriate
position.
16
There is a lack of bass
and no ambience.
The + and – wires are connected in
reverse at the amplifier or the speakers.
Connect the speaker wires to the correct + and –
phase.
11
A “humming” sound
can be heard.
Incorrect cable connections.
Connect the audio plugs firmly. If the problem
persists, the cables may be defective.
10
No connection from the turntable to the
GND terminal.
Make the GND connection between the turntable and
this unit.
10
The volume level is
low while playing a
record.
The record is being played on a turntable
with an MC cartridge.
The turntable should be connected to this unit through
the MC head amplifier.
—
The volume level
cannot be increased,
or the sound is
distorted.
The component connected to the MD/
TAPE OUT jacks of this unit is turned off.
Turn on the power of the component.
—
37
TROUBLESHOOTING
ADDITION
AL
IN
FO
RMA
T
IO
N
English
■
Tuner
The sound is
degraded when
listening with the
headphones
connected to the CD
player or the tape
deck connected to
this unit.
The power of this unit is turned off, or this
unit is set to the standby mode.
Turn on the power of this unit.
14
The sound level is
low.
The LOUDNESS control is functioning.
Set the LOUDNESS control to the FLAT position.
16
Using the BASS,
TREBLE, BALANCE
and LOUDNESS
controls does not
affect the tonal
quality.
The PURE DIRECT button is turned on.
The PURE DIRECT button must be turned off to use
those controls.
16
Problem
Cause
Remedy
See
page
FM
FM stereo
reception is
noisy.
The particular characteristics of the FM
stereo broadcasts being received may
cause this problem when the transmitter is
too far away or the antenna input is poor.
Check the antenna connections.
Try using a high-quality directional FM antenna.
12
Try using the manual tuning method.
21
There is
distortion, and
clear reception
cannot be
obtained even
with a good FM
antenna.
There is multipath interference.
Adjust the antenna position to eliminate the multipath
interference.
—
The desired
station cannot
be tuned in
with the
automatic
tuning method.
The signal is too weak.
Try using a high-quality directional FM antenna.
12
Try using the manual tuning method.
21
Previously
preset stations
can no longer
be tuned in.
This unit has been disconnected for a long
period.
Preset the stations again.
22
AM
The desired
station cannot
be tuned in
with the
automatic
tuning method.
The signal is weak or the antenna
connections are loose.
Tighten the AM loop antenna connections and orient
it for the best reception.
—
Try using the manual tuning method.
21
There are
continuous
crackling and
hissing noises.
The noises may result from lightning,
fluorescent lamps, motors, thermostats or
other electrical equipment.
Try using an outdoor antenna and a ground wire.
This will help somewhat, but it is difficult to
eliminate all noise.
—
There are
buzzing and
whining noises.
A TV set is being used nearby.
Move this unit away from the TV set.
—
38
TROUBLESHOOTING
■
Remote control
Problem
Cause
Remedy
See
page
The remote control
does not work nor
function properly.
Wrong distance or angle.
The remote control will function within a maximum
range of 6 m (19.7 ft) and no more than 30 degrees
off-axis from the front panel.
9
Direct sunlight or lighting (from an
inverter type of fluorescent lamp, etc.) is
striking the remote control sensor of this
unit.
Reposition this unit.
—
The batteries are weak.
Replace all batteries.
9
The remote control ID and this unit’s ID
do not match.
Switch the remote control ID or this unit’s ID.
29, 30
The remote control code was not correctly
set.
Try setting another code of the same manufacturer
using “LIST OF REMOTE CONTROL CODES” at
the end of this manual.
35
Even if the remote control code is
correctly set, there are some models that
do not respond to the remote control.
Use the supplied remote control for the components.
—
