Canon pixma pro-1: 7 8
7 8: Canon pixma pro-1
Table of contents
- Contents■
- Printer Installation Flow■ Printer Preparation Software Installation Installation Complete
- Symbols Used in This Document
- Printed Manual■ On-screen Manual and Online Manual■ Getting Started (this manual)
- Devices Required for Wired Connection■ When using the printer over a wired connection, a commercial network device (router, etc.) and Ethernet cable are required.
- Preparation
- 1 2
- 3 4 5 6
- 7 When it is necessary to turn off the printer
- 1 2 Install the Ink Tanks
- 3 4
- 5 6
- 1 2 Install the Print Head
- 3 4
- 5
- 6
- 7 8
- 9
- Software Installation
- For Windows XP/Windows XP SP1/Windows XP SP2/Windows Vista
- For Windows XP/Windows XP SP1/Windows XP SP2/Windows Vista If you prefer not to apply a Windows service pack, install the printer driver and IJ Network Tool by following the procedure below.
- For Mac OS X v10.6 to v10.6.7 Do you prefer to apply a Mac OS software update?
- For Mac OS X v10.4.11 to v10.5 Perform the installation by following one of the methods below.
- For Mac OS X v10.4.11 to v10.5 Install the software (the printer driver and IJ Network Tool) stored on the Setup CD-ROM by following 1 to 3 below.
- Do not connect the USB Easy-WebPrint EX cable yet.
- 1 1. Make sure that the POWER lamp (white) (A) is lit. 2. Press the ON button (B) to TURN OFF THE PRINTER.
- 2 1. Make sure that the printer has turned off. 2. Turn on the computer. 3. Insert the Setup CD-ROM into the CD-ROM drive.
- 3 3
- 4
- When the second page of the pattern is printed, Print Head Alignment is At the end of the installation, Quick Menu starts up. You can open the Online complete. Manual and On-screen Manual from here when you want to know about the details of the functions and operations or when need arises.
- 5 Load Paper
- My Image Garden 6 Application Software
- CREATIVE PARK PREMIUM Print Studio Pro
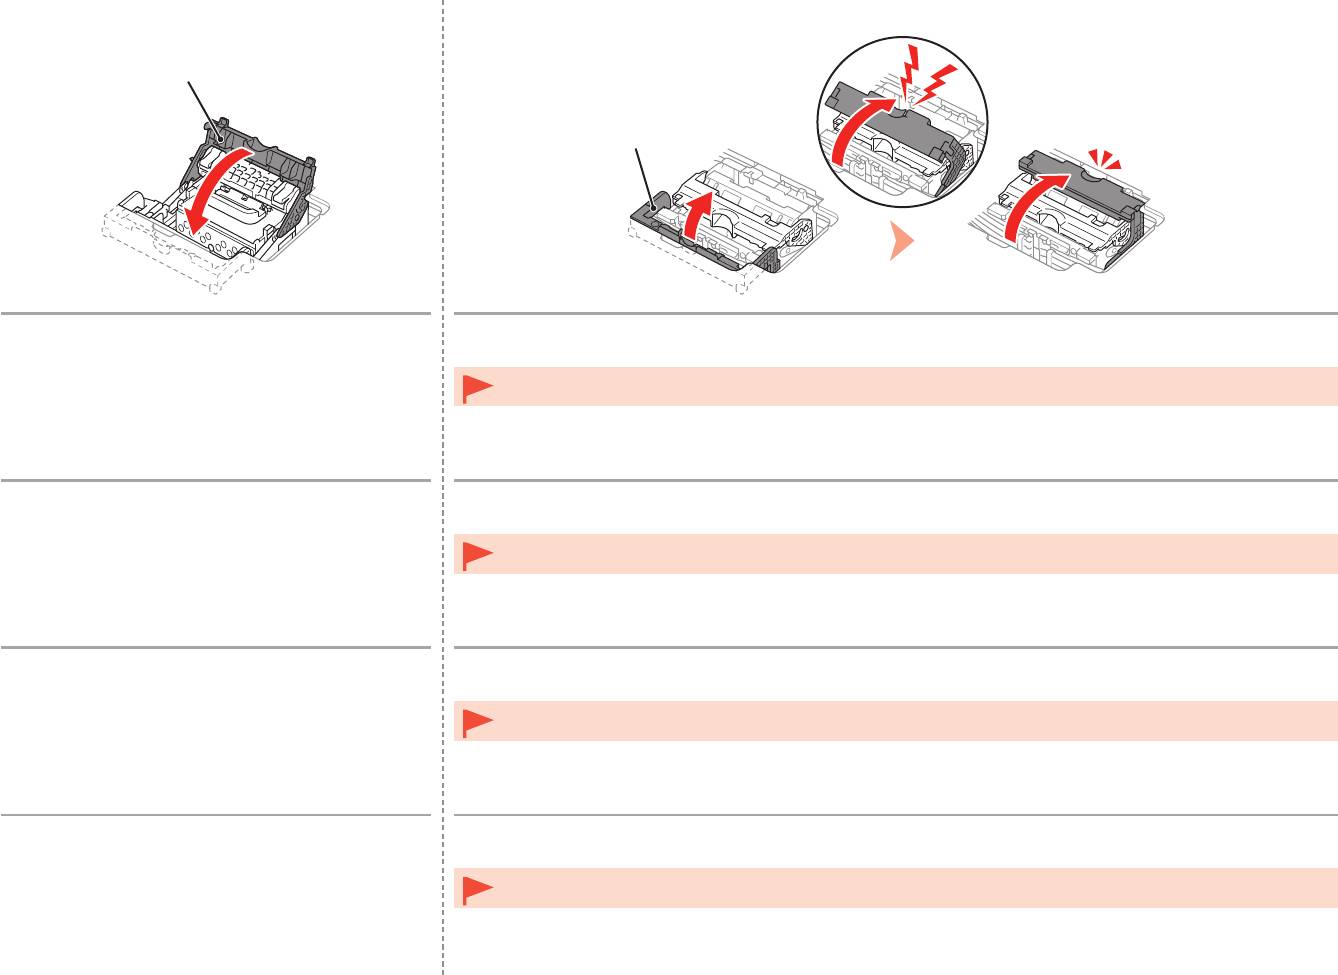
7
E
8
D
Lower the Print Head Lock Lever (3) (E).
Close the Joint Lever (4) (D) completely until it clicks.
The Joint Lever (4) may be tight and make a noise while being closed.
Once you have installed the Print Head, do not remove it unnecessarily.•
Abaissez complètement le levier de verrouillage
Abaissez le levier mixte (4) (D) complètement jusqu’à ce qu’il se mette en place.
de la tête d’impression (3) (E).
Le levier mixte (4) peut être très serré et faire du bruit lorsque vous l’abaissez.
Une fois la tête d’impression installée, ne la retirez que lorsque c’est absolument nécessaire.•
Senken Sie die Druckkopfverriegelung (3) (E).
Schließen Sie den Winkelhebel (4) (D) vollständig, bis er hörbar einrastet.
Möglicherweise ist der Winkelhebel (4) sehr straff und gibt Geräusche von sich, wenn er geschlossen ist.
Nach dem Einsetzen sollte der Druckkopf nicht unnötig wieder ausgebaut werden.•
Abbassare completamente la leva di bloccaggio della
Chiudere completamente la leva di collegamento (4) (D) finché non scatta in posizione.
testina di stampa (3) (E).
Quando viene chiusa, la leva di collegamento (4) potrebbe opporre resistenza ed emettere un rumore.
Una volta installata la testina di stampa, non rimuoverla se non in caso di effettiva necessità.•
16


