Canon i-sensys mf6140dn: instruction
Class: Office Equipment
Type:
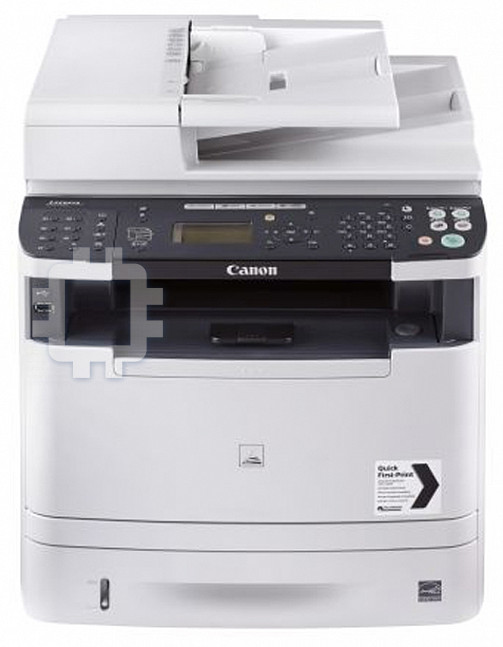
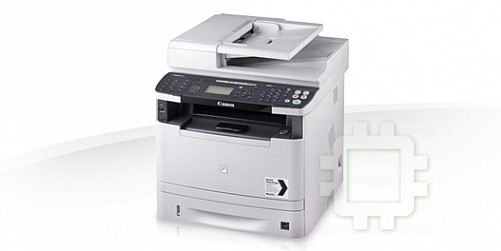
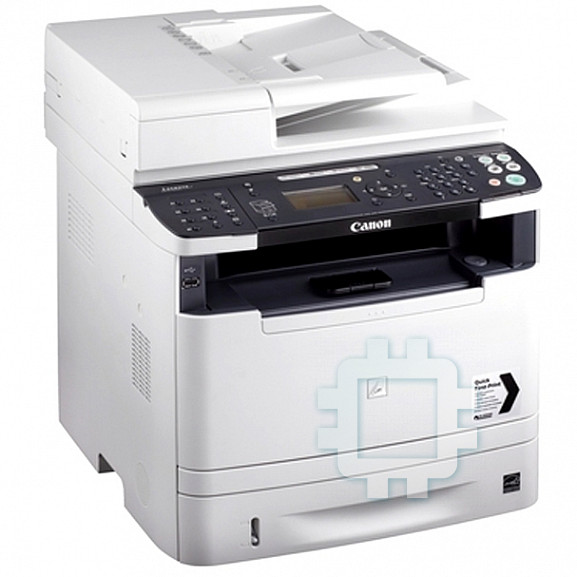
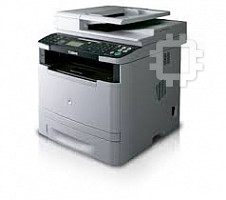
Manual for Canon i-sensys mf6140dn
Table of contents
- Contents
- Navigating the Menu and Text Input Method About the Supplied Manuals
- Attach the Optional Cassette to the Machine Connecting the Power Cord and Turning ON the Power Specifying the Initial Settings
- Choosing the Method to Connect the Machine to the Computer Connecting via a Wired LAN
- Specifying Initial Fax Settings and Connecting a Telephone Cable
- Perform Useful Tasks
- Clearing Paper Jams
- Replacing Toner Cartridge
- Symbols Used in This Manual Keys and Buttons Used in This Manual Illustrations and Displays Used in This Manual Important Safety Instructions Installation Power Supply Handling
- Maintenance and Inspections Consumables Others Legal Notices Legal Limitations on Usage of Your Product and the Use of Images

Getting Started
En
Mise en route
Fr
Erste Schritte
De
Introduzione
It
Introducción
Es
Introdução
Pt
Ξεκινώντας
El
Sådan kommer du i gang
Da
Aan de slag
Nl
Komme i gang
No
Komma igång
Sv
Aloittaminen
Fi
Начало работы
Ru
Початок роботи
Uk
Sagatavošana darbam
Lv
Parengimas darbui
Lt
Alustamine
Et
Pierwsze kroki
Pl
Začínáme
Cs
Začíname
Sk
Kako začnete
Sl
Početak
Hr
Kezdeti lépések
Hu
Punerea în funcţiune
Ro
Първи стъпки
Bg
Başlangıç
Tr
Ar
Fa
FT6-0407 (000)
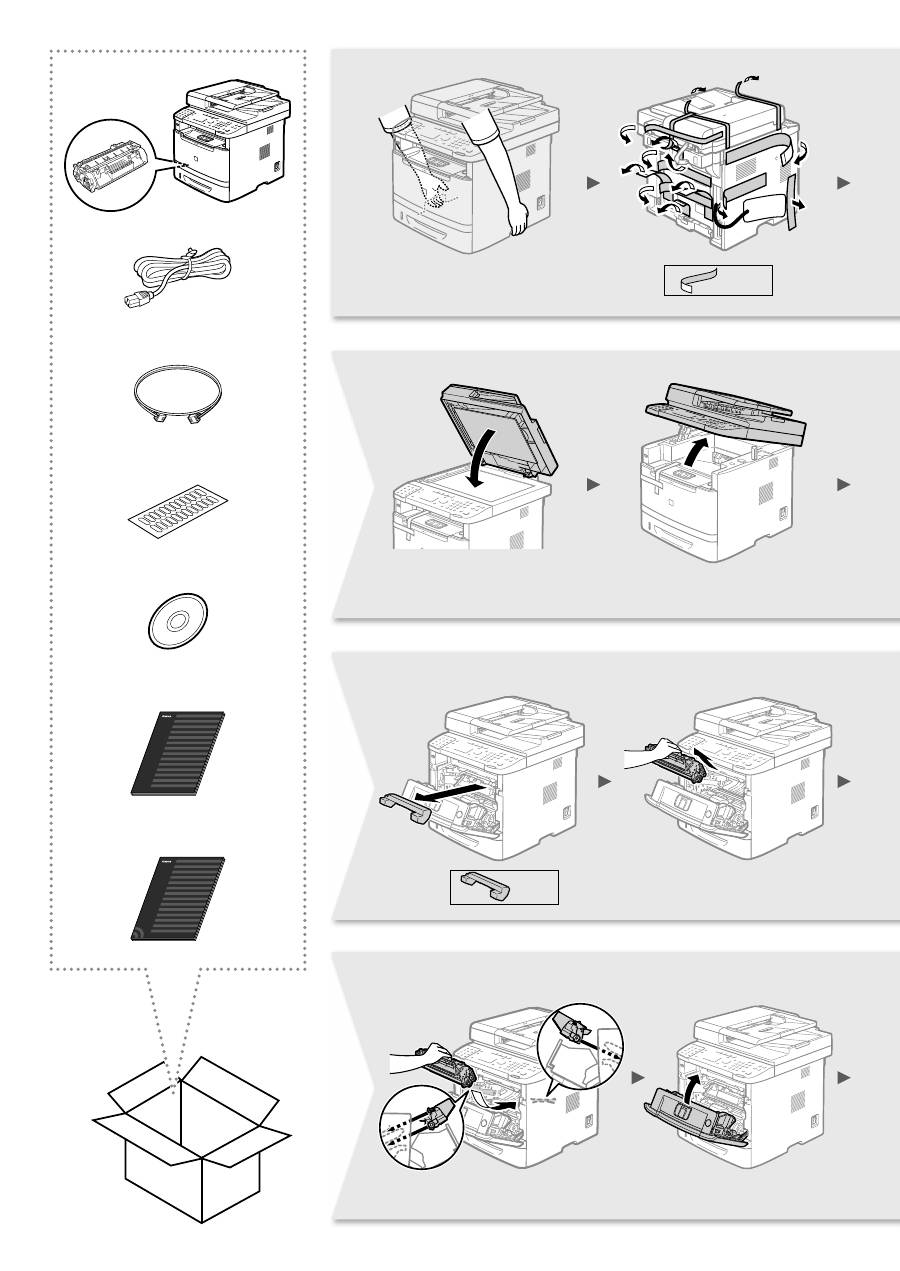
X 13
X 1
X 2
X 1
X 1
X 1
X 1
X 5
X 2
Installing the Handset (Option)
441 mm
473 mm
68 mm
390 mm
82 mm
264 mm
431 mm
138 mm
★
=100 mm


6
Saturs
Зміст
Содержание
Περιεχόμενα
Indhold
Inhoudsopgave
Inhalt
Table des matières
Contents
About the Supplied Manuals ..........................10
Navigating the Menu and Text Input
Method ..........................................................10
Attach the Optional Cassette to
the Machine ...................................................11
Connecting the Power Cord and Turning ON
the Power .......................................................11
Specifying the Initial Settings .........................11
Choosing the Method to Connect
the Machine to the Computer .........................12
Connecting via a Wired LAN .........................12
Connecting via a USB Cable..........................12
Setting a Paper Size and Type .......................13
Specifying Initial Fax Settings and
Connecting a Telephone Cable .....................13
Perform Useful Tasks .....................................14
Clearing Paper Jams......................................15
Replacing Toner Cartridge .............................16
Πληροφορίες
για
τα
παρεχόμενα
εγχειρίδια
......................................................70
Περιήγηση
στο
μενού
και
τη
μέθοδο
εισαγωγής
κειμένου
......................................70
Τοποθέτηση
της
προαιρετικής
κασέτας
στη
συσκευή
..................................................71
Σύνδεση
του
καλωδίου
ρεύματος
και
ΕΝΕΡΓΟΠΟΙΗΣΗ
της
ισχύος
........................71
Καθορισμός
αρχικών
ρυθμίσεων
...................71
Επιλογή
του
τρόπου
σύνδεσης
της
συσκευής
στον
υπολογιστή
...........................72
Σύνδεση
μέσω
ενσύρματου
LAN ..................72
Σύνδεση
μέσω
ενός
καλωδίου
USB ..............72
Καθορισμός
μεγέθους
και
τύπου
χαρτιού
.....73
Καθορισμός
των
αρχικών
ρυθμίσεων
του
φαξ
και
σύνδεση
καλωδίου
τηλεφώνου
.......73
Εκτέλεση
χρήσιμων
εργασιών
......................74
Αφαίρεση
μπλοκαρισμένων
χαρτιών
............75
Αντικατάσταση
κασέτας
γραφίτη
..................76
Сведения
о
входящих
в
комплект
руководствах
..............................................130
Поиск
в
меню
и
способ
ввода
текста
.......130
Подсоедините
дополнительную
кассету
к
устройству
...............................................131
Подсоединение
кабеля
питания
и
включение
аппарата
...............................131
Указание
начальных
параметров
.............131
Выбор
метода
подключения
аппарата
к
компьютеру
..............................................132
Подключение
через
проводную
локальную
сеть
.........................................132
Подключение
с
помощью
кабеля
USB .....132
Установка
формата
и
типа
бумаги
............133
Указание
начальных
параметров
факса
и
подсоединение
телефонного
кабеля
....133
Использование
полезных
функций
..........134
Устранение
замятия
бумаги
......................135
Замена
картриджа
с
тонером
...................136
A propos des manuels fournis ........................20
Navigation dans le menu et méthode
de saisie du texte ...........................................20
Monter la cassette optionnelle sur
la machine .....................................................21
Branchement du cordon d’alimentation
et mise sous tension ......................................21
Con
fi
guration des réglages initiaux ................21
Choix de la méthode de connexion de
la machine à l’ordinateur ................................22
Connexion via un réseau
fi
laire .....................22
Connexion via un câble USB .........................22
Réglage du format et du type de papier .........23
Con
fi
guration des réglages de fax initiaux
et connexion d’un câble téléphonique ...........23
Procédures utiles ...........................................24
Résolution des bourrages papier ...................25
Remplacement de la cartouche d’encre ........26
Om de medfølgende vejledninger ..................80
Navigation i menuen og
tekstindlæsningsmetode ................................80
Sæt den ekstra kassette i maskinen ..............81
Tilslutning af netledningen og AKTIVERING
af maskinen ...................................................81
Angivelse af startindstillingerne .....................81
Valg af metode til at slutte maskinen til
computeren ....................................................82
Forbindelse med kablet LAN .........................82
Forbindelse via USB-kabel ............................82
Indstilling af papirformat og -type ...................83
Angivelse af startindstillinger for fax og
tilslutning af en telefonledning .......................83
Udfør nyttige opgaver .....................................84
Udbedring af papirstop ..................................85
Udskiftning af tonerpatronen ..........................86
Посібники
з
комплекту
поставки
..............140
Переміщення
між
пунктами
меню
та
спосіб
введення
тексту
..............................140
Приєднання
додаткової
касети
до
головного
блока
.........................................141
Підключення
шнура
живлення
й
увімкнення
живлення
................................141
Встановлення
початкових
параметрів
.....141
Вибір
способу
підключення
апарата
до
комп
’
ютера
.................................................142
Підключення
через
дротову
локальну
мережу
.......................................................142
Підключення
через
кабель
USB ...............142
Установлення
розміру
та
типу
паперу
......143
Зазначення
початкових
параметрів
факсу
та
підключення
телефонного
кабелю
......143
Корисні
функції
..........................................144
Усунення
зминання
паперу
.......................145
Заміна
картриджа
з
тонером
....................146
Informationen zu den mitgelieferten
Anleitungen ....................................................30
Navigieren durch das Menü und
Texteingabemethode .....................................30
Bringen Sie die optionale Kassette
am Gerät an ...................................................31
Anschließen des Netzkabels und Einschalten
des Geräts über den Netzschalter .................31
Festlegen der anfänglichen Einstellungen .....31
Auswählen der Methode zum Herstellen einer
Verbindung zwischen Gerät und Computer ...32
Verbindung über ein LAN ..............................32
Verbindung über ein USB-Kabel ....................32
Einstellen von Papierformat und Papiertyp.....33
Festlegen der anfänglichen Faxeinstellungen
und Anschließen eines Telefonkabels ...........33
Ausführen nützlicher Aufgaben ......................34
Beseitigen von Papierstaus ............................35
Austauschen der Tonerpatrone ......................36
Informatie over de meegeleverde
handleidingen ................................................90
Navigeren in het menu en
tekstinvoermethode .......................................90
De optionele cassette op de machine
bevestigen .....................................................91
Het netsnoer aansluiten en de machine
INSCHAKELEN .............................................91
De begininstellingen opgeven ........................91
Kiezen hoe de machine met de computer
wordt verbonden ............................................92
Verbinding maken via een bekabeld LAN ......92
Verbinden via een USB-kabel ........................92
Papierformaat en type papier instellen ...........93
De beginfaxinstellingen opgeven en een
telefoonkabel aansluiten ...............................93
Nuttige taken uitvoeren ..................................94
Papierstoringen verhelpen .............................95
Tonercartridge vervangen ..............................96
Par komplekt
ā
cij
ā
iek
ļ
autaj
ā
m
rokasgr
ā
mat
ā
m ............................................150
Navi
ģē
šana izv
ē
ln
ē
un teksta ievades
metode.........................................................150
Papildu kasetes pievienošana iek
ā
rtai .........151
Str
ā
vas vada pievienošana un iek
ā
rtas
IESL
Ē
GŠANA ..............................................151
S
ā
kotn
ē
jo iestat
ī
jumu nor
ā
d
ī
šana ................151
Savienojuma veida starp iek
ā
rtu un
datoru izv
ē
le ................................................152
Savienojuma izveide, izmantojot
vadu LAN ....................................................152
Savienojuma izveide, izmantojot
USB kabeli ...................................................152
Pap
ī
ra form
ā
ta un tipa iestat
ī
šana ................153
S
ā
kotn
ē
jo faksa iestat
ī
jumu nor
ā
d
ī
šana un
t
ā
lru
ņ
a kabe
ļ
a pievienošana .......................153
Noder
ī
gu uzdevumu veikšana ......................154
Iestr
ē
gušu lapu iz
ņ
emšana ..........................155
Tonera kasetnes nomai
ņ
a ............................156

7
Spis tre
ś
ci
Sisukord
Turinys
Innhold
Innehåll
Sisällys
Índice
Contenido
Sommario
Informazioni sui manuali in dotazione ............40
Esplorazione del menu e metodo
d’immissione del testo ...................................40
Montare il cassetto opzionale sulla
macchina. ......................................................41
Collegamento del cavo di alimentazione e
accensione ....................................................41
Selezione delle impostazioni iniziali ...............41
Selezione del metodo di connessione della
macchina al computer ....................................42
Connessione tramite LAN cablata .................42
Connessione tramite cavo USB .....................42
Impostazione del formato e del tipo di carta ...43
Selezione delle impostazioni iniziali del fax
e connessione di un cavo telefonico .............43
Attività utili ......................................................44
Rimozione degli inceppamenti di carta ..........45
Sostituzione della cartuccia del toner ............46
Om de medfølgende håndbøkene ...............100
Navigere i menyen og
tekstinnskrivingsmetode ..............................100
Feste den ekstra kassetten til maskinen ......101
Koble til strømledningen og slå PÅ
maskinen .....................................................101
Angi oppstartsinnstillingene .........................101
Velge metode for å koble maskinen til
datamaskinen ..............................................102
Koble til via kablet LAN ...............................102
Koble til via en USB-kabel ............................102
Angi papirformat og -type .............................103
Angi oppstartsinnstillinger for faks og
koble til en telefonkabel ...............................103
Utføre nyttige oppgaver ................................104
Fjerne fastkjørt papir ....................................105
Bytte tonerkassett ........................................106
Apie pateikiamas instrukcijas .......................160
Meniu naršymas ir teksto
į
vesties b
ū
das ......160
Pasirinktin
ė
s kaset
ė
s
į
d
ė
jimas
į
aparat
ą
.......161
Maitinimo laido prijungimas ir aparato
Į
JUNGIMAS .................................................161
Pradini
ų
parametr
ų
nustatymas ...................161
Aparato prijungimo prie kompiuterio b
ū
do
pasirinkimas .................................................162
Prijungimas naudojant laidin
į
LAN ..............162
Prijungimas naudojant USB kabel
į
...............162
Popieriaus formato ir tipo nustatymas ..........163
Pradini
ų
fakso parametr
ų
nustatymas
ir telefono kabelio prijungimas .....................163
Nauding
ų
užduo
č
i
ų
vykdymas .....................164
Į
strigusio popieriaus iš
ė
mimas .....................165
Dažom
ų
j
ų
milteli
ų
kaset
ė
s keitimas .............166
Acerca de los manuales suministrados ..........50
Navegación por el menú y método de
introducción de texto ......................................50
Acoplamiento de la bandeja opcional a la
máquina .........................................................51
Conexión del cable de alimentación y
encendido del interruptor de alimentación .....51
Especi
fi
cación de la con
fi
guración inicial .......51
Selección del método para conectar
la máquina al ordenador ................................52
Conexión mediante una red LAN cableada ...52
Conexión con un cable USB ..........................52
Ajuste del tamaño y el tipo del papel ..............53
Especi
fi
cación de la con
fi
guración inicial
de fax y conexión del cable del teléfono ........53
Tareas útiles ...................................................54
Eliminación de atascos de papel ...................55
Sustitución del cartucho de tóner ...................56
Om de medföljande handböckerna ..............110
Navigering i menyn och
textinmatningsmetod....................................110
Sätt i tillvalskassetten i enheten ...................111
Ansluta nätkabeln och slå PÅ strömmen ......111
Ange de inledande inställningarna ...............111
Välj metod för att ansluta enheten
till datorn ......................................................112
Ansluta via ett trådbundet nätverk ...............112
Ansluta via en USB-kabel ............................112
Ange pappersformat och -typ.......................113
Ange inledande faxinställningar och
ansluta en telefonsladd ...............................113
Använda praktiska funktioner .......................114
Ta bort papper som fastnat ..........................115
Byta tonerpatron ..........................................116
Komplekti kuuluvad juhendid .......................170
Menüüs liikumine ja tekstisisestusviis ..........170
Eraldi ostetava paberikasseti paigaldamine
põhiseadmesse ...........................................171
Toitejuhtme ühendamine ja toite
SISSELÜLITAMINE .....................................171
Algsätete määramine ...................................171
Seadme arvutiga ühendamise
viisi valimine .................................................172
Ühenduse loomine kaabelühendusega
kohtvõrgu kaudu .........................................172
Ühendamine USB-kaabli abil .......................172
Paberiformaadi ja -tüübi määramine ............173
Faksi algsätete määramine ja telefonijuhtme
ühendamine ................................................173
Kasulike toimingute tegemine ......................174
Paberiummistuste kõrvaldamine ..................175
Toonerikasseti vahetamine ..........................176
Acerca dos manuais fornecidos .....................60
Navegar no menu e método de introdução
de texto ..........................................................60
Instalar a gaveta opcional na máquina ...........61
Ligar o cabo de alimentação e a
ALIMENTAÇÃO .............................................61
Especi
fi
car as de
fi
nições iniciais....................61
Selecionar o método de ligação da
máquina ao computador ................................62
Ligar através de LAN com
fi
os ......................62
Ligar através de um cabo USB ......................62
De
fi
nir um tipo e tamanho de papel ...............63
Especi
fi
car as de
fi
nições iniciais de fax
e ligar um cabo telefónico .............................63
Executar tarefas úteis ....................................64
Retirar papel encravado .................................65
Substituir uma cartridge de toner ...................66
Tietoja laitteen mukana toimitettavista
oppaista .......................................................120
Valikossa siirtyminen ja tekstinsyöttötapa ....120
Liitä lisävarusteena saatava kasetti
laitteeseen ...................................................121
Virtajohdon liittäminen ja virran
KYTKEMINEN .............................................121
Perusasetusten määrittäminen ....................121
Laitteen ja tietokoneen välisen
kytkentätavan valitseminen ..........................122
Kytkeminen langallisen lähiverkon kautta ....122
Kytkeminen USB-kaapelilla ..........................122
Paperikoon ja -tyypin määrittäminen ............123
Perusfaksiasetusten määrittäminen ja
puhelinjohdon kytkeminen ..........................123
Päätoimintojen käyttäminen .........................124
Paperitukosten poistaminen .........................125
Väriainekasetin vaihtaminen ........................126
Informacje o dostarczonych
podr
ę
cznikach .............................................180
Poruszanie si
ę
po menu i sposób
wpisywania tekstu ........................................180
Pod
łą
czanie opcjonalnej kasety
do urz
ą
dzenia ..............................................181
Pod
łą
czanie przewodu zasilania
i W
ŁĄ
CZANIE urz
ą
dzenia ............................181
Kon
fi
gurowanie ustawie
ń
pocz
ą
tkowych ......181
Wybór metody pod
łą
czenia urz
ą
dzenia do
komputera ....................................................182
Pod
łą
czanie za po
ś
rednictwem
przewodowej sieci LAN ...............................182
Pod
łą
czanie za pomoc
ą
kabla USB .............182
Ustawianie formatu i rodzaju papieru ...........183
Kon
fi
gurowanie ustawie
ń
pocz
ą
tkowych
faksu i pod
łą
czanie kabla telefonicznego ....183
Wykonywanie przydatnych zada
ń
................184
Usuwanie zaci
ę
tego papieru ........................185
Wymiana zasobnika z tonerem ....................186

8
Dodané p
ř
íru
č
ky ..........................................190
Navigace v nabídce a metoda zadávání
textu .............................................................190
P
ř
ipojení volitelného zásobníku k za
ř
ízení ....191
P
ř
ipojení napájecího kabelu a ZAPNUTÍ
p
ř
ístroje ........................................................191
Zadání po
č
áte
č
ního nastavení .....................191
Volba zp
ů
sobu p
ř
ipojení p
ř
ístroje
k po
č
íta
č
i......................................................192
P
ř
ipojení p
ř
es kabelovou sí
ť
LAN ................192
P
ř
ipojení pomocí kabelu USB ......................192
Nastavení velikosti a typu papíru ..................193
Ur
č
ení po
č
áte
č
ního nastavení faxu
a p
ř
ipojení telefonního kabelu .....................193
Provád
ě
ní užite
č
ných úkol
ů
.........................194
Odstra
ň
ování zachyceného papíru...............195
Vým
ě
na tonerové kazety ..............................196
Информация
за
предоставените
ръководства
...............................................250
Придвижване
в
менюто
и
метод
на
въвеждане
на
текст
...................................250
Прикрепете
допълнителното
касетно
устройство
към
машината
.........................251
Свързване
на
захранващия
кабел
и
ВКЛЮЧВАНЕ
на
захранването
..............251
Указване
на
първоначалните
настройки
...................................................251
Избор
на
метод
за
свързване
на
машината
към
компютър
...........................252
Свързване
чрез
LAN
кабел
......................252
Свързване
чрез
USB
кабел
.......................252
Задаване
на
формата
и
типа
на
хартията
.................................................253
Указване
на
първоначалните
настройки
на
факса
и
свързване
на
телефонен
кабел
.......................................253
Изпълнение
на
полезни
задачи
................254
Отстраняване
на
заседналата
хартия
......255
Подмяна
на
тонер
касета
..........................256
Informácie o dodaných príru
č
kách ...............200
Navigácia v ponuke a spôsob zadávania
textu .............................................................200
Pripojte volite
ľ
ný zásobník k zariadeniu .......201
Pripojenie napájacieho kábla a ZAPNUTIE
zariadenia ....................................................201
Zadanie po
č
iato
č
ného nastavenia ...............201
Výber spôsobu pripojenia zariadenia
k po
č
íta
č
u ....................................................202
Pripojenie prostredníctvom káblovej
siete LAN ....................................................202
Pripojenie pomocou kábla USB ...................202
Nastavenie formátu a typu papiera...............203
Zadanie po
č
iato
č
ného nastavenia faxu
a pripojenie telefónneho kábla ....................203
Vykonávanie užito
č
ných úloh .......................204
Odstra
ň
ovanie zachyteného papiera ...........205
Výmena kazety s tonerom ............................206
Makineyle Birlikte Gelen K
ı
lavuzlar
Hakk
ı
nda......................................................260
Menüde Gezinme ve Metin Giri
ş
Yöntemi ....260
İ
ste
ğ
e Ba
ğ
l
ı
Kaseti Makineye Ba
ğ
lama ........261
Güç Kablosunu Ba
ğ
lama ve Makineyi
AÇIK Konuma Getirme.................................261
Ba
ş
lang
ı
ç Ayarlar
ı
n
ı
Belirleme ......................261
Makineyi Bilgisayara Ba
ğ
lama Yöntemini
Seçme .........................................................262
Kablolu LAN arac
ı
l
ı
ğ
ı
yla ba
ğ
lama ................262
USB Kablosu ile Ba
ğ
lama ............................262
Ka
ğ
ı
t Boyutu ve Türü Ayarlama ....................263
Ba
ş
lang
ı
ç Faks Ayarlar
ı
n
ı
Belirleme
ve Telefon Kablosunu Ba
ğ
lama ...................263
Kullan
ı
ş
l
ı
Görevler Gerçekle
ş
tirme ...............264
Ka
ğ
ı
t S
ı
k
ı
ş
malar
ı
n
ı
Giderme .........................265
Toner Kartu
ş
unu De
ğ
i
ş
tirme ........................266
O priloženih navodilih ...................................210
Krmarjenje po meniju in na
č
in vnosa
besedila .......................................................210
Namestite dodatno kaseto v napravo ...........211
Priklju
č
itev napajalnega kabla in VKLOP......211
Dolo
č
anje za
č
etnih nastavitev ......................211
Izbor na
č
ina povezave naprave
z ra
č
unalnikom .............................................212
Povezava prek ži
č
nega LAN ........................212
Povezava s kablom USB ..............................212
Nastavitev velikosti in vrste papirja...............213
Dolo
č
anje za
č
etnih nastavitev faksa in
priklju
č
itev telefonskega kabla .....................213
Izvajanje uporabnih opravil ..........................214
Odpravljanje zastojev papirja .......................215
Zamenjava kartuše s tonerjem .....................216
270 .........................
ﺺﻨﻟﺍ
ﻝﺎﺧﺩﺇ
ﺔﻘﻳﺮﻃﻭ
ﺔﻤﺋﺎﻘﻟﺍ
ﱪﻋ
ﻞﻘﻨﺘﻟﺍ
270 .................................................
ﺔﻘﻓﺮﳌﺍ
ﺔﻟﺩﻷﺍ
ﻝﻮﺣ
271 .................................
ﺯﺎﻬﺠﻟﺎﺑ
ﻱﺭﺎﻴﺘﺧﻻﺍ
ﺝﺭﺪﻟﺍ
ﺐﻴﻛﺮﺗ
271 ....................................
ﻞﻴﻐﺸﺘﻟﺍﻭ
ﺔﻗﺎﻄﻟﺍ
ﻚﻠﺳ
ﻞﻴﺻﻮﺗ
271 ...........................................
ﺔﻴﻟﻭﻷﺍ
ﺕﺍﺩﺍﺪﻋﻹﺍ
ﺪﻳﺪﺤﺗ
272 .........................
ﺮﺗﻮﻴﺒﻤﻜﻟﺎﺑ
ﺯﺎﻬﺠﻟﺍ
ﻝﺎﺼﺗﺍ
ﺔﻘﻳﺮﻃ
ﺭﺎﻴﺘﺧﺍ
272 ..........................
ﺔﻴﻜﻠﺳ
LAN
ﺔﻜﺒﺷ
ﻝﻼﺧ
ﻦﻣ
ﻝﺎﺼﺗﻻﺍ
272 .........................................USB
ﻞﺑﺎﻛ
ﱪﻋ
ﻞﻴﺻﻮﺘﻟﺍ
273 .........................................
ﻕﺭﻮﻟﺍ
ﻉﻮﻧﻭ
ﺱﺎﻘﻣ
ﻂﺒﺿ
273 ............
ﻒﺗﺎﻫ
ﻞﺒﻛ
ﻞﻴﺻﻮﺗﻭ
ﺔﻴﻟﻭﻷﺍ
ﺲﻛﺎﻔﻟﺍ
ﺕﺍﺩﺍﺪﻋﺇ
ﺪﻳﺪﺤﺗ
274 ..................................................
ﺓﺪﻴﻔﻣ
ﻡﺎﻬﻣ
ﺬﻴﻔﻨﺗ
275 .......................................
ﻕﺭﻮﻟﺍ
ﺭﺎﺸﺤﻧﺍ
ﻦﻣ
ﺺﻠﺨﺘﻟﺍ
276 ..........................................
ﱪﺤﻟﺍ
ﺔﺷﻮﻃﺮﺧ
ﻝﺍﺪﺒﺘﺳﺍ
Съдържание
İ
çindekiler
Obsah
Obsah
Obsah

9
O priloženim priru
č
nicima ............................220
Kretanje po izborniku i na
č
in unosa teksta ...220
Priklju
č
ivanje dodatne kasete na ure
đ
aj .......221
Povezivanje kabela za napajanje
i uklju
č
ivanje napajanja ................................221
Odre
đ
ivanje po
č
etnih postavki .....................221
Odabir na
č
ina povezivanja ure
đ
aja
s ra
č
unalom .................................................222
Povezivanje putem kabelskog LAN-a ..........222
Povezivanje putem USB kabela ...................222
Postavljanje vrste i veli
č
ine papira ................223
Odre
đ
ivanje po
č
etnih postavki faksa
i priklju
č
ivanje telefonskog kabela ...............223
Provo
đ
enje korisnih zadataka ......................224
Otklanjanje zaglavljenog papira ...................225
Zamjena spremnika za toner ........................226
280 .......................
ﻦﺘﻣ
ﻥﺩﺮﮐ
ﺩﺭﺍﻭ
ﺵﻭﺭ
ﻭ
ﻮﻨﻣ
ﻥﺩﺮﮐ
ﺭﻭﺮﻣ
280 .......................
هﺪﺷ
ﻪﺿﺮﻋ
یﺎﻤﻨﻫﺍﺭ
یﺎﻫ
ﻪﭼﱰﻓﺩ
هﺭﺎﺑﺭﺩ
281 ..........................
هﺎﮕﺘﺳﺩ
ﻪﺑ
یﺭﺎﯿﺘﺧﺍ
ﺖﺳﺎﮐ
ﻥﺩﺮﮐ
ﻞﺻﻭ
281 ..................
هﺎﮕﺘﺳﺩ
ﻥﺩﺮﮐ
ﻦﺷﻭﺭ
ﻭ
ﻕﺮﺑ
ﻞﺑﺎﮐ
ﻥﺩﺮﮐ
ﻞﺻﻭ
281 ..............................................
ﻪﯿﻟﻭﺍ
ﺕﺎﻤﯿﻈﻨﺗ
ﻦﯿﯿﻌﺗ
282 ....................
ﻪﻧﺎﯾﺍﺭ
ﻪﺑ
هﺎﮕﺘﺳﺩ
ﻝﺎﺼﺗﺍ
یﺍﺮﺑ
ﺵﻭﺭ
ﺏﺎﺨﺘﻧﺍ
282 ............................
ﺭﺍﺩ
ﻢﯿﺳ
LAN
ﮏﯾ
ﻖﯾﺮﻃ
ﺯﺍ
ﻝﺎﺼﺗﺍ
282 ..................................... USB
ﻞﺑﺎﮐ
ﻖﯾﺮﻃ
ﺯﺍ
ﻝﺎﺼﺗﺍ
283 .........................................
ﺬﻏﺎﮐ
ﻉﻮﻧ
ﻭ
هﺯﺍﺪﻧﺍ
ﻢﯿﻈﻨﺗ
283 ...............
ﻦﻔﻠﺗ
ﻞﺑﺎﮐ
ﻝﺎﺼﺗﺍ
ﻭ
ﺲﮐﺎﻓ
ﻪﯿﻟﻭﺍ
ﺕﺎﻤﯿﻈﻨﺗ
ﻦﯿﯿﻌﺗ
284 ...............................................
ﺪﯿﻔﻣ
یﺎﻫﺭﺎﮐ
ﻡﺎﺠﻧﺍ
285 ..........................................
ﺬﻏﺎﮐ
ﺮﯿﮔ
ﻥﺩﺮﮐ
ﻑﺮﻃﺮﺑ
286 .......................................
ﻥﻮﺗ
یﺎﻫ
ﺞﯾﺮﺗﺭﺎﮐ
ﺾﯾﻮﻌﺗ
A mellékelt kézikönyvek ...............................230
Navigálás a menüben és a szövegbeviteli
mód megadása ............................................230
Csatlakoztassa a kiegészít
ő
kazettát a
készülékhez .................................................231
A tápkábel csatlakoztatása és a készülék
BEKAPCSOLÁSA ........................................231
A kezdeti beállítások megadása ..................231
A készülék számítógéphez csatlakozási
módjának kiválasztása .................................232
Csatlakozás vezetékes helyi hálózaton
keresztül ......................................................232
Csatlakozás USB-kábellel............................232
A papírméret és a papírtípus beállítása ........233
Kezdeti faxbeállítások megadása és
a telefonkábel csatlakoztatása ....................233
Hasznos feladatok végrehajtása ..................234
A papírelakadások megszüntetése ..............235
A festékkazetta cseréje ................................236
Despre manualele furnizate .........................240
Navigarea prin meniu
ş
i metoda de
introducere a textului ....................................240
Montarea casetei op
ţ
ionale la aparat ...........241
Conectarea cablului de alimentare
ş
i
PORNIREA aliment
ă
rii .................................241
Speci
fi
carea set
ă
rilor ini
ţ
iale ........................241
Alegerea metodei de conectare a
aparatului la computer .................................242
Conectarea printr-o re
ţ
ea LAN cu
fi
r ...........242
Conectarea printr-un cablu USB ..................242
Setarea dimensiunii
ş
i a tipului de hârtie ......243
Speci
fi
carea set
ă
rilor ini
ţ
iale de fax
ş
i
conectarea unui cablu de telefon ................243
Efectua
ţ
i activit
ăţ
i utile .................................244
Solu
ţ
ionarea blocajelor de hârtie .................245
Înlocuirea cartu
ş
ului de toner .......................246
Cuprins
Tartalom
Sadržaj
10
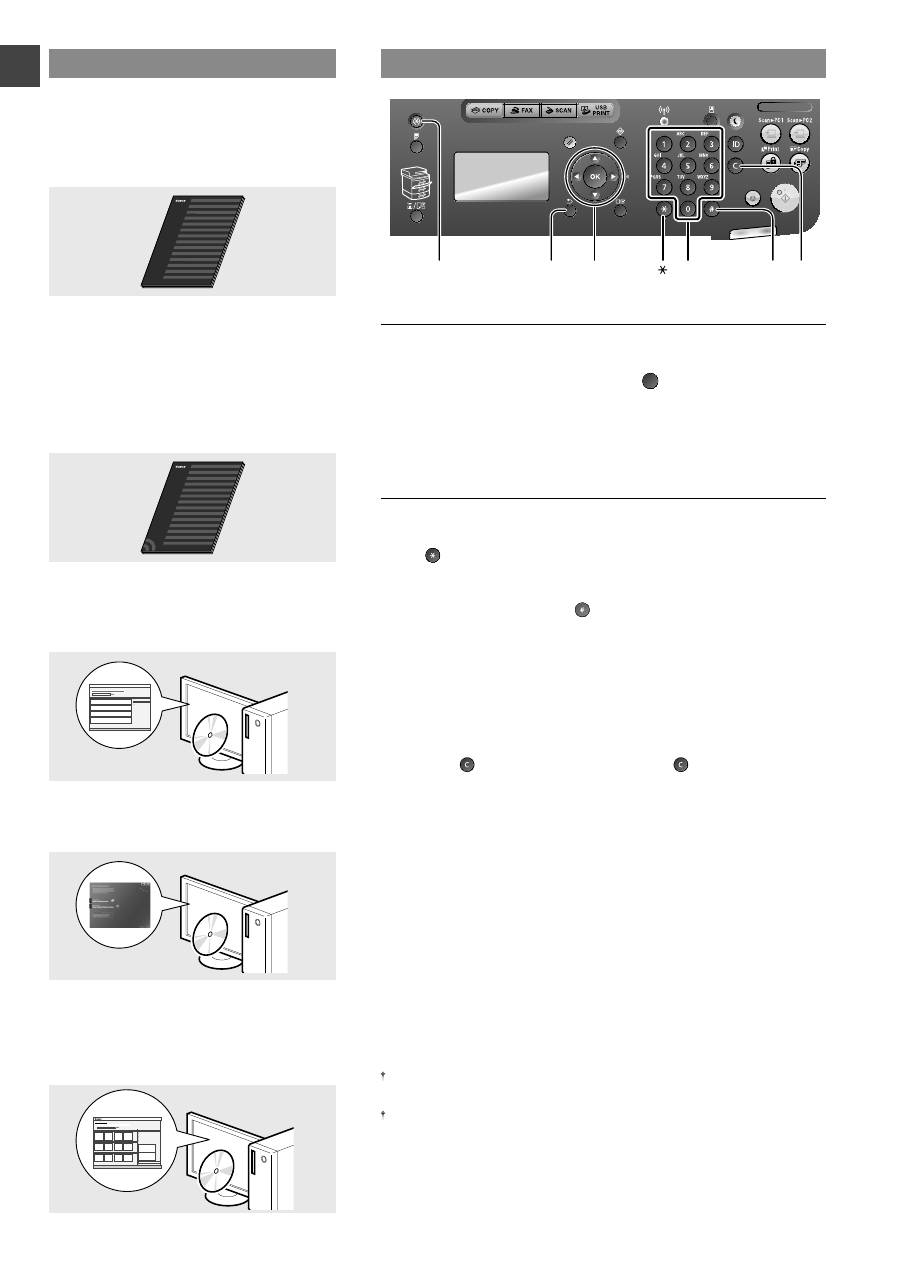
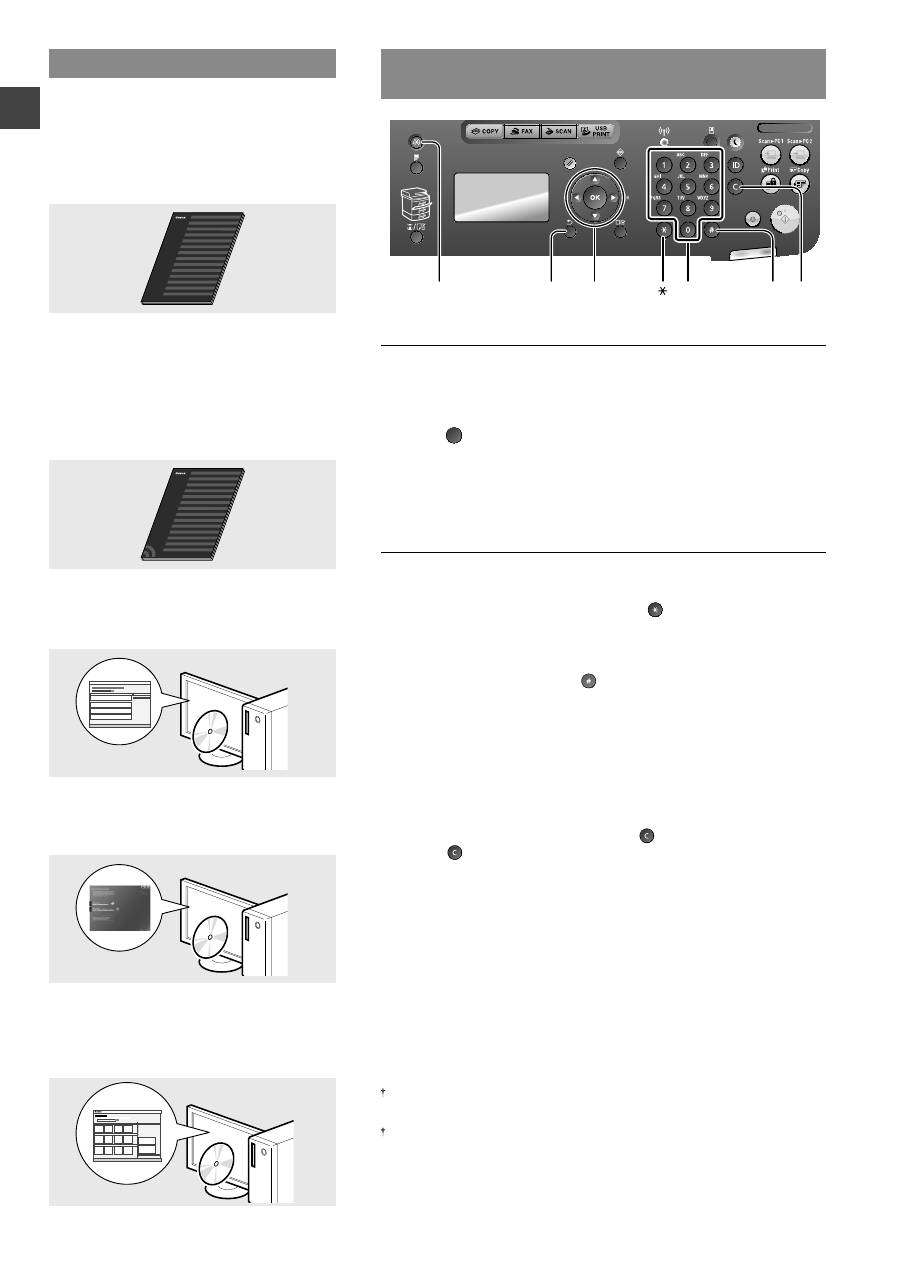
En
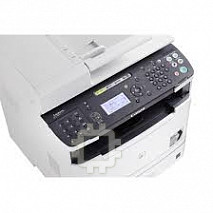
Navigating the Menu and Text Input Method
▲▼◀▶
OK
Menu
Back
#
C
Numeric keys
Navigating the Menu
Item selection or moving the cursor among the menu items
Select an item with [
▲
] or [
▼
]. Proceed to the next hierarchy with [OK] or
[
▶
]. Return to the previous hierarchy with [
] (Back) or [
◀
].
Setting con
fi
rmation
Press [OK]. However, when <Apply> appears on the display, select
<Apply>, and then press [OK].
Text Input Method
Changing entry mode
Press [
▼
] to select <Entry Mode>, and then press [OK]. You can also
press [ ] (Tone) to change the entry mode.
Entering text, symbols, and numbers
Enter with the numeric keys or [ ] (SYMBOLS).
For details on the switchable mode or the available text, see the next
page.
Moving the cursor (Entering a space)
Move with [
◀
] or [
▶
]. Move the cursor to the end of the text and press [
▶
]
to enter a space.
Deleting characters
Delete with [ ] (Clear). Pressing and holding [ ] (Clear) deletes all
characters.
About the Supplied Manuals
0
Getting Started (This manual):
Read this manual
fi
rst. This manual describes
the installation of the machine, the settings,
and a caution. Be sure to read this manual
before using the machine.
1
Wireless LAN Setting Guide
(MF6180dw Only):
Read this manual with Getting Started.
This manual describes Wireless LAN setup
procedures and causes and countermeasures
for troubles you might face during the setup.
Be sure to read this manual before using the
machine.
2
MF Driver Installation Guide
(User Software and Manuals DVD-ROM):
Read this manual next. This manual describes
software installation.
3
Send Setting Guide
(User Software and Manuals DVD-ROM):
Read this section for how to set Send features.
4
e-Manual
(User Software and Manuals DVD-ROM):
Read the desired chapter to suit your needs. The
e-Manual is categorized by subject to
fi
nd desired
information easily.
Viewing the e-Manual from the DVD-ROM
1 Insert the User Software and Manuals DVD-ROM in your computer.
2 Click [Manuals].
3 Click [e-Manual].
Depending on the operating system you are using, a security protection message
appears.
If the User Software and Manuals DVD-ROM has been already inserted in your
computer and [Manuals] is not displayed, remove the DVD-ROM and insert it
again.
11
En
Attach the Optional Cassette to the Machine
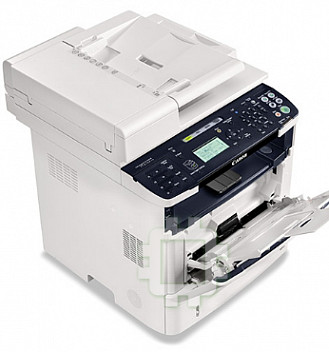
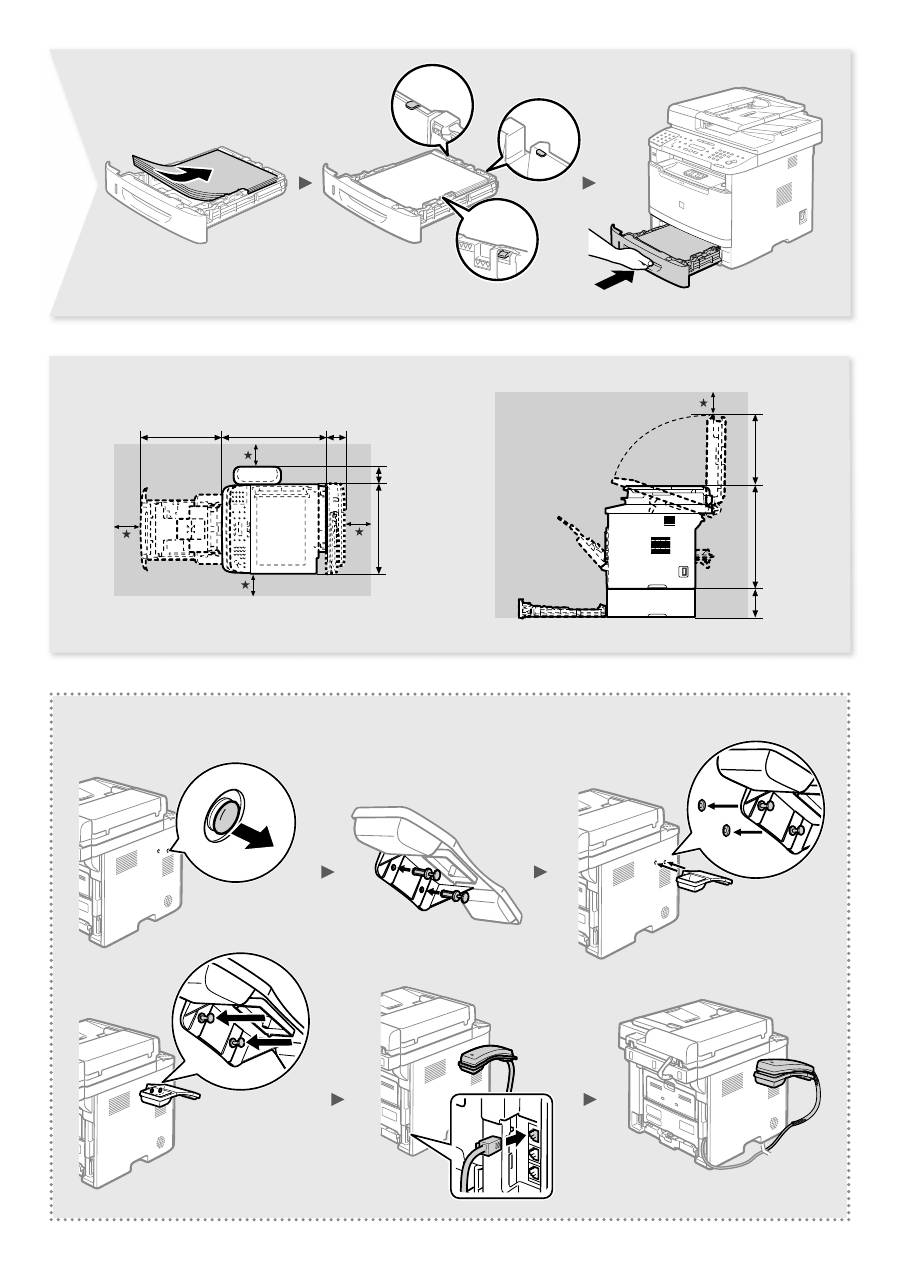
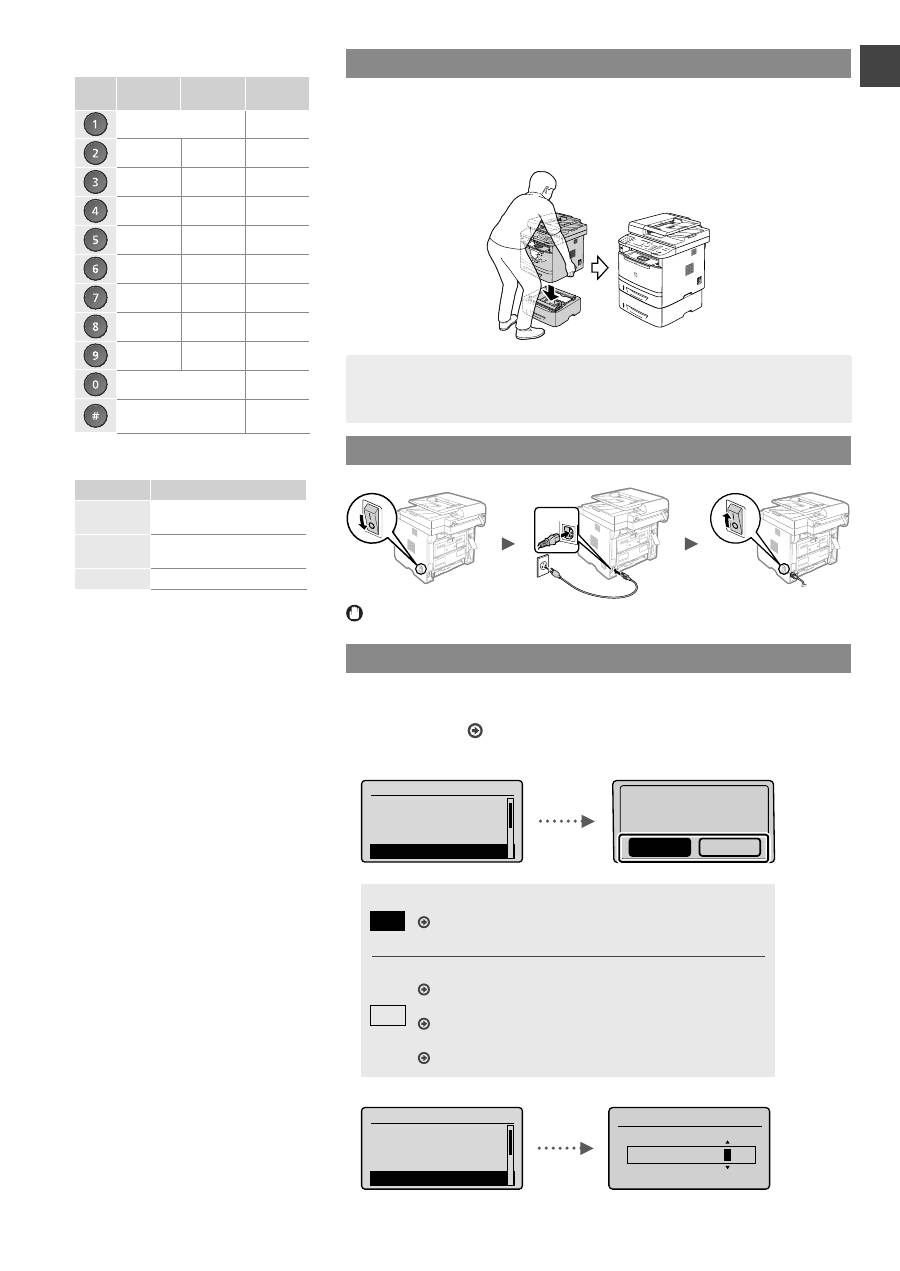
Take the drawer from the carton, and remove all packing materials, including
shipping tape before attaching the optional drawer to the main unit. Make sure the
main unit and the optional drawer are facing in the same direction when being
attached.
NOTE
• When moving the main unit, be sure to carry it from front side by using the
provided hand grips on the left and right sides, as seen in the illustration.
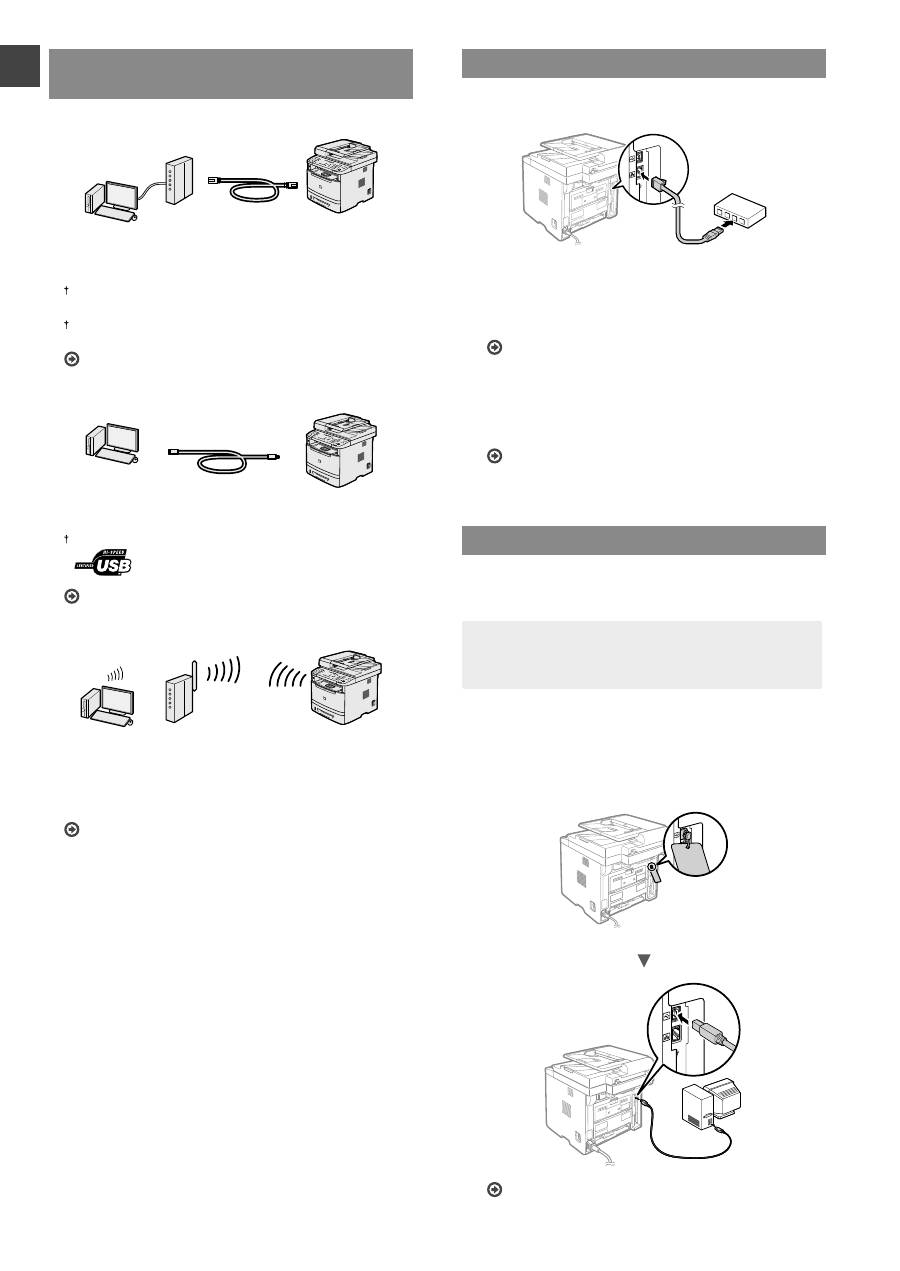
Connecting the Power Cord and Turning ON the Power
(2)
(1)
Do not connect the USB cable at this time. Connect it when installing software.
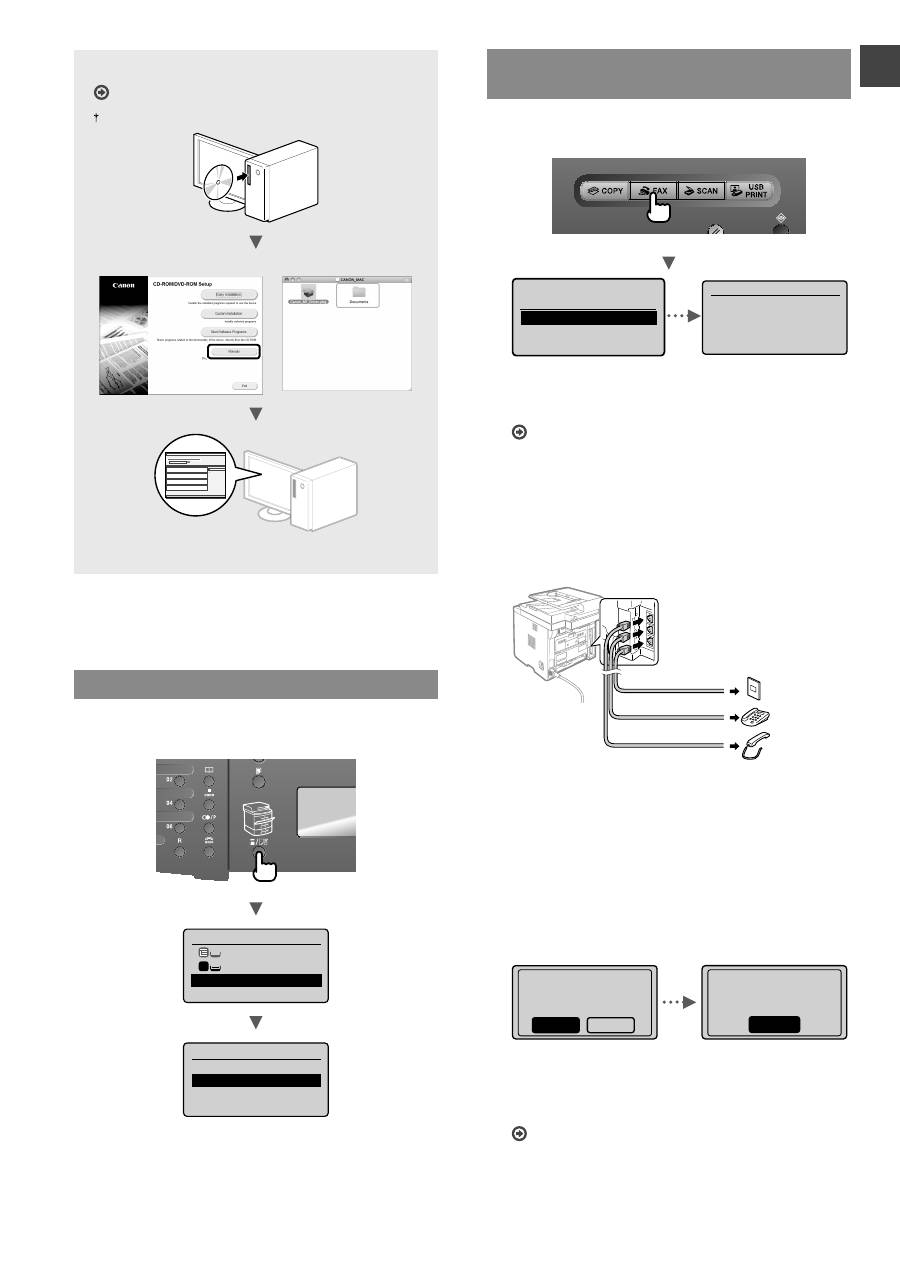
Specifying the Initial Settings
Follow the instructions on the screen, set the language and time. For details on
navigating the menu and how to input the numbers, see “Navigating the Menu and
Text Input Method” ( P.10).
●
MF6180dw
Language
Czech
Danish
Dutch
English
Use wireless LAN to
connect computer?
(Can config. later.)
No
Yes
Yes
No
Connect to the computer via a wireless LAN immediately
Start from step 4 of “Setting Wireless LAN” in the Wireless
LAN Setting Guide
Connect to the computer via a wireless LAN later
Refer to the Wireless LAN Setting Guide.
Connect to the computer via a wired LAN
Proceed to “Connecting via a Wired LAN” (P.12).
Connect to the computer via a USB cable
Proceed to “Connecting via a USB Cable” (P.12).
●
MF6140dn
Language
Czech
Danish
Dutch
English
Current Time Settings
01/01/2013 12:5
2
AM
Entering text, symbols, and numbers
Entry mode:
<A>
Entry mode:
<a>
Entry mode:
<12>
@ . - _ /
1
ABC
abc
2
DEF
def
3
GHI
ghi
4
JKL
jkl
5
MNO
mno
6
PQRS
pqrs
7
TUV
tuv
8
WXYZ
wxyz
9
(Not available)
0
- . * # ! “ , ; : ^ ` _ = / | ‘ ? $
@ % & + \
˜
( ) [ ] { } < >
(Not
available)
Changing entry mode
Entry mode
Available text
<A>
Uppercase alphabetic letters
and symbols
<a>
Lowercase alphabetic letters
and symbols
<12>
Numbers
12
En
Choosing the Method to Connect the
Machine to the Computer
●
Connecting via a Wired LAN
You can connect the machine to the computer through a
wired router. Use the LAN cables to connect the machine
to the wired router (access point).
Make sure that there is an available port in the router to connect
the machine and the computer.
Have a LAN Cable of Category 5 twisted-pair cable or higher
ready.
See “Connecting via a Wired LAN”
●
Connecting via a USB cable
You can connect the machine to the computer using a
USB cable.
Make sure that the USB cable you use has the following mark.
See “Connecting via a USB Cable”
●
Connection via a Wireless LAN (MF6180dw Only)
You can connect the machine to the computer through
a wireless router*. Since it is connected to wireless, no
LAN cables are needed.
* A wireless router (access point), which supports IEEE802.11b/
g/n, is required.
See the Wireless LAN Setting Guide.
If you do not sure whether your router is wireless or
wired:
See the instruction manual provided with your network
device, or contact the manufacturer.
Connecting via a Wired LAN
1
Connect the LAN cable.
The IP address will be automatically con
fi
gured in 2
minutes. If you want to set the IP address manually, see
the following items.
e-Manual “Network Settings”
▶
“Basic Network
Settings”
▶
“Setting the IP Address”
2
Install the driver and software using the User
Software and Manuals DVD-ROM.
Proceed to “Setting a Paper Size and Type” (P.13).
Connecting via a USB Cable
Connect the USB cable after installing the MF Drivers and
the MF Toolbox.
NOTE
• If you connected the USB cable before installing the
MF drivers, refer to the MF Driver Installation Guide.
1
Install the driver and software using the User
Software and Manuals DVD-ROM.
2
Connect the USB cable.
Proceed to “Setting a Paper Size and Type” (P.13).
13
En
For details on the installation procedures:
See the MF Driver Installation Guide
You can also download the driver from the Canon website.
Windows
Macintosh
Setting a Paper Size and Type
Follow the instructions on the screen, set the paper size
and type.
Select Paper
MP Tray
A4:Plain
Paper Settings
1
Paper Settings
Multi-Purpose Tray
Drawer 1
Drawer 2
Register Custom Paper
Specifying Initial Fax Settings and
Connecting a Telephone Cable
1
Specify the initial fax settings.
Perform fax setup?
Set up Now
Set up Later
Connect phone line.
Follow illustrations
on the next screen:
Connect line to A.
*Next : Press OK
Follow the “Fax Setup Guide” to specify a fax number, a
unit name, and a receive mode. For more details on the
receive mode, see the e-Manual.
e-Manual “Fax”
▶
“Using the Fax Functions”
▶
“Receiving Faxes”
▶
“RX Mode”
How to use a username
When you send a document, the sender information
that you registered is printed on the recipient’s paper.
2
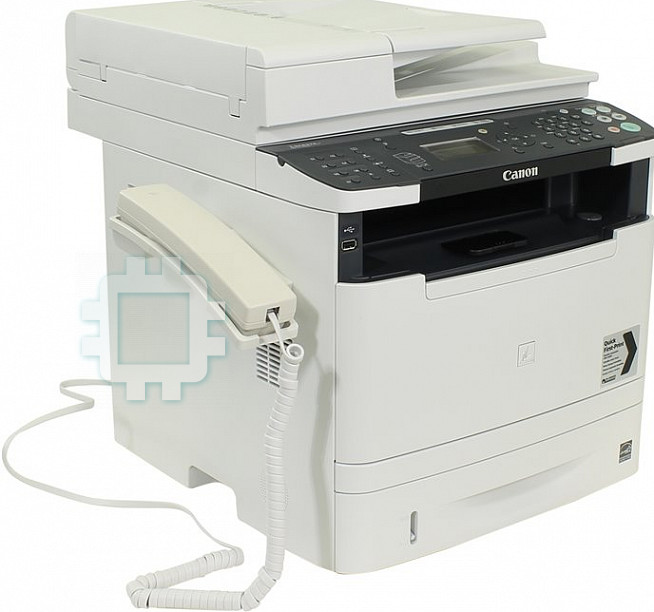
Connect a telephone cable.
Handset (option)
Telephone line connector
Telephone
(C)
(B)
(A)
When <Connect phone line.> appears on the display,
connect the telephone cable by referring to the
illustration.
When installing the optional handset:
For more details, see the supplied manual with the
handset.
3
Exit the Fax Setup Guide, and then restart the
machine.
End Fax Setup
Guide?
No
Yes
OK
Turn the main power
OFF and ON to apply
settings.
Turn OFF the machine and wait for at least 10 seconds
before turning it ON again. The telephone line types are
not detected automatically. See the e-Manual and set a
telephone line manually.
e-Manual “Fax”
▶
“Using the Fax Functions”
▶
“Changing Fax Settings (Settings that Can Be Speci
fi
ed
Using the [Menu] Button)”
▶
“Con
fi
guring Send
Settings”
▶
“Select Line Type”
14
En
* Windows XP/Vista/7/8 Only
Perform Useful Tasks
You can use various functions in this machine. Following functions are the overview of the main functions that you can use
routinely.
Copy
Enlarged/Reduced Copies
You can enlarge or reduce standard
size documents to copy on standard
size paper or specify the copy ratio in
percentage.
2-Sided Copying
You can copy 1-sided documents on
both sides of paper.
Collating
You can sort copies into sets
arranged in page order.
Reduced Layout
You can reduce multiple documents
to copy them onto one sheet.
2 on 1
4 on 1
Copying ID Card
You can make a copy of a 2-sided
card onto one side of paper.
Fax
Sending a Document Directly from
a Computer (PC Fax)
In addition to the normal sending and
receiving faxes, you can use the PC
fax.
Sending
You can register fax destinations in
the address book. You can specify the
destinations using various methods,
enabling you to send documents
quickly and easily.
•
Destination search
•
One-touch keys
•
Coded dialing
•
Destination Group
•
LDAP server
•
Specifying from the sending history
•
Sequential broadcast
•
Delayed sending
Receiving
●
Receiving in the memory
You can store the received
documents in the memory. You can
print the stored documents at any
time, and if you do not need them, you
can delete them.
●
Remote Receiving
If an external telephone is connected,
you can switch to the fax receiving
mode immediately by dialing the ID
number for fax receiving using the
dial buttons of the telephone during a
phone call.
Enlarged/Reduced Printing
2-Sided Printing
Reduced Layout
You can reduce multiple documents
to print them onto one sheet.
2 on 1
4 on 1
Booklet Printing
Poster Printing
Watermark Printing
Displaying a Preview before
Printing
Selecting a “Pro
fi
le”
Network Settings
This machine comes equipped with
a network interface that you can
construct a network environment easily.
You can print a document, use the PC
fax, and use the network scan from all
computers which are connected with
the machine. The machine supports to
increase work e
ffi
ciency as a shared
machine in the o
ffi
ce.
Scan
Saving the Documents Using the
Operation Panel of the Machine
1
3
Documents
Data
2
Saving the Documents Using
Operations from a Computer
●
Scanning with the MF Toolbox
1
2
3
Data
Documents
●
Scanning from an Application
●
Scanning with the WIA Driver*
Saving in a USB Memory
You can save scanned documents
in a USB memory connected to the
machine.
Documents
Data
Emailing scanned documents
You can send scanned documents to
your e-mail application.
Documents
Data E-mail
+
Sending scanned documents to a
fi
le server
You can send scanned documents to
a
fi
le server.
Documents
Data
File server
Remote UI
You can understand the condition
of the machine from the computers
on the network. You can access the
machine and manage jobs or specify
various settings via network.
15
En
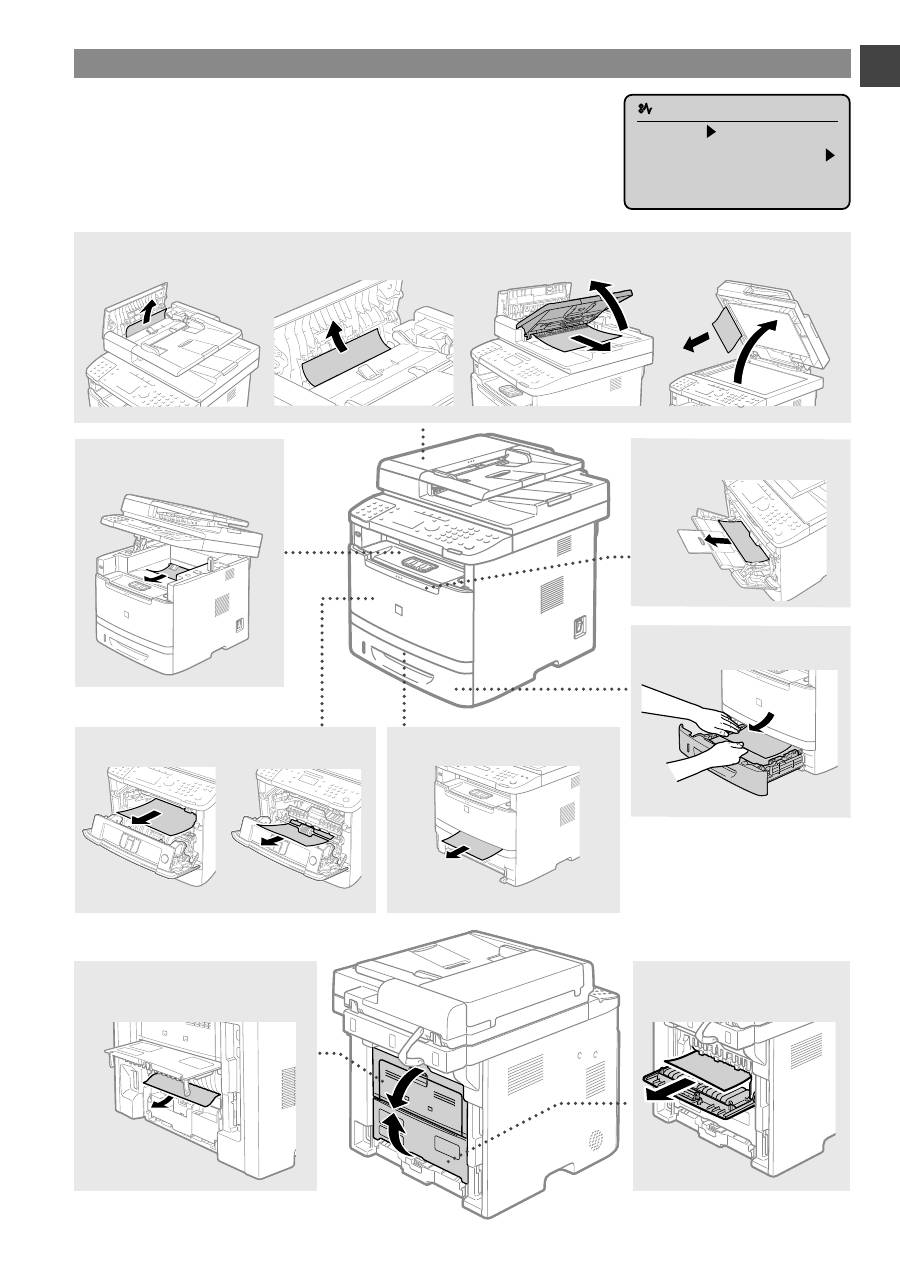
Clearing Paper Jams
If the following screen appears, a paper jam has occurred in the feeder or inside
the machine. Follow the procedure displayed on the screen to remove the jammed
document or paper. This manual indicates only areas where paper jams occur. For
details on each function, see the e-Manual.
Paper jam.
Press [ ] to
display steps.
Duplex unit
Back Cover
Output Area
Front Cover
2-sided Transport Guide
Multi-purpose tray
Paper Drawer
Feeder
16
En
Replacing Toner Cartridge
Toner cartridges are consumables. When the toner becomes nearly empty or has run out completely in the middle of a job run,
a message appears on the screen, or the following problems may occur. Take the appropriate action accordingly.
When a Message Appears
When the toner becomes nearly empty in the middle of a job run, a message appears on the screen.
Message
When the message is
displayed on the screen
Description and Solutions
<Prepare toner
cartridge.>
When the toner cartridge
needs a replacement
soon.
Shake the toner cartridge to evenly distribute the toner inside the cartridge.
e-Manual “Before Replacing the Toner Cartridge”
We recommend that the toner cartridge be replaced before printing high-
volume documents.
e-Manual “Replacing the Toner Cartridge”
When white streaks appear on the output, or the output is partially faded:
When white streaks appear on the output or the output is partially faded, the toner cartridge has almost reached the end of
its life, even if no message appears on the screen. When the print quality becomes unacceptable, see the following to
fi
x the
problem.
When White Streaks Appear on the Output or the Output Is Partially Faded
When the toner nearly runs out, white streaks appear on the output, or the output is partially faded.
No message appears on the screen, if the toner nearly runs out.
Replace the toner cartridge when white streaks appear on the
output, or the output is partially faded.
Do not perform <Copy Image Adjustment> in such situations
above. Even you try to adjust using this function, the condition
may not be improved.
When this problem occurs:
Follow the steps in the procedure below before replacing the toner cartridge. The machine continues printing until the toner runs
out completely.
e-Manual “Before Replacing the Toner Cartridge”
When the print quality is still unacceptable:
If the problem persists after you have followed the steps in the procedure below, replace the toner cartridge.
e-Manual “Replacing the Toner Cartridge”

17
En

18
En
Symbols Used in This Manual
WARNING
Indicates a warning concerning operations that may lead to death
or injury to persons if not performed correctly. To use the machine
safely, always pay attention to these warnings.
CAUTION
Indicates a caution concerning operations that may lead to injury to
persons if not performed correctly. To use the machine safely, always
pay attention to these cautions.
IMPORTANT
Indicates operational requirements and restrictions. Be sure to read
these items carefully to operate the machine correctly, and avoid
damage to the machine or property.
Keys and Buttons Used in This Manual
The following symbols and key names are a few examples of how
keys to be pressed are expressed in this manual.
• Operation panel keys: [Key icon] + (Key name)
Example: [ ] (Stop)
• Display: <Specify destination.>
• Buttons and items on the computer display: [Preferences]
Illustrations and Displays Used in This Manual
Illustrations and displays used in this manual are which of MF6180dw
unless speci
fi
ed.
Important Safety Instructions
Please read the “Important Safety Instructions” in this manual and in
the e-Manual thoroughly before operating the machine.
As these instructions are intended to prevent injury to the user and
other persons or to prevent destruction of property, always pay
attention to these instructions and operational requirements.
Please note that you are responsible for all damages caused by
failure to follow the directions provided herein, using the device for
any purpose for which it was not intended, or repairs or alterations
made by anyone other than a Canon-approved technician.
Installation
WARNING
• Do not install the machine near
fl
ammable substances such as
alcohol-based products or paint thinners. If these substances
come in contact to the electrical parts inside the machine could
ignite these substances and cause a
fi
re or increase your risk of
electric shock.
• Do not place necklaces and other metal objects or containers
fi
lled with liquid on the machine. If foreign substances come into
contact with electrical parts inside the machine, this may result in
a
fi
re or electrical shock.
If any of these substances falls into the machine, turn o
ff
the
power to the machine immediately and contact your local Canon
dealer.
• Do not use near any medical equipment. Radio wave emitted from
this machine may interfere with medical equipments, which may
result in serious accidents.
CAUTION
• Do not install the machine in the following locations. Doing so may
result in personal injury,
fi
re or electrical shock.
−
Unstable location
−
A location subject to excessive vibrations
−
A location where block the ventilation slots (too close to walls,
bed, shaggy rug, and other similar objects)
−
A damp or dusty location
−
A location exposed to direct sunlight or an outside place
−
A location subject to high temperatures
−
A location near open
fl
ames
−
A location with poor ventilation system
• Although ozone is generated from the machine during operation,
it does not have any a
ff
ect on the human body. However, if you
intend to use the machine for long periods of time, ensure that the
installation location is well ventilated.
• Do not connect unapproved cables to this machine. Doing so may
result in a
fi
re or an electric shock.
• Machines with a hard disk may not operate properly when used at
high altitudes of about 3,000 meters above sea level, or higher.
Power Supply
WARNING
• Do not use power cords other than the one provided, as this can
result in a
fi
re or electrical shock.
• Do not modify or bend the power cord and do not pull on it with
great force. Do not place heavy objects on the power cord.
Damaging the power cord may result in a
fi
re or an electric shock.
• Do not plug or unplug the power plug with wet hands, as this can
result in electrical shock.
• Do not use extension cords or multi-plug power strips with this
machine. Doing so may result in a
fi
re or electric shock.
• Do not bundle up or tie up the power cord in a knot, as this can
result in a
fi
re or electrical shock.
• Insert the power plug completely into the AC power outlet. Failure
to do so can result in a
fi
re or electrical shock.
• Remove the power plug completely from the power outlet during a
thunder storm. Failure to do may result in a
fi
re, electric shock, or
malfunction.
CAUTION
• Use only a power supply that meets the voltage requirements
listed herein. Failure to do so may result in a
fi
re or electric shock.
• Do not obstruct the power outlet where this machine is connected,
so that you can unplug the power cord easily in an emergency.
Handling
WARNING
• Do not disassemble or modify the machine. There are high-
temperature and high-voltage components inside the machine
which may result in a
fi
re or electrical shock.
• Do not allow children to touch or play with the power cord and
cables or internal or electrical parts. Doing so may result in serious
personal injury.
• Please contact an authorized Canon dealer if the machine makes
an unusual noise, emits an unusual smell, or emits smoke or
excessive heat. Continued use may result in a
fi
re or electric
shock.
• Do not use
fl
ammable sprays near the machine. If
fl
ammable
substances come into contact with electrical parts inside the
machine, this may result in a
fi
re or electric shock.

19
En
CAUTION
• For your safety, please unplug the power cord if the machine will
not be used for a long period of time.
• Use caution when opening and closing covers to avoid injury to
your hands.
• Keep hands and clothing away from the rollers in the output
area. If the rollers catch your hands or clothing, this may result in
personal injury.
• The inside of the machine and the output slot is very hot during
and immediately after use. Avoid contact with these areas to
prevent burns. Also, printed paper may be hot immediately after
being output, so use caution when handling it. Failure to do so
may result in burns.
Maintenance and Inspections
WARNING
• Turn o
ff
the machine and unplug the power cord from the outlet
before cleaning. Failure to do so may result in a
fi
re or an electric
shock.
• Unplug the power plug from the power outlet periodically and
clean the area around the base of the power plug’s metal pins and
the power outlet with a dry cloth to remove dust and grime. When
damp, accumulated dust may cause short circuiting or
fi
res.
• Use a damp, well wrung-out cloth to clean the machine. Dampen
cleaning cloths with water only. Do not use alcohol, benzenes,
paint thinners, or other
fl
ammable substances. If these substances
come into contact with electrical parts inside the machine, this
may result in a
fi
re or electric shock.
• Check the power cord and plug regularly for damage. Check the
machine for rust, dents, scratches, cracks, or excessive heat
generation. Use of poorly-maintained equipment may result in a
fi
re or electric shock.
Consumables
WARNING
• Do not dispose of used toner cartridges in open
fl
ames. This may
cause an ignition, and result in burns or
fi
re.
• If you accidentally spill or scatter toner, carefully wipe up the loose
toner with a damp, soft cloth and avoid inhaling any toner dust.
Never use a vacuum cleaner to clean up loose toner. Doing so
may cause a malfunction in the vacuum cleaner or result in a dust
explosion due to static discharge.
CAUTION
• Keep the toner cartridges and other consumables out of the reach
of small children. If toner is ingested, consult a physician or poison
control center immediately.
• Do not attempt to disassemble the toner cartridge. The toner may
scatter and get into your eyes or mouth. If toner gets into your eyes
or mouth, wash them immediately with cold water and consult a
physician.
• If toner spills from the toner cartridge, avoid inhaling it or allowing
it to come into contact with your skin. If the toner comes into
contact with your skin, wash immediately with soap. If you inhale
the toner or your skin becomes irritated due to contact with the
toner, consult a physician or poison control center immediately.
Others
WARNING
• If you are using a cardiac pacemaker:
This machine generates a low level magnetic
fi
eld. If you feel any
abnormalities in your body while using this machine, please move
away from the machine and consult your physician immediately.
Legal Notices
Legal Limitations on Usage of Your Product
and the Use of Images
Using your product to scan, print or otherwise reproduce certain
documents, and the use of such images as scanned, printed or
otherwise reproduced by your product, may be prohibited by law
and may result in criminal and/or civil liability. A non-exhaustive list of
these documents is set forth below. This list is intended to be a guide
only. If you are uncertain about the legality of using your product to
scan, print or otherwise reproduce any particular document, and/or
of the use of the images scanned, printed or otherwise reproduced,
you should consult in advance with your legal advisor for guidance.
−
Paper Money
−
Traveler’s Checks
−
Money Orders
−
Food Stamps
−
Certi
fi
cates of Deposit
−
Passports
−
Postage Stamps (canceled or uncanceled)
−
Immigration Papers
−
Identifying Badges or Insignias
−
Internal Revenue Stamps (canceled or uncanceled)
−
Selective Service or Draft Papers
−
Bonds or Other Certi
fi
cates of Indebtedness
−
Checks or Drafts Issued by Governmental Agencies
−
Stock Certi
fi
cates
−
Motor Vehicle Licenses and Certi
fi
cates of Title
−
Copyrighted Works/Works of Art without Permission of
Copyright Owner
Considerable e
ff
ort has been made to make sure that the manuals
for the machine are free of inaccuracies and omissions. However,
as we are constantly improving our products if you need an exact
speci
fi
cation, please contact Canon.
20
Fr
Navigation dans le menu et méthode de saisie du
texte
▲▼◀▶
OK
Menu
Préc.
#
C
Clavier numérique
Navigation dans le menu
Sélection des options ou déplacement du curseur dans les
options de menu
Sélectionnez une option à l’aide de [
▲
] ou [
▼
]. Passez à la hiérarchie
suivante à l’aide de [OK] ou [
▶
]. Passez à la hiérarchie précédente à
l’aide de [
] (Préc.) ou [
◀
].
Validation des réglages
Appuyez sur [OK]. Cependant, lorsque <Appliquer> s’a
ffi
che à l’écran,
sélectionnez <Appliquer>, et appuyez sur [OK].
Méthode de saisie du texte
Modi
fi
cation du mode de saisie
Appuyez sur [
▼
] pour sélectionner <Mode de saisie>, et appuyez sur
[OK]. Vous pouvez également appuyer sur [ ] (Tonalité) pour modi
fi
er
le mode d’entrée.
Saisie de texte, de symboles et de chi
ff
res
Utilisez le clavier numérique ou [ ] (SYMBOLES).
Pour en savoir plus sur le changement de mode ou le texte disponible,
reportez-vous à la page suivante.
Déplacement du curseur (ajout d’un espace)
Déplacez-vous à l’aide de [
◀
] ou [
▶
]. Déplacez le curseur à la
fi
n du
texte, puis appuyez sur [
▶
] pour ajouter un espace.
Suppression de caractères
Supprimez un caractère en appuyant sur [ ] (E
ff
acement). Maintenez
la touche [ ] (E
ff
acement) enfoncée pour e
ff
acer tous les caractères.
A propos des manuels fournis
0
Mise en route (ce manuel) :
Commencez par lire ce manuel. Il explique
comment installer et con
fi
gurer la machine, et
indique les précautions à suivre. Veillez à bien
lire ce manuel avant d’utiliser la machine. Veillez
à lire ce manuel avant d’utiliser la machine.
1
Guide des paramètres du réseau sans
fi
l
(MF6180dw uniquement) :
Lisez ce manuel avec Mise en route. Ce
manuel décrit les procédures de con
fi
guration
du réseau sans
fi
l ainsi que les causes et les
remèdes aux problèmes auxquels vous pourriez
être confronté pendant la con
fi
guration. Veillez à
lire ce manuel avant d’utiliser la machine.
2
Guide d’installation du pilote MF
(User Software and Manuals DVD-ROM) :
Vous devez ensuite lire ce manuel. Il explique
comment installer le logiciel.
3
Guide des réglages d’envoi
(User Software and Manuals DVD-ROM) :
Consultez cette section pour savoir comment
con
fi
gurer les fonctions d’envoi.
4
Manuel électronique
(User Software and Manuals DVD-ROM) :
Lisez le chapitre de votre choix. Le manuel
électronique est divisé en rubriques a
fi
n de
faciliter la recherche d’informations.
A
ffi
chage du manuel électronique depuis le DVD-ROM
1 Insérez le DVD-ROM “User Software and Manuals” dans le lecteur de
votre ordinateur.
2 Cliquez sur [Voir les manuels].
3 Cliquez sur [Manuel électronique].
En fonction de votre système d’exploitation, un message d’avertissement de
sécurité apparaît parfois.
Si le DVD-ROM “User Software and Manuals” a déjà été inséré dans l’ordinateur
et que [Voir les manuels] ne s’a
ffi
che pas, retirez le DVD-ROM et insérez-le à
nouveau.


