Canon i-SENSYS MF5980dw: instruction
Class: Office Equipment
Type:
Manual for Canon i-SENSYS MF5980dw
Table of contents
- Starter Guide
- Check! Check!
- Option
- English
- English Contents
- English About the Supplied Manuals
- English Navigating the Menu and Text Input Method
- English Attach the Optional Drawer to the Main Unit English
- English Connecting the Power Cord and Turning ON the Power English Specifying the Initial Settings
- English Setting a Paper Size and Type
- English Specifying Initial Fax Settings and Connecting a Telephone Cable
- English
- Selecting the method for connecting to the machine English
- English Connecting to Wired LAN
- English Installing the Driver/Software
- Copy Perform Useful Tasks
Starter Guide
English
Read this guide first.
Please read this guide before operating this product.
After you finish reading this guide, store it in a safe
place for future reference.
Základní příručka
Česky
Nejdříve si přečtěte tuto příručku.
Před spuštěním zařízení si přečtěte tuto příručku.
Po přečtení příručku uložte na bezpečném místě,
abyste ji měli v budoucnu k dispozici.
Upute za početak korištenja
Hrvatski
Najprije pročitajte ovaj priručnik.
Prije korištenja proizvoda pročitajte ove upute.
Kad upute pročitate, spremite ih na sigurno mjesto radi
buduće upotrebe.
Руководство по началу работы
Русский
Сначала прочитайте это руководство.
Перед началом работы с данным изделием
ознакомьтесь с этим руководством.
Ознакомившись с руководством, храните его в
надежном месте для использования в качестве
справочника.
Başlangıç Kılavuzu
Türkçe
Önce bu kılavuzu okuyun.
Bu ürünü çalıştırmadan önce lütfen bu kılavuzu okuyun.
Bu kılavuzu okuduktan sonra, gelecekte başvuruda
bulunmak üzere güvenli bir yerde saklayın.
Startvejledning
Dansk
Læs denne vejledning først.
Læs denne vejledning, inden du tager produktet i brug.
Når du har læst vejledningen, skal du gemme den et
sikkert sted til senere brug.
Guía de inicio
Español
Lea en primer lugar esta guía.
Lea esta guía antes de utilizar el producto.
Una vez que haya terminado de leer la guía, guárdela
en un lugar seguro para consultarla en el futuro.
Guide de démarrage
Français
Lisez ce guide en premier.
Lisez ce guide avant d’utiliser le produit.
Une fois que vous aurez lu ce guide, stockez-le dans
un endroit sûr pour pouvoir y revenir ultérieurement.
Telepítési kézikönyv
Magyar
Először ezt az útmutatót olvassa el.
Olvassa el ezt a kézikönyvet a termék használata előtt.
Az elolvasás után gondosan őrizze meg.
Ghid de punere rapidă în funcţiune
Română
Citiţi mai întâi acest ghid.
Vă rugăm să citiţi acest ghid înainte de utilizarea
acestui produs.
După ce terminaţi de citit acest ghid, păstraţi-l într-un
loc sigur, pentru referinţă viitoare.
Початок роботи
Українська
Спочатку прочитайте цей посібник.
Будь ласка, прочитайте цей посібник перед
початком роботи з виробом.
Прочитавши цей посібник, зберігайте його в
безпечному місці для використання в майбутньому.
Darba sākšanas rokasgrāmata
Latviešu
Vispirms izlasiet šo rokasgrāmatu.
Pirms iekārtas izmantošanas, lūdzu, izlasiet šo
rokasgrāmatu.
Pēc izlasīšanas rokasgrāmatu nolieciet drošā vietā, lai
to varētu izmantot arī turpmāk.
Startveiledning
Norsk
Les denne veiledningen først.
Les denne veiledningen før du bruker produktet.
Oppbevar veiledningen på et trygt sted etter du har lest
den, slik at du kan finne den igjen senere.
Beknopte handleiding
Nederlands
Lees eerst deze handleiding.
Lees deze handleiding zorgvuldig door voordat u het
product gaat gebruiken.
Bewaar de handleiding na het doorlezen op een veilige
plaats, zodat u deze later nog kunt raadplegen.
Guida all’avvio
Italiano
Leggere prima questa guida.
Leggere la presente guida prima di utilizzare il prodotto.
Dopo averla letta, conservare questa guida in un luogo
sicuro per poterla consultare in futuro.
Przewodnik wprowadzający
Polski
Należy najpierw przeczytać niniejszy podręcznik.
Przed rozpoczęciem pracy z urządzeniem należy
przeczytać niniejszy podręcznik.
Po przeczytaniu instrukcji należy ją przechowywać
w bezpiecznym miejscu, na wypadek gdyby była
potrzebna w przyszłości.
Začetna navodila
Slovenščina
Najprej preberite ta priročnik.
Pred uporabo izdelka preberite ta navodila.
Ko jih preberete, jih shranite na varno mesto za
prihodnjo uporabo.
ةيبرعلا
ليغشتلا ءدب ليلد
.ًلاوأ ليلدلا اذه أرقا
.جتنملا اذه ليغشت لبق ليلدلا اذه ةءارق ءاجرلا
،هتءارق نم ءاهتنلاا دعبو
.لبقتسملا يف هيلإ عوجرلل نمآ ناكم يف هعض
Pradinė instrukcija
Lietuviškai
Pirma perskaitykite šią instrukciją.
Prieš naudodami produktą, perskaitykite šią instrukciją.
Perskaitę šią instrukciją, ją saugiai pasidėkite, kad
galėtumėte naudotis ateityje.
Aloitusopas
Suomi
Lue tämä opas ensin.
Lue tämä opas ennen tuotteen käyttämistä.
Kun olet lukenut oppaan, säilytä se myöhempää
käyttöä varten.
Manual Inicial
Português
Leia este manual primeiro.
Leia este manual antes de utilizar o produto.
Após ter lido o manual, guarde-o num local seguro
para consultas futuras.
Handbuch für Starter
Deutsch
Lesen Sie zuerst dieses Handbuch.
Lesen Sie dieses Handbuch, bevor Sie dieses Produkt in Betrieb nehmen.
Bewahren Sie dieses Handbuch nach dem Lesen als zukünftige Referenz
gut auf.
Úvodná príručka
Slovensky
Túto príručku si prečítajte ako prvú.
Skôr ako začnete zariadenie používať, si prečítajte túto
príručku.
Po prečítaní skladujte príručku na bezpečnom mieste,
aby ste ju mohli použiť aj v budúcnosti.
Кратко ръководство
Български
Прочетете първо това ръководство.
Прочетете това ръководство, преди да започнете
работа с продукта.
След като прочетете ръководството, го съхранявайте на
удобно място, за да го използвате за бъдещи справки.
یسراف
راک هب زاغآ یامنهار
.دينک هعلاطم ار امنهار هچرتفد نيا ادتبا
.دينک هعلاطم ار امنهار هچرتفد نيا لوصحم نيا اب ندرک راک زا لبق ًافطل
لحم رد ار نآ یدعب یاه هدافتسا یارب ،امنهار نيا لماک هعلاطم زا سپ
.دينک یرادهگن ینما
Alustusjuhend
Eesti
Lugege esmalt seda juhendit.
Tutvuge enne toote kasutamist hoolikalt selle
juhendiga.
Kui olete juhendi läbi lugenud, pange see edasiseks
kasutamiseks käepärasesse kohta.
Starthandbok
Svenska
Läs den här handboken först.
Läs handboken innan du använder produkten.
Spar handboken för framtida bruk när du har läst den.
Οδηγός πρώτων βημάτων
Ελληνικά
Διαβάστε πρώτα αυτόν τον οδηγό.
Πριν λειτουργήσετε το προϊόν, διαβάστε αυτό τον
οδηγό.
Αφού ολοκληρώσετε την ανάγνωση του οδηγού,
φυλάξτε τον σε ασφαλές σημείο για να μπορείτε να
ανατρέξετε σε αυτόν στο μέλλον.
Check!
Check!
100 mm
795 mm
1279mm
590 mm
100 mm
100 mm
100 mm
100 mm
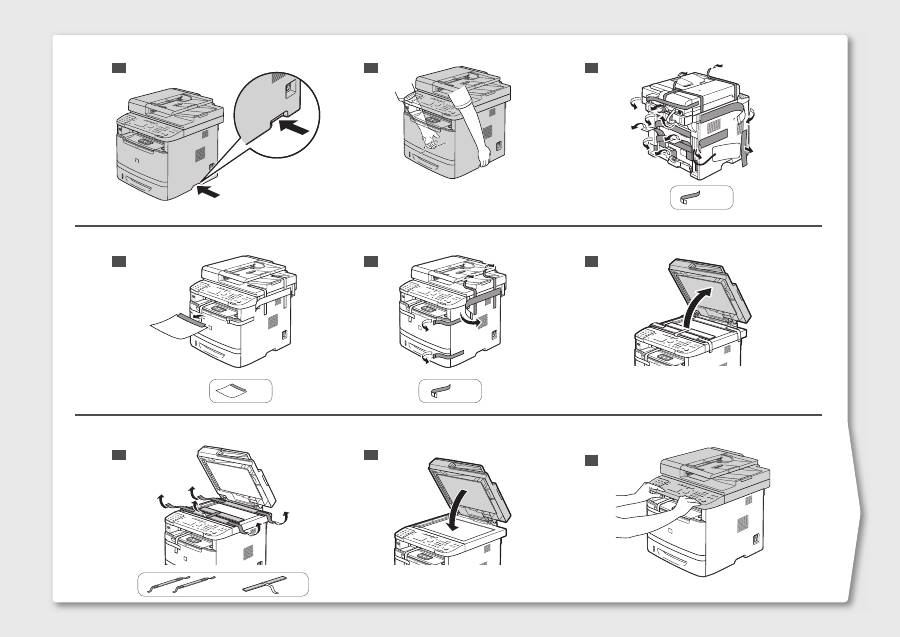
1
2
4
3
5
x 12
x 5
x 1
6
7
8
x 2
x 1
9
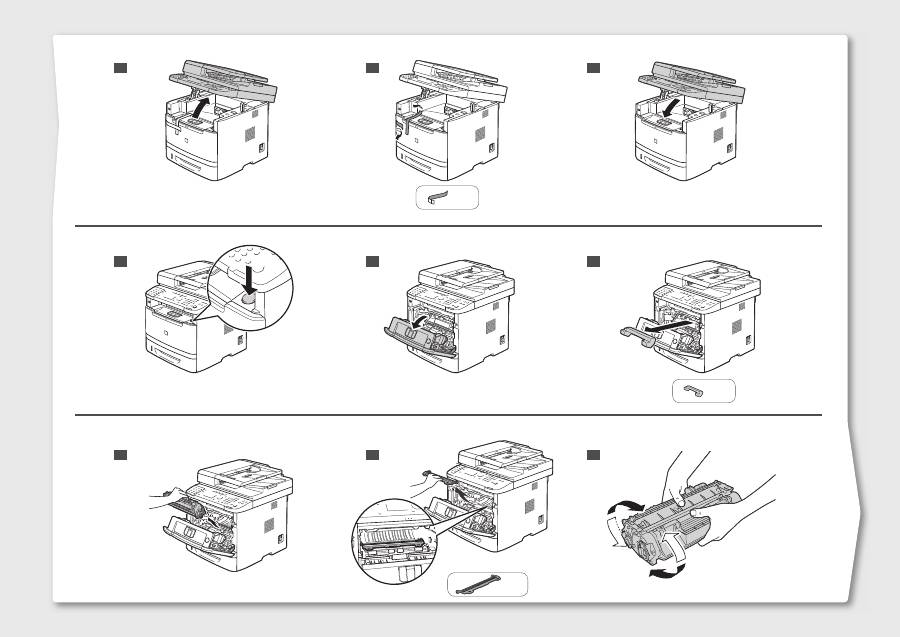
14
15
16
17
18
x 1
x 1
13
12
10
11
x 2

19
20
21
22
23
x 1
24
25
26
Option
Installing the Handset
5
6
7
2
3
1
4

English Français
Italiano Deutsch
Česky Magyar
Polski Slovensky
Hrvatski Română
S
lo
ve
nš
či
na
Б
ъ
лг
ар
ск
и
Русский Українська
Türkçe Latviešu
Lietuviškai
Eesti
Dansk Norsk
Suomi Svenska
Español Nederlands
Português Ελληνικά
یسراف ةي
برعلا
English
Settings for the Machine and Software Installation
Next, specify the settings for the machine and install software. See the language tab page on the right.
Français
Paramètres pour l’installation de la machine et du logiciel
Spécifiez ensuite les paramètres de la machine et installez le logiciel. Reportez-vous à l’onglet de langue, à droite.
Italiano
Impostazioni della macchina e installazione del software
Selezionare le impostazioni della macchina e installare il software. Vedere la pagina a destra corrispondente alla scheda della lingua.
Deutsch
Einstellungen für das Gerät und Softwareinstallation
Geben Sie als nächstes die Einstellungen für das Gerät an, und installieren Sie die Software. Sie finden das Sprachenregister auf der rechten Seite.
Česky
Nastavení zařízení a instalace softwaru
Poté zvolte nastavení zařízení a nainstalujte software. Stránka karty s jazykem je umístěna vpravo.
Magyar
A készülék beállításainak megadása és szoftvertelepítés
A következő lépésben adja meg a készülék beállításait és telepítse a szoftvert. Tekintse meg a jobb oldalon található nyelvi címke oldalát.
Polski
Ustawienia urządzenia oraz instalacja oprogramowania
Następnie określ ustawienia urządzenia i zainstaluj oprogramowanie. Patrz odpowiednia karta języka po prawej stronie.
Slovensky
Nastavenie zariadenia a inštalácia softvéru
Potom zvoľte nastavenie zariadenia a nainštalujte softvér. Stránka karty s jazykom je umiestnená vpravo.
Hrvatski
Postavke za uređaj i instaliranje softvera
Zatim odredite postavke za uređaj, a potom instalirajte softver. Pogledajte stranicu kartice jezika na desnoj strani.
Română
Setări pentru aparat şi instalarea software-ului
În continuare, specificaţi setările pentru aparat şi instalaţi software-ul. Vezi pagina cu etichete de limbi din partea dreaptă.
Slovenščina
Nastavitve za namestitev naprave in programske opreme
Nato določite nastavitve za napravo in namestite programsko opremo. Oglejte si stran zavihka z jeziki na desni.
Български
Настройки на устройството и инсталиране на софтуера
След това задайте настройките за устройството и инсталирайте софтуера. Вж. страницата с раздела за език дясно.
Русский
Настройки для аппарата и установка программного обеспечения
Далее задайте настройки для аппарата и установите программное обеспечение. См. вкладку для вашего языка справа.
Українська
Параметри для встановлення програмного забезпечення та апарата
Потім вкажіть параметри для апарата та встановіть програмне забезпечення. Див. вкладку зі сторінкою мови з правого боку.
ةيبرعلا
جماربلا تيبثتو زاهجلل تادادعإ
.نيميلا ىلع ةدوجوملا ةغللا بيوبت ةملاع ةحفص رظنا .جماربلا تيبثتب مقو زاهجلا تادادعإ ددح ،كلذ دعب
یسراف
رازفا مرن بصن و هاگتسد تاميظنت
.دينک هعجارم تسار تمس رد نابز هنابز هحفص هب .دينک بصن ار رازفا مرن و هداد ماجنا ار هاگتسد تاميظنت ،سپس
Türkçe
Makine Ayarları ve Yazılım Kurulumu
Ardından, makine ayarlarını belirleyin ve yazılımı kurun. Sağ taraftaki dil sekmesine bakın.
Latviešu
Iekārtas iestatījumi un programmatūras instalēšana
Tālāk norādiet iekārtas iestatījumus un instalējiet programmatūru. Skatiet valodu cilnes lapu, kas atrodas labajā pusē.
Lietuviškai
Aparato ir programinės įrangos diegimo parametrai
Nurodykite aparato parametrus ir įdiekite programinę įrangą. Žr. kalbų skirtuko puslapį dešinėje.
Eesti
Seadme ja tarkvara installisätted
Järgmisena määrake seadme ja tarkvara installisätted.Vaadake paremal asuvat keelte loendit.
Dansk
Maskinindstillinger og softwareinstallation
Angiv derefter maskinindstillingerne, og installer software. Se fanesiden for sprog i højre side.
Norsk
Innstillinger for maskin- og programvareinstallasjon
Angi deretter innstillinger for maskinen, og installer programvaren. Se kategorisiden for språk til høyre.
Suomi
Laitteen asetukset ja ohjelmiston asentaminen
Määritä seuraavaksi laitteen asetukset ja asenna ohjelmisto. Katso kielivälilehtisivu oikealla.
Svenska
Inställningar för enheten och installation av programvaran
Ange sedan inställningarna för enheten och installera programvaran. Se sidan med språkflikar till höger.
Español
Configuración para la máquina e instalación del software
A continuación, especifique la configuración para la máquina e instale el software. Vea la página de la ficha de idioma en el lado derecho.
Nederlands
Instellingen voor het apparaat en software-installatie
Geef vervolgens de instellingen voor het apparaat op en instelleer de software. Zie het tabblad van uw taal aan de rechterkant.
Português
Defi nições da máquina e instalação do software
A seguir, especifi que as defi nições da máquina e instale o software. Consulte a página do separador do idioma, do lado direito.
Ελληνικά
Ρυθμίσεις συσκευής και εγκατάσταση λογισμικού
Στη συνέχεια, καθορίστε τις ρυθμίσεις συσκευής και εγκαταστήστε το λογισμικό. Ανατρέξτε στη σελίδα καρτέλας γλώσσας στα δεξιά.
1
English
1 About the Supplied Manuals . . . . . . . . . . . . . . . . . . . . . . . . . . . . . . . . . . . . . . . . . . . . P.2
2 Navigating the Menu and Text Input Method . . . . . . . . . . . . . . . . . . . . . . . . . . . . . . . P.3
3 Attach the Optional Drawer to the Main Unit . . . . . . . . . . . . . . . . . . . . . . . . . . . . . . . P.4
4 Connecting the Power Cord and Turning ON the Power . . . . . . . . . . . . . . . . . . . . . P.5
5 Specifying the Initial Settings . . . . . . . . . . . . . . . . . . . . . . . . . . . . . . . . . . . . . . . . . . . P.5
6 Setting a Paper Size and Type . . . . . . . . . . . . . . . . . . . . . . . . . . . . . . . . . . . . . . . . . . . P.6
7 Specifying Initial Fax Settings and Connecting a Telephone Cable . . . . . . . . . . . . P.7
8 Selecting the method for connecting to the machine . . . . . . . . . . . . . . . . . . . . . . . . P.9
9 Connecting to Wired LAN . . . . . . . . . . . . . . . . . . . . . . . . . . . . . . . . . . . . . . . . . . . . . . P.10
10 Installing the Driver/Software . . . . . . . . . . . . . . . . . . . . . . . . . . . . . . . . . . . . . . . . . . P.11
11 Perform Useful Tasks . . . . . . . . . . . . . . . . . . . . . . . . . . . . . . . . . . . . . . . . . . . . . . . . . P.12
Français
1 A propos des manuels fournis . . . . . . . . . . . . . . . . . . . . . . . . . . . . . . . . . . . . . . . . . . P.2
2 Navigation dans le menu et méthode de saisie de texte . . . . . . . . . . . . . . . . . . . . . . P.3
3 Fixez la cassette en option sur l'unité principale. . . . . . . . . . . . . . . . . . . . . . . . . . . . P.4
4 Branchement du cordon d'alimentation et allumage de la machine . . . . . . . . . . . . P.5
5 Spéci
fi
cation des paramètres initiaux . . . . . . . . . . . . . . . . . . . . . . . . . . . . . . . . . . . . . P.5
6 Réglage du format et du type de papier . . . . . . . . . . . . . . . . . . . . . . . . . . . . . . . . . . . P.6
7 Spéci
fi
cation des paramètres de fax initiaux et connexion du câble téléphonique . . . P.7
8 Sélection de la méthode de connexion à la machine . . . . . . . . . . . . . . . . . . . . . . . . P.9
9 Connexion au réseau sans
fi
l . . . . . . . . . . . . . . . . . . . . . . . . . . . . . . . . . . . . . . . . . . P.10
10 Installation du pilote/logiciel . . . . . . . . . . . . . . . . . . . . . . . . . . . . . . . . . . . . . . . . . . . P.11
11 Exécution de tâches utiles . . . . . . . . . . . . . . . . . . . . . . . . . . . . . . . . . . . . . . . . . . . . . P.13
Italiano
1 Informazioni sui manuali forniti a corredo con il prodotto . . . . . . . . . . . . . . . . . . Pag.2
2 Navigazione del menu e metodo di input del testo . . . . . . . . . . . . . . . . . . . . . . . . Pag.3
3 Collegare il cassetto opzionale all'unità principale . . . . . . . . . . . . . . . . . . . . . . . . Pag.4
4 Collegamento del cavo di alimentazione e accensione della macchina . . . . . . . Pag.5
5 Selezione delle impostazioni iniziali . . . . . . . . . . . . . . . . . . . . . . . . . . . . . . . . . . . . Pag.5
6 Impostazione di un formato e di un tipo di carta . . . . . . . . . . . . . . . . . . . . . . . . . . Pag.6
7 Impostazioni iniziali del fax e collegamento di un cavo telefonico . . . . . . . . . . . Pag.7
8 Selezione del metodo di collegamento della macchina . . . . . . . . . . . . . . . . . . . . Pag.9
9 Collegamento alla LAN cablata . . . . . . . . . . . . . . . . . . . . . . . . . . . . . . . . . . . . . . . Pag.10
10 Installazione di driver/software . . . . . . . . . . . . . . . . . . . . . . . . . . . . . . . . . . . . . . . Pag.11
11 Attività utili . . . . . . . . . . . . . . . . . . . . . . . . . . . . . . . . . . . . . . . . . . . . . . . . . . . . . . . . Pag.14
Deutsch
1 Informationen zu den mitgelieferten Handbüchern . . . . . . . . . . . . . . . . . . . . . . . . . . S.2
2 Navigieren durch das Menü und Texteingabemethode . . . . . . . . . . . . . . . . . . . . . . . S.3
3 Anbringen der optionalen Kassette an der Haupteinheit . . . . . . . . . . . . . . . . . . . . . S.4
4 Anschließen des Netzkabels und Einschalten des Geräts . . . . . . . . . . . . . . . . . . . . S.5
5 Angeben der Anfangseinstellungen . . . . . . . . . . . . . . . . . . . . . . . . . . . . . . . . . . . . . . S.5
6 Einstellen eines Papierformats und Papiertyps . . . . . . . . . . . . . . . . . . . . . . . . . . . . . S.6
7 Angeben der Anfangsfaxeinstellungen und Anschließen eines Telefonkabels . . . S.7
8 Auswählen der Methode für das Herstellen einer Verbindung zum Gerät . . . . . . . S.9
9 Herstellen einer Verbindung zu einem Wired LAN . . . . . . . . . . . . . . . . . . . . . . . . . S.10
10 Installieren des Treibers bzw. der Software . . . . . . . . . . . . . . . . . . . . . . . . . . . . . . . S.11
11 Hilfreiche Funktionen . . . . . . . . . . . . . . . . . . . . . . . . . . . . . . . . . . . . . . . . . . . . . . . . . S.15
Contents
Table des matières
Sommario
Inhalt
1 2 3 4 5 6 7 8 9 10 11
English Français
Italiano Deutsch
2
English
A
Starter Guide (This manual):
Read this manual
fi
rst.
This manual describes the
installation of the machine, the
settings, and a caution. Be sure to
read this manual before using the
machine.
B
Wireless LAN Setting Guide:
Read this manual next.
This manual describes the procedure for
con
fi
guring wireless LAN setting and the
causes and resolutions of problems that
occur in the settings. Be sure to read this
manual before using the machine.
C
MF Driver Installation Guide
(User Software CD-ROM):
Read this manual third.
This manual describes
software installation.
D
e-Manual (User Manual CD-ROM): Read the desired chapter to suit your needs.
The e-Manual is categorized by subject to
fi
nd desired information easily.
Displaying the e-Manual from the CD-ROM
1. Insert the User Software CD-ROM in your computer.
2. Click [Display Manuals].
3. Click the [
] for [e-Manual].
* Depending on the operating system you are using, a security protection message is displayed. Allow the contents to be displayed.
Français
A
Guide de démarrage (ce manuel) :
Lisez ce manuel en premier.
Ce manuel décrit l'installation de
la machine, les paramètres et les
précautions à prendre. Veillez à
lire attentivement ce manuel avant
d'utiliser la machine.
B
Guide des paramètres du réseau sans
fi
l :
Lisez ensuite ce manuel.
Ce manuel décrit la procédure de
con
fi
guration des paramètres du réseau
sans
fi
l, et présente les causes et solutions
des problèmes qui se produisent avec ces
paramètres. Veillez à lire attentivement ce
manuel avant d'utiliser la machine.
C
Guide d'installation des
pilotes MF (CD-ROM "User
Software CD-ROM") :
Lisez ce manuel en troisième.
Ce manuel décrit l'installation
du logiciel.
D
Manuel électronique (CD-ROM "User Manual CD-ROM") : Lisez le chapitre qui répond à vos besoins.
Le manuel électronique est divisé en catégories par sujet, ce qui permet de trouver facilement les informations voulues.
Af
fi
chage du manuel électronique directement depuis le CD-ROM
1. Insérez le CD-ROM "User Software CD-ROM" dans votre ordinateur.
2. Cliquez sur [Af
fi
cher manuel].
3. Cliquez sur le bouton [
] correspondant à [Manuel électronique].
* Selon votre système d'exploitation, un message de protection de la sécurité peut s'af
fi
cher. Autorisez l'af
fi
chage du contenu.
Italiano
A
Guida all'avvio (questo manuale):
Leggere prima questo manuale.
In questo manuale vengono descritti
l'installazione della macchina, le
impostazioni e le avvertenze da
osservare. Leggere attentamente il
manuale prima di utilizzare la macchina.
B
Guida alla con
fi
gurazione LAN wireless:
Successivamente leggere questo manuale.
In questo manuale viene descritta la procedura
da eseguire per con
fi
gurare le impostazioni della
rete LAN wireless e vengono trattate le cause e
le soluzioni agli eventuali problemi che possono
presentarsi con le impostazioni. Leggere attentamente
il manuale prima di utilizzare la macchina.
C
Guida di Installazione del
Driver MF (User Software
CD-ROM):
Leggere questo manuale in
terza battuta.
Questo manuale descrive
l'installazione del software.
D
e-Manual (User Manual CD-ROM): Leggere il capitolo desiderato in base alle proprie esigenze.
L'e-Manual è suddiviso in una serie di categorie per argomento che consentono di trovare le informazioni desiderate più facilmente.
Visualizzazione dell'e-Manual dal CD-ROM
1. Inserire l'User Software CD-ROM nel computer.
2. Fare clic su [Visual. manuale].
3. Fare clic sul pulsante [
] relativo a [e-Manual].
* A seconda del sistema operativo in uso, è possibile che venga visualizzato un messaggio di protezione. Consentire la visualizzazione dei contenuti.
Deutsch
A
Handbuch für Starter (dieses Handbuch):
Lesen Sie zuerst dieses Handbuch.
In diesem Handbuch werden die
Geräteinstallation, die Einstellungen und
Vorsichtshinweise beschrieben. Lesen
Sie dieses Handbuch vor Inbetriebnahme
des Geräts unbedingt durch.
B
Handbuch der WLAN-Einstellungen:
Lesen Sie als nächstes dieses Handbuch.
In diesem Handbuch werden die Vorgehensweisen
zur Kon
fi
guration der Wireless LAN-Einstellung
sowie die Ursachen und Abhilfemaßnahmen bei
Problemen beschrieben, die bei den Einstellungen
auftreten. Lesen Sie dieses Handbuch vor
Inbetriebnahme des Geräts unbedingt durch.
C
Installationshandbuch zum
MF-Treiber (User Software
CD-ROM):
Lesen Sie dieses Handbuch
an dritter Stelle.
In diesem Handbuch wird
die Softwareinstallation
beschrieben.
D
e-Anleitung (User Manual CD-ROM): Lesen Sie das gewünschte Kapitel entsprechend Ihren Anforderungen.
Die e-Anleitung ist thematisch gegliedert, sodass Sie die gewünschten Informationen problemlos
fi
nden.
Anzeigen der e-Anleitung von der CD-ROM
1. Legen Sie die User Software CD-ROM in Ihren Computer ein.
2. Klicken Sie auf [Zeige Handbuch].
3. Klicken Sie für [e-Handbuch] auf [
].
* Abhängig von dem von Ihnen verwendeten Betriebssystem wird eine Sicherheitswarnung angezeigt. Lassen Sie die Anzeige des Inhalts zu.
D
C
A
B
1
About the Supplied Manuals
A propos des manuels fournis
Informazioni sui manuali forniti a corredo con il prodotto
Informationen zu den mitgelieferten Handbüchern
1 2 3 4 5 6 7 8 9 10 11
3
English
Navigating the Menu
▪
Item selection or moving the cursor among the menu items
Select an item with [
] or [
].
Proceed to the next hierarchy with [OK] or [
].
Return to the previous hierarchy with [
] (Back) or [
].
▪
Setting con
fi
rmation
Press [OK]. However, when <Apply> appears on the display, select <Apply>,
and then press [OK].
Text Input Method
- Changing entry mode
Press [
] to select <Entry Mode>, and press [OK]. You can also press [
] (Tone) to change the entry
mode.
- Entering text, symbols, and numbers
Enter using the numeric keys or [
] (Symbols).
For details on the switchable mode or the available text, see the next page.
- Moving the cursor (entering a space)
Move with [
] or [
].
Move the cursor to the end of the text and press [
] to enter a space.
- Deleting characters
Delete with [
] (Clear).
Pressing and holding [
] (Clear) key deletes all characters.
Français
Navigation dans le menu
▪
Sélection d'éléments ou déplacement du curseur dans les éléments de menu
Sélectionner un élément avec [
] ou [
].
Passer au niveau hiérarchique suivant avec [OK] ou [
].
Revenir au niveau hiérarchique précédent avec [
] (Préc.) ou [
].
▪
Con
fi
rmation du paramétrage
Appuyer sur [OK]. Toutefois, si le message <Appliquer> apparaît sur
l'af
fi
cheur, sélectionner <Appliquer>, puis appuyer sur [OK].
Méthode de saisie du texte
- Changement de mode de saisie
Appuyer sur [
] pour sélectionner <Mode de saisie>, puis appuyer sur [OK]. Vous pouvez également
utiliser [
] (Tonalité) pour changer de mode de saisie.
- Saisie de texte, de symboles et de chiffres
Utiliser le clavier numérique ou [
] (SYMBOLES).
Pour en savoir plus sur les modes ou le texte disponible, reportez-vous à la page suivante.
- Déplacement du curseur (ajout d'un espace)
Utiliser [
] ou [
] pour le déplacement.
Déplacer le curseur vers la
fi
n du texte saisi et appuyer sur [
] pour
entrer un espace.
- Suppression de caractères
Utiliser [
] (Effacement) pour effectuer la suppression.
Appuyer sur la touche [
] (Effacement) et la maintenir enfoncée pour
supprimer tous les caractères.
Italiano
Navigazione dei menu
▪
Selezione di una voce o spostamento del cursore sulle voci dei menu
Selezionare una voce utilizzando [
] e [
].
Procedere al livello gerarchico successivo con [OK] o [
].
Tornare al livello gerarchico precedente con [
] (Indietro) o [
].
▪
Conferma delle impostazioni
Premere [OK]. Alla visualizzazione del messaggio <Applica> sul display,
selezionare <Applica> e premere [OK].
Metodo d'immissione del testo
- Cambio della modalità d'immissione
Premere [
] per selezionare <Modo immissione> e premere [OK]. Per cambiare il modo d'immissione è
anche possibile premere [
] (Tono).
- Immissione di testo, simboli e numeri
Immettere utilizzando i tasti numerici oppure [
] (Simboli).
Per i dettagli relativi al modo selezionabile o al testo disponibile, vedere la pagina successiva.
- Spostamento del cursore (immissione di uno spazio)
Spostare il cursore utilizzando [
] e [
].
Spostare il cursore alla
fi
ne del testo e premere [
] per immettere uno
spazio.
- Cancellazione dei caratteri
Cancellare utilizzando [
] (Azzera).
Tenendo premuto il tasto [
] (Azzera) si cancellano tutti i caratteri.
Deutsch
Navigieren durch das Menü
▪
Elementauswahl oder Versetzen des Cursors zwischen den Menüelementen
Wählen Sie mit [
] oder [
] ein Element aus.
Fahren Sie mit [OK] oder [
] mit der nächsten Hierarchie fort.
Kehren Sie mit [
] (Zurück) oder [
] zur vorherigen Hierarchie zurück.
▪
Bestätigung der Einstellung
Drücken Sie [OK]. Wenn auf dem Display jedoch <Anwenden> angezeigt wird,
wählen Sie <Anwenden> aus, und drücken Sie dann [OK].
Texteingabemethode
- Ändern des Eingabemodus
Drücken Sie [
], um <Eingabemodus> auszuwählen, und drücken Sie [OK]. Sie können den
Eingabemodus auch durch Drücken von [
] (Ton) ändern.
- Eingeben von Text, Symbolen und Zahlen
Nehmen Sie die Eingabe über die numerischen Tasten oder über [
] (Symbole) vor.
Nähere Informationen zur Modusänderung oder zum verfügbaren Text
fi
nden Sie auf der nächsten Seite.
- Versetzen des Cursors (Eingeben eines Leerzeichens)
Versetzen Sie den Cursor mit [
] oder [
].
Versetzen Sie den Cursor an das Ende des Textes, und drücken Sie
[
], um ein Leerzeichen einzugeben.
- Löschen von Zeichen
Löschen Sie Zeichen mit [
] (Löschen).
Wenn Sie die Taste [
] (Löschen) gedrückt halten, werden alle Zeichen
gelöscht.
2
Navigating the Menu and Text Input Method
Navigation dans le menu et méthode de saisie de texte
Navigazione del menu e metodo di input del testo
Navigieren durch das Menü und Texteingabemethode
#
C
Numeric
keys
OK
1 2 3 4 5 6 7 8 9 10 11
English Français
Italiano Deutsch
4
English
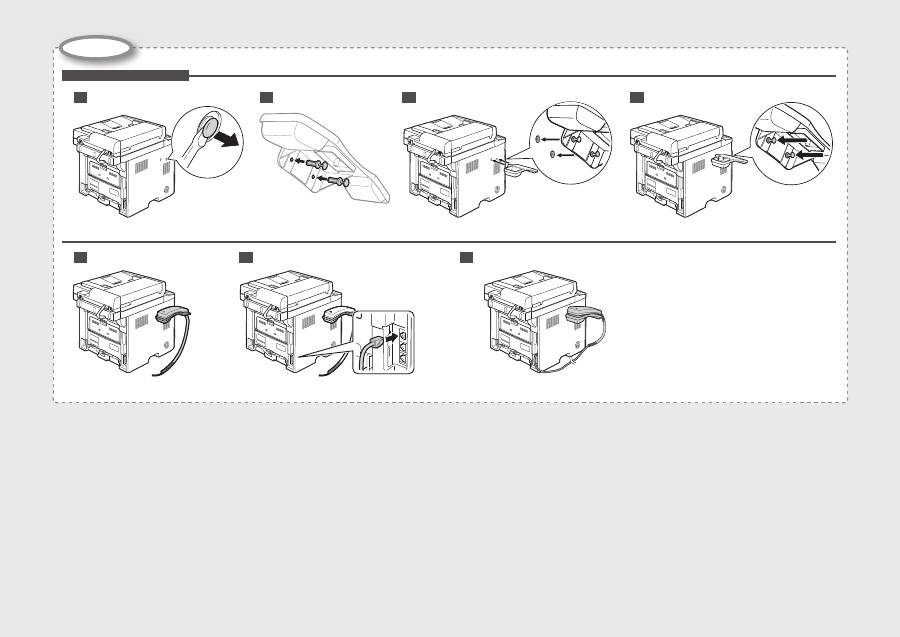
Take the drawer from the carton, and remove all packing materials, including shipping tape before attaching
the optional drawer to the main unit. Make sure the main unit and the optional drawer are facing in the same
direction when being attached.
When moving the main unit, be sure to carry it from front side by using the provided hand grips on the left and right sides, as seen
in the illustration.
Français
Sortez la cassette de son carton et retirez tous les matériaux d'emballage, y compris la bande adhésive
d'expédition, avant de
fi
xer la cassette en option sur l'unité principale. Véri
fi
ez que l'unité principale et la
cassette en option font face à la même direction lorsque vous les
fi
xez.
Lorsque vous déplacez l'unité principale, veillez à la transporter depuis l'avant en la tenant par les poignées de transport à gauche
et à droite, comme dans l'illustration.
Italiano
Estrarre il cassetto opzionale dal cartone e prima di agganciarlo all'unità principale provvedere a rimuovere
tutto il materiale d'imballaggio, incluso il nastro di trasporto. Quando li si aggancia, assicurarsi che l'unità
principale e il cassetto opzionale siano rivolti nella stessa direzione.
Quando si sposta l'unità principale, trasportarla guardandola dal davanti e afferrandola dalle apposite maniglie che si trovano sui
lati destro e sinistro, come si vede illustrato nella
fi
gura.
Deutsch
Nehmen Sie die Kassette aus dem Karton, und entfernen Sie das gesamte Verpackungsmaterial, einschließlich
des Versandbandes, bevor Sie die optionale Kassette an der Haupteinheit anbringen. Vergewissern Sie sich,
dass die Haupteinheit und die optionale Kassette beim Anbringen in dieselbe Richtung zeigen.
Beim Transport der Haupteinheit tragen Sie diese unbedingt von der Vorderseite aus, indem Sie sie an den dafür vorgesehenen
Handgriffen links und rechts festhalten, wie in der Abbildung dargestellt.
3
Attach the Optional Drawer to the Main Unit
Fixez la cassette en option sur l'unité principale
Collegare il cassetto opzionale all'unità principale
Anbringen der optionalen Kassette an der Haupteinheit
English
Entering text, symbols, and numbers
Key
Entry mode: <A>
Entry mode: <a>
Entry mode:
<12>
@ . - _ /
1
ABC
abc
2
DEF
def
3
GHI
ghi
4
JKL
jkl
5
MNO
mno
6
PQRS
pqrs
7
TUV
tuv
8
WXYZ
wxyz
9
(Not available)
0
- . * # ! “ , ; : ^ ` _ = / | ‘ ? $
@ % & + \ ( ) [ ] { } < >
~
(Not available)
Changing the entry mode
Entry mode
Available text
<A>
Alphabet (capital letters) and symbols
<a>
Alphabet (small letters) and symbols
<12>
Numbers
Italiano
Immissione di testo, simboli e numeri
Tasto
Modo
d'immissione: <A>
Modo
d'immissione: <a>
Modo d'immissione:
<12>
@ . - _ /
1
AÀBC
aàbc
2
DEÈF
deèf
3
GHIÌ
ghiì
4
JKL
jkl
5
MNOÒ
mnoò
6
PQRS
pqrs
7
TUÙV
tuùv
8
WXYZ
wxyz
9
(Non disponibile)
0
- . * # ! “ , ; : ^ ` _ = / | ‘ ? $
@ % & + \ ( ) [ ] { } < >
~
(Non
disponibile)
Cambio della modalità d'immissione
Modo d'immissione
Testo disponibile
<A>
Alfabeto (lettere maiuscole) e simboli
<a>
Alfabeto (lettere minuscole) e simboli
<12>
Numeri
Deutsch
Eingeben von Text, Symbolen und Zahlen
Taste
Eingabemodus:
<A>
Eingabemodus:
<a>
Eingabemodus:
<12>
@ . - _ /
1
AÄBC
aäbc
2
DEF
def
3
GHI
ghi
4
JKL
jkl
5
MNOÖ
mnoö
6
PQRSß
pqrs
7
TUÜV
tuüv
8
WXYZ
wxyz
9
(nicht verfügbar)
0
- . * # ! “ , ; : ^ ` _ = / | ‘ ? $
@ % & + \ ( ) [ ] { } < >
~
(nicht
verfügbar)
Ändern des Eingabemodus
Eingabemodus
Verfügbarer Text
<A>
Alphabet (Großbuchstaben) und Symbole
<a>
Alphabet (Kleinbuchstaben) und Symbole
<12>
Zahlen
Français
Saisie de texte, de symboles et de chiffres
Touche
Mode de saisie:
<A>
Mode de saisie:
<a>
Mode de saisie:
<12>
@ . - _ /
1
AÀÂBCÇ
aàâbcç
2
DEËÉÈÊF
deëéèêf
3
GHIÏÎ
ghiïî
4
JKL
jkl
5
MNOÔ
mnoô
6
PQRS
pqrs
7
TUÜÙÛV
tuüùûv
8
WXYZ
wxyz
9
(Non disponible)
0
- . * # ! “ , ; : ^ ` _ = / | ‘ ? $
@ % & + \ ( ) [ ] { } < >
~
(Non
disponible)
Modi
fi
cation du mode de saisie
Mode de saisie
Texte disponible
<A>
Lettres (majuscules) et symboles
<a>
Lettres (minuscules) et symboles
<12>
Chiffres
1 2 3 4 5 6 7 8 9 10 11
5
English
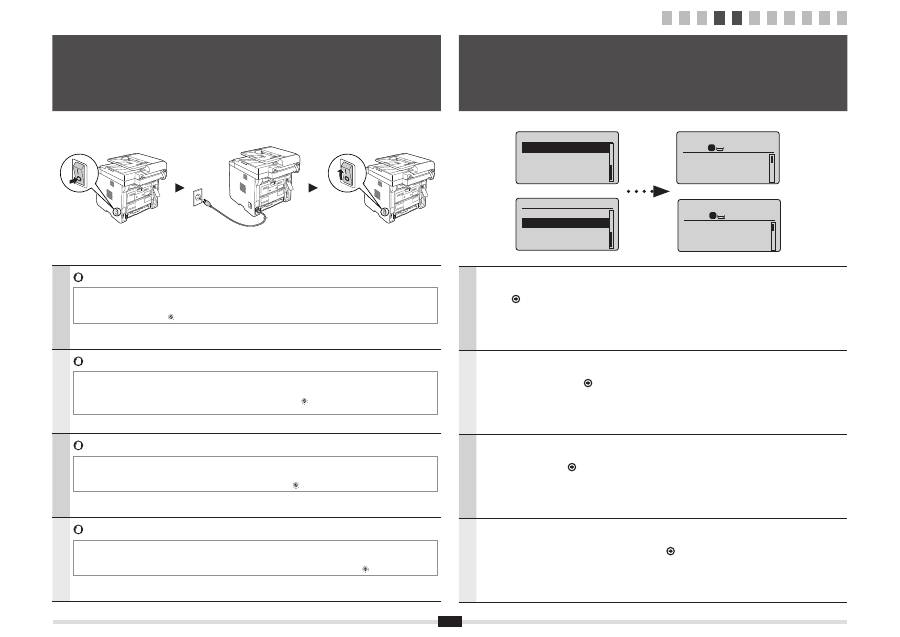
Do not connect the USB cable. Connect the USB cable when installing the software.
* A single sheet of paper may be ejected when the power is turned on the
fi
rst time after installing this machine. This is not a
malfunction.
* If no operations are performed for a
fi
xed period of time, the machine automatically enters the energy saver state (sleep mode).
To cancel sleep mode, press [
] (Energy Saver) on the control panel.
Français
Ne branchez pas le câble USB. Vous le connecterez lors de l'installation du logiciel.
* Une seule feuille de papier peut être éjectée lors que vous allumez la machine pour la première fois après l'avoir installée. Ce
comportement est normal.
* Si vous n'effectuez aucune opération pendant le délai spéci
fi
é, la machine passe automatiquement en mode d'économie
d'énergie (mode Veille). Pour annuler le passage en mode Veille, appuyer sur [
] (Economie d'énergie) sur le panneau de
commandes.
Italiano
Non collegare il cavo USB. Collegare il cavo USB quando si installa il software.
* Dopo aver installato la macchina, alla prima accensione potrebbe essere espulso un foglio di carta singolo. Non si tratta di un
malfunzionamento.
* Se per un periodo di tempo pre
fi
ssato non viene eseguita alcuna operazione, la macchina entra automaticamente nello stato di
risparmio energetico (modo riposo). Per annullare il modo riposto, premere [
] (Risparmio energetico) sul pannello di controllo.
Deutsch
Schließen Sie nicht das USB-Kabel an. Schließen Sie das USB-Kabel bei der Installation der Software an.
* Es wird möglicherweise ein einzelnes Blatt Papier ausgegeben, wenn die Stromversorgung nach der Installation des Geräts
zum ersten Mal eingeschaltet wird. Dies ist keine Fehlfunktion.
* Wenn über einen festgelegten Zeitraum keine Vorgänge durchgeführt werden, wechselt das Gerät automatisch in den
Stromsparmodus (schlafmodus). Zum Abbrechen des Schlafmodus drücken Sie auf dem Bedienfeld [
] (Stromsparmodus).
4
Connecting the Power Cord and Turning ON the Power
Branchement du cordon d'alimentation et allumage de la machine
Collegamento del cavo di alimentazione e accensione della macchina
Anschließen des Netzkabels und Einschalten des Geräts
English
Follow the instructions on the screen, set the language and time.
For details on navigating the menu and how to input the numbers, see 2 "Navigating the Menu and Text Input
Method" (
P.3).
Français
Suivez les instructions à l'écran pour dé
fi
nir la langue et l'heure.
Pour en savoir plus sur la navigation dans le menu et la saisie des nombres, voir 2 "Navigation dans le menu
et méthode de saisie de texte" (
P.3).
Italiano
Seguire le istruzioni visualizzate per impostare la lingua e l'orario.
Per i dettagli sulla navigazione del menu e su come immettere i numeri, vedere 2 "Navigazione del menu e
metodo di input del testo" (
Pag.3).
Deutsch
Folgen Sie den Anweisungen auf dem Bildschirm, und stellen Sie die Sprache und die Uhrzeit ein.
Nähere Informationen zum Navigieren durch das Menü und zur Eingabe der Zahlen
fi
nden Sie unter 2
"Navigieren durch das Menü und Texteingabemethode" (
S.3).
Language
English
French
Spanish
German
Language
English
French
Spanish
German
Copie: tche Copie
100% A4
Densité: 0
Type d'original: Te
...
Recto verso: Non
1
+
-
1
5
Specifying the Initial Settings
Spéci
fi
cation des paramètres initiaux
Selezione delle impostazioni iniziali
Angeben der Anfangseinstellungen
Copy: Press Start
100% A4
Density: 0
Original Type: Text
...
2-Sided: Off
1
+
-
1
1 2 3 4 5 6 7 8 9 10 11

English Français
Italiano Deutsch
6
English
Follow the instructions on the screen, set the paper size and type.
After completing the setting, specify the following settings.
7 "Specifying Initial Fax Settings and Connecting a Telephone Cable" (P.7)
Français
Suivez les instructions à l'écran pour dé
fi
nir le format et le type de papier.
Une fois le paramétrage effectué, spéci
fi
ez les paramètres suivants.
7 "Spéci
fi
cation des paramètres de fax initiaux et connexion du câble téléphonique"
(P.7)
Italiano
Seguire le istruzioni visualizzate per impostare il formato e il tipo di carta.
Dopo aver completato l'impostazione, selezionare le impostazioni seguenti.
7 "Impostazioni iniziali del fax e collegamento di un cavo telefonico" (Pag.7)
Deutsch
Folgen Sie den Anweisungen auf dem Bildschirm, und stellen Sie das Papierformat und den Papiertyp ein.
Wenn Sie die Einstellung abgeschlossen haben, geben Sie die folgenden Einstellungen an.
7 "Angeben der Anfangsfaxeinstellungen und Anschließen eines Telefonkabels" (S.7)
6
Setting a Paper Size and Type
Réglage du format et du type de papier
Impostazione di un formato e di un tipo di carta
Einstellen eines Papierformats und Papiertyps
Select Paper
MP Tray
LTR:Plain
Paper Settings
1
Choisir le papier
Bac multifonct.
A4:Ordinaire
Réglages du papier
1
Copy: Press Start
100% A4
Density: 0
Original Type: Text
...
2-Sided: Off
1
+
-
1
1 2 3 4 5 6 7 8 9 10 11
Copie: tche Copie
100% A4
Densité: 0
Type d'original: Te
...
Recto verso: Non
1
+
-
1

7
English
7-1
Specify the initial fax settings.
Follow the "Fax Setup Guide" to specify a fax number, a unit name, and a receive mode.
For more details on the receive mode, see the e-Manual.
e-Manual -> "Fax" -> "Using the Fax Functions" -> "Receiving Faxes" -> "RX Mode."
What happens with the unit name
Once the information has been registered, it
is printed at the top of each page that you are
sending.
7-2
Connect a telephone cable.
When <Connect phone line> appears on the display, connect the telephone cable by
referring to the illustration.
When installing the optional handset
For more details, see the supplied manual with the handset.
Français
7-1
Spéci
fi
ez les paramètres de fax initiaux.
Suivez les instructions du manuel "Guide de con
fi
guration du fax" pour spéci
fi
er un numéro de
fax, un nom d'unité et un mode de réception.
Pour en savoir plus sur le mode de réception, reportez-vous au manuel électronique.
Manuel électronique -> "Fax" -> "Utilisation des fonctions fax" -> "Réception de fax" ->
"Mode RX".
Traitement du nom d'unité
Une fois les informations enregistrées, elles
sont imprimées en haut de chaque page que
vous envoyez.
7-2
Connectez un câble téléphonique.
Lorsque l'af
fi
cheur indique <Connecter ligne tél.>, branchez le câble téléphonique en
vous reportant à l'illustration.
Lors de l'installation du combiné en option
Pour en savoir plus, reportez-vous au manuel fourni avec le combiné.
Italiano
7-1
Speci
fi
care le impostazioni iniziali del fax.
Attenersi alle istruzioni della "Guida con
fi
gurazione fax" per speci
fi
care il numero del fax, il
nome dell'unità e la modalità di ricezione.
Per ulteriori dettagli sulla modalità di ricezione, consultare l'e-Manual.
e-Manual -> "Fax" -> "Utilizzo delle funzioni fax" -> "Ricezione di fax" -> "Modo RX".
Operazioni eseguite con il nome dell'unità
Una volta registrate le informazioni, queste
vengono stampate nella parte superiore di ogni
pagina che si sta inviando.
7-2
Collegare un cavo telefonico.
Alla visualizzazione del messaggio <Collegare linea tel.> sul display, collegare il cavo
del telefono facendo riferimento all'illustrazione.
Quando si installa il ricevitore opzionale
Per ulteriori dettagli consultare il manuale fornito a corredo con il ricevitore.
Deutsch
7-1
eben Sie die Anfangsfaxeinstellungen an.
Folgen Sie den Anweisungen im "Fax Setup Handbuch", um eine Faxnummer, den Namen
einer Einheit und einen Empfangsmodus anzugeben.
Weitere Informationen zum Empfangsmodus
fi
nden Sie in der e-Anleitung.
e-Anleitung -> "Fax" -> "Verwenden der Faxfunktion" -> "Empfangen von Faxen" ->
"Empfangsmodus".
Verwendung des Namens der Einheit
Nachdem die Informationen gespeichert wurden,
werden sie auf jeder von Ihnen gesendeten
Seite oben gedruckt.
7-2
Schließen Sie ein Telefonkabel an.
Wenn auf dem Display <Telefonleitung anschl.> angezeigt wird, schließen Sie das
Telefonkabel entsprechend der Abbildung an.
Wenn Sie den optionalen Hörer installieren
Nähere Informationen
fi
nden Sie in dem mit dem Hörer gelieferten Handbuch.
Perform fax setup?
Set up Now
Set up Later
Configurer le fax ?
Maintenant
Plus tard
Connect phone line.
Follow illustrations
on the next screen:
Connect line to A.
*Next : Press OK
Connecter ligne tél.
Suivre instructions
à l'écran suivant :
Connecter ligne à A.
*Suivant: App sur OK
7
Specifying Initial Fax Settings and Connecting a Telephone Cable
Spéci
fi
cation des paramètres de fax initiaux et connexion du câble téléphonique
Impostazioni iniziali del fax e collegamento di un cavo telefonico
Angeben der Anfangsfaxeinstellungen und Anschließen eines Telefonkabels
Telephone line
connector
Telephone
1 2 3 4 5 6 7 8 9 10 11
English Français
Italiano Deutsch
8
English
7-3
Exit the Fax Setup Guide, and then restart the machine.
Turn OFF the machine, wait for at least 10 seconds, and then it back ON.
The telephone line types are not detected automatically. See the e-Manual and set a telephone line manually.
e-Manual -> "Fax" -> "Using the Fax Functions" -> "Changing Fax Settings (Settings that Can Be Speci
fi
ed Using the [Menu] Button)" ->
"Con
fi
guring Send Settings" -> "Select Line Type."
For Network Connection
9 "Connecting to Wired LAN" (P.10)
For USB Connection
10 "Installing the Driver/Software" (P.11)
Français
7-3
Quittez le Guide de con
fi
guration du fax, puis redémarrez la machine.
Mettez la machine hors tension, puis attendez au moins 10 secondes avant de la remettre sous tension.
Les types de ligne téléphonique ne sont pas détectés automatiquement. Reportez-vous au manuel électronique et con
fi
gurez manuellement la ligne
téléphonique.
Manuel électronique -> "Fax" -> "Utilisation des fonctions de fax" -> "Modi
fi
cation des réglages de fax (Eléments pouvant être spéci
fi
és avec le
bouton [Menu])" -> "Con
fi
guration des réglages d'envoi" -> "Choix du type de ligne".
Pour la connexion réseau
9 "Connexion au réseau sans
fi
l" (P.10)
Avec une connexion USB
10 "Installation du pilote/logiciel" (P.11)
Italiano
7-3
Chiudere la Guida con
fi
gurazione fax e riavviare la macchina.
Spegnere la macchina, attendere almeno 10 secondi e quindi riaccenderla.
Le tipologie di linea telefonica non vengono riconosciute automaticamente. Consultare l'e-Manual e impostare manualmente una linea telefonica.
e-Manual -> "Fax" -> "Utilizzo delle funzioni fax" -> "Modi
fi
ca delle impostazioni fax (impostazioni selezionabili utilizzando il pulsante [Menu])" ->
"Con
fi
gurazione delle impostazioni di invio" -> "Selezione tipo linea".
Per il collegamento di rete
9 "Collegamento alla LAN cablata" (Pag.10)
Per il collegamento USB
10 "Installazione di driver/software" (Pag.11)
Deutsch
7-3
Beenden Sie das Fax Setup Handbuch, und starten Sie das Gerät dann erneut.
Schalten Sie das Gerät aus, warten Sie mindestens 10 Sekunden, und schalten Sie es dann wieder ein.
Die Telefonleitungstypen werden nicht automatisch erkannt. Lesen Sie in der e-Anleitung nach, und legen Sie die Telefonleitung manuell fest.
e-Anleitung -> "Fax" -> "Verwenden der Faxfunktionen" -> "Ändern der Faxeinstellungen (Einstellungen, die über die Schalt
fl
äche [Menü]
angegeben werden können)" -> "Kon
fi
gurieren von Sendeeinstellungen" -> "Leitungstyp wählen".
Für Netzwerkverbindung
9 "Herstellen einer Verbindung zu einem Wired LAN" (S.10)
Für USB-Verbindung
10 "Installieren des Treibers bzw. der Software" (S.11)
End Fax Setup Guide?
No
Yes
Terminer guide
d'installation fax ?
Non
Oui
Mettre la machine
hors/ss tension pour
appliquer réglages.
OK
Turn the main power
OFF and ON to apply
settings.
OK
1 2 3 4 5 6 7 8 9 10 11

9
8
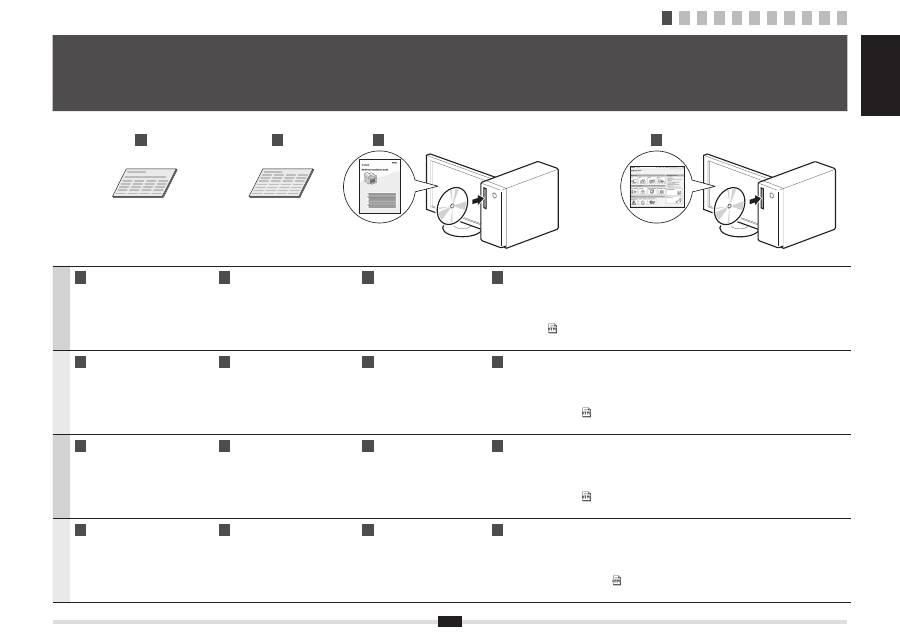
Selecting the method for connecting to the machine
Sélection de la méthode de connexion à la machine
Selezione del metodo di collegamento della macchina
Auswählen der Methode für das Herstellen einer Verbindung zum Gerät
English
Select from the following three methods, depending on your
environment and devices.
If you are not sure whether the router or
access point you are using supports wireless
LAN or wired LAN, see the instruction manual
provided with the network device you are
using, or contact the manufacturer.
Connecting via a USB Cable
Connect them using a USB cable.
Installing the Driver/Software P.11
* The machine does not come with a USB cable.
Have cables ready as needed.
Wireless LAN
Connect using wireless communication (radio frequency) without
using a cable.
Connecting to Wireless LAN: Refer to the separate manual
"Wireless LAN Setting Guide".
* A wireless LAN or access point that supports IEEE802.11 (b/g
or n) is required.
Wired LAN
Connect them using a LAN cable.
Connecting to Wired LAN P.10
* Check to make sure that there is a free port for connecting the
machine or the computer you use to the router or hub.
* Use a Category 5 or higher twisted pair cable for the LAN.
Français
Sélectionnez l'une trois des méthodes suivantes, en fonction de
votre environnement et de vos périphériques.
Si vous ne savez pas si le routeur ou point
d'accès que vous utilisez prend en charge le
réseau sans
fi
l ou le réseau
fi
laire, consultez
le manuel d'instructions fourni avec votre
périphérique réseau ou contactez le fabricant.
Connexion par câble USB
Branchez-les avec un câble USB.
Installation du pilote/ logiciel P.11
* La machine est livrée sans câble USB.
Procurez-vous les câbles nécessaires.
Réseau sans
fi
l
Connectez-vous par communication sans
fi
l (fréquence radio) sans
utiliser de câble.
Connexion au réseau sans
fi
l : Reportez-vous au manuel
spéci
fi
que "Guide des paramètres du réseau sans
fi
l".
* Vous devez utiliser un réseau sans
fi
l ou un point d'accès
prenant en charge IEEE802.11 (b/g ou n).
Réseau
fi
laire
Connectez-vous avec un câble réseau (LAN).
Connexion au réseau
fi
laire P.10
* Assurez-vous qu'il existe un port libre où connecter la
machine ou l'ordinateur que vous utilisez sur le routeur ou le
concentrateur.
* Utilisez un câble réseau (LAN) à paires torsadées CAT5 ou
supérieur.
Italiano
Selezionare uno dei tre metodi seguenti in base all'ambiente
operativo e ai dispositivi presenti.
Se non si conosce il supporto per una rete
LAN wireless o cablata del router o dell'Access
Point utilizzato, consultare il manuale delle
istruzioni fornito a corredo con il dispositivo di
rete utilizzato o rivolgersi al produttore.
Collegamento tramite cavo USB
Collegare utilizzando un cavo USB.
Installazione di driver/software Pag.11
* Insieme alla macchina non viene fornito un cavo USB.
I cavi devono essere già disponibili e pronti.
LAN wireless
Collegare utilizzando la comunicazione wireless (frequenza radio)
senza utilizzare un cavo.
Collegamento a una LAN wireless: fare riferimento al
manuale separato "Guida alla con
fi
gurazione LAN wireless".
* È richiesta una LAN wireless o un Access Point che supporti lo
standard IEEE802.11 (b/g oppure n).
LAN cablata
Collegare utilizzando un cavo di rete LAN.
Collegamento a una LAN cablata Pag.10
* Veri
fi
care che vi sia una porta disponibile per collegare la
macchina o il computer utilizzato al router o all'hub.
* Utilizzare un cavo a coppie ritorte di categoria 5 o superiore
per la rete LAN.
Deutsch
Wählen Sie abhängig von Ihrer Umgebung und Ihren Geräten eine
der folgenden drei Methoden aus.
Wenn Sie sich nicht sicher sind, ob der von
Ihnen verwendete Router oder Access Point
Wireless LAN oder Wired LAN unterstützt,
lesen Sie in der Bedienungsanleitung des von
Ihnen verwendeten Netzwerkgeräts nach, oder
wenden Sie sich an den Hersteller.
Herstellen einer Verbindung über ein USB-Kabel
Stellen Sie die Verbindung über ein USB-Kabel her.
Installieren des Treibers bzw. der Software S.11
* Im Lieferumfang des Geräts be
fi
ndet sich kein USB-Kabel.
Halten Sie die Kabel bei Bedarf bereit.
Wireless LAN
Stellen Sie die Verbindung über eine drahtlose Kommunikation
(Funkfrequenz) ohne Verwendung eines Kabels her.
Herstellen einer Verbindung zu einem Wireless LAN: Siehe
separates Handbuch "Handbuch der WLAN-Einstellungen".
* Es ist ein Wireless LAN oder Access Point erforderlich, der
IEEE802.11 (b/g oder n) unterstützt.
Wired LAN
Stellen Sie die Verbindung über ein LAN-Kabel her.
Herstellen einer Verbindung zu einem Wired LAN S.10
* Vergewissern Sie sich, dass ein freier Anschluss für den
Anschluss des von Ihnen verwendeten Geräts oder Computers
an den Router oder Hub vorhanden ist.
* Verwenden Sie ein Kabel der Kategorie 5 oder höher mit
verdrilltem Adernpaar für das LAN.
1 2 3 4 5 6 7 8 9 10 11
English Français
Italiano Deutsch
10
English
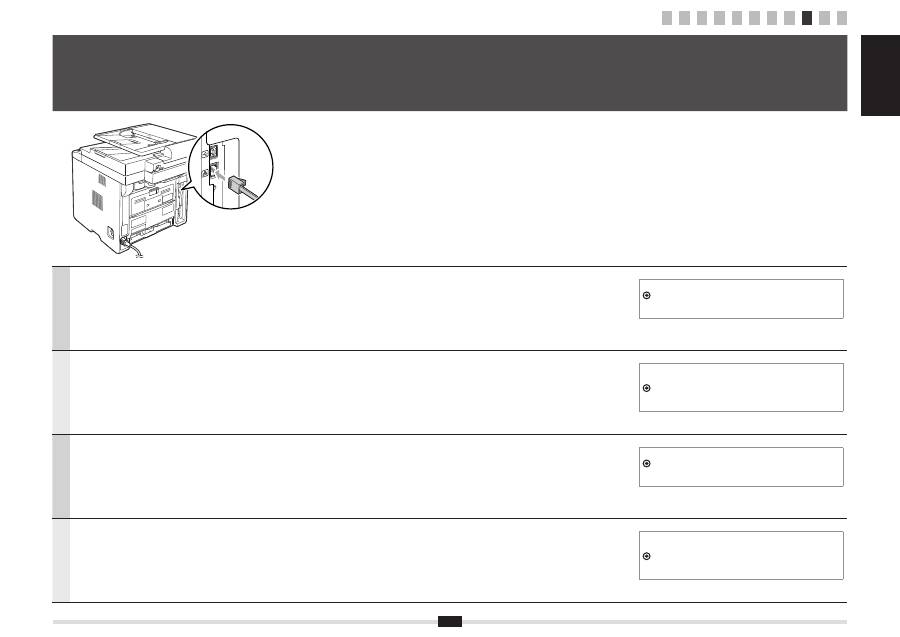
Connect the LAN cable.
The machine sets the IP address automatically. Wait approximately two minutes.
If you want to set the IP address manually, see the following items.
e-Manual -> "Network Settings" -> "Basic Network Settings" ->
"Setting the IP Address" -> "Setting the IPv4 Address" or "Setting the
IPv6 Address"
Français
Connectez le câble réseau (LAN).
La machine dé
fi
nit automatiquement l'adresse IP. Attendez environ deux minutes.
Si vous souhaitez dé
fi
nir manuellement l'adresse IP, voir les rubriques
suivantes.
Manuel électronique -> "Réglages réseau" -> "Réglages réseau de
base" -> "Réglage de l'adresse IP" -> "Dé
fi
nition de l'adresse IPv4" ou
"Dé
fi
nition de l'adresse IPv6".
Italiano
Collegare il cavo LAN.
La macchina imposta l'indirizzo IP automaticamente. Attendere circa due minuti.
Per impostare manualmente l'indirizzo IP vedere le voci seguenti.
e-Manual -> "Impostazioni di rete" -> "Impostazioni di rete di base"
-> "Impostazione dell'indirizzo IP" -> "Impostazione dell'indirizzo IPv4" o
"Impostazione dell'indirizzo IPv6".
Deutsch
Schließen Sie das LAN-Kabel an.
Das Gerät legt die IP-Adresse automatisch fest. Warten Sie ca. 2 Minuten.
Wenn Sie die IP-Adresse manuell festlegen möchten, lesen Sie die
folgenden Punkte.
e-Anleitung -> "Netzwerkeinstellungen" -> "Grundlegende
Netzwerkeinstellungen" -> "Festlegen der IP-Adresse" -> "Festlegen der
IPv4-Adresse" oder "Festlegen der IPv6-Adresse".
9
Connecting to Wired LAN
Connexion au réseau sans
fi
l
Collegamento alla LAN cablata
Herstellen einer Verbindung zu einem Wired LAN
1 2 3 4 5 6 7 8 9 10 11
11
English
A
Install the driver and software using the User Software CD-ROM.
B
For details on the installation procedures, see the MF Driver Installation Guide.
Français
A
Installez le pilote et le logiciel avec le CD-ROM "User Software CD-ROM".
B
Pour en savoir plus sur les procédures d'installation, voir le Guide d'installation des pilotes MF.
Italiano
A
Installare il driver e il software dall'User Software CD-ROM.
B
Per i dettagli relativi alle procedure d'installazione, consultare la Guida di Installazione del Driver MF.
Deutsch
A
Installieren Sie den Treiber und die Software über die User Software CD-ROM.
B
Nähere Informationen zur Vorgehensweise bei der Installation
fi
nden Sie im Installationshandbuch zum MF-Treiber.
10
Installing the Driver/Software
Installation du pilote/logiciel
Installazione di driver/software
Installieren des Treibers bzw. der Software
A
B
A
B
1 2 3 4 5 6 7 8 9 10 11

English Français
Italiano Deutsch
12
Copy
Remote UI
Network Settings
Fax
Scan
●
Sending a Document Directly from a Computer
(PC Fax)
In addition to the normal sending and receiving faxes, you
can use the PC fax.
●
Sending
You can register fax destinations in the address book.
You can specify the destinations using various methods,
enabling you to send documents quickly and easily.
▪
Destination search
▪
One-touch keys
▪
Coded dialing
▪
Destination Group
▪
Specifying from the sending history
▪
Sequential broadcast
●
Saving the Documents Using the Operation Panel
of the Machine
1
2
3
Documents
Data
●
Saving the Documents Using Operations from a
Computer
▪
Scanning with the MF Toolbox
1
2
3
Documents
Data
▪
Scanning from an Application
▪
Scanning with the WIA Driver
(Windows XP/Vista/7 Only)
●
Enlarged/Reduced Printing
●
2-Sided Printing
●
Reduced Layout
You can reduce multiple documents to print them onto
one sheet.
2 on 1
4 on 1
●
Booklet Printing
●
Poster Printing
●
Watermark Printing
●
Displaying a Preview before Printing
●
Selecting a "Pro
fi
le"
This machine comes equipped with a network interface that you can construct a network environment easily. If you
use the MF5980dw, you can connect to the network using the wireless LAN. Also you can print a document, use the
PC fax, and use the network scan from all computers which are connected with the machine. The machine supports to
increase work ef
fi
ciency as a shared machine in the of
fi
ce.
You can understand the condition of the machine from the computers on the network.
You can access the machine and manage jobs or specify various settings via network.
●
Enlarged/Reduced Copies
You can enlarge or reduce standard size documents to
copy on standard size paper or specify the copy ratio in
percentage.
●
2-Sided Copying
You can copy 1-sided documents on both sides of paper.
●
Collating
You can sort copies into sets arranged in page order.
●
Reduced Layout
You can reduce multiple documents to copy them onto
one sheet.
2 on 1
4 on 1
●
Copying ID Card
You can make a copy of a 2-sided card onto one side of
paper.
●
Receiving
▪
Receiving in the memory
You can store the received documents in the memory.
You can print the stored documents at any time or if
you do not need them, you can delete them.
▪
Remote Receiving
If an external telephone is connected, you can switch
to the fax receiving mode immediately by dialing the
ID number for fax receiving using the dial buttons of
the telephone during a phone call.
11
Perform Useful Tasks
English
You can use various functions in this machine. Following functions are the overview of the main functions that you can use routinely.
For details on each function, see the e-Manual.
●
Saving in a USB Memory
You can save scanned documents in a USB memory
connected to the machine.
Documents
Data
●
Emailing scanned documents (MF5980dw only)
You can send scanned documents to your e-mail
application.
Documents
Data
+
●
Sending scanned documents to a
fi
le server
You can send scanned documents to a
fi
le server.
Documents
Data
File server
1 2 3 4 5 6 7 8 9 10 11
1 2 3 4 5 6 7 8 9 10 11
13
11
Exécution de tâches utiles
Français
Vous pouvez utiliser les diverses fonctions de la machine. Voici les principales fonctions que vous utiliserez au quotidien.
Pour en savoir plus sur chaque fonction, voir le manuel électronique.
Copie
Impression
Interf dist
Réglages réseau
Fax
Numérisation
●
Envoi d'un document directement depuis un
ordinateur (Fax PC)
Outre les modes normaux d'envoi et de réception de fax,
vous pouvez utiliser la fonction Fax PC.
●
Envoi
Vous pouvez enregistrer des destinataires de fax dans le
carnet d'adresses. Vous disposez de plusieurs méthodes
pour spéci
fi
er les destinataires, ce qui vous permet
d'envoyer vos documents rapidement et facilement.
▪
Recherche de destinataires
▪
Boutons de composition 1 touche
▪
Composition codée
▪
Groupe de destinataires
▪
Spéci
fi
cation depuis l'historique d'envoi
▪
Multidiffusion
●
Enregistrement de documents avec le panneau de
commandes de la machine
1
2
3
Documents
Données
●
Enregistrement de documents via des opérations
réalisées depuis un ordinateur
▪
Numérisation avec MF Toolbox
1
2
3
Documents
Données
▪
Numérisation depuis une application
▪
Numérisation avec le pilote WIA
(Windows XP/Vista/7 uniquement)
●
Impression réduite/agrandie
●
Impression recto verso
●
Présentation réduite
Vous pouvez réduire plusieurs document pour les
imprimer tous sur une seule page.
2 sur 1
4 sur 1
●
Impression au format brochure
●
Impression d'af
fi
che
●
Impression avec
fi
ligrane
●
Af
fi
chage d'un aperçu avant l'impression
●
Sélection d'un "pro
fi
l"
Cette machine est équipée d'une interface réseau qui vous permet de créer facilement un environnement réseau. Si
vous utilisez le modèle MF5980dw, vous pouvez vous connecter au réseau par réseau sans
fi
l. Vous pouvez aussi
imprimer un document, utiliser le fax PC et utiliser la numérisation réseau depuis n'importe quel ordinateur connecté à
la machine. Utilisée en mode partagé au sein d'un bureau, cette machine augmente votre productivité.
Vous pouvez connaître la condition de la machine à partir des ordinateurs du réseau.
Vous pouvez accéder à la machine sur le réseau a
fi
n de gérer les tâches ou de spéci
fi
er divers paramètres.
●
Copie réduite/agrandie
Vous pouvez agrandir ou réduire les documents de
taille standard a
fi
n de les copier sur du papier de format
standard, ou spéci
fi
er un taux de reproduction en
pourcentage.
●
Copie recto verso
Vous pouvez copier des documents recto sur les deux
faces du papier.
●
Tri séquentiel
Vous pouvez trier les copies par ensemble de pages,
dans l'ordre.
●
Enregistrement sur clé USB
Vous pouvez enregistrer les documents numérisés sur
une clé USB connectée à la machine.
Documents
Données
●
Envoi par e-mail des documents numérisés
Vous pouvez envoyer les documents numérisés vers
votre application de messagerie.
Documents
Données
+
●
Envoi des documents numérisés vers un serveur
de
fi
chiers
Vous pouvez envoyer les documents numérisés vers un
serveur de
fi
chiers.
Documents
Données Serveur de fichiers
●
Présentation réduite
Vous pouvez réduire plusieurs document pour les copier
tous sur une seule page.
2 sur 1
4 sur 1
●
Copie d'une carte d'identité
Vous pouvez copier les deux faces d'une carte sur une
même face du papier.
●
Réception
▪
Réception en mémoire
Vous pouvez stocker les documents reçus dans la
mémoire.
Vous pouvez imprimer les documents stockés à
tout moment ou les supprimer si vous n'en avez pas
besoin.
▪
Réception à distance
Si un téléphone externe est connecté, vous pouvez
passer immédiatement en mode de réception de fax
en composant l'ID de réception de fax sur les touches
de votre téléphone au cours d'un appel téléphonique.
