Canon pixma pro-1: 5 6
5 6: Canon pixma pro-1
Table of contents
- Contents■
- Printer Installation Flow■ Printer Preparation Software Installation Installation Complete
- Symbols Used in This Document
- Printed Manual■ On-screen Manual and Online Manual■ Getting Started (this manual)
- Devices Required for Wired Connection■ When using the printer over a wired connection, a commercial network device (router, etc.) and Ethernet cable are required.
- Preparation
- 1 2
- 3 4 5 6
- 7 When it is necessary to turn off the printer
- 1 2 Install the Ink Tanks
- 3 4
- 5 6
- 1 2 Install the Print Head
- 3 4
- 5
- 6
- 7 8
- 9
- Software Installation
- For Windows XP/Windows XP SP1/Windows XP SP2/Windows Vista
- For Windows XP/Windows XP SP1/Windows XP SP2/Windows Vista If you prefer not to apply a Windows service pack, install the printer driver and IJ Network Tool by following the procedure below.
- For Mac OS X v10.6 to v10.6.7 Do you prefer to apply a Mac OS software update?
- For Mac OS X v10.4.11 to v10.5 Perform the installation by following one of the methods below.
- For Mac OS X v10.4.11 to v10.5 Install the software (the printer driver and IJ Network Tool) stored on the Setup CD-ROM by following 1 to 3 below.
- Do not connect the USB Easy-WebPrint EX cable yet.
- 1 1. Make sure that the POWER lamp (white) (A) is lit. 2. Press the ON button (B) to TURN OFF THE PRINTER.
- 2 1. Make sure that the printer has turned off. 2. Turn on the computer. 3. Insert the Setup CD-ROM into the CD-ROM drive.
- 3 3
- 4
- When the second page of the pattern is printed, Print Head Alignment is At the end of the installation, Quick Menu starts up. You can open the Online complete. Manual and On-screen Manual from here when you want to know about the details of the functions and operations or when need arises.
- 5 Load Paper
- My Image Garden 6 Application Software
- CREATIVE PARK PREMIUM Print Studio Pro
5 6
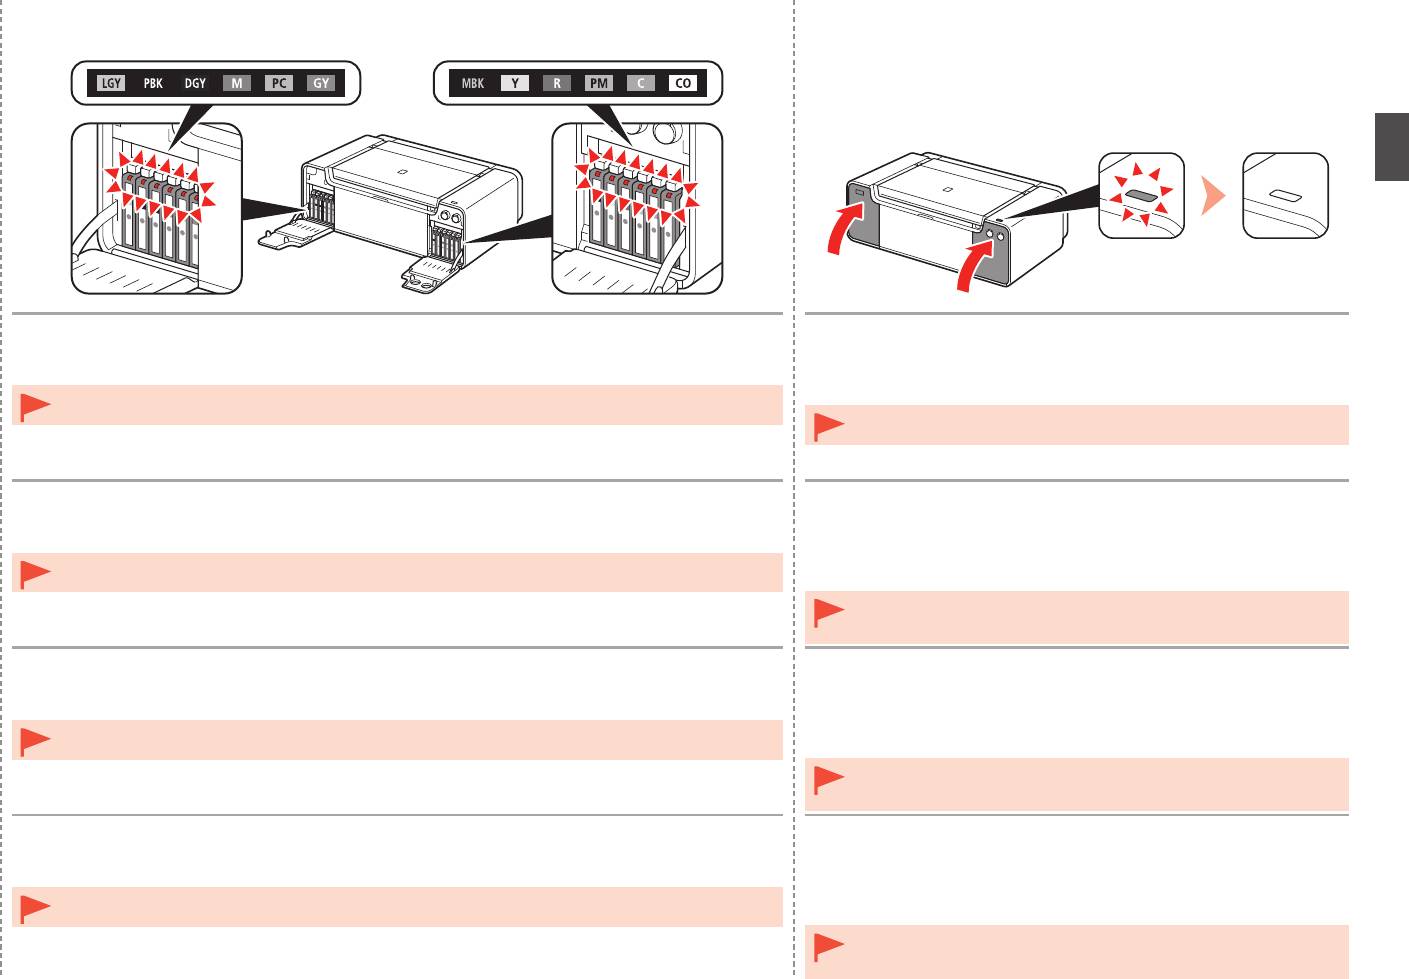
Install all the other ink tanks in the same way according to the color order indicated on the label.
1. Close the left and right Tank Covers until they click.
2. Make sure that the Tank Cover Open button (blue) is not lit, then
Make sure all the Ink lamps light red.
proceed to the next step.
Once you have installed the ink tanks, do not remove them unnecessarily.•
•
If the Tank Cover Open button (blue) remains lit, make sure that the ink
tanks are correctly installed.
Installez toutes les autres cartouches d’encre de la même manière, en respectant l’ordre des
1. Fermez les couvercles de réservoir droit et gauche jusqu’à ce
couleurs indiqué sur l’étiquette.
qu’ils s’enclenchent.
Vérifiez que tous les témoins d’encre (Ink) sont allumés en rouge.
2
. Vérifiez que le bouton Ouverture du couvercle du réservoir
(Tank Cover Open) (bleu) est éteint, puis passez à l’étape
Une fois les réservoirs d’encre installés, ne les retirez que lorsque c’est absolument nécessaire.•
suivante.
•
Si le bouton Ouverture du couvercle du réservoir (Tank Cover Open)
(bleu) reste allumé, vériez que les réservoirs d’encre sont correctement
installés.
Setzen Sie die übrigen Tintenbehälter auf dieselbe Weise ein. Beachten Sie dabei die
1. Schließen Sie die linke und rechte Abdeckung der
Farbreihenfolge auf den Aufklebern.
Tintenpatronen, bis sie hörbar einrasten.
Stellen Sie sicher, dass alle Anzeige für Tintenbehälter (Ink) rot leuchten.
2
. Stellen Sie sicher, dass die Taste zum Öffnen der
Tintenpatronenabdeckung (Tank Cover Open) (blau) nicht
Nach dem Einsetzen sollten die Tintenbehälter nicht unnötig wieder ausgebaut werden.•
leuchtet, und fahren Sie dann mit dem nächsten Schritt fort.
•
Wenn die Taste zum Öffnen der Tintenpatronenabdeckung (Tank Cover
Open) (blau) weiterhin leuchtet, überprüfen Sie, ob die Tintenpatronen
richtig eingesetzt wurden.
Installare tutti gli altri serbatoi d’inchiostro con la stessa procedura in base all’ordine di colore
1. Chiudere i coperchi dei serbatoi destro e sinistro finché non
indicato sull’etichetta.
scattano in posizione.
Assicurarsi che tutte le spie dell’inchiostro (Ink) si accendano e diventino rosse.
2
. Assicurarsi che il pulsante di apertura del coperchio del
serbatoio (Tank Cover Open) (blu) sia spento, quindi andare al
Una volta installati i serbatoi d’inchiostro, non rimuoverli se non in caso di effettiva necessità.•
passaggio successivo.
•
Se il pulsante di apertura del coperchio del serbatoio (Tank Cover Open)
(blu) rimane acceso, assicurarsi che i serbatoi d’inchiostro siano installati
correttamente.
11


