Canon pixma pro-1: 5 Load Paper
5 Load Paper: Canon pixma pro-1
Table of contents
- Contents■
- Printer Installation Flow■ Printer Preparation Software Installation Installation Complete
- Symbols Used in This Document
- Printed Manual■ On-screen Manual and Online Manual■ Getting Started (this manual)
- Devices Required for Wired Connection■ When using the printer over a wired connection, a commercial network device (router, etc.) and Ethernet cable are required.
- Preparation
- 1 2
- 3 4 5 6
- 7 When it is necessary to turn off the printer
- 1 2 Install the Ink Tanks
- 3 4
- 5 6
- 1 2 Install the Print Head
- 3 4
- 5
- 6
- 7 8
- 9
- Software Installation
- For Windows XP/Windows XP SP1/Windows XP SP2/Windows Vista
- For Windows XP/Windows XP SP1/Windows XP SP2/Windows Vista If you prefer not to apply a Windows service pack, install the printer driver and IJ Network Tool by following the procedure below.
- For Mac OS X v10.6 to v10.6.7 Do you prefer to apply a Mac OS software update?
- For Mac OS X v10.4.11 to v10.5 Perform the installation by following one of the methods below.
- For Mac OS X v10.4.11 to v10.5 Install the software (the printer driver and IJ Network Tool) stored on the Setup CD-ROM by following 1 to 3 below.
- Do not connect the USB Easy-WebPrint EX cable yet.
- 1 1. Make sure that the POWER lamp (white) (A) is lit. 2. Press the ON button (B) to TURN OFF THE PRINTER.
- 2 1. Make sure that the printer has turned off. 2. Turn on the computer. 3. Insert the Setup CD-ROM into the CD-ROM drive.
- 3 3
- 4
- When the second page of the pattern is printed, Print Head Alignment is At the end of the installation, Quick Menu starts up. You can open the Online complete. Manual and On-screen Manual from here when you want to know about the details of the functions and operations or when need arises.
- 5 Load Paper
- My Image Garden 6 Application Software
- CREATIVE PARK PREMIUM Print Studio Pro
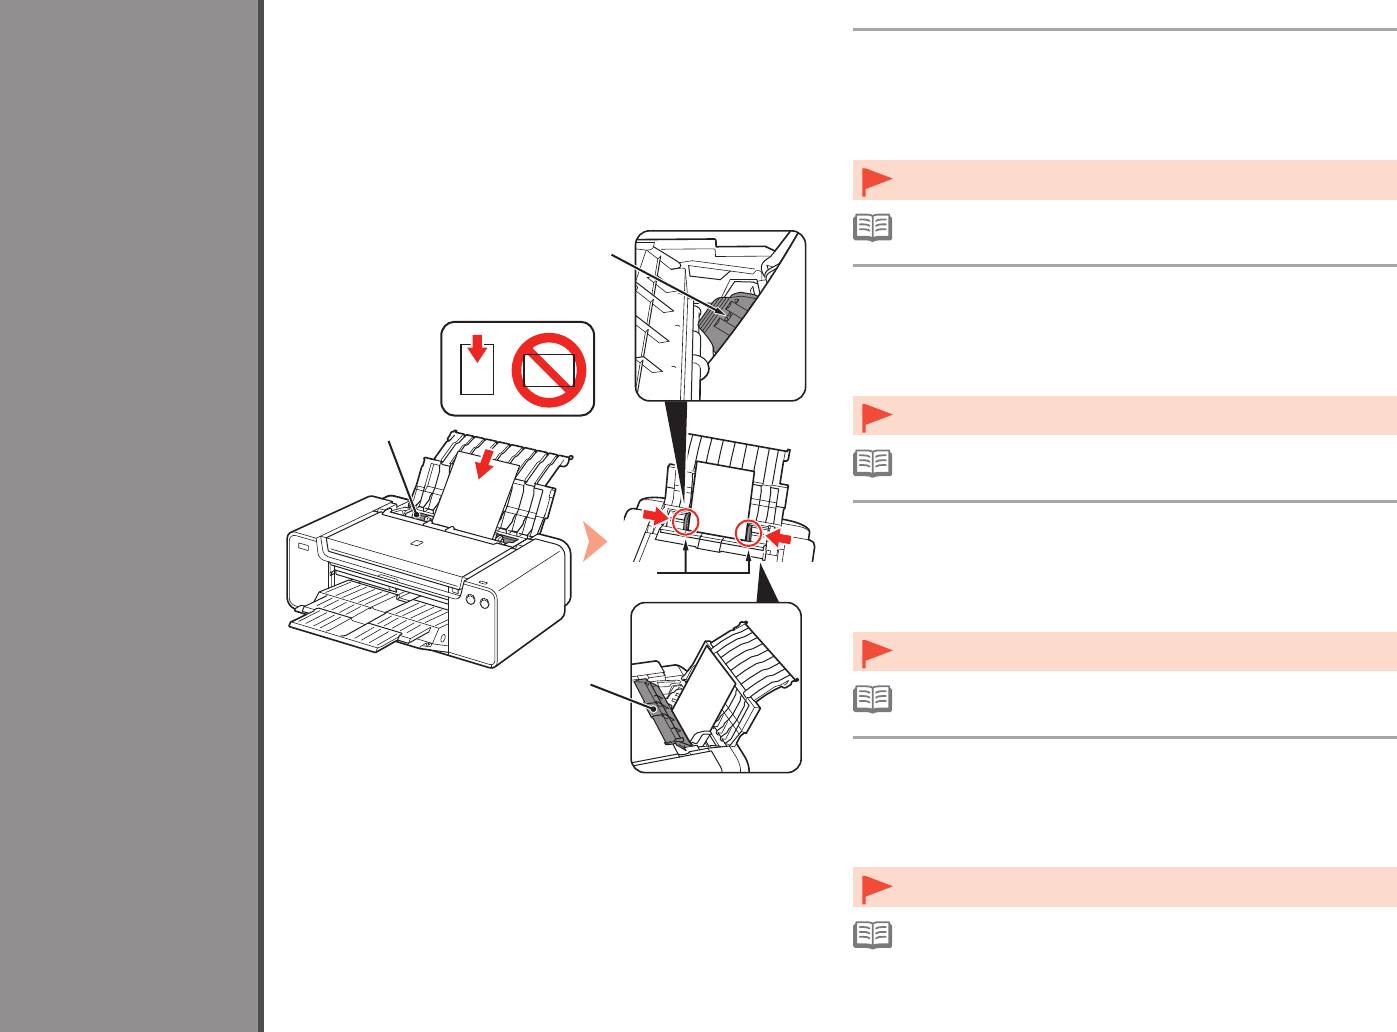
Load paper in the Rear Tray (A) and slide the left and right Paper
Guides (B) against both edges of the paper, then close the Feed
Slot Cover (D).
Load paper in portrait orientation with the printing side facing up.
5
Make sure that the height of the paper stack does not exceed the line (C).
Close the Feed Slot Cover (D) gently. Otherwise it may damage the paper.•
•
For details on other paper loading methods and supported paper types, refer
to "Loading Paper" in the On-screen Manual or Online Manual.
C
Chargez du papier dans le réceptacle arrière (A), faites glisser les
guides papier (B) gauche et droit contre les deux bords du papier,
puis fermez le couvercle de la fente d’alimentation (D).
Load Paper
Chargez du papier dans le sens de la hauteur (orientation Portrait), face à imprimer
vers le haut.
Vérifiez que la hauteur du papier chargé ne dépasse pas la ligne (C).
•
Fermez délicatement le couvercle de la fente d’alimentation (D). Sinon, vous
A
risquez d’abîmer le papier.
•
Pour plus d’informations sur les autres méthodes de chargement du
papier et sur les types de papier pris en charge, reportez-vous à la section
«
Chargement du papier » dans le Manuel à l’écran ou le Manuel en ligne.
Einlegen von Papier
Legen Sie Papier in das hintere Fach (A) ein, und verschieben Sie
Chargement du papier
die linke und rechte Papierführung (B) an beide Kanten des Papiers.
Schließen Sie dann die Abdeckung für Einzugsschacht (D).
Caricamento della carta
B
Legen Sie das Papier im Hochformat mit der zu bedruckenden Seite nach oben
ein.
Vergewissern Sie sich, dass die Höhe des Papierstapels nicht die Linie (C)
übersteigt.
•
Schließen Sie vorsichtig die Abdeckung für den Einzugsschacht (D).
Andernfalls wird möglicherweise das Papier beschädigt.
D
•
Informationen zu weiteren Möglichkeiten für das Einlegen von Papier und
zu den unterstützten Papiertypen nden Sie unter “Einlegen von Papier” im
On-Screen-Handbuch bzw. Online-Handbuch.
Caricare la carta nel vassoio posteriore (A) e fare scorrere le guide della
carta (B) destra e sinistra no a quando non toccano entrambi i bordi del
foglio, quindi chiudere il coperchio dell’alimentatore manuale (D).
Caricare la carta con orientamento verticale con il lato di stampa rivolto verso l’alto.
Verificare che l’altezza della pila di carta non superi la linea (C).
•
Chiudere con delicatezza il coperchio dello slot di alimentazione (D). In caso
contrario potrebbe danneggiare la carta.
•
Per informazioni dettagliate su altri metodi di caricamento della carta e sui
tipi di carta supportati, consultare “Caricamento della carta” nel Manuale a
video o Manuale online.
30


