Canon pixma pro-1: 3 4 5 6
3 4 5 6: Canon pixma pro-1
Table of contents
- Contents■
- Printer Installation Flow■ Printer Preparation Software Installation Installation Complete
- Symbols Used in This Document
- Printed Manual■ On-screen Manual and Online Manual■ Getting Started (this manual)
- Devices Required for Wired Connection■ When using the printer over a wired connection, a commercial network device (router, etc.) and Ethernet cable are required.
- Preparation
- 1 2
- 3 4 5 6
- 7 When it is necessary to turn off the printer
- 1 2 Install the Ink Tanks
- 3 4
- 5 6
- 1 2 Install the Print Head
- 3 4
- 5
- 6
- 7 8
- 9
- Software Installation
- For Windows XP/Windows XP SP1/Windows XP SP2/Windows Vista
- For Windows XP/Windows XP SP1/Windows XP SP2/Windows Vista If you prefer not to apply a Windows service pack, install the printer driver and IJ Network Tool by following the procedure below.
- For Mac OS X v10.6 to v10.6.7 Do you prefer to apply a Mac OS software update?
- For Mac OS X v10.4.11 to v10.5 Perform the installation by following one of the methods below.
- For Mac OS X v10.4.11 to v10.5 Install the software (the printer driver and IJ Network Tool) stored on the Setup CD-ROM by following 1 to 3 below.
- Do not connect the USB Easy-WebPrint EX cable yet.
- 1 1. Make sure that the POWER lamp (white) (A) is lit. 2. Press the ON button (B) to TURN OFF THE PRINTER.
- 2 1. Make sure that the printer has turned off. 2. Turn on the computer. 3. Insert the Setup CD-ROM into the CD-ROM drive.
- 3 3
- 4
- When the second page of the pattern is printed, Print Head Alignment is At the end of the installation, Quick Menu starts up. You can open the Online complete. Manual and On-screen Manual from here when you want to know about the details of the functions and operations or when need arises.
- 5 Load Paper
- My Image Garden 6 Application Software
- CREATIVE PARK PREMIUM Print Studio Pro
C
3 4
5 6
A
1
2
B
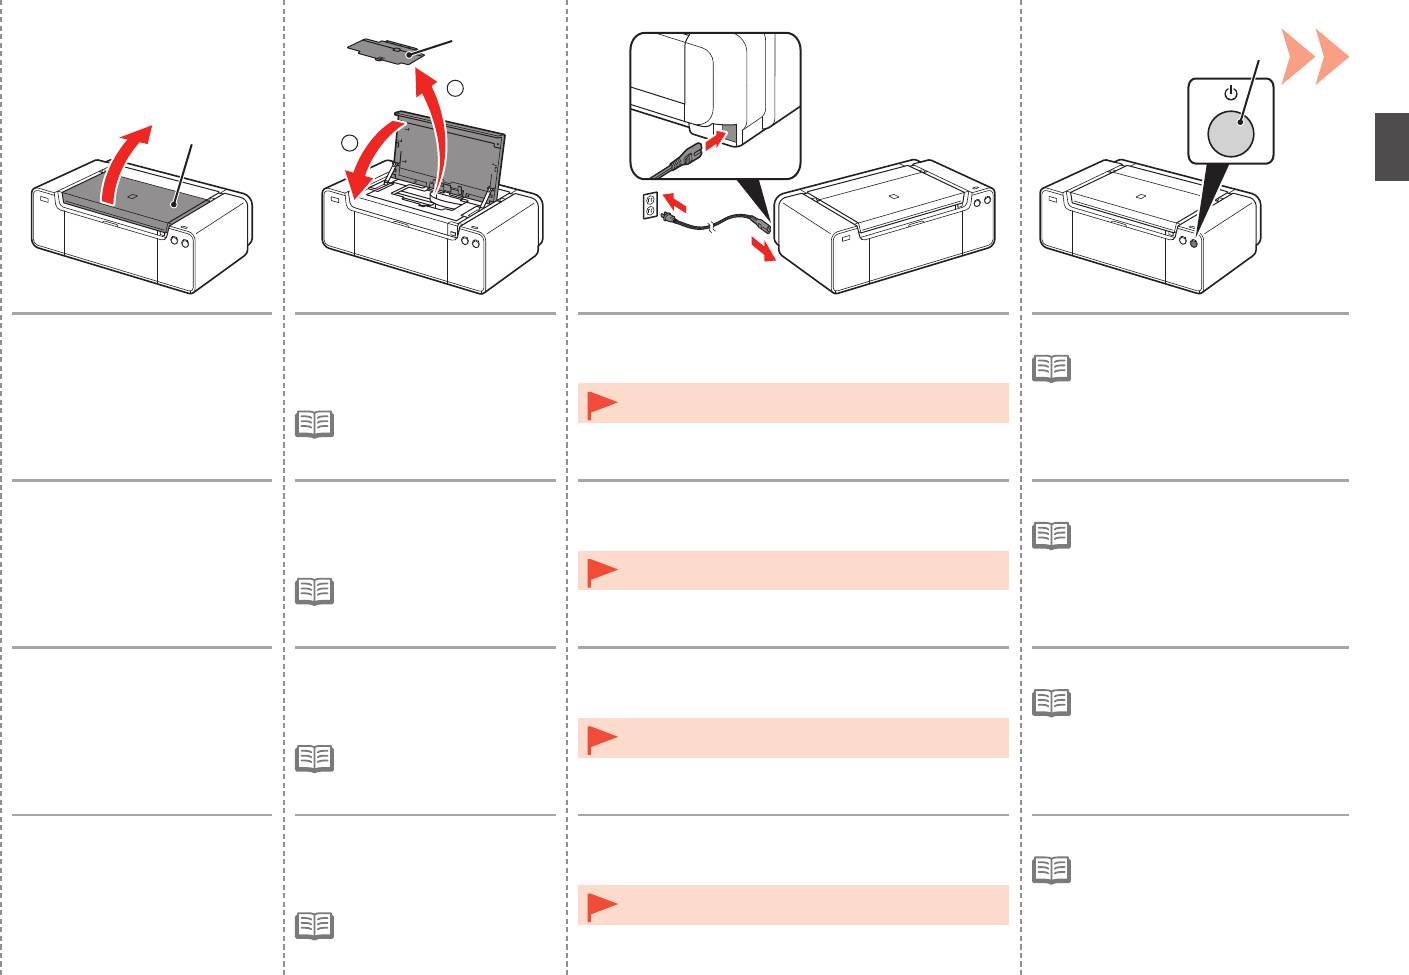
Open the Top Cover (A). 1. Remove the Head Cover (B).
Insert the power cord into the connector on the left
Press the ON button (C).
2. Close the Top Cover.
side at the back of the printer and into the wall outlet
•
It takes about 5 seconds for the ON
firmly.
button to work after the power cord is
plugged in.
•
Do NOT connect the USB cable or Ethernet cable at this
•
The Head Cover is to be
stage.
installed during the printer
installation.
Ouvrez le capot supérieur (A). 1. Retirez le capot des têtes (B).
Insérez fermement le cordon d’alimentation dans le
Appuyez sur le bouton MARCHE (ON) (C).
2. Fermez le capot supérieur.
connecteur à l’arrière de l’imprimante, sur le côté
•
Il faut environ 5 secondes pour que
gauche, et dans la prise secteur.
le bouton MARCHE (ON) réagisse
après le branchement du cordon
•
NE branchez PAS le câble USB ni le câble Ethernet
d’alimentation.
•
Le capot des têtes doit
maintenant.
être mis en place lors de
l’installation de l’imprimante.
Öffnen Sie die obere
1. Entfernen Sie die Abdeckung
Schließen Sie das Netzkabel am Netzkabelanschluss
Drücken Sie die Taste EIN (ON) (C).
Abdeckung (A).
für den Kopf (B).
links auf der Rückseite des Druckers an, und stecken
•
Es dauert ca. 5 Sekunden, bis die
2
. Schließen Sie die obere
Sie das andere Ende in die Steckdose.
Taste EIN (ON) nach Anschluss des
Abdeckung.
Netzkabels funktioniert.
•
Schließen Sie zu diesem Zeitpunkt das USB-Kabel oder
•
Die Abdeckung für den
Ethernet-Kabel noch NICHT an.
Kopf wird während der
Druckerinstallation angebracht.
Aprire il coperchio superiore (A). 1. Rimuovere il coperchio della
Inserire il cavo di alimentazione nel connettore sulla
Premere il pulsante ON (C).
testina (B).
parte posteriore sinistra della stampante e nella presa
•
Il pulsante ON funziona dopo circa
2
. Chiudere il coperchio
a muro.
5 secondi che il cavo di alimentazione
superiore.
è stato collegato alla presa elettrica.
•
NON collegare il cavo USB o quello Ethernet in questa
•
Il coperchio della testina deve
fase.
essere installato durante
l’installazione della stampante.
7


