Canon pixma pro-1: 3 4
3 4: Canon pixma pro-1
Table of contents
- Contents■
- Printer Installation Flow■ Printer Preparation Software Installation Installation Complete
- Symbols Used in This Document
- Printed Manual■ On-screen Manual and Online Manual■ Getting Started (this manual)
- Devices Required for Wired Connection■ When using the printer over a wired connection, a commercial network device (router, etc.) and Ethernet cable are required.
- Preparation
- 1 2
- 3 4 5 6
- 7 When it is necessary to turn off the printer
- 1 2 Install the Ink Tanks
- 3 4
- 5 6
- 1 2 Install the Print Head
- 3 4
- 5
- 6
- 7 8
- 9
- Software Installation
- For Windows XP/Windows XP SP1/Windows XP SP2/Windows Vista
- For Windows XP/Windows XP SP1/Windows XP SP2/Windows Vista If you prefer not to apply a Windows service pack, install the printer driver and IJ Network Tool by following the procedure below.
- For Mac OS X v10.6 to v10.6.7 Do you prefer to apply a Mac OS software update?
- For Mac OS X v10.4.11 to v10.5 Perform the installation by following one of the methods below.
- For Mac OS X v10.4.11 to v10.5 Install the software (the printer driver and IJ Network Tool) stored on the Setup CD-ROM by following 1 to 3 below.
- Do not connect the USB Easy-WebPrint EX cable yet.
- 1 1. Make sure that the POWER lamp (white) (A) is lit. 2. Press the ON button (B) to TURN OFF THE PRINTER.
- 2 1. Make sure that the printer has turned off. 2. Turn on the computer. 3. Insert the Setup CD-ROM into the CD-ROM drive.
- 3 3
- 4
- When the second page of the pattern is printed, Print Head Alignment is At the end of the installation, Quick Menu starts up. You can open the Online complete. Manual and On-screen Manual from here when you want to know about the details of the functions and operations or when need arises.
- 5 Load Paper
- My Image Garden 6 Application Software
- CREATIVE PARK PREMIUM Print Studio Pro
3
4
D
D
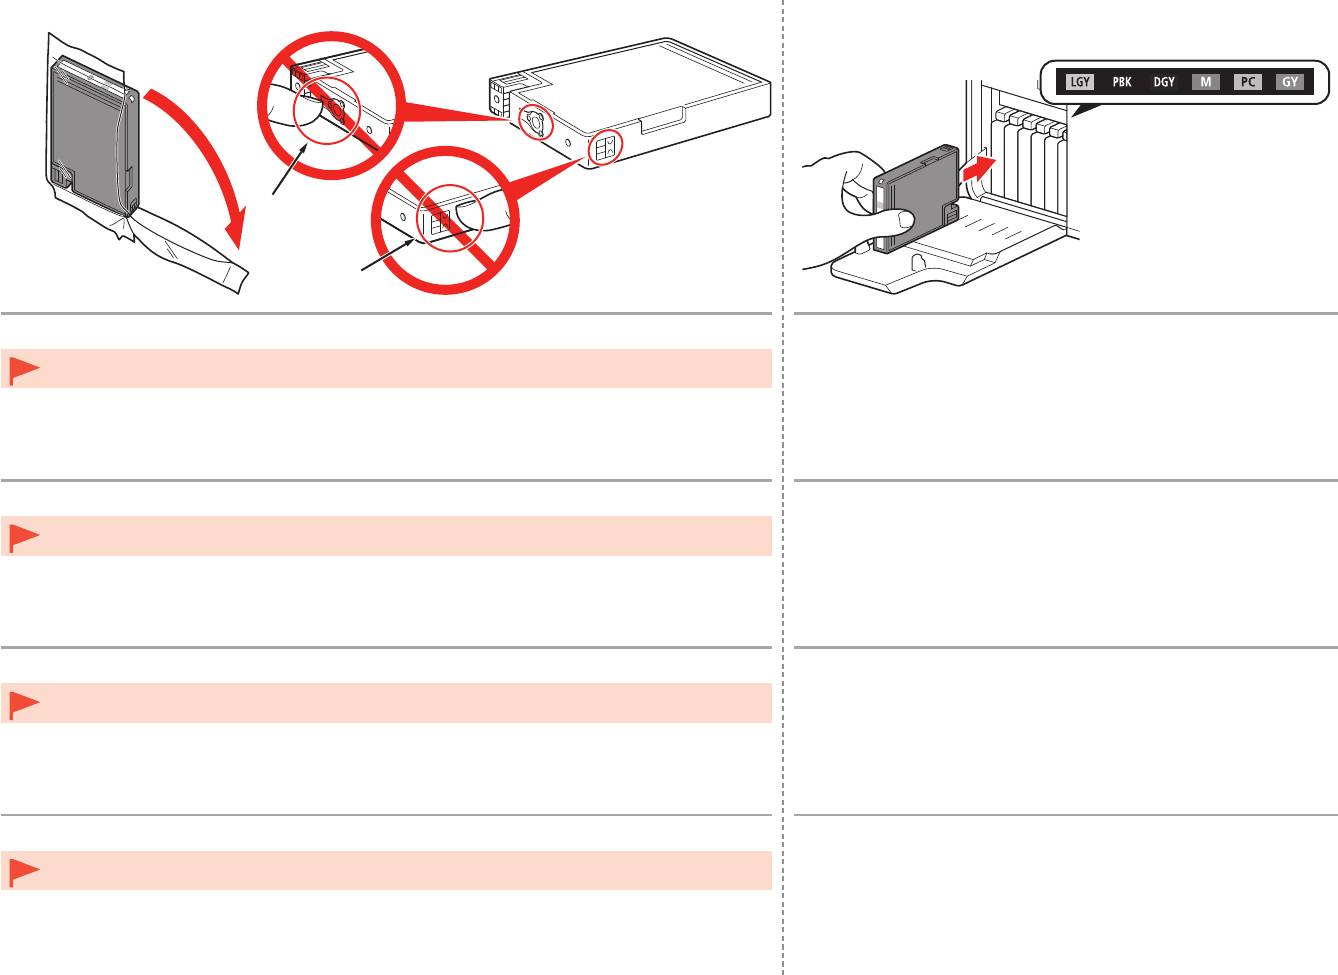
Remove the ink tank from the package.
Set the ink tank.
Press the mark (PUSH) to set the ink tank firmly into place.
Do not touch the contacts (D) of the ink tanks.•
When the installation is completed properly, the Ink lamp lights red.
Make sure that the color of the label matches the ink tank.
Sortez le réservoir d’encre de l’emballage.
Installez le réservoir d’encre.
Appuyez sur le repère (PUSH) du réservoir d’encre jusqu’à ce qu’il
Ne touchez pas les contacts (D) des réservoirs d’encre.•
se mette correctement en place.
Une fois l’installation terminée, le voyant Encre (Ink) s’allume en rouge.
Assurez-vous que la couleur de l’étiquette correspond à celle du réservoir d’encre.
Nehmen Sie die Tintenpatrone aus der Verpackung.
Setzen Sie die Tintenpatrone ein.
Drücken Sie auf die Markierung (PUSH), damit die Tintenpatrone
Berühren Sie nicht die Kontakte (D) der Tintenpatronen.•
fest einrastet.
Wenn die Tintenpatrone richtig eingesetzt wurde, leuchtet die Anzeige für die
Tintenpatrone (Ink) rot.
Die Farbe des Aufklebers muss mit der Farbe der Tintenpatrone übereinstimmen.
Estrarre il serbatoio d’inchiostro dalla confezione.
Inserire il serbatoio d’inchiostro.
Premere sul segno (PUSH) per posizionare in modo stabile il
Non toccare i contatti (D) dei serbatoi d’inchiostro.•
serbatoio d’inchiostro.
Se l’installazione è stata eseguita correttamente, l’indicatore luminoso
dell’inchiostro (Ink) emetterà una luce rossa.
Assicurarsi che il colore del serbatoio d’inchiostro corrisponda all’etichetta.
10


