Canon pixma pro-1: 1 2
1 2: Canon pixma pro-1
Table of contents
- Contents■
- Printer Installation Flow■ Printer Preparation Software Installation Installation Complete
- Symbols Used in This Document
- Printed Manual■ On-screen Manual and Online Manual■ Getting Started (this manual)
- Devices Required for Wired Connection■ When using the printer over a wired connection, a commercial network device (router, etc.) and Ethernet cable are required.
- Preparation
- 1 2
- 3 4 5 6
- 7 When it is necessary to turn off the printer
- 1 2 Install the Ink Tanks
- 3 4
- 5 6
- 1 2 Install the Print Head
- 3 4
- 5
- 6
- 7 8
- 9
- Software Installation
- For Windows XP/Windows XP SP1/Windows XP SP2/Windows Vista
- For Windows XP/Windows XP SP1/Windows XP SP2/Windows Vista If you prefer not to apply a Windows service pack, install the printer driver and IJ Network Tool by following the procedure below.
- For Mac OS X v10.6 to v10.6.7 Do you prefer to apply a Mac OS software update?
- For Mac OS X v10.4.11 to v10.5 Perform the installation by following one of the methods below.
- For Mac OS X v10.4.11 to v10.5 Install the software (the printer driver and IJ Network Tool) stored on the Setup CD-ROM by following 1 to 3 below.
- Do not connect the USB Easy-WebPrint EX cable yet.
- 1 1. Make sure that the POWER lamp (white) (A) is lit. 2. Press the ON button (B) to TURN OFF THE PRINTER.
- 2 1. Make sure that the printer has turned off. 2. Turn on the computer. 3. Insert the Setup CD-ROM into the CD-ROM drive.
- 3 3
- 4
- When the second page of the pattern is printed, Print Head Alignment is At the end of the installation, Quick Menu starts up. You can open the Online complete. Manual and On-screen Manual from here when you want to know about the details of the functions and operations or when need arises.
- 5 Load Paper
- My Image Garden 6 Application Software
- CREATIVE PARK PREMIUM Print Studio Pro
1 2
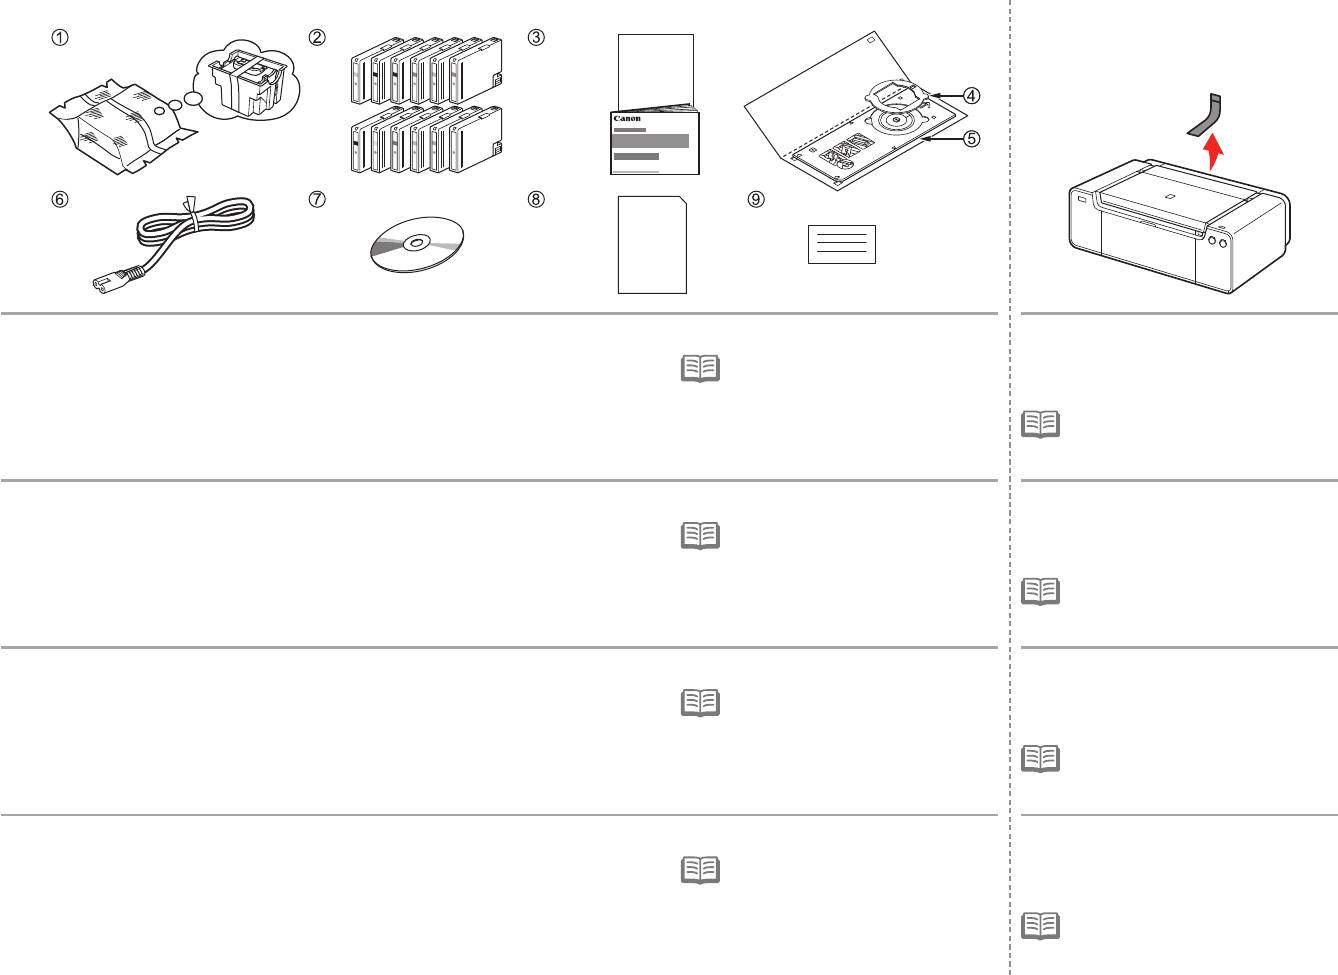
Make sure all the following items are supplied.
Remove all orange tape and protective
1. Print Head
7. Setup CD-ROM
materials from the inside and outside of
•
A USB cable is necessary to connect
2. Ink tanks (12: LGY, PBK, DGY, M, PC, GY,
8. Matte Photo Paper MP-101 (for Automatic
the printer with your computer (USB
the printer.
MBK, Y, R, PM, C, CO)
Print Head Alignment)
connection only).
3
. Manuals
9
. Other documents
•
The tape and protective materials may
4. 8 cm disc adapter
differ in shape and position from those
5. Disc tray
shown here.
6. Power cord
Vérifiez que vous avez bien reçu tous les éléments suivants.
Retirez l’intégralité du ruban orange
1. Tête d’impression
7. CD-ROM d’installation
et du plastique de protection présents
•
Un câble USB est nécessaire pour
2. Réservoirs d’encre (12 : LGY, PBK, DGY, M,
8. Papier Photo Mat MP-101 (pour l’alignement
brancher l’imprimante à votre ordinateur
à l’intérieur et sur l’extérieur de
PC, GY, MBK, Y, R, PM, C, CO)
automatique de la tête d’impression)
(connexion USB uniquement).
l’imprimante.
3
. Manuels
9
. Autres documents
•
La forme et la position réelles du ruban
4. Adaptateur disque 8 cm
et du plastique de protection peuvent
5. Bac disque
différer de celles montrées ici.
6. Cordon d’alimentation
Vergewissern Sie sich, dass alle unten gezeigten Gegenstände in der Verpackung enthalten sind.
Entfernen Sie alle orangefarbenen
1. Druckkopf
7. Installations-CD-ROM (Setup CD-ROM)
Klebebänder und das Schutzmaterial
•
Um den Drucker mit Ihrem Computer
2. Tintenpatronen (12: LGY, PBK, DGY, M, PC,
8. Fotopapier Matt (Matte Photo Paper) MP-101
zu verbinden, benötigen Sie ein USB-
innen und außen am Drucker.
GY, MBK, Y, R, PM, C, CO)
(für die automatische Druckkopfausrichtung)
Kabel (nur USB-Verbindung).
3
. Handbücher
9
. Weitere Dokumente
•
Klebebänder und Schutzmaterial
4. 8-cm-CD-Adapter
können in Form und Position von
5. CD-Fach
der hier dargestellten Anwendung
6. Netzkabel
abweichen.
Assicurarsi che siano presenti i seguenti elementi.
Rimuovere il nastro arancione e tutti
1. Testina di stampa
7. CD-ROM di installazione (Setup CD-ROM)
i materiali protettivi dall’interno e
•
Per collegare la stampante al computer,
2. Serbatoi d’inchiostro (12: LGY, PBK, DGY,
8. Carta Fotografica Opaca (Matte Phote
è necessario un cavo USB (solo
dall’esterno della stampante.
M, PC, GY, MBK, Y, R, PM, C, CO)
Paper) MP-101 (per l’allineamento
connessione USB).
3
. Manuali
automatico della testina di stampa)
4. Adattatore per dischi da 8 cm
9
. Altri documenti
•
La forma e la posizione del nastro e dei
materiali protettivi potrebbero essere
5. Vassoio disco
diverse da quelle illustrate qui.
6. Cavo di alimentazione
6


