Canon pixma pro-1: 1 2 Install the Ink Tanks
1 2 Install the Ink Tanks: Canon pixma pro-1
Table of contents
- Contents■
- Printer Installation Flow■ Printer Preparation Software Installation Installation Complete
- Symbols Used in This Document
- Printed Manual■ On-screen Manual and Online Manual■ Getting Started (this manual)
- Devices Required for Wired Connection■ When using the printer over a wired connection, a commercial network device (router, etc.) and Ethernet cable are required.
- Preparation
- 1 2
- 3 4 5 6
- 7 When it is necessary to turn off the printer
- 1 2 Install the Ink Tanks
- 3 4
- 5 6
- 1 2 Install the Print Head
- 3 4
- 5
- 6
- 7 8
- 9
- Software Installation
- For Windows XP/Windows XP SP1/Windows XP SP2/Windows Vista
- For Windows XP/Windows XP SP1/Windows XP SP2/Windows Vista If you prefer not to apply a Windows service pack, install the printer driver and IJ Network Tool by following the procedure below.
- For Mac OS X v10.6 to v10.6.7 Do you prefer to apply a Mac OS software update?
- For Mac OS X v10.4.11 to v10.5 Perform the installation by following one of the methods below.
- For Mac OS X v10.4.11 to v10.5 Install the software (the printer driver and IJ Network Tool) stored on the Setup CD-ROM by following 1 to 3 below.
- Do not connect the USB Easy-WebPrint EX cable yet.
- 1 1. Make sure that the POWER lamp (white) (A) is lit. 2. Press the ON button (B) to TURN OFF THE PRINTER.
- 2 1. Make sure that the printer has turned off. 2. Turn on the computer. 3. Insert the Setup CD-ROM into the CD-ROM drive.
- 3 3
- 4
- When the second page of the pattern is printed, Print Head Alignment is At the end of the installation, Quick Menu starts up. You can open the Online complete. Manual and On-screen Manual from here when you want to know about the details of the functions and operations or when need arises.
- 5 Load Paper
- My Image Garden 6 Application Software
- CREATIVE PARK PREMIUM Print Studio Pro
1
A
2
C
2
B
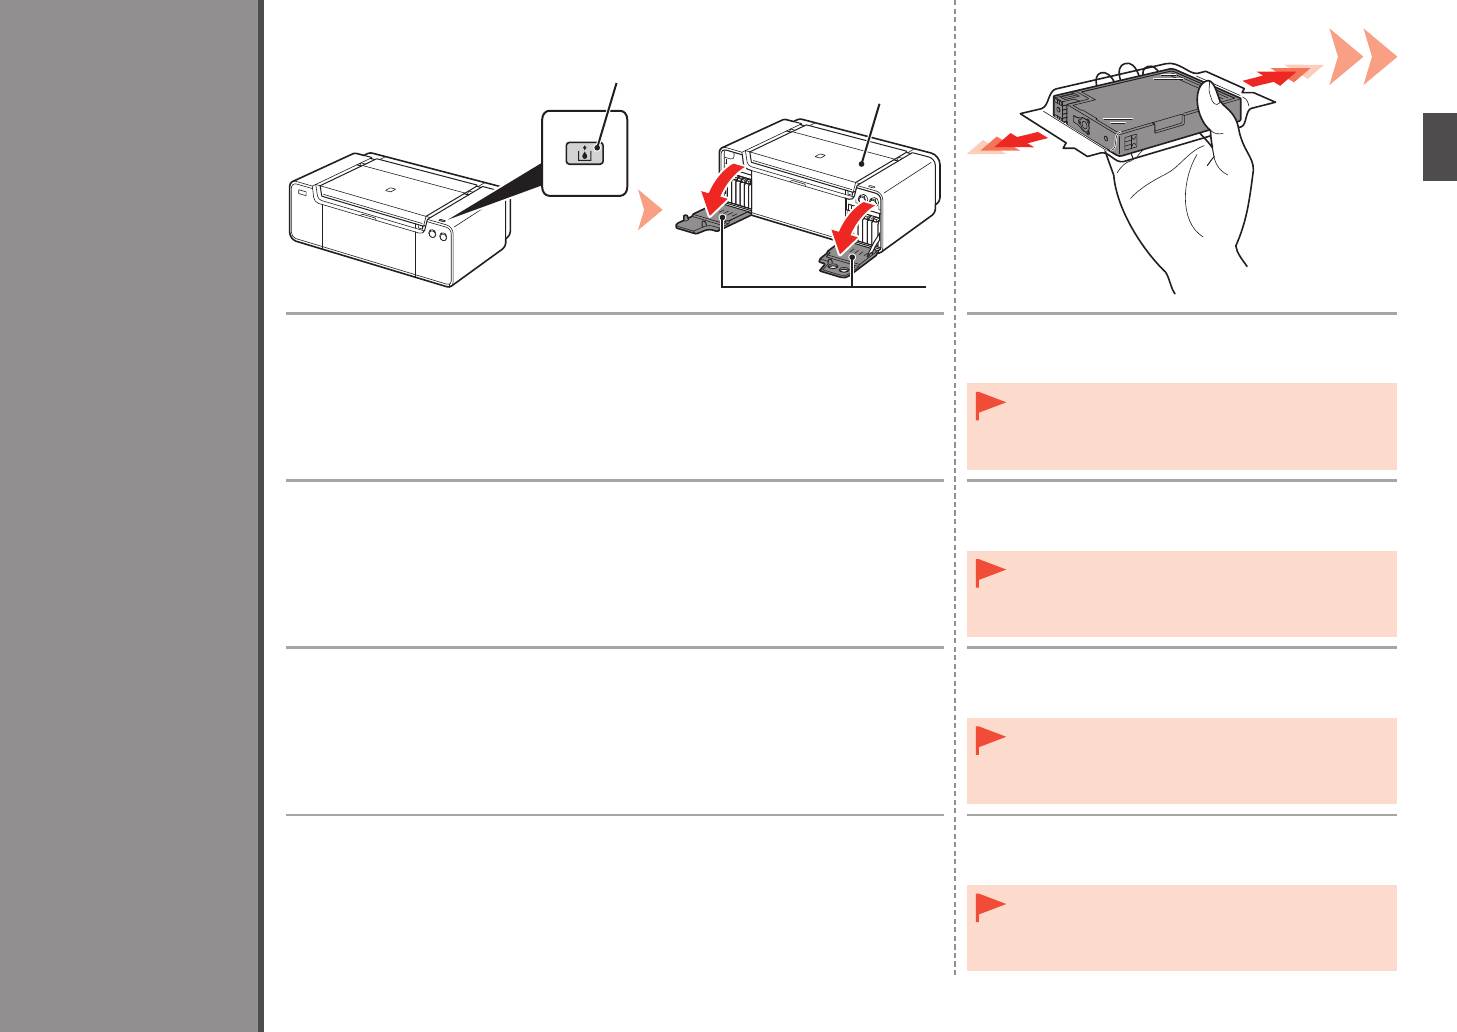
Press the Tank Cover Open button (A).
Before removing the ink tank from its package, shake
The left and right Tank Covers (B) open.
it 5 to 6 times horizontally.
Make sure the Top Cover (C) is closed.
•
Handle the ink tanks carefully. Do not drop or apply
excessive pressure to them.
•
Be sure to use the supplied ink tanks.
Install the Ink Tanks
Appuyez sur le bouton Ouverture du couvercle du réservoir (Tank Cover Open) (A).
Avant de retirer le réservoir d’encre de son emballage,
Les couvercles de réservoir droit et gauche (B) s’ouvrent.
secouez-le 5 à 6 fois de façon horizontale.
Assurez-vous que le capot supérieur (C) est fermé.
•
Manipulez les réservoirs d’encre avec précaution. Ne
les faites pas tomber et n’exercez pas une trop grande
pression dessus.
•
Prenez soin d’utiliser les cartouches d’encre fournies.
Einsetzen der Tintenpatronen
Drücken Sie die Taste zum Öffnen der Tintenpatronenabdeckung (Tank Cover Open) (A).
Schütteln Sie die Tintenpatrone 5 oder 6 Mal hin und
Die linke und rechte Abdeckung der Tintenpatronen (B) werden geöffnet.
her, bevor Sie sie aus der Verpackung nehmen.
Achten Sie darauf, dass die obere Abdeckung (C) geschlossen ist.
•
Behandeln Sie die Tintenpatrone vorsichtig. Lassen Sie
sie nicht fallen, und üben Sie keinen übermäßigen Druck
auf sie aus.
Installation des cartouches d’encre
•
Verwenden Sie nur die mitgelieferten Tintenbehälter.
Installazione dei serbatoi d’inchiostro
Premere il pulsante di apertura del coperchio del serbatoio (Tank Cover Open) (A).
Prima di rimuovere il serbatoio d’inchiostro dalla
I coperchi dei serbatoi (B) destro e sinistro si aprono.
confezione, agitarlo 5 o 6 volte in senso orizzontale.
Assicurarsi che il coperchio superiore (C) sia chiuso.
•
Maneggiare con cura i serbatoi d’inchiostro. Evitare di farli
cadere o di applicarvi una pressione eccessiva.
•
Utilizzare i serbatoi di inchiostro forniti con la stampante.
9


