Canon pixma pro-1: 3 4
3 4: Canon pixma pro-1
Table of contents
- Contents■
- Printer Installation Flow■ Printer Preparation Software Installation Installation Complete
- Symbols Used in This Document
- Printed Manual■ On-screen Manual and Online Manual■ Getting Started (this manual)
- Devices Required for Wired Connection■ When using the printer over a wired connection, a commercial network device (router, etc.) and Ethernet cable are required.
- Preparation
- 1 2
- 3 4 5 6
- 7 When it is necessary to turn off the printer
- 1 2 Install the Ink Tanks
- 3 4
- 5 6
- 1 2 Install the Print Head
- 3 4
- 5
- 6
- 7 8
- 9
- Software Installation
- For Windows XP/Windows XP SP1/Windows XP SP2/Windows Vista
- For Windows XP/Windows XP SP1/Windows XP SP2/Windows Vista If you prefer not to apply a Windows service pack, install the printer driver and IJ Network Tool by following the procedure below.
- For Mac OS X v10.6 to v10.6.7 Do you prefer to apply a Mac OS software update?
- For Mac OS X v10.4.11 to v10.5 Perform the installation by following one of the methods below.
- For Mac OS X v10.4.11 to v10.5 Install the software (the printer driver and IJ Network Tool) stored on the Setup CD-ROM by following 1 to 3 below.
- Do not connect the USB Easy-WebPrint EX cable yet.
- 1 1. Make sure that the POWER lamp (white) (A) is lit. 2. Press the ON button (B) to TURN OFF THE PRINTER.
- 2 1. Make sure that the printer has turned off. 2. Turn on the computer. 3. Insert the Setup CD-ROM into the CD-ROM drive.
- 3 3
- 4
- When the second page of the pattern is printed, Print Head Alignment is At the end of the installation, Quick Menu starts up. You can open the Online complete. Manual and On-screen Manual from here when you want to know about the details of the functions and operations or when need arises.
- 5 Load Paper
- My Image Garden 6 Application Software
- CREATIVE PARK PREMIUM Print Studio Pro
3 4
F
E
C
D
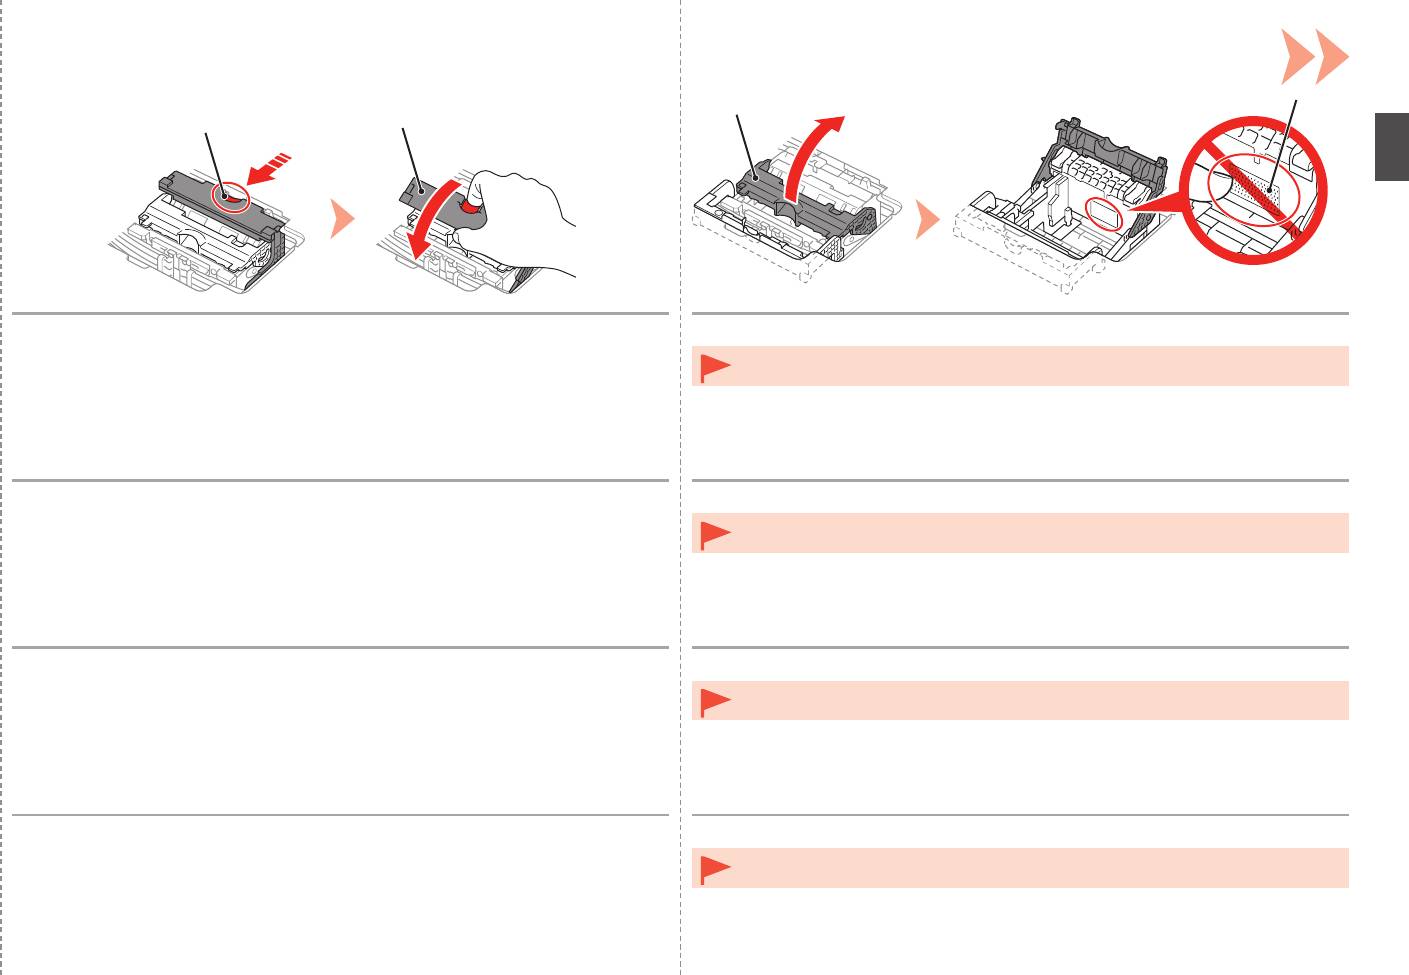
While pressing the Lock Button (C) in the direction of the arrow, open the Joint
Open the Print Head Lock Lever (2) (E) fully until it stops.
Lever (1) (D) forward.
•
Do not touch the inside of the Print Head Holder (F). The printer may not print properly if you
touch it.
Lorsque vous appuyez sur le bouton de verrouillage (C) dans le sens de la flèche,
Relevez le levier de verrouillage de la tête d’impression (2) (E) jusqu’à ce qu’il s’arrête.
relevez le levier mixte (1) (D) vers l’avant.
•
Ne touchez pas l’intérieur du support de tête d’impression (F). L’imprimante risque de ne pas
imprimer correctement si vous y touchez.
Drücken Sie die Taste für die Verriegelung (C) in Richtung des Pfeils, und öffnen
Öffnen Sie die Druckkopfverriegelung (2) (E) vollständig bis zum Anschlag.
Sie gleichzeitig den Winkelhebel (1) (D) nach vorn.
•
Vermeiden Sie jede Berührung der Komponenten im Inneren des Druckkopfhalters (F). Nach
einer Berührung druckt der Drucker unter Umständen nicht mehr einwandfrei.
Spingendo il pulsante di blocco (C) nella direzione della freccia, aprire la leva di
Aprire completamente la leva di bloccaggio della testina di stampa (2) (E) fino all’arresto.
collegamento (1) (D) spostandola in avanti.
•
Non toccare la parte interna del supporto della testina di stampa (F). In caso contrario, la
stampante potrebbe non stampare correttamente.
13


