Sigma ELECTRONIC FLASH EF-610 DG SUPER NA-iTTL (ニコン用): WIRELESS FLASH
WIRELESS FLASH: Sigma ELECTRONIC FLASH EF-610 DG SUPER NA-iTTL (ニコン用)
WIRELESS FLASH
When using the “Wireless Flash” mode, you can take pictures with a more three-dimensional feeling
with shadow, or you can produce natural images with shadow depending on the flash position without
any extension cord connecting the camera body to the flash. In case of the EF-610 DG SUPER
NA-iTTL, communication between the camera body and the flash will be achieved by the light of the
flash. In the “Wireless Flash” mode, the camera will calculate the correct exposure automatically.
◆ This function is available with CLS compatible cameras only.
◆ If the camera body incorporates Commander mode, it is possible to use its own built-in flash for wireless
photography.
◆ In these instructions, we call a flash unit, which is attached to the camera body the “Master unit ”, and we call
a flash unit at a remote position a “Slave unit”.
◆ When setting a slave unit at the desired position, you can use a mini-stand. This mini-stand has a screw hole
for a tripod.
◆ Place the slave flash unit at the desired location. Do not place the slave unit within the picture area.
◆ Set the flash unit within the range of 0.5m/1.5ft~5m/16ft from the subject and set the camera body within the
range of 1m/3ft~5m/16ft from the subject.
◆ Two or more sets of Slaves can be divided into groups and different flash conditions can be set for each group
(1~3). The Master Flash should be set at 0.
◆ Channel and group number settings can be input on the master unit and slave units. Other settings can be
input on the master flash unit only.
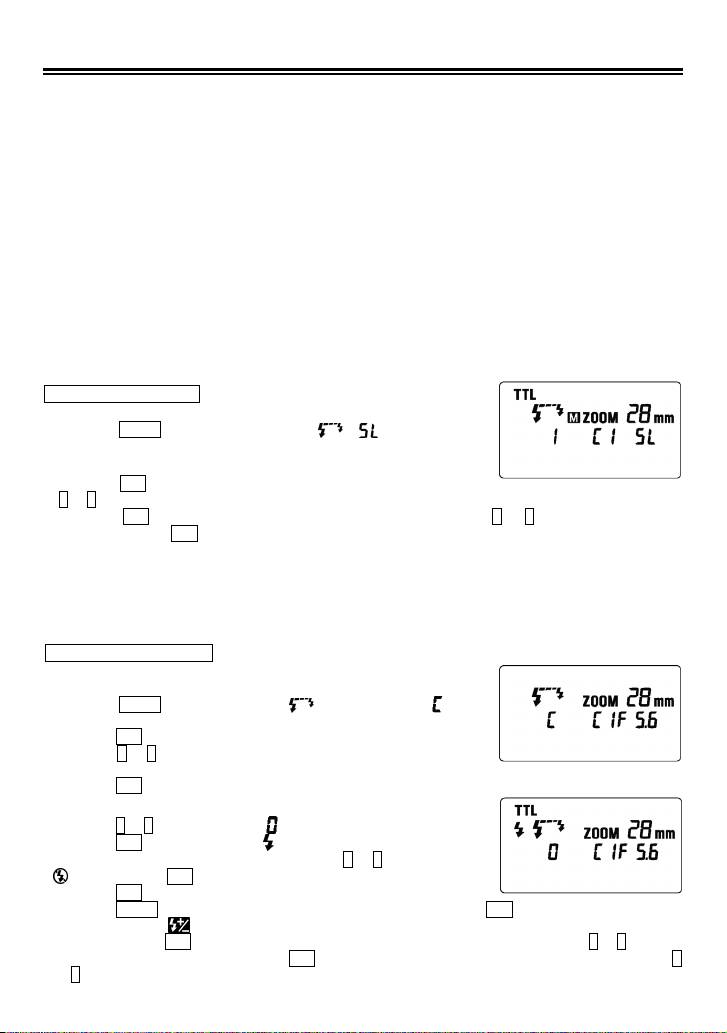
Setting the slave unit
1. Attach the flashgun to the camera body and switch “ON” the flash unit.
Press the MODE button to select the TTL /
/
icon.
◆ Setting cannot be done if camera’s exposure display turns off. In such a
case, press the camera’s shutter button half-way to re-activate the setting.
2. Press the SEL button to make the channel indicator blink and press the
+ or – button to set the channel number (from C1- C4).
3. Press the SEL button to make the group number blink and press the + or – button to set the group
number. Press the SEL button to confirm.
4. Detach the slave unit from the camera body and place it in the desired position.
◆ In the case of using the built-in flash of a camera body with Commander mode for wireless photography,
Group A cameras correspond to Group 1 flashguns and Group B corresponds to Group 2 flashguns. When
using the built-in flash unit of the D70 for wireless photography, set the channel number to C3 and group
number to 1. For the rest of the settings, refer to your camera’s instruction manual. Please also note that it
cannot be used with camera’s command mode AA and M1/128.
Setting the Master Unit
Setting the channel number on the master flash unit
1. Attach the flashgun to the camera body, and switch “ON” the flash unit.
Press the MODE button to select the
icon. Confirm the
icon is
shown in the display.
2. Press the SEL button to make the channel indicator blink on the display.
3. Press the + or – button to set the desired channel number. (Choose the
same channel number as set on the slave flash unit.)
4. Press the SEL button several times until the display stops blinking.
Setting the flash mode on the master flash unit
5. Press the + or – button and select
(Master)
6. Press the SEL button and confirm
icon is blinking.
(If you do not want to fire master unit, press the + or – button and select
icon. Press the SEL button to confirm this setting).
7. Press the SEL button again.
8. Press the MODE button and select TTL, M or MULTI and then press the SEL button to confirm.
9.
If TTL is selected, icon will blink and you can set the exposure compensation. If no compensation is
required press the SEL button to complete the setup. If compensation is required press the + or – button to
set the required amount, then press the SEL button to set compensation. If M mode is selected, press the +
or – button to set the flash output amount. If MULTI is selected, exposure will switch to Multi Flash Mode.
23
Оглавление
- 安全上のご注意
- 各部の名称(1 ページ)
- 電池の入れ方
- ワイドパネルについて
- 連続撮影時のご注意
- FV ロック撮影
- 後幕シンクロ撮影
- バウンス撮影
- スレーブ発光
- 主要諸元
- PRECAUTIONS
- DESCRIPTION OF THE PARTS
- ADJUSTING THE FLASH HEAD
- WIDE PANEL
- LIMITS OF CONTINUOUS SHOOTING
- FV LOCK
- REAR-CURTAIN SYNCHRONIZATION
- BOUNCE FLASH
- WIRELESS FLASH
- SLAVE FLASH
- SPECIFICATIONS
- PRECAUTIONS
- DESCRIPTION DES ELEMENTS
- AJUSTEMENT DE LA TETE FLASH
- ELARGISSEUR D'ANGLE
- LIMITES DES PRISES DE VUE CONSECUTIVES AU FLASH
- MEMORISATION DE LA PUISSANCE DU FLASH FV
- SYNCHRONISATION SUR LE SECOND RIDEAU
- FLASH INDIRECT
- FLASH SANS CORDON EN MODE EVOLUE
- FLASH ESCLAVE
- CARACTERISTIQUES TECHNIQUES
- VOORZORGSMAATREGELEN
- OMSCHRIJVING VAN DE ONDERDELEN
- HET AFSTELLEN VAN DE FLITSKOP
- GROOTHOEK ADAPTER
- MAXIMALE PRESTATIES BIJ CONTINU FOTOGRAFEREN.
- FV LOCK
- SYNCHRONISATIE VAN HET 2 SLUITERGORDIJN
- INDIRECT FLITSEN
- DRAADLOOS FLITSEN
- SLAVE FUNCTIE
- TECHNISCHE GEGEVENS:
- PRECAUCIONES
- DESCRIPCIÓN DE LAS PARTES
- AJUSTE DEL CABEZAL DEL FLASH
- FLASH AUTOMÁTICO TTL
- LIMITES DEL DISPARO CONTINUO
- PRIORIDAD DE DISTANCIA FLASH MANUAL
- COMPENSACIÓN DE EXPOSICIÓN
- MODO DE MULTI FLASH (Estroboscópico)
- FLASH INALAMBRICO
- FLASH ESCLAVO
- ESPECIFICACIONES
- ATTENZIONE
- DESCRIZIONE DELLE PARTI
- REGOLAZIONE DELLA TESTA DEL FLASH
- ILLUMINAZIONE DEL DISPLAY LCD
- LIMITAZIONI QUANDO SI SCATTA IN SEQUENZA
- FLASH MANUALE
- FV LOCK
- RIDUZIONE DELL'EFFETTO "OCCHI ROSSI"
- FLASH INDIRETTO
- FLASH SECONDARIO
- SPECIFICHE
- BEMÆRK
- BESKRIVELSE AF FLASHENS DELE
- JUSTERING AF FLASHHOVEDET
- LCD-DISPLAY BELYSNING
- KONTINUERLIG OPTAGELSE
- MANUEL INDSTILLING AF FLASH
- FV LÅS
- REDUKTION AF ”RØDE ØJNE”
- BOUNCE FLASH (indirekte flash)
- SLAVE-FLASH
- SPECIFIKATIONER
- VORSICHTSMAßNAHMEN
- BESCHREIBUNG DER TEILE
- EINSTELLEN DES BLITZKOPFES
- WEITWINKELSTREUSCHEIBE
- GRENZEN DER SERIENAUSLÖSUNG
- DISTANZVORGABE MIT MANUELLER BLITZSTEUERUNG
- SYNCHRONISATION AUF DEN ZWEITEN VERSCHLUSSVORHANG
- INDIREKTES BLITZEN
- KABELLOSES BLITZEN
- „SLAVE“ GERÄT
- TECHNISCHE DATEN
- 注 意
- 相容相機型號
- 安裝閃光燈到相機及其解除
- TTL 模式
- 閃燈連發限制
- 閃光值鎖
- 第二簾幕閃燈同步
- 反射閃光
- 離機無線從屬(Slave)閃光模式
- 規 格
- 사용상 주의점
- 각부의 명칭
- 플래시 헤드 조정
- LCD 패널 조명
- 연속 촬영시 주의점
- 매뉴얼 플래시 작동
- FV LOCK 촬영
- 후막 동조 촬영
- 바운스 촬영
- 무선 플래시 촬영
- 슬레이브 플래시
- 제품 사양
- ПРЕДОСТОРОЖНОСТИ
- ОПИСАНИЕ СОСТАВНЫХ ЧАСТЕЙ
- НАСТРОЙКА ГОЛОВКИ ВСПЫШКИ
- РАССЕИВАЮЩАЯ ПАНЕЛЬ
- ОГРАНИЧЕНИЯ ДЛЯ НЕПРЕРЫВНОЙ СЪМКИ
- СИНХРОНИЗАЦИЯ ПО ВТОРОЙ ШТОРКЕ
- РЕЖИМ ВСПЫШКИ MULTY (МНОГОКРАТНЫЙ)
- НАПРАВЛЕННОСТЬ ВСПЫШКИ
- ХАРАКТЕРИСТИКИ
- PRECAUÇÕES
- DESCRIÇÃO DOS COMPONENTES
- COMO AJUSTAR A CABEÇA DO FLASH
- PAINEL DE GRANDE ANGULAR
- LIMITES DO DISPARO CONTÍNUO
- BLOQUEIO FV
- SINCRONIZAÇÃO DA CORTINA POSTERIOR
- FLASH INDIRECTO
- FLASH SEM FIOS (WIRELESS)
- FLASH ESCRAVO
- ESPECIFICAÇÕES
