MPM MRK-03: GB
GB: MPM MRK-03

SAFETY INSTRUCTIONS
Read this user manual carefully before use.
Take particular caution when operating if there are children near the device!
Always turn o the device by setting the switch in
position (disabled).
Place the food processor on asmooth and stable surface.
Always turn o the device before assembling all of the accessories.
Before operating, make sure that there are no hard tools (such as spoon or spatula) left by mi-
stake in the container of the food processor as this may lead to permanent damage of the
components or even the entire device.
If the equipment is faulty, do not use it due to the fact that using faulty device may be dange-
rous. In this situation, contact an authorized service center to x the fault.
Do not use the device if the power cord, the plug or other parts are damaged. In this case take
the device to be repaired.
GB
Do not use the device outdoors.
Do not hang the power cord over sharp edges and do not allow the power cord to touch hot
surfaces.
Before starting the device, make sure that all add-on devices and accessories are installed
correctly.
Before disassembly, turn o the device and wait until the motor stops completely.
To push the products use the pusher. It is categorically forbidden to use other object for this
purpose because it may lead to damage of the equipment or body injury.
Take particular caution in contact with cutting blades, especially when removing, emptying
or washing.
Keep this device out of reach of children.
Do not leave the device switched on when unattended.
After nishing operating, rst set the switch in
position and then unplug the device.
Do not immerse the processing unit, the power cord or the plug in water or other liquids.
Do not use accessories and spare parts of other manufacturers or those that are not recom-
mended by MPM agd S.A. If you use such parts, the warranty shall expire.
Do not exceed the maximum capacity indicated on the container of the food processor.
Before processing, wait until the components are cool.
The device is designed for home use only.
Wash all the parts carefully before being used again.
This equipment is not designed to be used by persons (including children) with reduced
physical, sensory or mental abilities or persons who have no experience or knowledge of the
equipment, unless it is done under supervision or in accordance with operating instructions
of the equipment by persons responsible for their safety.
Pay attention to children to prevent playing with the equipment/device.
Do not place the device near other electrical devices, burners, cookers or ovens.
13
MRK-03_instrukcja_v02.indd 13 2012-07-27 08:56:46
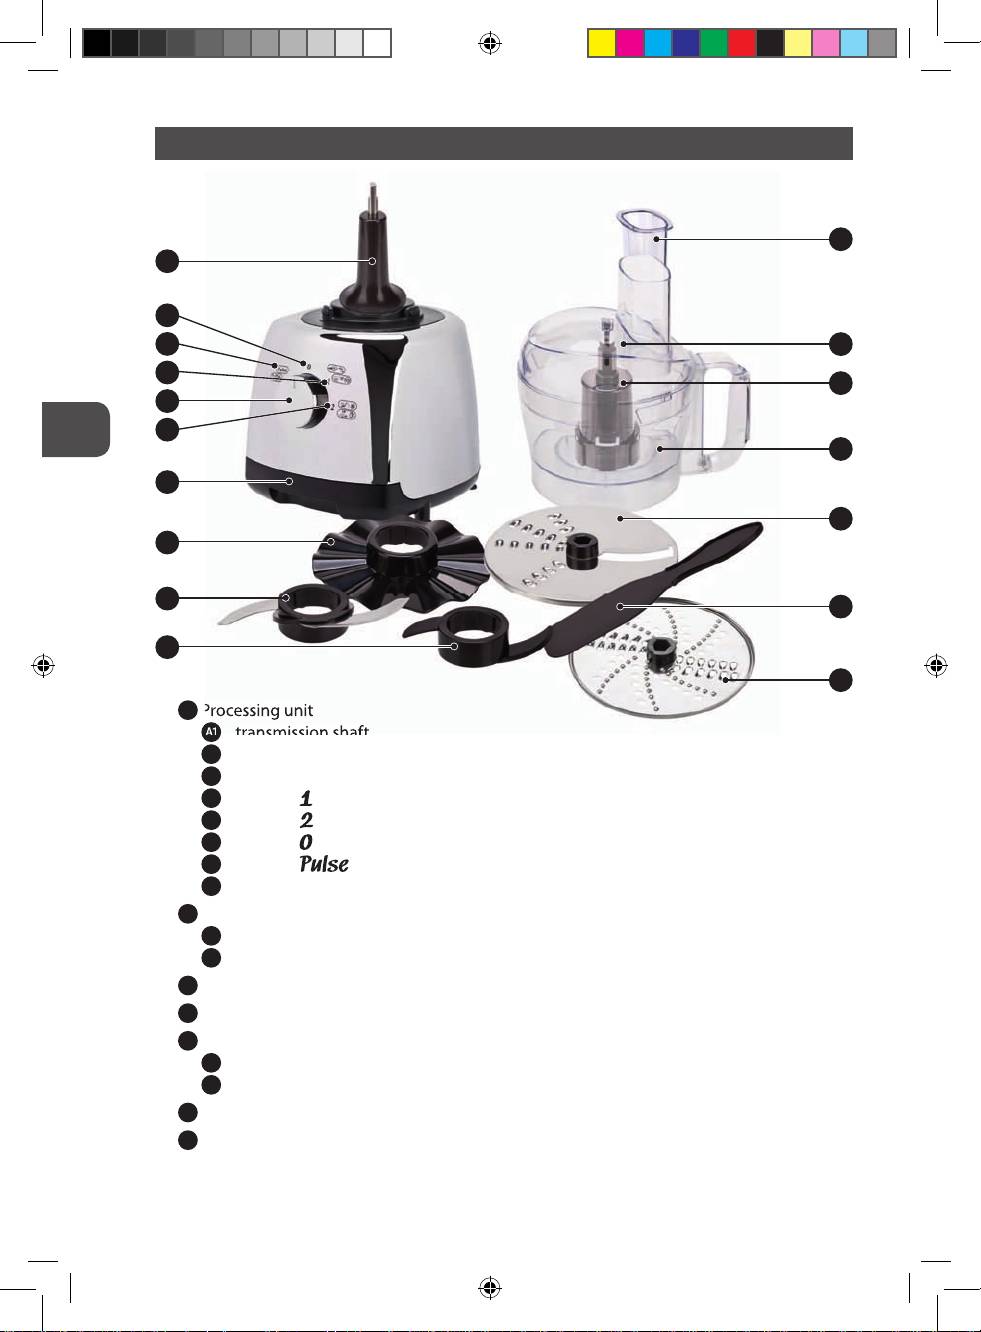
DESCRIPTION OF THE DEVICE
GB
A
Processing unit
A1
transmission shaft
A2
disks and cutting tools driver
A3
switch
A4
position – slow motor operation
A5
position – fast motor operation
A6
position – disabled
A7
position – allows to run the drive for the time of holding the switch
A8
compartment for accessories
B
Container
B1
lid
B2
pusher with feeder
C1
Double cutting and grinding disk
C2
Full disc for grating potatoes
D
Cutting and kneading accessories
D1
metal knife for cutting
D2
plastic stirrer for kneading
E
Add-on device for whipping froth, light sauces or stirring cocktails
F
Spatula
14
Processing unit
A1
transmission shaft
B2
A1
A6
A7
B1
A4
A2
A3
A5
B
A8
C1
E
D1
F
D2
C2
MRK-03_instrukcja_v02.indd 14 2012-07-27 08:56:56
NOTE! This device is equipped in asafety lock that allows switching on the food processor only if the accessories
are correctly assembled to the processing unit.
When the accessories are correctly assembled, abuilt-in safety lock is unlocked, which allows
you to run the device.
BEFORE FIRST USE
After unpacking, wash all parts of the food processor with hot water; read the user manual
and familiarize with all the parts of the device.
USING THE DEVICE
STIRRING/ KNEADING FUNCTION
GB
Place the container of the food processor
B
on the processing unit
A
in order to place the
handle to the right side of the device. Lock the container by turning it clockwise until it snaps
into the spanners. Place the stirrer for kneading
D2
on the discs driver
A2
in the container of the
food processor
B
. Place the products to be kneaded in the container. Place the lid
B1
and turn
it clockwise until the spanner is locked. Place the pusher
B2
in the lid. If necessary, you can add
products thorough the hole in the lid. After nishing operating, turn the switch
A3
in position
A6
.
NOTE! Do not allow the kneaded dough to form a lump as this may lead to damage of the device. During
operating the use of 1 or 2 speed is recommended,
if necessary.
CHOPPING FUNCTION
Place the container of the food processor
B
on the processing unit
A
in order to place the handle
to the right side of the device. Lock the container by turning it clockwise until it snaps into the
spanners. Place the metal knife for cutting
D1
on the discs driver
A2
in the container of the food
processor
B
. Place the products to be cut in the container. Place the lid
B1
and turn it clockwise
until the spanner is locked. Place the pusher
B2
in the lid. If necessary, you can add products
thorough the hole in the lid. After nishing operating, turn the switch
A3
in position
A6
.
GRINDING AND CUTTING FUNCTION
Place the container of the food processor
B
on the processing unit
A
in order to place the
handle to the right side of the device. Lock the container by turning it clockwise until it snaps
into the spanners. Place the double cutting and grinding disk
C
on the discs driver
A2
in the
container of the food processor
B
. Place the lid
B1
and turn it clockwise until the spanner is
locked. Place the products through the hole in the lid of the food processor pushing it with the
pusher
B2
. After nishing operating, turn the switch
A3
in position
A6
. When operating with
the use of the disk, set the speed in
position at the very beginning. Then, if it is necessary,
you may increase the speed to
position.
MASHING FUNCTION
Place the food container
B
on the motor unit
A
so that the handle is positioned on the
right side of the appliance. Lock the container, turning it clockwise until the locking clips snap
into place. Mount the mashing disc
C2
on the spindle
A2
in the food container
B
. Apply the
15
MRK-03_instrukcja_v02.indd 15 2012-07-27 08:56:57
lid
B1
and turn it clockwise until it locks into place. Insert the potatoes into the food container
through the feeder tube, pressing gently with the pusher
B2
. When your food is ready, turn
the speed selector
A3
to position
A6
. When using the blades, rst turn the speed selector
to position
A4
, then adjust it to position
A5
if necessary.
NOTE! To push the products use only the type of pushed designed for this type of work. Do not push the products
with your hands or with objects not designed for this purpose as this may lead to damage of the device. Do not
allow the kneaded dough to form alump as this may lead to damage of the device.
WHIPPING FROTH, LIGHT SAUCES OR STIRRING COCKTAILS FUNCTION
Place the container of the food processor
B
on the processing unit
A
in order to place the handle
to the right side of the device. Lock the container by turning it clockwise until it snaps into the
GB
spanners. Place the add-on device for whipping froth, light sauces or stirring cocktails
E
on the
discs driver
A2
in the container of the food processor
B
. Place the products to be kneaded in the
container. Place the lid
B2
and turn it clockwise until the spanner is locked. Place the pusher
B2
inthe lid. If necessary, you can add products thorough the hole in the lid. After nishing operating,
turn the switch
A3
in position
A6
.
CLEANING AND MAINTENANCE
1. Before cleaning set the speed switch in position
A6
and unplug the device.
2. Disassembly the add-on devices and accessories in the reverse order than they were
assembled for various functions. Wash all add-on devices and accessories in water with
detergent (this step should be done immediately after use as it facilitates the cleaning
process) and then dry.
3. Do not immerse the processing unit
A
in water and other liquids.
4. Just wipe them with awet cloth.
After nishing operating, the accessories may be placed in the compartment
A8
which
is located at the bottom of the processing unit
A
. This will facilitate storage of the food
processor and prevent loosing the accessories.
WHEN THE DEVICE DOES NOT WORK
Make sure the plug is properly inserted into the network socket or whether there is any vol-
tage in the socket.
Check whether the container of the food processor
B
and the lid
B1
are assembled correctly.
If everything is assembled correctly and the device still does not work, you should report to an
authorized service centre to detect and remove any faults.
16
MRK-03_instrukcja_v02.indd 16 2012-07-27 08:56:57
TECHNICAL SPECIFICATION
Power supply: 220-240 V ~50/60 Hz
Power: 700 W
Maximum speed: 21000 r/min.
Number of speeds: 2 +
function
The capacity of food processor container: 1.2 L
The maximum time of continuous operation, KB MAX = 1 min.
The maximum noise level, L
= 80 dB
WA
GB
PROPER DISPOSAL OF THE PRODUCT (waste electrical and electronic equipment)
Poland
This symbol on the product indicates that the product, after its lifetime, should not be disposed with other
household wastes. To avoid harmful inuence on the environment and human health due to uncontrolled
waste disposal, dispose the waste device to the service point of waste household appliances or report
collecting it from home. In order to obtain detailed information about the location and how to dispose
the waste electrical and electronic equipment in asafe way, contact your retailer or local Department
of Environmental Protection. Do not dispose the device with other municipal waste
17
MRK-03_instrukcja_v02.indd 17 2012-07-27 08:56:57
Оглавление
- PL INSTRUKCJA OBSŁUGI .......................................................................... 3 CZ NÁVOD K OBSLUZE ..............................................................................8 GB USER MANUAL ...................................................................................13 HU HASZNÁLATI ÚTMUTATÓ ................................................................... 18 RU ИНСТРУКЦИЯ ПО ОБСЛУЖИВАНИЮ ................................................ 23 LT VARTOTOJO INSTRUKCIJA .................................................................. 28 UA ІНСТРУКЦІЯ З ОБСЛУГОВУВАННЯ .................................................... 33
- PL
- CZ
- na strouhání brambor
- CZ
- GB
- HU
- RU
- RU ВНИМАНИЕ! Фирмa MPM agd S.Aоставляет за собой возможность технических изменений.
- LT
- Įtampa: 220-240 V ~50/60 Hz Galingumas: 700 W Maksimalnūs apsisukimai: 21000 ap./min. Bėgių skaičius: 2 + funkcija Procesoriaus talpyklos talpa: 1,2 L Maksimalus išsinio darbo laikas, KB MAX = 1 min. Maksimalus triukšmo lygis, L
- UA
- УВАГА! Компанія MPM agd S.A.застерігає за собою право на можливість технічних змін. UA
- NOTES
- Życzymy zadowolenia zużytkowania naszego wyrobu izapraszamy do skorzystania zszerokiej oferty handlowej firmy Přejeme spokojenost s používáním našeho výrobku azveme k využití široké obchodní nabídky firmy We wish you satisfaction from using the product and invite you to check awide range of other appliances
