EXFO Photonic Solutions Div. FVA-600: 5 Maintenance
5 Maintenance: EXFO Photonic Solutions Div. FVA-600

Maintenance 14
5 Maintenance
To help ensure long, trouble-free operation:
³ Always inspect fiber-optic connectors before using them and clean them if
necessary.
³ Keep the unit free of dust.
³ Clean the unit casing and front panel with a cloth slightly dampened with water.
³ Store unit at room temperature in a clean and dry area. Keep the unit out of
direct sunlight.
³ Avoid high humidity or significant temperature fluctuations.
³ Avoid unnecessary shocks and vibrations.
³ If any liquids are spilled on or into the unit, turn off the power immediately,
disconnect from any external power source, remove the batteries and let the
unit dry completely.
WARNING
Use of controls, adjustments, and procedures for operation and
maintenance other than those specified herein may result in
hazardous radiation exposure.
Cleaning EUI Connectors
Regular cleaning of EUI connectors will help maintain optimum performance. There
is no need to disassemble the unit.
IMPORTANT
If any damage occurs to internal connectors, the module casing will
have to be opened and a new calibration will be required.
To clean EUI connectors:
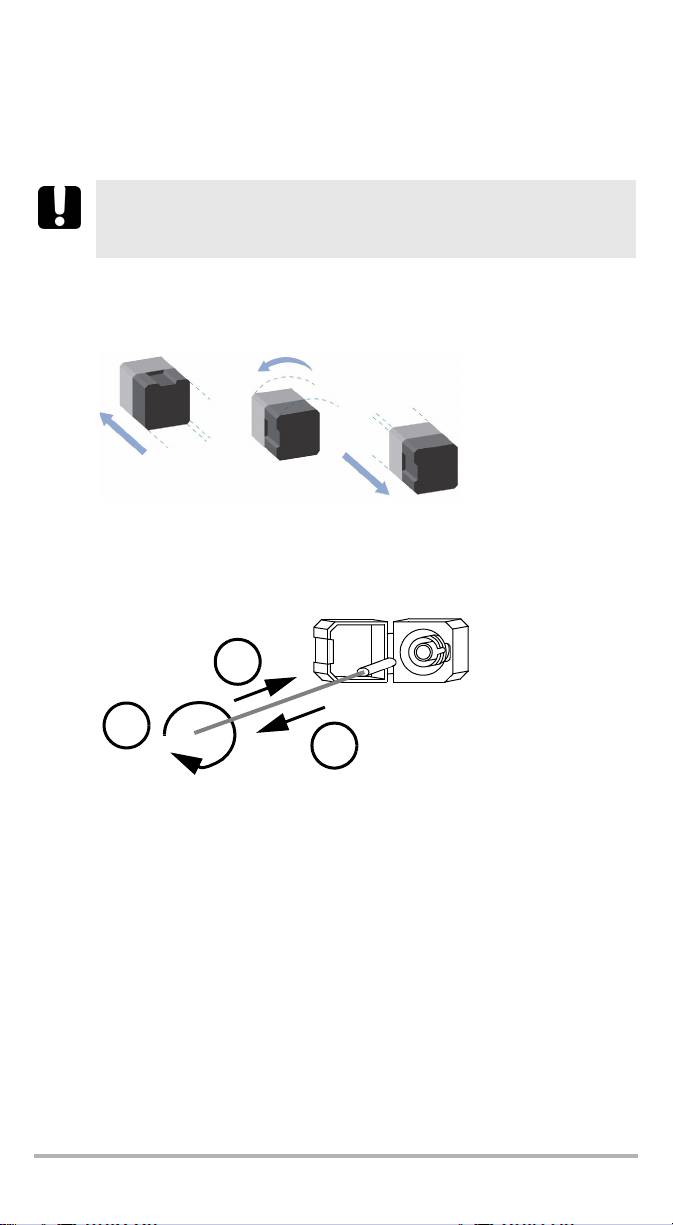
1. Remove the EUI from the instrument to expose the connector baseplate and
ferrule.
Turn
Pull
Push
2. Moisten a 2.5 mm cleaning tip with one drop of isopropyl alcohol (alcohol may
leave traces if used abundantly).
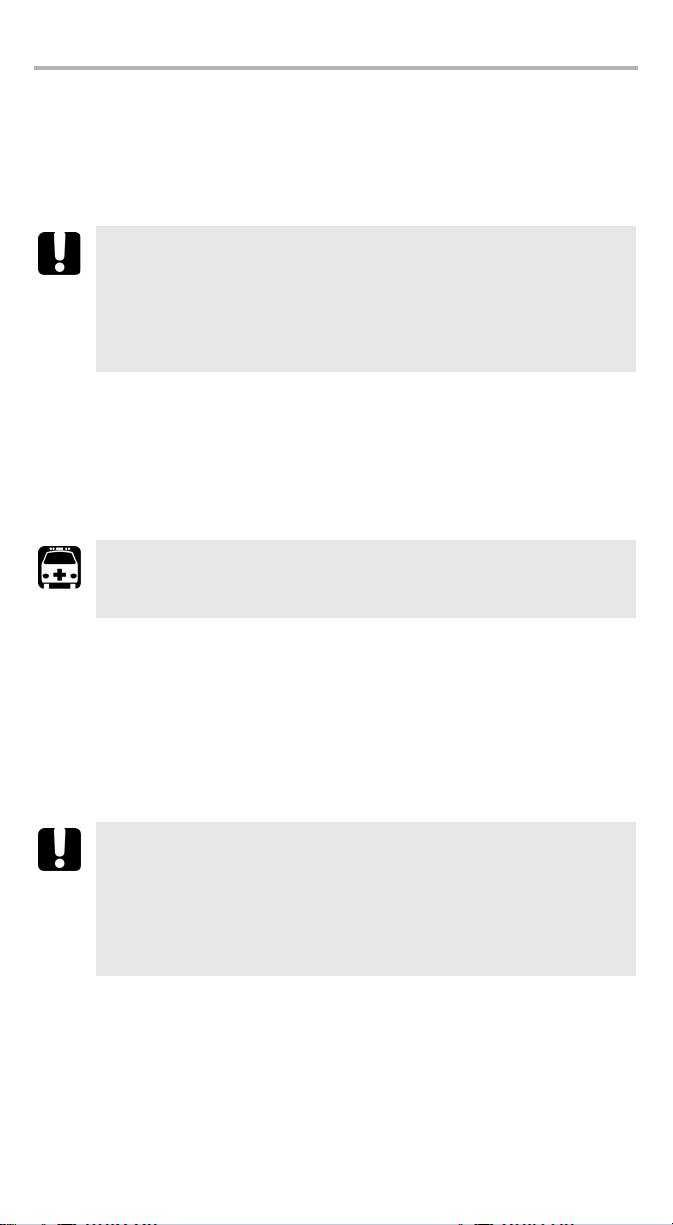
3. Slowly insert the cleaning tip into the EUI adapter until it comes out on the other
side (a slow clockwise rotating movement may help).
3
4
5
4. Gently turn the cleaning tip one full turn, then continue to turn as you withdraw
it.
FVA-600 15
Maintenance 16
5. Repeat steps 3 to 4 with a dry cleaning tip.
Note: Make sure you don’t touch the soft end of the cleaning tip.
6. Clean the ferrule in the connector port as follows:
6a. Deposit one drop of isopropyl alcohol on a lint-free wiping cloth.
IMPORTANT
Since isopropyl alcohol is not absolutely pure, it may leave residues
if used abundantly or left to evaporate (about 10 seconds).
Avoid contact between the tip of the bottle and the wiping cloth,
dry the surface quickly, and use a bottle that distributes only a drop
of alcohol at a time.
6b. Gently wipe the connector and ferrule.
6c. With a dry lint-free wiping cloth, gently wipe the same surfaces to ensure
that the connector and ferrule are perfectly dry.
6d. Verify connector surface with a portable fiber-optic microscope (for
example, EXFO’s FOMS) or fiber inspection probe (for example, EXFO’s
FIP).
WARNING
Verifying the surface of the connector WHILE THE UNIT IS ACTIVE
WILL result in permanent eye damage.
7. Put the EUI back onto the instrument (push and turn clockwise).
8. Throw out cleaning tips and wiping cloths after one use.
Recharging the Battery Pack
To recharge the battery pack, connect the AC adapter/charger. A full recharge takes
approximately 5 hours. For maximum efficiency, recharge the battery at room
temperature.
IMPORTANT
o
³ The battery functions and charges properly between 0
C and
o
o
o
45
C (32
F and 113
F). It will not charge if the temperature is
o
o
o
o
below -10
C (14
F) or above 45
C (113
F).
o
o
³ Never store battery at temperatures above 60
C (140
F).
³ Charge only with specified charger.
To recharge the Li-Ion battery:
Connect the unit to a power outlet (or car outlet) using the AC adapter/charger. The
charge cycle will start and end automatically.
Note: While charging, the battery indicator animates continuously. It does not
reflect the actual charge status until charging is complete.
Replacing the Battery
Your unit requires one Li-Ion battery.
To replace the battery:
1. Turn off the unit (if the AC adapter is plugged in,
you may replace the batteries while unit is on).
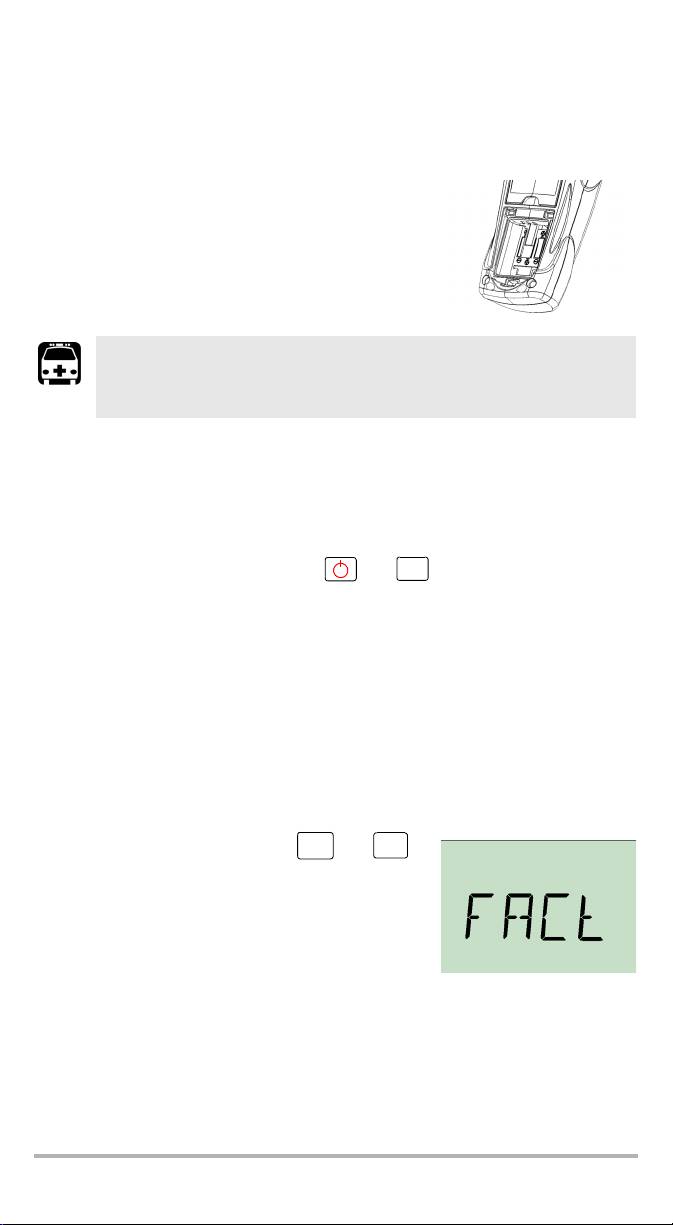
2. Open the battery compartment door located at the
back of the unit.
3. Replace batteries respecting the polarity.
4. Close the battery compartment door.
WARNING
Do not throw batteries into fire or water and do not short-circuit
the batteries’ electrical contacts. Do not disassemble.
Checking the LCD Display
If you suspect that part of the LCD display is not lighting up properly, you can
perform a test to light up all segments at once.
To check the LCD Display:
Abs/
Rel/
1. When the unit is on, press and hold and simultaneously.
Pwr
2. Press any button to exit the LCD check mode.
Reverting to the Default Settings
You can revert to the default settings for the following parameters in one step:
³ Preselected wavelengths
³ Smallest step size in use
³ Backlight off
³ Use absolute operation mode
To reset the values:
When the unit is on, press and hold and .
λ
Select
FVA-600 17

Maintenance 18
Recycling and Disposal (Applies to European
Union Only)
Recycle or dispose of your product (including electric and electronic
accessories) properly, in accordance with local regulations. Do not
dispose of it in ordinary garbage receptacles.
This equipment was sold after August 13, 2005 (as identified by the
black rectangle).
³ Unless otherwise noted in a separate agreement between EXFO and a
customer, distributor or commercial partner, EXFO will cover costs related to
the collection, treatment, recovery and disposal of end-of-lifecycle waste
generated by electronic equipment introduced after August 13, 2005 to an
European Union member state with legislation regarding Directive 2002/96/EC.
³ Except for reasons of safety or environmental benefit, equipment manufactured
by EXFO, under its brand name, is generally designed to facilitate dismantling
and reclamation.
For complete recycling/disposal procedures and contact information, visit the EXFO
Web site at www.exfo.com/recycle.
Оглавление
- 1 Introducing the FVA-600 Variable Attenuator
- 2 Safety Information
- 3 Getting Started with Your FVA-600 Variable Attenuator
- 4 Operating the FVA-600 Variable Attenuator
- 5 Maintenance
- 6 Troubleshooting
- 7 Warranty
- A Technical Specifications
- BTypical Test Configurations
- 1 Présentation de l’Atténuateur Variable FVA-600
- 2 Informations relatives à la sécurité
- 3 Initiation à votre Atténuateur Variable FVA-600
- 4 Utilisation de l’Atténuateur Variable FVA-600
- 5 Entretien
- 6 Dépannage
- 7 Garantie
- A Caractéristiques techniques
- B Configurations de test classiques
- 1FVA-600 可变衰减器简介
- 2 安全信息
- 3FVA-600 可变衰减器入门
- 4 操作 FVA-600 可变衰减器
- 5 维护
- 6 故障排除
- 7 保修
- A 技术规格
- B 典型测试配置
- 1 Presentación del Atenuador variable FVA-600
- 2 Información de seguridad
- 3 Primeros pasos con el Atenuador variable FVA-600
- 4 Funcionamiento del Atenuador variable FVA-600
- 5 Mantenimiento
- 6 Solución de problemas
- 7 Garantía
- A Especificaciones técnicas
- B Configuraciones de las comprobaciones típicas
- 1 Apresentação do Atenuador variável FVA-600
- 2Informações de segurança
- 3 Iniciar a utilização do seu Atenuador variável FVA-600
- 4 Funcionamento da Atenuador variável FVA-600
- 5 Manutenção
- 6 Resolução de avarias
- 7 Garantia
- A Especificações técnicas
- B Configurações de teste convencionais
- 1 Общие сведения о Регулируемый аттенюатор FVA-600
- 2 Информация о безопасности
- 3 Начало работы с Регулируемый аттенюатор FVA-600
- 4 Работа с устройством Регулируемый аттенюатор FVA-600
- 5 Обслуживание
- 6 Поиск и устранение неисправностей
- 7 Гарантия
- A Технические характеристики
- B Типовые конфигурации тестов
