Yamaha DV-C6860: Troubleshooting
Troubleshooting: Yamaha DV-C6860
Table of contents
- Important notes for users in the U.K.
- DANGER CAUTION LASER SAFETY
- CAUTION: READ THIS BEFORE OPERATING THIS UNIT.
- Introduction Region codes Cleaning discs Supplied accessories Patent information Notes on discs
- Functional Overview Front panel
- Rear panel
- Remote control
- Connections General notes on connections Audio connections
- Video connections
- Getting Started Step 1: Inserting batteries into the remote control
- Getting Started Step 2: Turning on the power Step 3: Setting a TV type and display
- Getting Started
- Step 4: Setting a language preference
- Disc Operations Basic playback General operation
- Selecting the various repeat/ shuffle functions
- Disc Operations Operations for video playback (DVD/VCD/SVCD)
- Disc Operations Zooming in On-screen display (OSD) DVD Resuming playback from the last stopped point VCD/SVCD
- Disc Operations Special DVD features
- Audio CDs Special VCD & SVCD features Playing MP3/JPEG/Kodak picture CDs
- Disc Operations Special picture disc features
- Scan effect Playing MP3 music and JPEG pictures simultaneously
- Setup Menu UNLOCK General setup menu
- Setup Menu
- Setup Menu Audio setup menu
- Setup Menu
- Setup Menu Video setup menu
- Setup Menu
- Setup Menu
- Setup Menu Preference setup menu
- Setup Menu
- Setup Menu
- Language Code
- Language Code
- Troubleshooting
- Troubleshooting
- Glossary
- Specifications
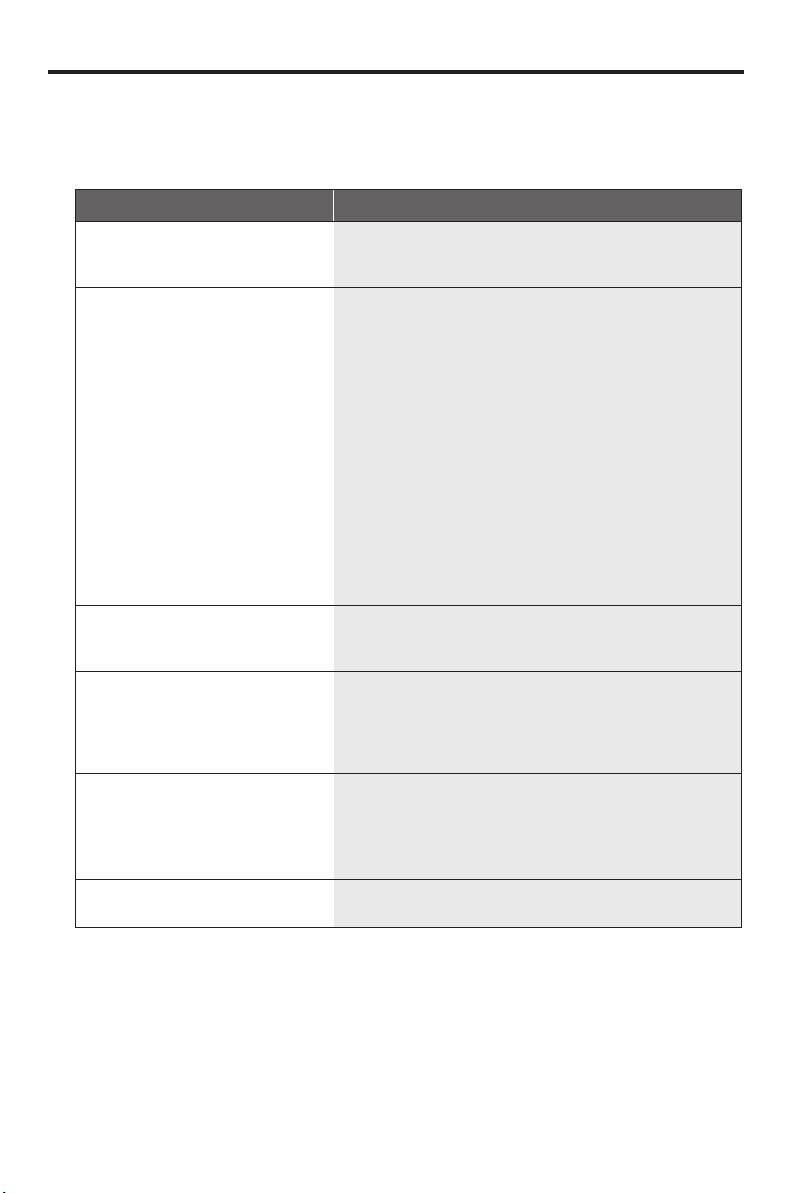
Troubleshooting
Refer to the chart below when this unit does not function properly. If the
problem you are experiencing is not listed below or if the instruction below does
not help, set this unit to the standby mode, disconnect the power cord, and
contact the nearest authorized YAMAHA dealer or service center.
Problem Solution
No power – Check if the AC power cord is properly connected.
– Press STANDBY/ON on the front panel of this unit to turn
on the power.
No picture – Refer to the manual supplied with your TV for correct Video
In channel selection. Change the TV channel until you see
the DVD screen.
– Check if the TV is turned on.
– Make sure the video signal output setting of this unit matches
the video connection (see “Switching the YUV/RGB” on
page 27).
– If you do not use progressive scan connections (using the
component video (Y PB PR) jacks of this unit) and no picture
is displayed on the TV, follow the steps below to turn off the
progressive scan;
1. Press /
(OPEN/CLOSE) on the front panel to open the
disc tray.
2. Press 1 on the remote control.
3. Press ANGLE on the remote control to deactivate
progressive scan. This unit is set to Component/Interlaced
video.
Distorted picture – Occasionally, a small amount of picture distortion may
appear depending on the disc being played back. This is not
a malfunction.
Completely distorted picture
– Make sure the disc is compatible with this unit (see “Notes
or black/white picture with
on discs” on page 2).
DVD
– Ensure that the TV type of this unit is set to match that of
the disc and your TV (see “Setting a color system for your
TV” on page 9).
The screen size looks
– Make sure the TV setting of this unit matches the screen size
unnatural, or the caption is
of your TV (see “Setting the TV display” on page 25).
displayed only partially on the
– Change the screen size and the aspect ratio of your TV.
TV monitor or is not displayed
at all
No sound or distorted sound – Adjust the volume.
– Check that the speakers are connected correctly.
32 En


