Yamaha DV-C6860: Connections General notes on connections Audio connections
Connections General notes on connections Audio connections: Yamaha DV-C6860
Table of contents
- Important notes for users in the U.K.
- DANGER CAUTION LASER SAFETY
- CAUTION: READ THIS BEFORE OPERATING THIS UNIT.
- Introduction Region codes Cleaning discs Supplied accessories Patent information Notes on discs
- Functional Overview Front panel
- Rear panel
- Remote control
- Connections General notes on connections Audio connections
- Video connections
- Getting Started Step 1: Inserting batteries into the remote control
- Getting Started Step 2: Turning on the power Step 3: Setting a TV type and display
- Getting Started
- Step 4: Setting a language preference
- Disc Operations Basic playback General operation
- Selecting the various repeat/ shuffle functions
- Disc Operations Operations for video playback (DVD/VCD/SVCD)
- Disc Operations Zooming in On-screen display (OSD) DVD Resuming playback from the last stopped point VCD/SVCD
- Disc Operations Special DVD features
- Audio CDs Special VCD & SVCD features Playing MP3/JPEG/Kodak picture CDs
- Disc Operations Special picture disc features
- Scan effect Playing MP3 music and JPEG pictures simultaneously
- Setup Menu UNLOCK General setup menu
- Setup Menu
- Setup Menu Audio setup menu
- Setup Menu
- Setup Menu Video setup menu
- Setup Menu
- Setup Menu
- Setup Menu Preference setup menu
- Setup Menu
- Setup Menu
- Language Code
- Language Code
- Troubleshooting
- Troubleshooting
- Glossary
- Specifications
Connections
You need to set “DIGITAL
General notes on connections
OUTPUT” to “ALL” (see “DIGITAL
OUTPUT” on page 23).
Be sure to turn off this unit and unplug the
power supply cable before you make or
Notes:
change connections.
– If the audio format of the digital output
does not match the capabilities of your
• Depending on the component you wish
receiver, the receiver produces a distorted
to connect, there are various ways to
sound or no sound at all. Make sure to
make connections. Possible connections
select the appropriate audio format from
are described below.
the menu screen on the disc.
• Refer to the manuals of your other
Pressing AUDIO on the remote control once
components as necessary to make the
or more may change not only the audio
best connections.
language but also the audio format. The
• Do not connect this unit via your VCR.
selected format appears in the front panel
The video quality could be distorted by
display for several seconds.
the copy protection system.
– If you wish to enjoy Dolby Digital, DTS, and
• Do not connect the audio out jack of
MPEG formats, you must connect this unit
this unit to the phono in jack of your
to an AV receiver that supports these
audio system.
formats.
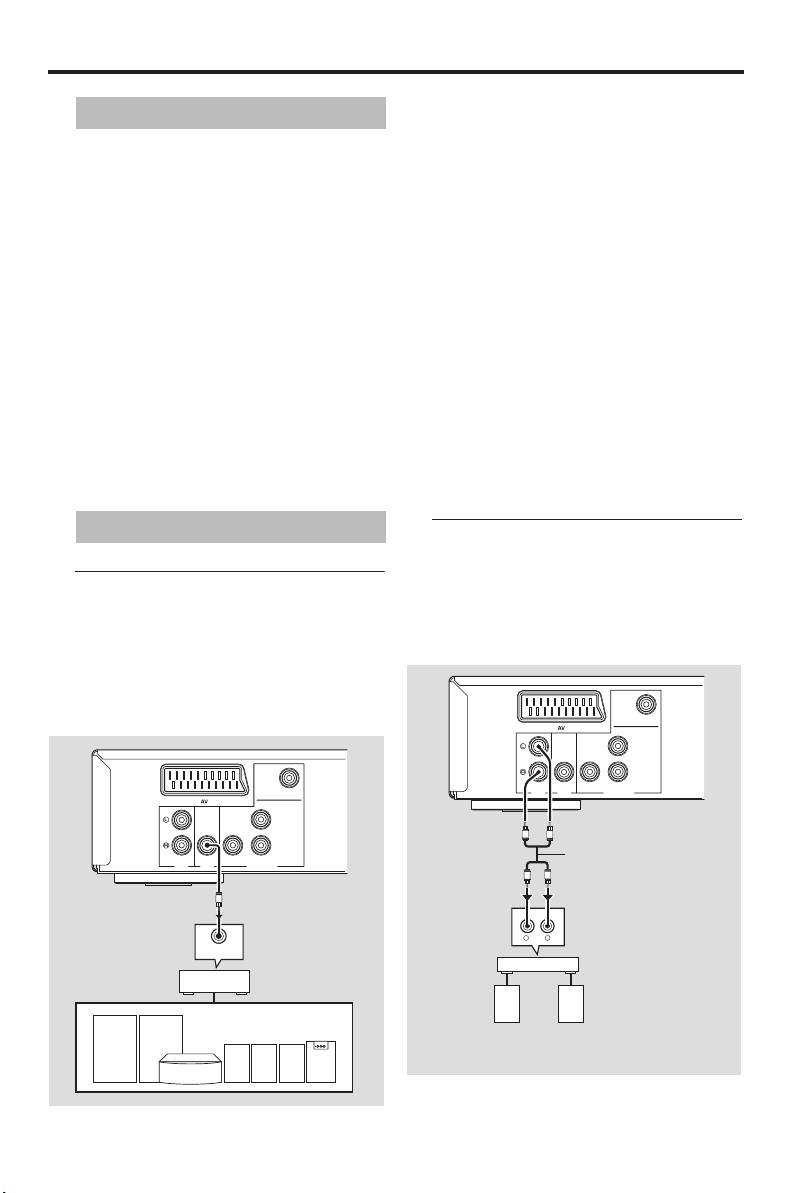
Audio connections
Analog connection
This unit has analog output jacks.
Connect AUDIO OUT (L, R) jacks of this
Digital connection
unit to the corresponding input jacks of
This unit has a coaxial digital out jack.
your audio component (such as a stereo
Connect DIGITAL OUT - COAXIAL jack
amplifier) using the supplied audio cable.
of this unit to your AV receiver equipped
with a Dolby Digital, DTS, or MPEG
decoder using a commercially available
coaxial cable.
VIDEO
Y
COAXIAL COMPONENT
AUDI O
DIGITAL
PR/CR
P
B/CB
VIDEO
OUT
OUT
VIDEO OUT
Y
COAXIAL COMPONENT
This unit
R
L
Audio pin cable
AUDI O
DIGITAL
PR/CR
P
B/CB
(supplied)
OUT
OUT
VIDEO OUT
R
L
This unit
C
CD/DVD
RL
COAXIAL
IN
Stereo
amplifier
AV receiver
Speakers
Left
Right
speaker
speaker
6 En


