ZyXEL Communications NWD210N: " Never bend, twist or force the NWD210N into
" Never bend, twist or force the NWD210N into : ZyXEL Communications NWD210N

ENGLISH
" Never bend, twist or force the NWD210N into
the port. If there is not enough space to attach
the NWD210N, use the included USB cable.
The NWD210N’s LED (light) turns on if it is properly inserted.
V If the NWD210N’s LED is not on after you have
installed the software and the NWD210N, make
sure the NWD210N is properly inserted.
The NWD210N automatically connects to an available
wireless network without security enabled.
However, this may not be the wireless network to which you
want to connect. Run the utility to ensure you are connected
to the correct network.
2.1 Run the Utility
The utility is an interface that allows you to see information
about and control the NWD210N.
8

ENGLISH
When you insert the NWD210N, an icon appears in the dock.
The utility runs automatically. The Site Survey screen
displays (see section 4.3 on page 23).
V If the utility does not run automatically, click the
icon.
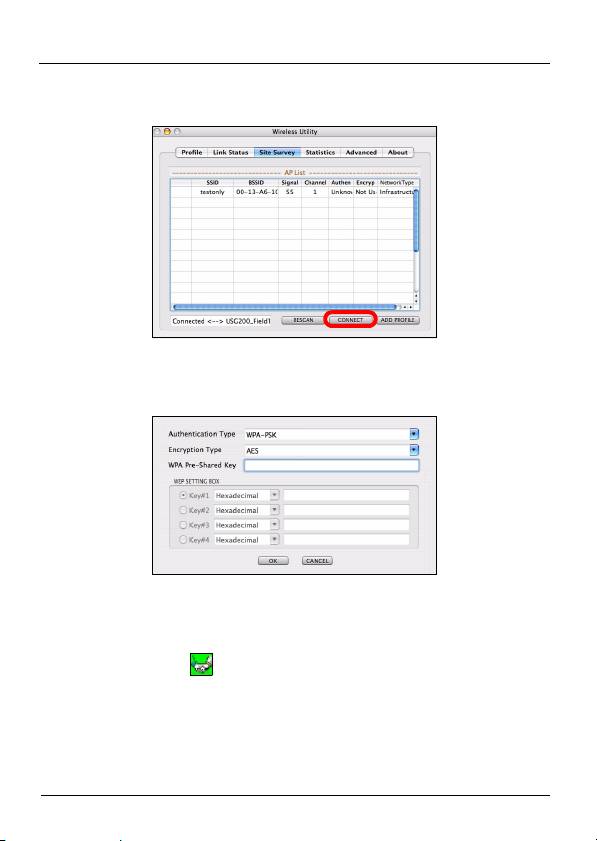
3 Connect to a Wireless Network
This section describes how to connect your NWD210N to an
existing wireless network.
1 If the Site Survey screen is not already open, open the
utility and click the Site Survey tab.
2 The available wireless networks display in the AP List.
SSID means Service Set Identifier and is the name of the
wireless network.
9
ENGLISH
3 Choose the network you want to connect to by clicking on
it and clicking Connect.
4 If a network has no security, go to step 6.
5 If a network has security, a screen displays prompting you
to enter security information.
Get this information from the network administrator. Be sure
to enter the information exactly as it was given to you. Click
OK.
6 A green icon ( ) displays to the left of the network’s
SSID, indicating that the NWD210N is successfully
connected.
10

ENGLISH
To access the Internet, open your Internet browser and enter
the URL of a web site in the address bar. The AP should be
connected to the Internet.
If the web site displays correctly, you are successfully
connected to the Internet.
4 The Utility’s Screens
This section describes each of the NWD210N utility’s
interface screens. See the Windows User’s Guide (on the CD)
for background information about the NWD210N’s features.
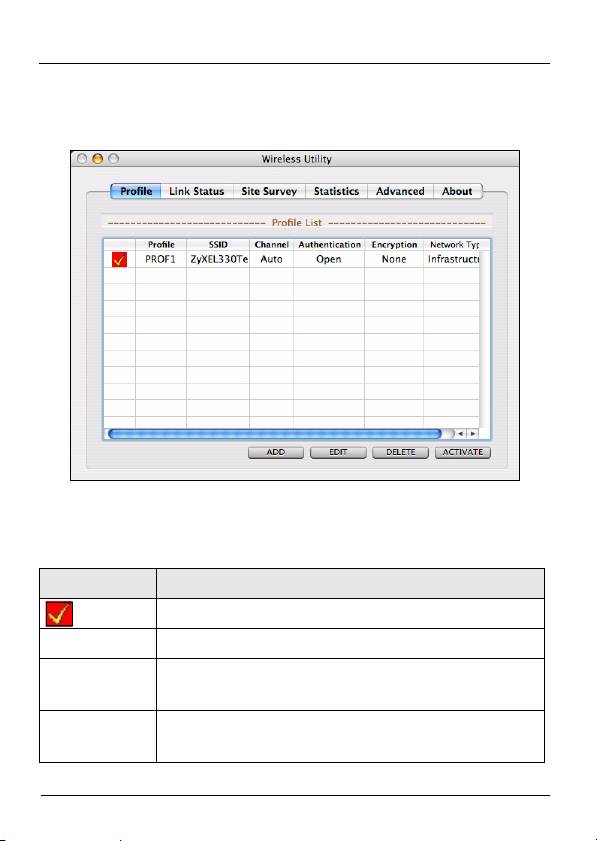
4.1 The Profile Screens
A profile lets you automatically connect to the same wireless
network every time you use the ZyXEL utility. You can also
configure different profiles for different networks - for example
if you use wireless networks both at home and at work.
11
ENGLISH
4.1.1 The Profile List Screen
Click the utility’s Profile tab. The following screen displays.
The following table describes the labels in this screen.
Table 3 The Profile List Screen
LABEL DESCRIPTION
This indicates the currently-active profile.
Profile This is the name of the pre-configured profile.
SSID This is the SSID of the wireless network to
which the selected profile associates.
Channel This field displays the channel number used by
the profile.
12

ENGLISH
Table 3 The Profile List Screen
LABEL DESCRIPTION
Authenticatio
This field displays the type of authentication
n
used by the network (Open, Shared, WPA-
PSK or WPA2-PSK).
Encryption This field displays the encryption protocol used
by the network.
• When WEP security is used, WEP displays.
• When WPA-PSK or WPA2-PSK security is used,
TKIP or AES displays.
Network
This field displays Infrastructure when the
Type
profile is configured to connect to an access
point, or Ad Hoc when the network is
configured to connect to another computer.
Add Click this to create a new profile.
Edit Click this to alter the settings of an existing
profile.
Delete Click this to remove a profile from the list.
Activate Click this to select the profile to use.
Alternatively, double-click the profile’s name in
the list.
13
ENGLISH
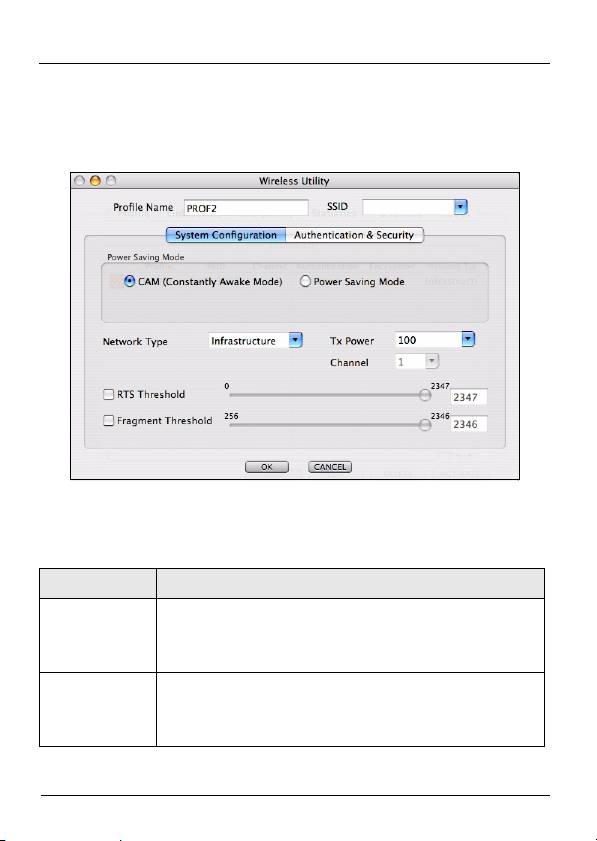
4.1.2 The Add Profile: System Configuration Screen
Use this screen to configure a profile’s basic settings. Click
Add in the Profile List screen. The following screen displays.
The following table describes the labels in this screen.
Table 4 The Add Profile: System Configuration Screen
LABEL DESCRIPTION
Profile Name Enter a descriptive name in this field, or
alternatively keep the name assigned by the
utility.
SSID Select an available wireless device from the
list, or enter the SSID of the wireless device to
which you want to associate.
14

ENGLISH
Table 4 The Add Profile: System Configuration Screen
LABEL DESCRIPTION
CAM
Select this to have the NWD210N never go into
(Constantly
sleep mode.
Awake
Mode)
Power
Select this to have the NWD210N go into sleep
Saving Mode
mode when it is not transmitting data.
Network
Select Infrastructure to connect to a wireless
Type
access point, or select 802.11 Ad Hoc to
connect to another wireless-enabled computer.
Tx Power This field controls the transmission power of
the NWD210N. When using the NWD210N with
a notebook computer, select a lower
transmission power level when you are close to
the AP in order to conserve battery power.
Channel In ad-hoc mode, choose the radio channel to
use for the wireless network. If there are other
networks in the area, choose a channel as far
away as possible, in order to minimize the risk
of interference.
In Infrastructure mode, this field is not
configurable; the NWD210N uses whichever
channel the access point uses.
RTS
Select the packet size above which the
Threshold
NWD210N transmits an RTS (Request To
Send) message.
15
ENGLISH
Table 4 The Add Profile: System Configuration Screen
LABEL DESCRIPTION
Fragment
Select the packet size above which the
Threshold
NWD210N fragments (breaks up) the packet
into smaller pieces.
OK Click this to save your changes and return to
the Profile List screen.
Cancel Click this to return to the Profile List screen
without saving your changes.
16

ENGLISH
4.1.3 The Add Profile: Authentication & Security
Screen
Use this screen to configure a profile’s security settings. Click
Authentication & Security in the Add Profile: System
Configuration screen. The following screen displays.
17

ENGLISH
The following table describes the labels in this screen.
Table 5 The Add Profile: Authentication & Security Screen
LABEL DESCRIPTION
Authenticatio
Select the security standard you want to use.
n Type
All the other wireless devices on your network
must be able to use the same standard you
select.
• Open mode is used when security is not an
issue. No authentication is required, and any
wireless device can join the network.
• Shared mode security is used with WEP (Wired
Equivalent Privacy).
• WPA-PSK security uses a pre-shared key. All the
wireless devices on the network use the same
key to access the network. This option is not
available in ad-hoc mode.
• WPA2-PSK is an improved version of WPA-PSK
security. This option is not available in ad-hoc
mode.
Encryption
• When you select Open or Shared in the
Authentication Type field, either select None to
Type
use no security, or select WEP to use Wired
Equivalent Privacy security.
• When you select WPA-PSK or WPA2-PSK in the
Authentication Type field, select TKIP to use
the Temporal Key Integrity Protocol. Alternatively,
select AES to use the Advanced Encryption
Standard.
18

ENGLISH
Table 5 The Add Profile: Authentication & Security Screen
LABEL DESCRIPTION
WPA Pre-
When you select WPA-PSK or WPA2-PSK in
Shared Key
the Authentication Type field, enter the
network’s pre-shared key (8~64 uppercase or
lowercase letters and numbers).
Key #1~4 When you select WEP in the Encryption Type
field, you must enter the network’s WEP key.
Check with your network’s administrator for the
correct settings.
Select the key number (1~4), select the key
type (Hexadecimal or ASCII), and enter the
WEP key in the field to the right.
Hexadecimal keys use numerals and the letters
a~f only, whereas ASCII keys use numerals
and all letters.
OK Click this to save your settings and return to the
previous screen.
Cancel Click this to return to the previous screen
without saving your settings.
4.1.4 The Edit Profile: System Configuration Screen
Use this screen to change a profile’s basic settings. Click Edit
in the Profile List screen. The screen that displays is identical
to that described in section 4.1.2 on page 14.
19
ENGLISH
4.1.5 The Edit Profile: Authentication and Security
Screen
Use this screen to change a profile’s security settings. Click
Authentication and Security in the Edit Profile: System
Configuration screen. The screen that displays is identical to
that described in section 4.1.3 on page 17.
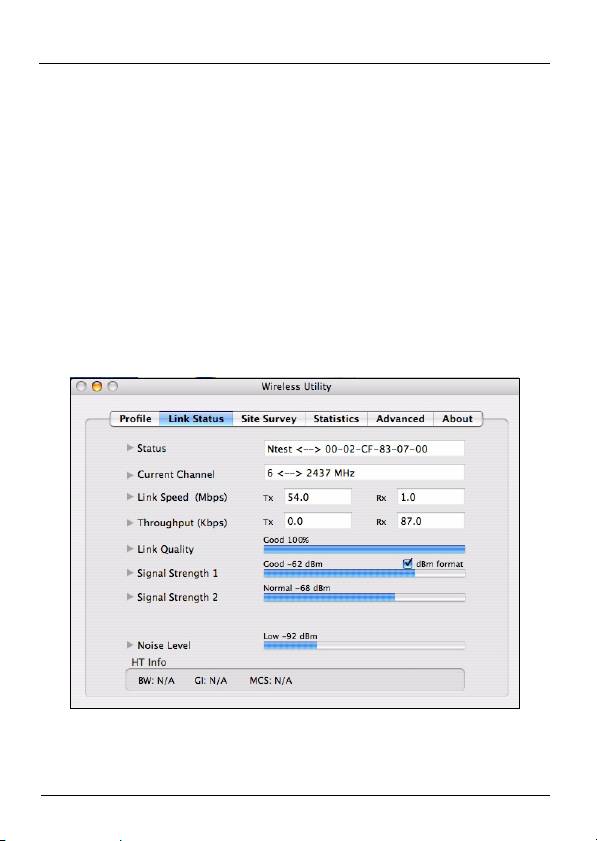
4.2 The Link Status Screen
Use this screen to see your current connection status,
configuration and data rate statistics. Click the utility’s Link
Status tab. The following screen displays.
20

ENGLISH
The following table describes the labels in this screen.
Table 6 The Link Status Screen
LABEL DESCRIPTION
Status This displays the SSID (Service Set IDentifier)
and MAC (Media Access Control) address of
the access point or peer device to which the
NWD210N is connected.
Current
This displays the channel number of the current
Channel
wireless connection, as well as the radio
frequency of the channel in megahertz.
Link Speed
This displays the maximum possible data
(Mbps)
transmission (tx) and reception (rx) speeds of
the current connection in megabits per second.
Throughput
This displays the actual data transmission (tx)
(Kbps)
and reception (rx) speeds of the current
connection in kilobits per second.
Link Quality This shows the quality of the wireless
connection. This refers to the percentage of
packets transmitted successfully. If there are
too many wireless stations in a wireless
network, collisions may occur which could
result in a loss of messages even though you
have high signal strength.
21

ENGLISH
Table 6 The Link Status Screen (Continued)
LABEL DESCRIPTION
Signal
These show the strength of the signal. The
Strength 1~2
NWD210N has two internal antennas, each of
which has a separate display bar.
The signal strength depends mainly on the
antenna output power and the distance
between your NWD210N and the AP or peer
computer.
dBm format Click this to display the Signal Strength 1 and
2 values in dBm (decibels below 1 milliwatt).
Noise Level This displays the amount of interference on the
wireless connection.
HT Info This section displays advanced information
about the 802.11n wireless connection (if you
are using 802.11b or 802.11g, nothing displays
here).
HT stands for “high throughput”.
BW: this displays the bandwidth (20 or 40 Mhz)
of the wireless connection.
GI: this displays the guard interval length. The
guard interval is used to prevent wireless
transmissions from interfering with one another.
MCS: this displays the modulation and coding
scheme, which dictates how the data is
transmitted over the wireless link.
22
ENGLISH
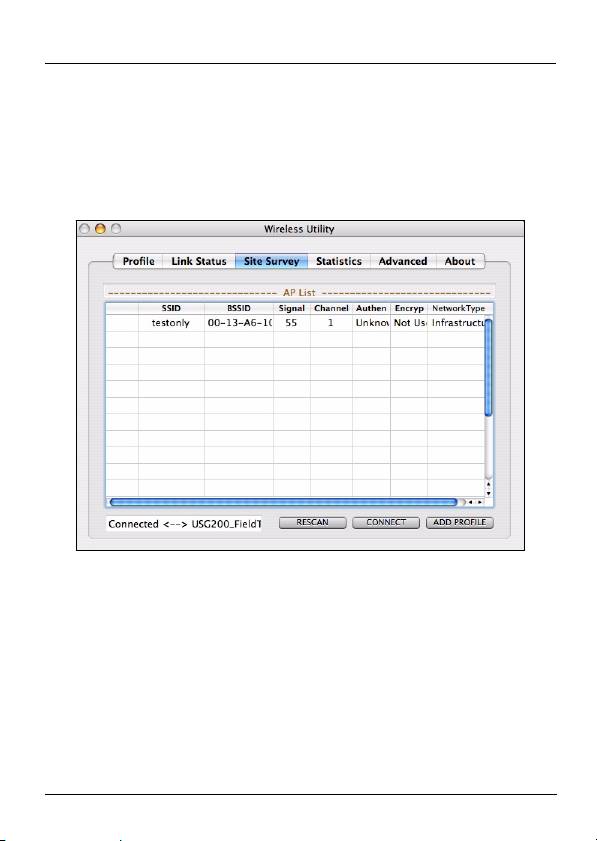
4.3 The Site Survey Screen
Use this screen to see information about the wireless
networks in your area, and to connect to a wireless network.
Click the utility’s Site Survey tab. The following screen
displays.
23

ENGLISH
The following table describes the labels in this screen.
Table 7 The Site Survey Screen
LABEL DESCRIPTION
SSID This displays the network’s Service Set
IDentifier. The SSID is the name of the network.
BSSID This displays the Basic Service Set IDentifier.
The BSSID is the MAC (Media Access Control)
address of the access point or peer wireless
device.
Every networking device has a unique MAC
address, which identifies it on the network.
Signal This displays the received radio signal strength
of the network. The higher the value, the better
the connection.
Channel This displays the wireless channel on which the
network is operating.
Authenticatio
This displays whether WPA, WPA2, WPA-PSK
n
or WPA2-PSK is used on the network.
If the network uses no security or WEP,
Unknown displays.
At the time of writing, the NWD210N does not
support WPA or WPA2.
24

ENGLISH
Table 7 The Site Survey Screen (Continued)
LABEL DESCRIPTION
Encryption When WPA, WPA2, WPA-PSK or WPA2-PSK is
used, this displays the encryption protocol used
(TKIP or AES).
When WEP is used, WEP displays.
When no security is used, Not Used displays.
Network
This field displays the network type
Type
(Infrastructure or Ad Hoc) of the wireless
device.
RESCAN Click this to update the list.
CONNECT Click this to connect to the highlighted wireless
network.
ADD
Click this to go to the Add Profile: System
PROFILE
Configuration screen (see <Links>Section
4.1.2 on page 14).
25
ENGLISH
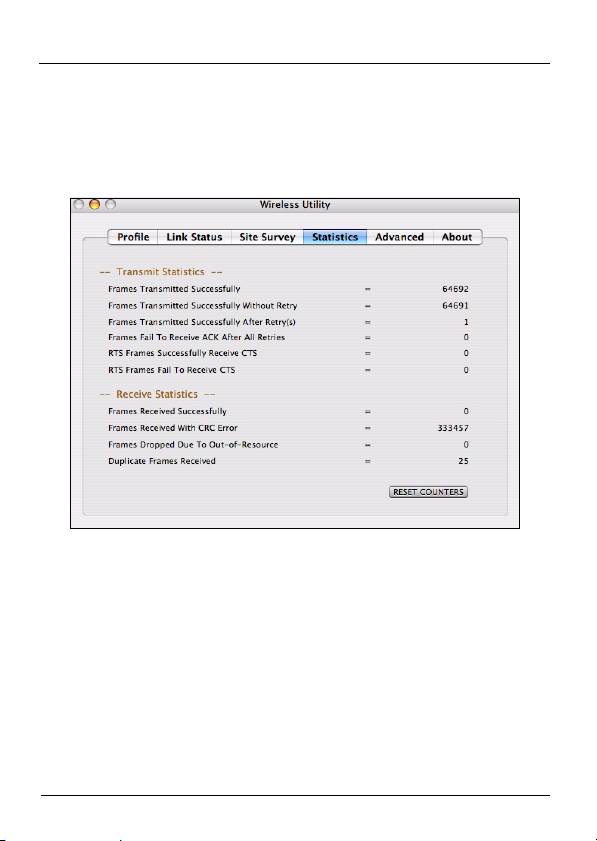
4.4 The Statistics Screen
Use this screen to view details of your NWD210N’s
transmission and reception performance. Click the utility’s
Statistics tab. The following screen displays.
26

ENGLISH
The following table describes the labels in this screen.
Table 8 The Statistics Screen
LABEL DESCRIPTION
Transmit Statistics This section displays statistics about
the data frames sent by the
NWD210N.
Frames Transmitted
This displays the total number of
Successfully
frames transmitted by the
NWD210N.
Frames Transmitted
This displays the number of frames
Successfully Without
successfully transmitted by the
Retry
NWD210N on the first attempt.
Frames Transmitted
This displays the number of frames
Successfully After
transmitted by the NWD210N after a
Retry(s)
second or subsequent attempt.
Frames Failed to
This displays the number of frames
Receive ACK After All
transmitted by the NWD210N that
Retries
did not receive an acknowledgement
response from the other wireless
device.
RTS Frames
This displays the number of frames,
Successfully Received
large enough to require the sending
CTS
of a “Request to Send” message,
that then received a “Clear to Send”
message from the other wireless
device.
27

ENGLISH
Table 8 The Statistics Screen
LABEL DESCRIPTION
RTS Frames Failed to
This displays the number of frames,
Receive CTS
large enough to require the sending
of a “Request to Send” message,
that did not receive a “Clear to Send”
message from the other wireless
device.
Receive Statistics This section displays statistics about
the data frames received by the
NWD210N.
Frames Received
This displays the number of frames
Successfully
received by the NWD210N without
error.
Frames Received with
This displays the number of frames
CRC Error
received by the NWD210N that
contained a Cyclic Redundancy
Check error. Cyclic Redundancy
Checks are used to determine
whether received data has been
altered in transit (by radio
interference, for example).
Frames Dropped Due
This displays the number of frames
To Out-of-Resource
that were not processed because the
NWD210N did not have the
necessary memory.
28
ENGLISH
Table 8 The Statistics Screen
LABEL DESCRIPTION
Duplicate Frames
This shows the number of received
Received
frames that were identical to other
received frames.
RESET COUNTERS Click this to turn all the counters back
to zero.
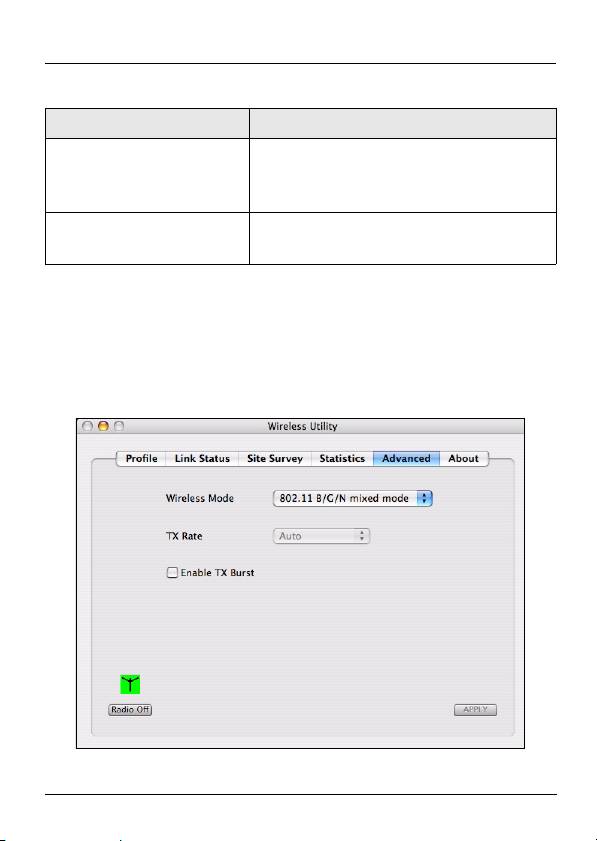
4.5 The Advanced Screen
Use this screen to configure the wireless standard used by
the NWD210N, its transmission rate, and to enable or disable
burst transmission. Click the utility’s Advanced tab. The
following screen displays.
29

ENGLISH
The following table describes the labels in this screen.
Table 9 The Advanced Screen
LABEL DESCRIPTION
Wireless
Select the type of network to which you want to
Mode
connect.
•Select 802.11 B/G mixed mode to connect to
IEEE 802.11b or IEEE 802.11g devices.
•Select 802.1.1 B mode to connect to IEEE
802.11b devices only.
•Select 802.11 B/G/N mixed mode to connect to
IEEE 802.11b, 802.11g or 802.11n wireless
devices. Choose this if you are not sure which to
use.
TX Rate This field displays the maximum rate at which
data is sent by the NWD210N over the wireless
network.
• When you select 802.11 B/G mixed mode or
802.11 B/G/N mixed mode in the Wireless
Mode field, this field is set to Auto and is not
user-configurable.
• When you select 802.1.1 B mode in the
Wireless Mode field, select Auto to have the
NWD210N choose the highest speed the network
supports, or select 1, 2, 5.5 or 11 Mbps.
Enable TX
Select this to turn burst transmission on.
Burst
Deselect it to turn burst transmission off.
30
ENGLISH
Table 9 The Advanced Screen
LABEL DESCRIPTION
Radio On/Off A green icon ( ) displays when the
NWD210N’s radio is enabled. A red icon ( )
displays when the NWD210N’s radio is
disabled.
•Select Radio Off to disable the NWD210N’s
wireless functions.
•Select Radio On to enable the NWD210N’s
wireless functions.
Apply Click this to save your settings.
31
ENGLISH
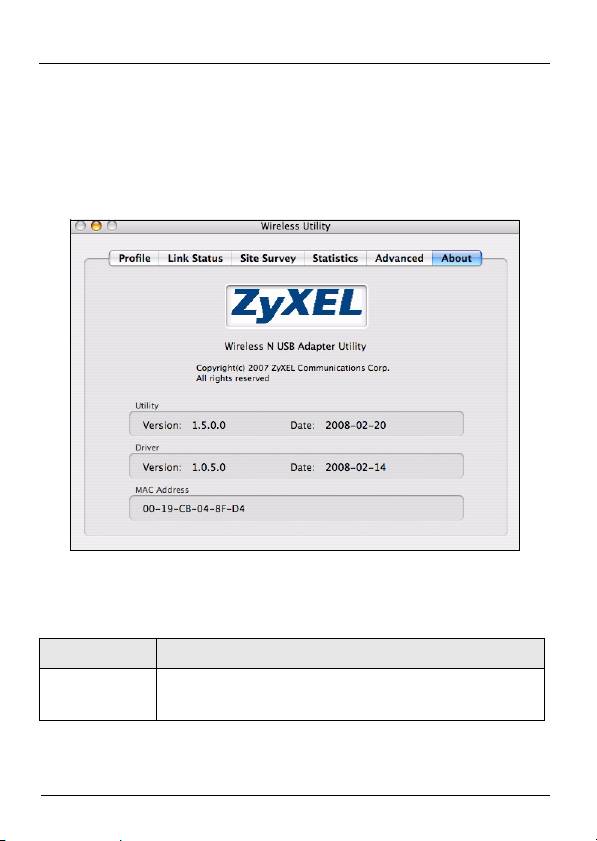
4.6 The About Screen
Use this screen to see the version numbers of the
NWD210N’s utility and driver, and to see its MAC (Media
Access Control) address. Click the utility’s About tab. The
following screen displays.
The following table describes the labels in this screen.
Table 10 The About Screen
LABEL DESCRIPTION
Utility This section displays the version number and
release date of the NWD210N’s utility.
32
ENGLISH
Table 10 The About Screen
LABEL DESCRIPTION
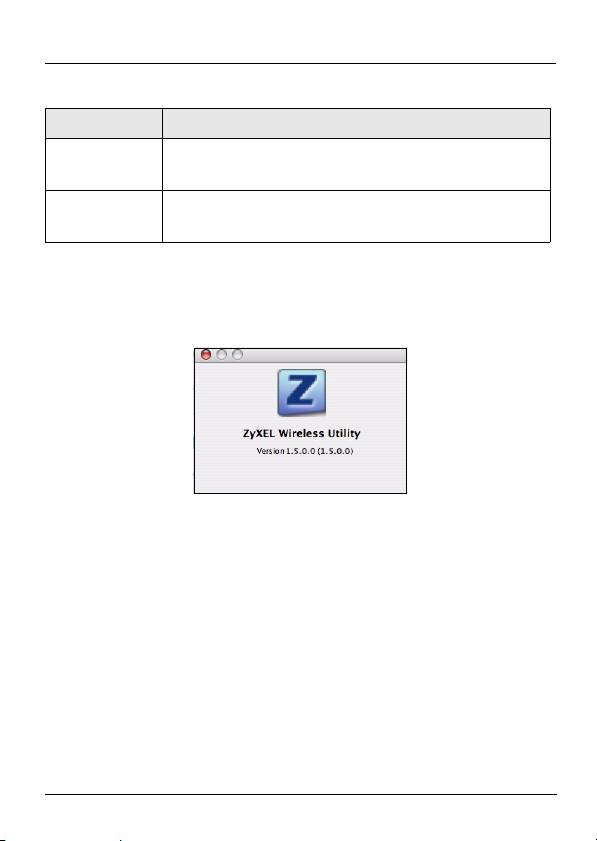
Driver This section displays the version number and
release date of the NWD210N’s driver.
MAC
This field displays the NWD210N Media
Address
Access Control (MAC) address.
You can also see the utility’s version number by clicking on
the ZyXEL Wireless Utility menu at the top of your screen
and selecting About Wireless Utility. The following screen
displays.
33

ENGLISH
Procedure to View a Product’s Certification(s)
1 Go to www.zyxel.com.
2 Select your product from the drop-down list box on
the ZyXEL home page to go to that product's page.
3 Select the certification you wish to view from this
34
DEUTSCH
Übersicht
Der NWD210N ist ein drahtloser USB-Netzwerkadapter für
Ihren Computer. Der NWD210N ist WPS-kompatibel (Wi-Fi
Protected Setup; Wi-Fi-geschütztes Setup).
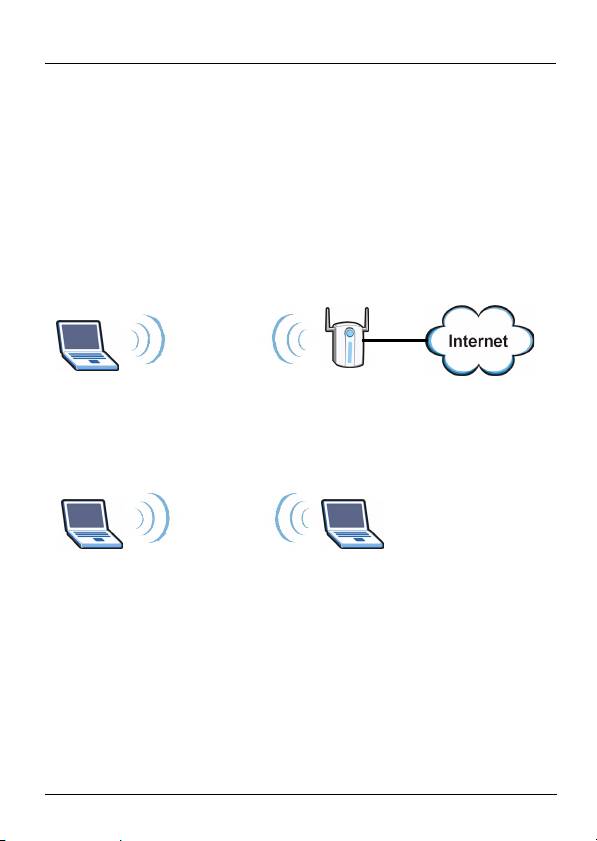
Verbinden Sie einen Computer mit dem NWD210N an einen
Wireless Access Point (AP). Das ist auch als Infrastruktur-
Modus bekannt.
Sie können den NWD210N auch verwenden, um drahtlos
eine Verbindung zu einem anderen Wireless-Computer
herzustellen. Das wird auch Ad-hoc-Modus genannt.
35
D
EUTSC
H
Оглавление
- " Install the software from the CD before you
- " If you are not sure which operating system
- " Choose an internal hard drive (identifiable by its
- " Make sure you have saved all your work before
- " Do not install the hardware until you have
- " Never bend, twist or force the NWD210N into
- " Installieren Sie die Software von der CD, bevor
- " Wenn Sie nicht wissen, welche
- " Wählen Sie eine interne Festplatte (sie ist durch
- " Denken Sie daran, vorher Ihre Arbeiten zu
- " Setzen Sie die Hardware erst ein, wenn Sie die
- " Stecken Sie den NWD210N ohne starken Druck
- " Instale el software desde el CD antes de
- " Si no está seguro de qué versión de sistema
- " Elija una unidad de disco duro interna
- " ¡Asegúrese de haber guardado todo su trabajo
- " No instale el hardware hasta que haya instalado
- " Nunca doble, tuerza o fuerce el NWD210N en el
- " Installez le logiciel à partir du CD avant d'insérer
- " Si vous n'êtes pas sûr de la version de votre
- " Choisissez un disque dur interne (identifiable
- " Vérifiez que vous avez enregistré tout votre
- " Ne pas installer le matériel avant d'avoir installé
- " Ne jamais plier, tordre ou forcer le NWD210N
- " Installare il software dal CD prima di inserire
- " Se non si conosce la versione del sistema
- " Scegliere un'unità a disco rigido interna
- " Assicurarsi di aver salvato tutto il lavoro prima di
- " Non installare l'hardware prima di aver installato
- " Non curvare, torcere o forzare l'NWD210N nella
- " Установите с CD-диска программное
- " Если вы не знаете точно версию своей
- " Выберите внутренний жесткий диск
- " Перед перезагрузкой сохраните все
- " Не устанавливайте оборудование до
- " Ни в коем случае не изгибайте, не
- " 插入 NWD210N 之前請先從 CD 安裝軟體。先
- " 如果您不確定電腦執行的作業系統版本,按一下
- " 選擇一個內部硬碟機 ( 可依其 圖示辨識 )。
- " 重新啟動前請確認您已經將所有工作資料儲存妥
- " 將 NWD210N 插入
