SIM2 MICO 50: introduction 1.
introduction 1.: SIM2 MICO 50
English
MiCO 50
5
introduction 1.
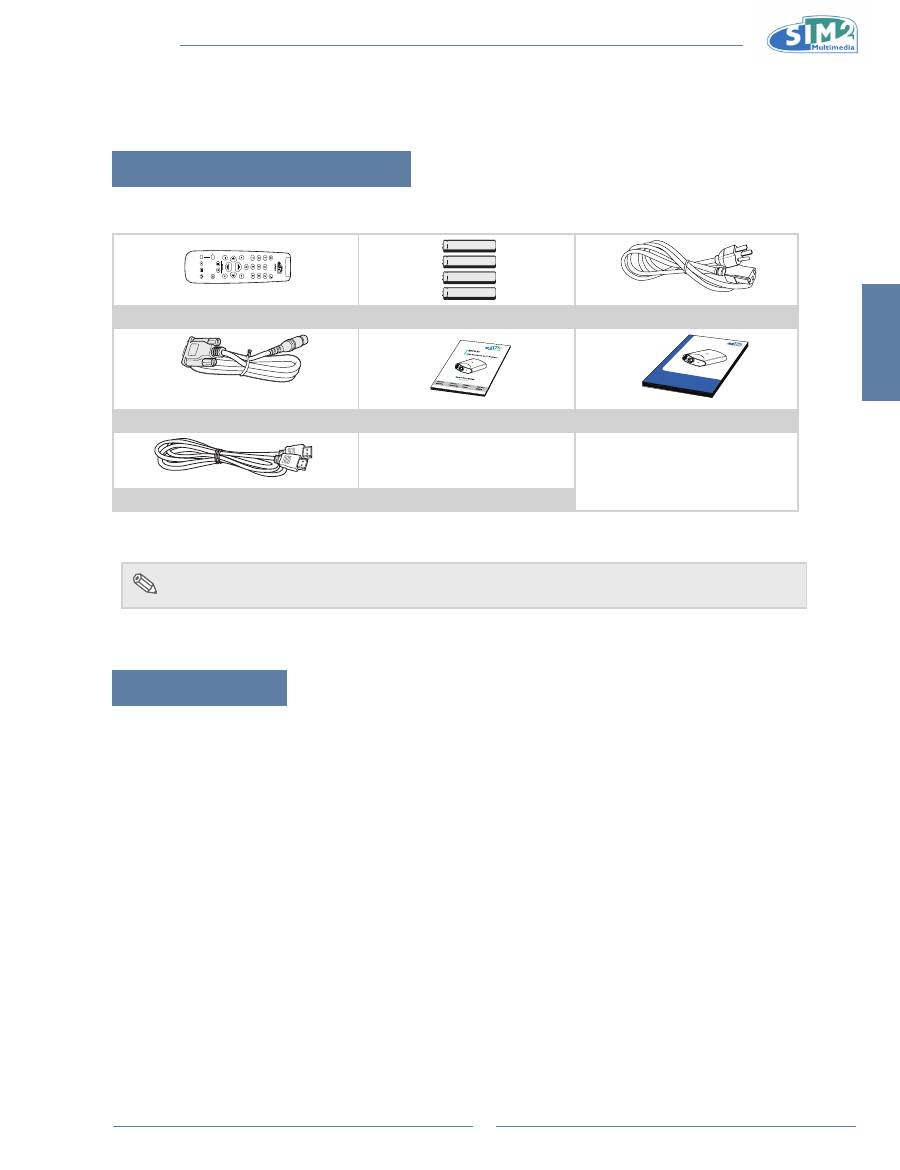
Package Contents
Open the package and ensure that you have the following items:
LIG
H
T
F1
Z
O
O
M
FO
C
U
S
F2
Remote control
Four “AAA” size batteries
Power cord (By country)
C3X Lu
mis HO
ST
User an
d insta
llation m
anual
MICO 50
User an
d insta
llation m
anual
RS232 cable
Quick Guide
User’s Manual
Optional:
Ceiling mount package
•
HDMI to HDMI cable (3M)
note
Some of the cables may not be available depending on the region. Please check with
•
your nearest Authorized Dealer.
If anything is missing or appears damaged, contact your dealer immediately.
Features
0.95" 1080p single chip DMD™ DarkChip4.
•
newly developed lVDs chip.
•
high color purity and high brightness thanks to lED light source.
•
Enhanced i/p conversion algorithm.
•
Extensive improvements on the jagged edges or slanted lines in moving images.
•
improved Edge Up-scaling.
•
As a result of reducing jagged edges and flickering when up-scaling edges of slanted lines, even signals
•
not reaching a panel resolution of 480i/p can be projected by converting them to 1920X1080 resolution
images.
improved Film Mode Function.
•
3:2 pull down enhancement for 480i and 2:2 for 576i signals, but HDTV 1080i signals as well.
•
Use of a hDMi/hDCP terminal enables all processes from input to signal processing and projection to be
•
performed digitally, resulting in the realization of all-digital projection without any data loss due to
analog conversion. This also supports the building of home theaters using hTPC.
lighting system: luminus Phlatlight PT120 R/g/B lEDs.
•
lED life: around 30.000 hours.
•
new DynamicBlack technology.
•
Contrast ratio up to 100.000:1 (with DynamicBlack).
•
Luminance over 800 ANSI Lumens (common Bightness figure around 25% more than luminance one).
•
2 lenses available: short throw ratio (T1 : 1.5 –2.1 :1) and long throw ratio (T2: 2.1 –3.9 :1).
•
Horizontal and vertical motorized lens shift.
•
low power consumption in standby mode (< 1W).
•
MiCO 50
6
Components
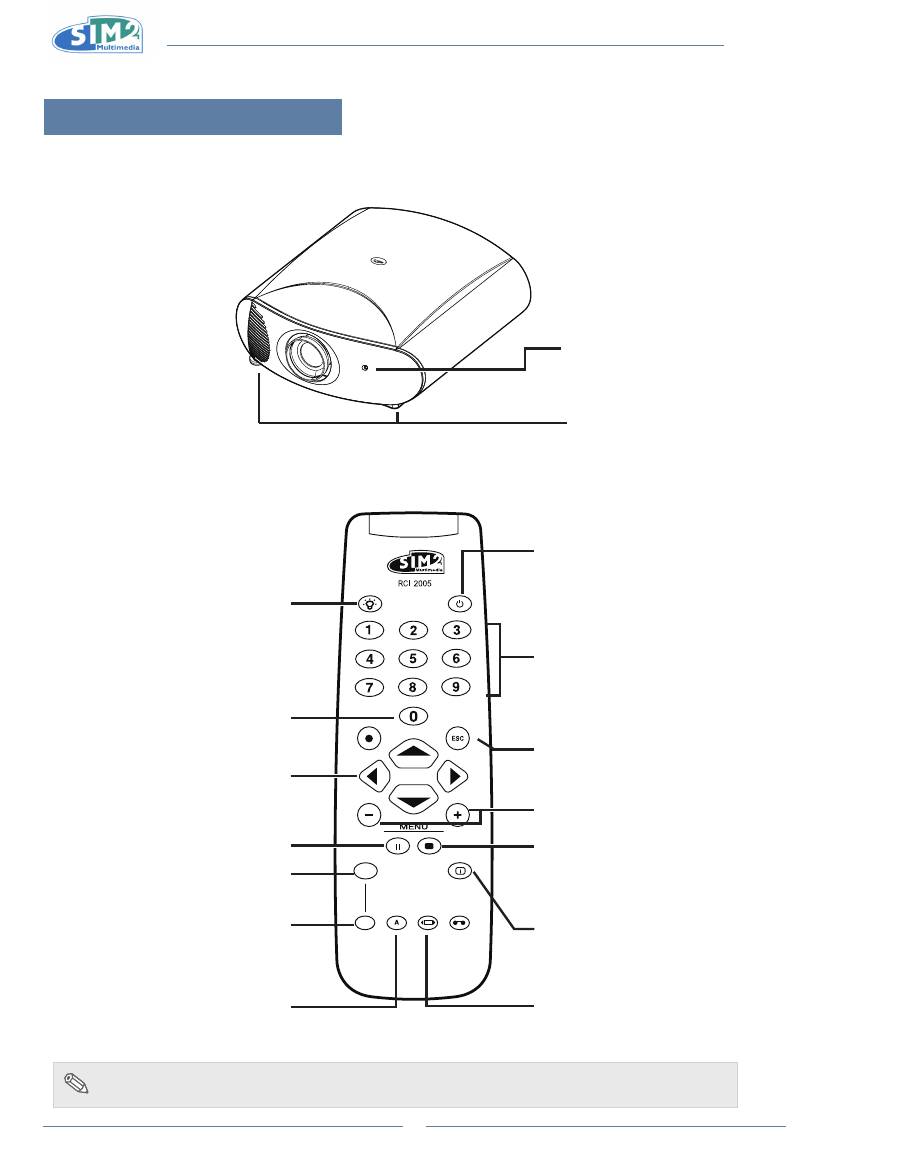
Projector (Front and Top View)
Adjustment feet
Remote control sensor
Remote Control
LIGHT
F1
ZOOM
FOCUS
F2
Power OFF button
For turning the power off.
p
/
q
/
t
/
u
Browse through OSD menus and
parameter settings.
MEnU +/-
Switches on the OSD and browse through its
pages.
info
Display information on the selected sources
and projector status.
Zoom
Selects lens
zoom adjustment.
Auto
Automatically optimizes the projected image
on the Graphics RGB source.
Focus
Set the lens to focus.
EsC button
Disables the OSD.
Backlighting
Backlights the keys on the remote control.
Key 0
Switches the panel on from Standby.
Keys 1-7
Selects the sources directly.
(switch the panel on from standby)
1 Composite
2 S-VIDEO
3 COMPONENT
4 GRAPHICS RGB
5 HDMI 1
6 HDMI 2
7 SCART
Memories
Opens the Memory management menu.
Aspect
Selects the images aspect ratio.
Freeze
Freezes/unfreezes a moving picture.
note
To use SCART input mode, first ensure that the SCART-to-RCA cable is connected and
•
SCART is set enabled via Source menu.
English
MiCO 50
7
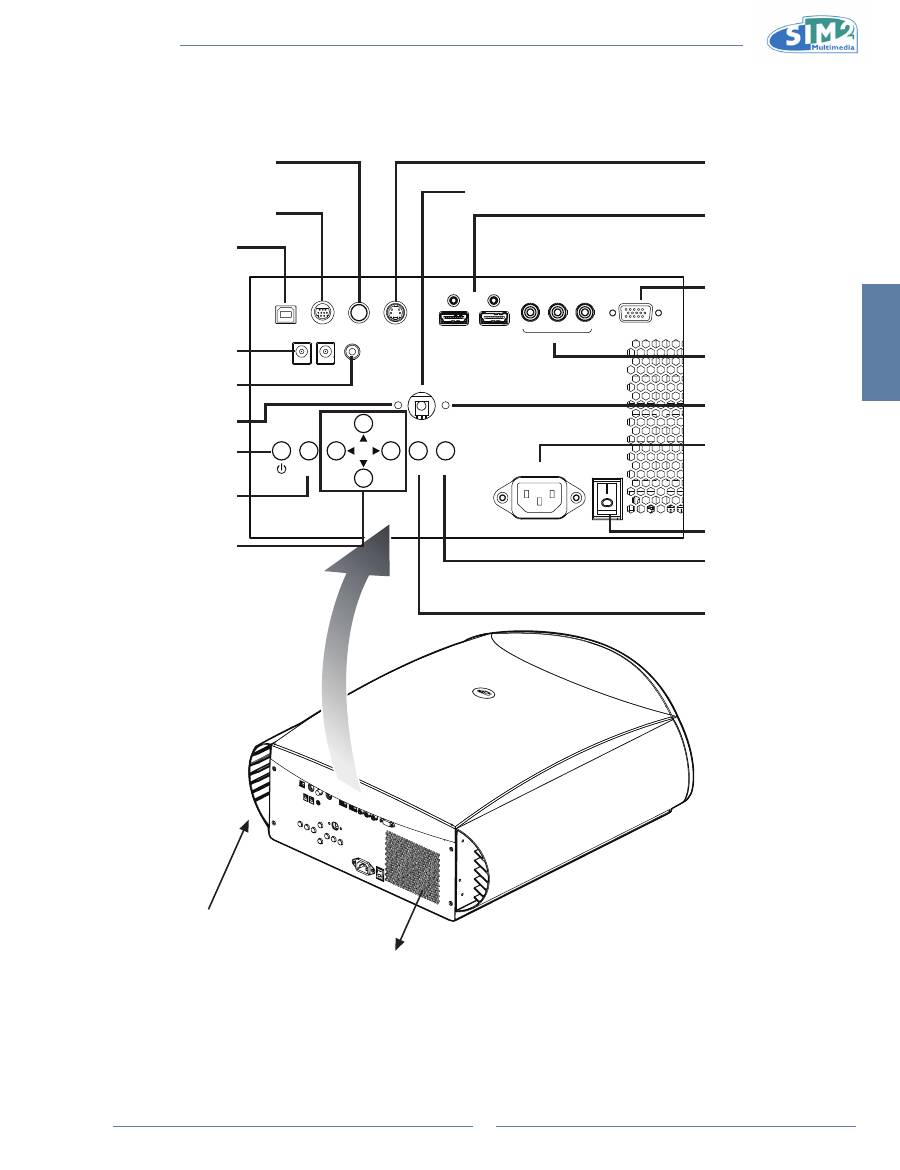
Projector (Rear View)
GRAPHICS RGB
HDMI 1
S-VIDEO
COMPOSITE
ESC
SOURCE
MENU
100-240 V / 50-60 Hz
USB
12V
TRIG1
12V
TRIG2
WIRED REMOTE
RS-232
HDMI 2
COMPONENT
Pr
Pb
Y
Exhaust vent
Remote control sensor
Component
Terminals for YPbPr/
YCbCr
AC socket
100~240V AC, 50/60Hz
Wired Remote
Terminal for wired
remote control
12V Trigger
Terminals for screen
controlling
Rs-232C terminal
Command control
UsB
B type terminal for
service port
s-Video
Terminals for connecting
S-Video
hDMi
Terminals for connecting
HDMI
PC
Terminal for connecting PC
RGB signals
Composite
Terminals for connecting
Composite
Air inlet
p
/
q
/
t
/
u
Browse through the
OSD menus and set
parameters.
source
Open the input selection
menu.
EsC
Disables the OSD.
Menu
Press to open the
OSD menu.
Power
Power switch
Red lED
Standby
Blue lED
Power ON
MiCO 50
8
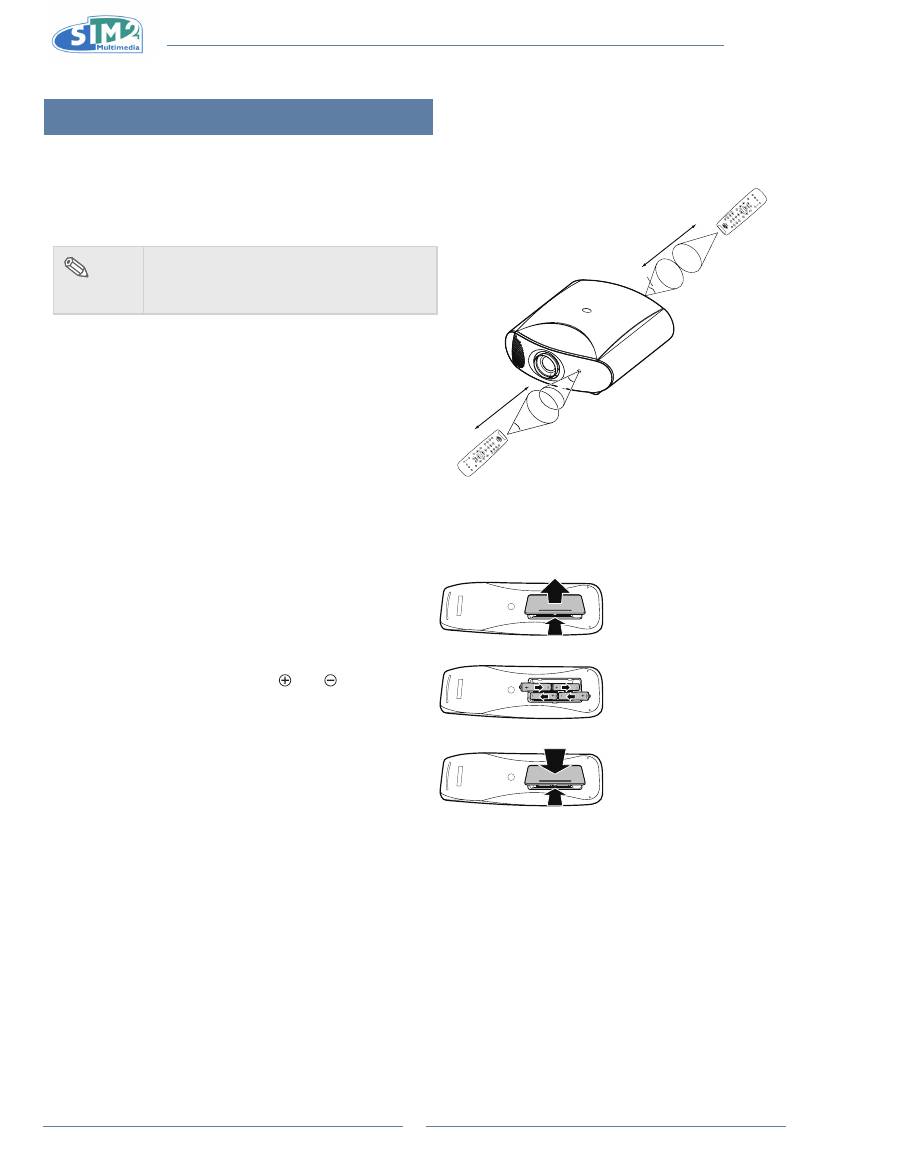
Using the Remote Control
Available Range of the Remote Control
The remote control can be used to control the projector within
n
the ranges shown in the illustration.
note
The signal from the remote control
•
can be
reflected by the screen. Remote control
signal may vary according to usage.
When using the remote control:
Be sure not to drop it, or expose it to moisture or high
•
temperature.
The remote control may malfunction under a fluorescent
•
lamp. If that occurs, move the projector away from the
fluorescent lamp.
Inserting the Batteries
The batteries (four “AAA” size) are included in the package.
1
Press down the tab on the cover
and pull the cover towards the
direction of the arrow.
2
insert the included batteries.
Insert the batteries making sure the
polarities correctly match the and
marks inside the battery
compartment.
3
insert the lower tab of the cover
into the opening, and press down
the cover until it clicks in place.
30°
23'(7 m)
LIG
HT
F1
ZO
O
M
FO
CU
S
F2
30°
30°
23'(7 m)
LI
GH
T
F1
ZO
O
M
FO
CU
S
F2
25°
Оглавление
- Introduzione 1.
- Collegamenti e Impostazione 2.
- operazioni di base 3.
- Funzioni facili 4.
- appendice
- introduction 1.
- Connections and setup 2.
- Basic Operation 3.
- Easy to Use Functions 4.
- Appendix
- introduction 1.
- Branchements et réglages 2.
- Opérations de base 3.
- Fonctions faciles à utiliser 4.
- appendice
- einleitung 1.
- Verbindungen und einrichtung 2.
- Grundbedienung 3.
- Leicht bedienbare Funktionen 4.
- Anhang
- Introducción 1.
- Conexiones y configuración 2.
- Funcionamiento básico 3.
- Funciones de uso sencillo 4.
- apéndice
- Introdução 1.
- Ligações e instalação 2.
- Funções básicas 3.
- Funções fáceis de utilizar 4.
- Apêndice
- Введение 1.
- Подключения и настройка 2.
- Основные операции 3.
- Простые в использовании 4. функции
- Приложение
- 简介 1..
- 连接和设置 2..
- 基本操作 3..
- 简单易用的功能 4..
- 附录
