SIM2 MICO 50: Easy to Use Functions 4.
Easy to Use Functions 4.: SIM2 MICO 50
English
MiCO 50
21
Easy to Use Functions 4.
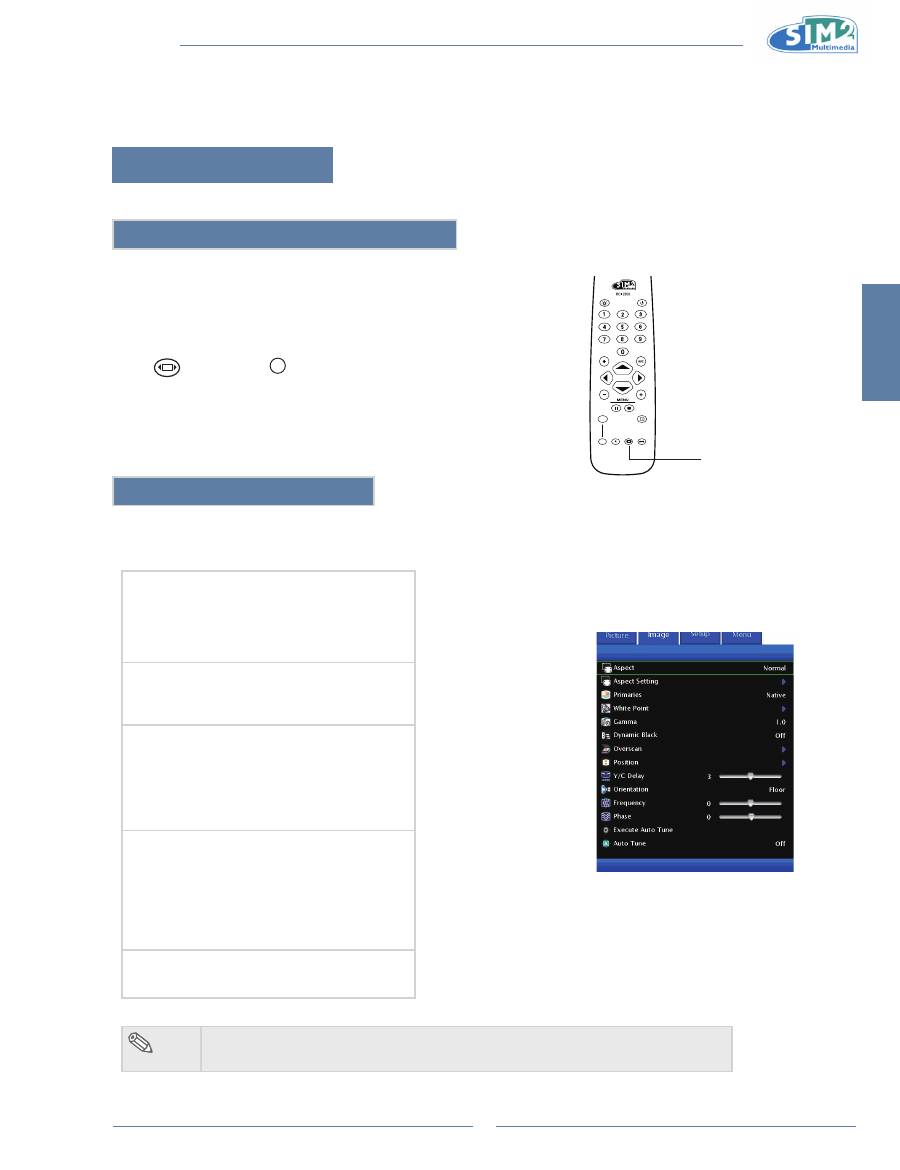
image menu
You can adjust the projector's Image to your preferences with the following settings.
selecting the Picture Display Mode
This function allows you to modify or customize the picture display mode
to enhance the input image. Depending on the input signal, you can
choose “Anamorphic”, “Normal”, “LetterBox”, “Panoramic”, “Pixel to
Pixel”, more three user aspects.
Press
on remote or
MENU
on keypad and select Aspect.
Aspect Function
The Aspect function enables you to control how the projector resizes the input image.
The following options are available:
normal
Resolution depends on the Input Signal
•
4:3 input scaled to fit display height
•
Width scaled to maintain 4:3 aspect ratio
•
Black bars on left and right (taking up 25% of the
•
whole display)
Anamorphic
Resolution 1920x1080
•
4:3 input is stretched to fit 16:9 display
•
Stretches entire image.
•
letterBox
Resolution 1920x1080
•
4:3 input scaled to fit display width
•
Height scaled to maintain 4:3 aspect ratio:
•
1440x1080
25% of the entire image on the top and bottom is
•
cropped.
Panoramic
Resolution 1920x1080
•
4:3 input is stretched to fit 16:9 display
•
With 4:3 input, the central ratio remains true to
•
scale, but the image is stretched to fit display
width.
1920x1080 input image is identical to the one
•
displayed in Anamorphic mode.
Pixel to Pixel
Resolution depends on the input signal.
•
Ouput resolution is equal to input resolution.
•
note
The User 1 & 2 are default on Anamorphic and User 3 is default on LetterBox.
•
LIGHT
F1
ZOOM
FOCUS
F2
Aspect Ratio
MiCO 50
22
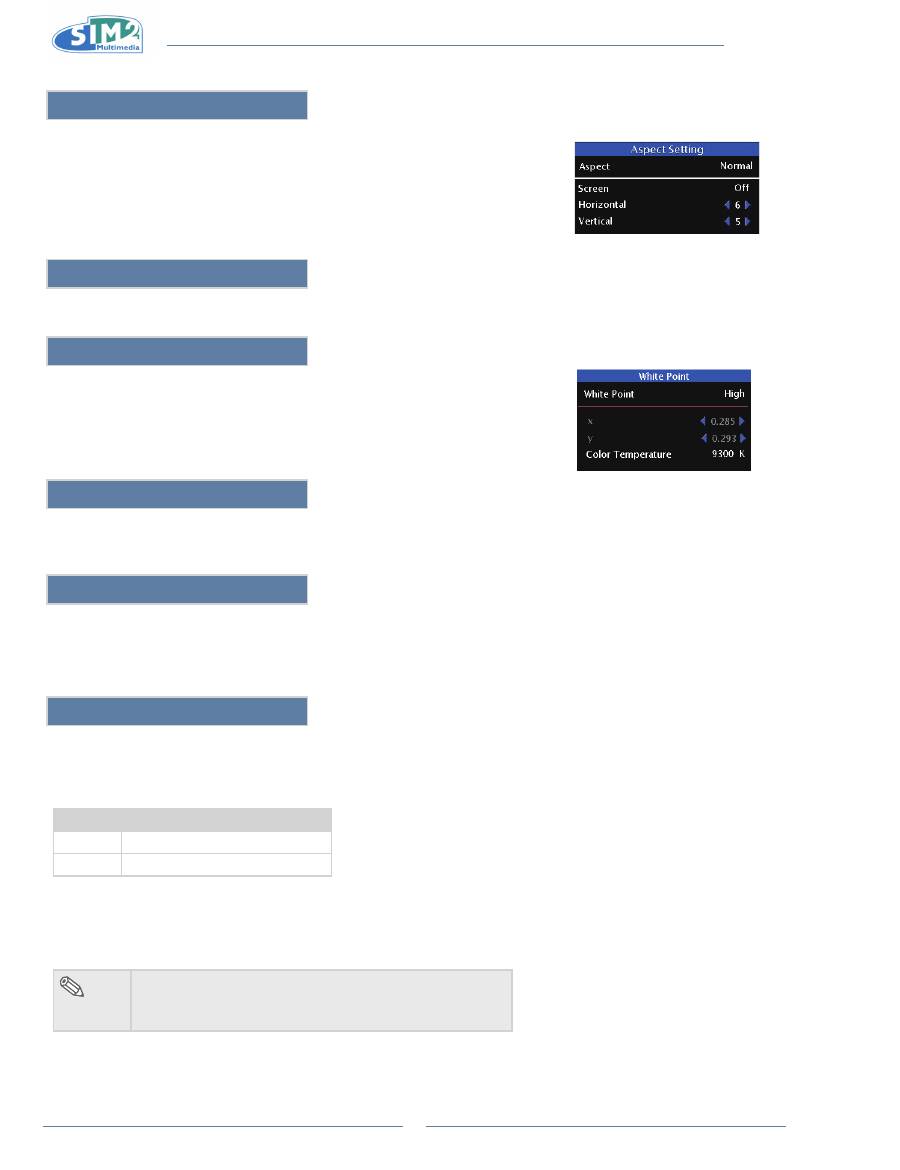
Aspect setting
Choose what Aspect will be to setup and the selected aspect did not apply
1.
on current image except User 1/2/3.
The "Screen" setting is available for every Aspect and used for 12V trigger
2.
setting and its default for each aspect is Off.
The H/V adjustment is only available for Aspect User 1/2/3.
3.
Primaries
The Primaries are the color gamut for RGB. The Primaries is default on Auto.
White Point
The White Point High is closed to 9300K, Medium is to 8500K, Low is to 5400K,
and Native is the LED native white point without any calibration. To adjust
coordinates of white point, select "User".
gamma
Use this option to adjust the gamma correction of the image. Default setting is 2.2. Gamma correction provides eight
sets of gamma corrections 1.0, 1.5, 1.8, 2.0, 2.2, 2.35, 2.5, and 2.8.
Dynamic Black
This function utilizes the contrast of colors to enable black colors to appear blacker on screen while significantly
enhancing the performance of black scenes.
To enable the function, set it to “ON”.
Overscan
This function enables you to remove some edges of the image.
Overscan Type
The following options are available:
Selection
Description
Zoom
Scales or zooms the image.
Crop
Cuts a portion of the image.
Overscan Adjust
This function enables you to adjust the image display on screen. Available options are from 0-10. The
default value is 1 which is suitable for S-Video/Composite, 480i/p, 576i/p, and analog 1080i/p input sources.
Press “
•
t
” or “
u
” to select value.
note
The adjustable range is 0~1 when 1080i and 1035i
•
input.
The adjustable range is 0~5 when 1080p input.
•

English
MiCO 50
23
Position
This function enables you to center the display vertically and horizontally.
Press “
1
t
” or “
u
” of the Horizontal Position, the display will move to the left or the right.
Press “
2
t
” or “
u
” of the Vertical Position, the display will move upward or downward.
note
This function is only available for Component and
•
Graphics RGB inputs.
Y/C Delay
The function allows you to adjust color and luma signals in order to match both timings up. It is only available for
Composite and S-Video.
Orientation
This projector is equipped with a reverse/invert image function that allows you to reverse or invert the projected image
for various applications.
Selection
Description
Floor
Normal image
Ceiling
Inverted image
Floor Rear
Reversed image
Ceiling Rear
Reversed and inverted image
note
This function is used for the reversed image and
•
ceiling-mount setups.
Frequency
The function enables you to adjust vertical noise (only available for Component and Graphics RGB inputs).
Phase
The function enables you to adjust horizontal noise (similar to tracking on your VCR). It is only available for Component
and Graphics RGB inputs.
Execute Auto Tune
The function allows you to perform auto tune (only available for RGB Graphics).
Auto Tune
The function allows you to adjust a computer image automatically (only available for RGB Graphics).
MiCO 50
24
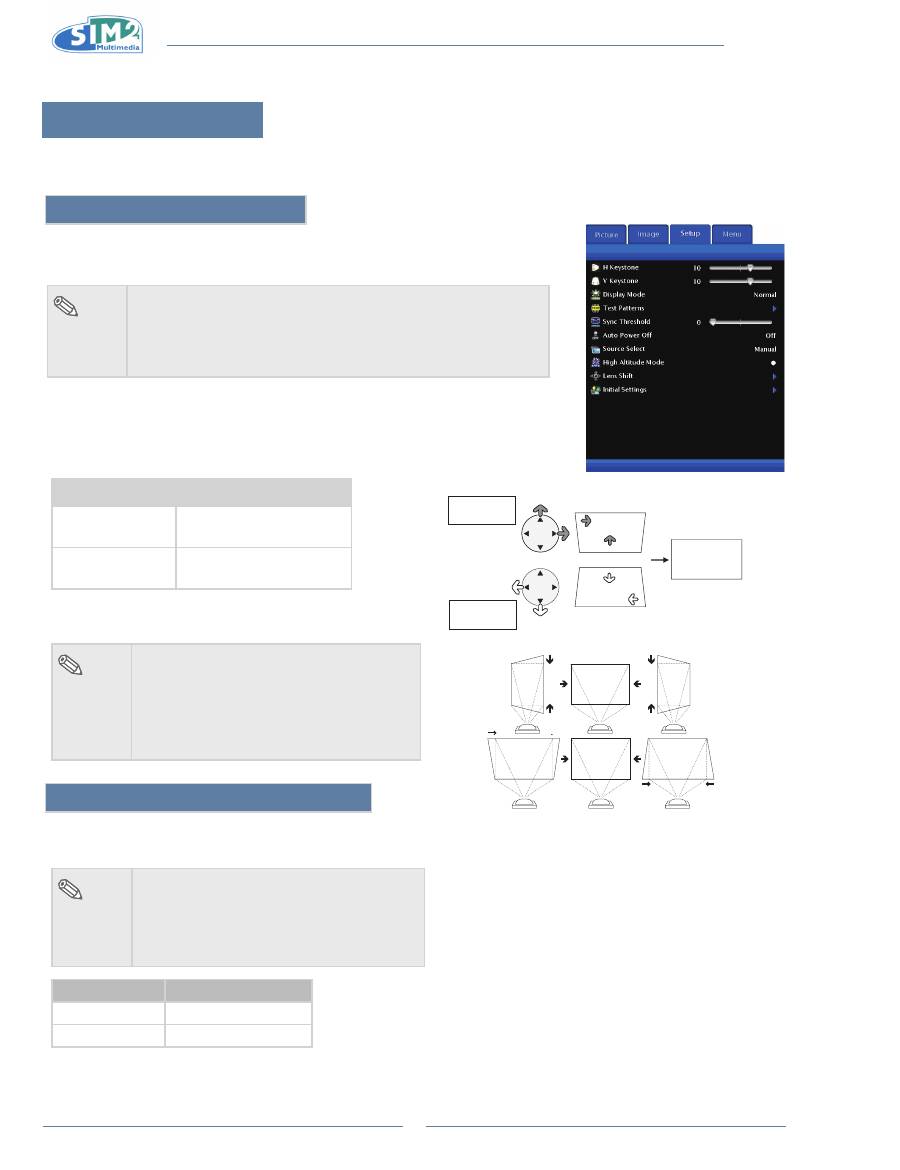
setup menu
You can adjust the projector's settings to your preferences with the following options.
h/V Keystone
Correcting Trapezoidal Distortion and Adjusting Vertical Size of the picture:
This function allows for Keystone correction.
note
When the image is projected either from
•
top or from bottom
toward the screen at an angle, the image becomes distorted
trapezoidally. The function for correcting trapezoidal distortion is
called Keystone Correction.
select “h Keystone” or “V Keystone” in the setup
1
.
Selection
Description
H Keystone
Horizontally adjusts the
keystone settings.
V Keystone
Vertically adjusts the
keystone settings.
Press“
2
t
” or “
u
” to adjust the keystone
correction.
note
Since the trapezoidal distortion of the
•
image can be corrected up to various
angles, the actual screen can be
diagonally set up to that angle as well.
Straight lines or the edges of images may
•
appear jagged while adjusting the image.
Display Mode
These functions allow you to increase the brightness of the
projector.
note
Although noise is increased when “Display
•
Mode” is set to “Overlap”, brightness
increases by 20%.
“Display Mode” mode is factory preset to
•
“Normal”.
Status
Brightness
Normal
80%
Overlap
100%
* “V-SIZE” is not displayed
when the value of
“KEYSTONE” is “0”.
Vertical Keystone Correction
Horizontal Keystone Correction
Compresses
upper side.
Compresses
lower side.
English
MiCO 50
25
Test Pattern
Select to display test patterns.
sync Threshold
This function is only available on Component input.
The projector is compatible with SDTV(480i and 576i), EDTV(480p and 576p), and HDTV(720p,1080i and 1080p) video
signals. If a hardware device, such a DVD player, is not syncing properly with the projector, adjust this option to help it to
sync when connected to the projector.
Auto Power Off
When an input signal is not detected and you don't press any input button on keypad or remote for more than 15
minutes, the projector will automatically turn off if set to “ON”.
Auto Power OFF function will be disabled when it is set to “OFF”.
note
When the Auto Power OFF function is set to “ON”, 5 minutes before the power turns off, the
•
message “Power OFF in 5 min.” will appear on the screen to indicate the remaining minutes.
source select
Used to select the input source automatically when there is no signal in the current input.
Source Select
Auto
Manual
note
If you select "Auto", then the input source is selected automatically.
•
high Altitude Mode
When it selected in ON, all the fan in the projector will be running in high speed mode.
lens shift
The function allows you to adjust the height and width of the projected image within the shift range of the lens.
initial settings
This process will set all the items to factory default settings.
MiCO 50
26
Menu menu
This menu is used to set the following projector's preferences.
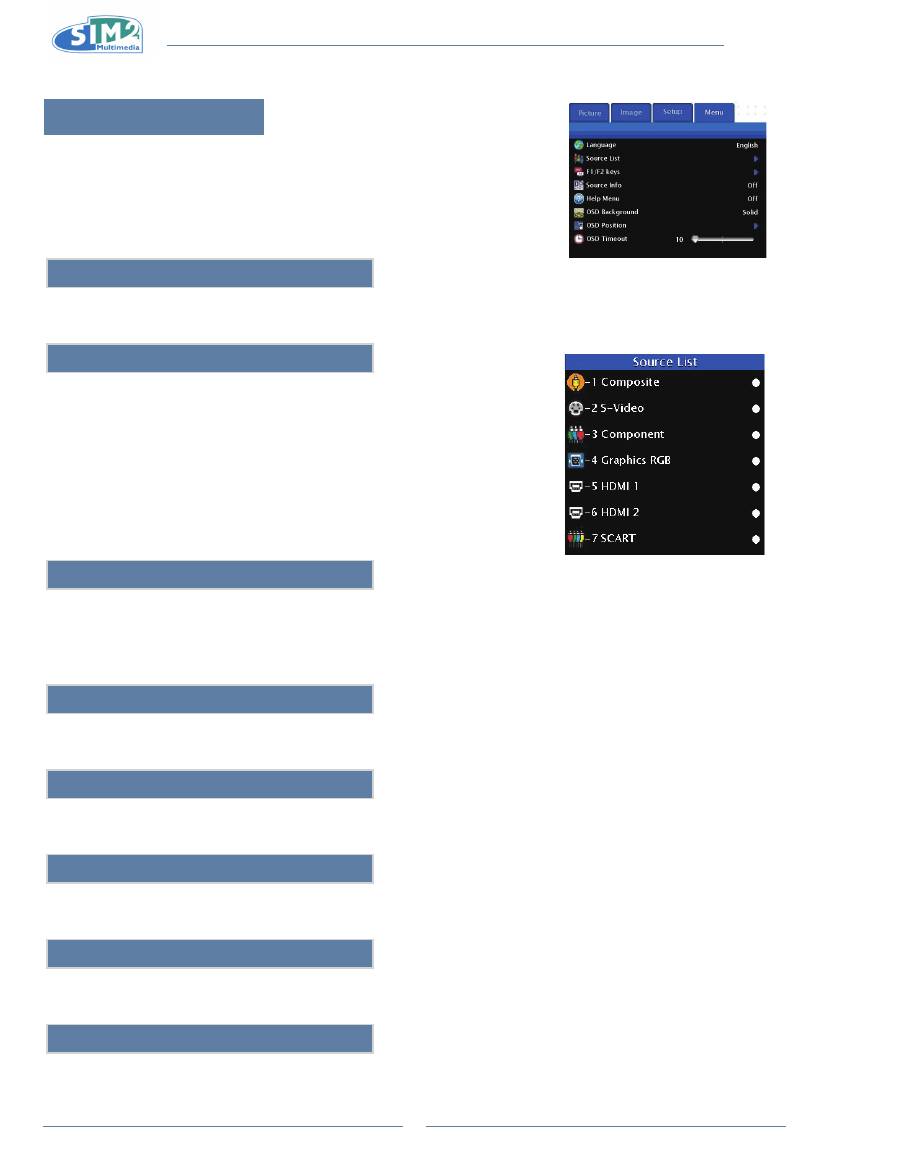
language
The on-screen display language of the projector can be set to different languages.
source list
Used to select which input source will be enabled.
F1/F2 keys
The F1/F2 key could be assigned the hot key what user wants (Zoom, Focus, Overscan, Blank, or Gamma).
The F1 is default on Zoom.
•
The F2 is default on Focus.
•
source info
The Status screen displays information about the current source, Horiz. Frequency, Vert. Frequency, Resolution etc.
help Menu
A help menu which explains the button functionality for each item. It's visible if selecting Yes, hided if No.
OsD Background
When this function is enabled, the OSD is transparently displayed on the screen to blend with the image.
OsD Position
The function enables you to adjust the OSD position.
OsD Timeout
OSD Timeout is used to set how long the OSD will stay open if no buttons are pressed. The default is 10 seconds.
Оглавление
- Introduzione 1.
- Collegamenti e Impostazione 2.
- operazioni di base 3.
- Funzioni facili 4.
- appendice
- introduction 1.
- Connections and setup 2.
- Basic Operation 3.
- Easy to Use Functions 4.
- Appendix
- introduction 1.
- Branchements et réglages 2.
- Opérations de base 3.
- Fonctions faciles à utiliser 4.
- appendice
- einleitung 1.
- Verbindungen und einrichtung 2.
- Grundbedienung 3.
- Leicht bedienbare Funktionen 4.
- Anhang
- Introducción 1.
- Conexiones y configuración 2.
- Funcionamiento básico 3.
- Funciones de uso sencillo 4.
- apéndice
- Introdução 1.
- Ligações e instalação 2.
- Funções básicas 3.
- Funções fáceis de utilizar 4.
- Apêndice
- Введение 1.
- Подключения и настройка 2.
- Основные операции 3.
- Простые в использовании 4. функции
- Приложение
- 简介 1..
- 连接和设置 2..
- 基本操作 3..
- 简单易用的功能 4..
- 附录
