SIM2 MICO 50: Basic Operation 3.
Basic Operation 3.: SIM2 MICO 50
English
MiCO 50
17
Basic Operation 3.
image Projection
Basic Procedure
Connect the required external equipment to the projector
before operating the following procedures.
info
The language preset at the factory is
•
English.
If you want to change the on-screen display
to another language, reset the language
according to the procedure on page 18.
Plug the power cord into the wall outlet. Press
1
the power switch to turn on the projector.
Press 0 on the remote control or
2
on the
keypad of the projector.
The power indicator illuminates blue, and the projector
•
enters power on mode.
note
The power indicator illuminates,
•
indicating the status of the LED.
Red:
The power is ready.
Blue:
The image is displayed
Press 0 on the remote control to turn on the
•
“Source” selection menu when in normal
operation.
Press the source button on the projector to select
3
the inPUT mode.
KEY 1
Selects the source Composite.
KEY 2
Selects the source S-Video.
KEY 3
Selects the source Component.
KEY 4
Selects the source Graphics RGB.
KEY 5
Selects the source HDMI 1.
KEY 6
Selects the source HDMI 2.
KEY 7
Selects the source SCART
note
When a signal is not received,
•
“NO SIGNAL” will be displayed.
Set SCART enabled before
•
selecting the SCART input.
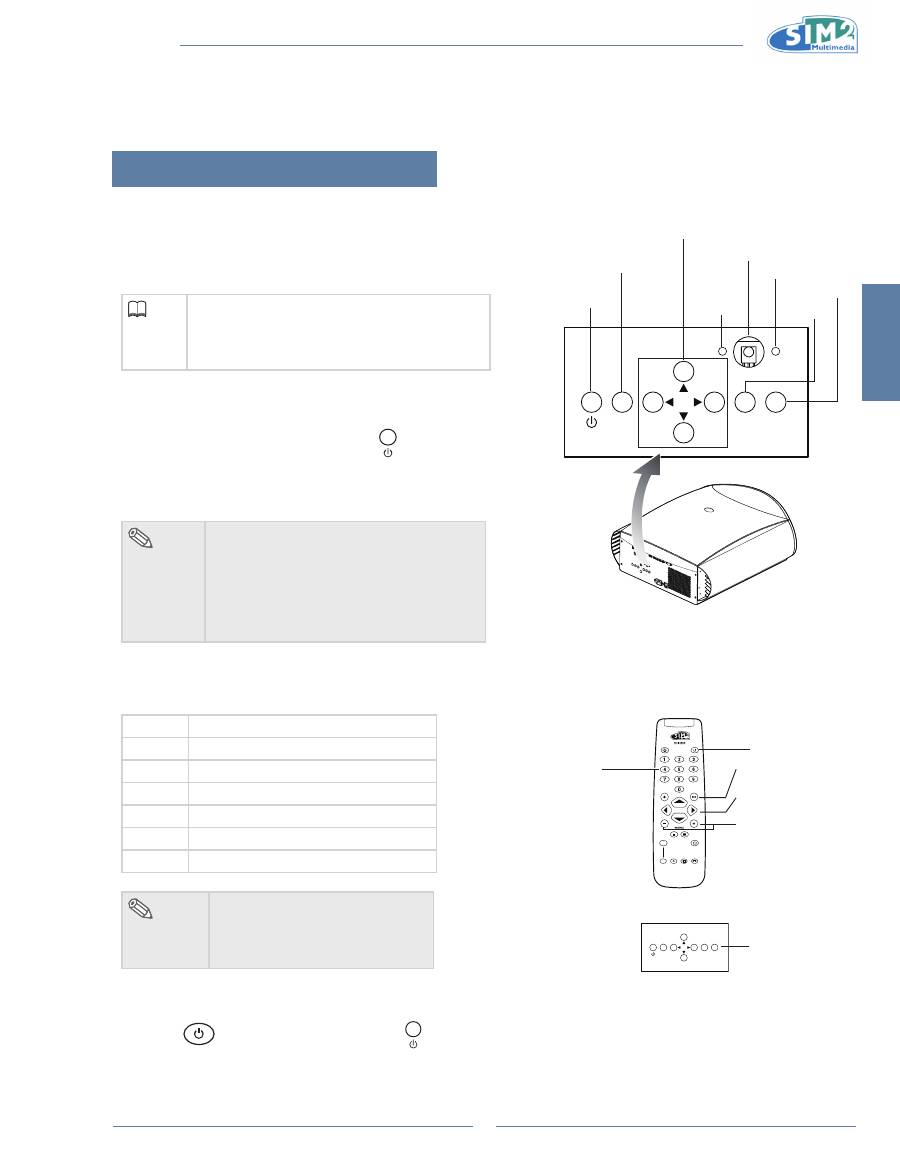
Press
4
on the remote control or on the projector to turn off the projector.
ESC
SOURCE
MENU
p
,
q
,
t
,
u
buttons
Power
MEnU
EsC
source
Remote control sensor
Red lED
Blue lED
LIGHT
F1
ZOOM
FOCUS
F2
EsC button
MEnU +/- button
Power button
ESC
SOURCE
MENU
p
,
q
,
t
,
u
buttons
Keys 1-7
selects the sources
directly.
1 Composite
2 s-ViDEO
3 COMPOnEnT
4 gRAPhiCs RgB
5 hDMi 1
6 hDMi 2
7 sCART
source button
MiCO 50
18
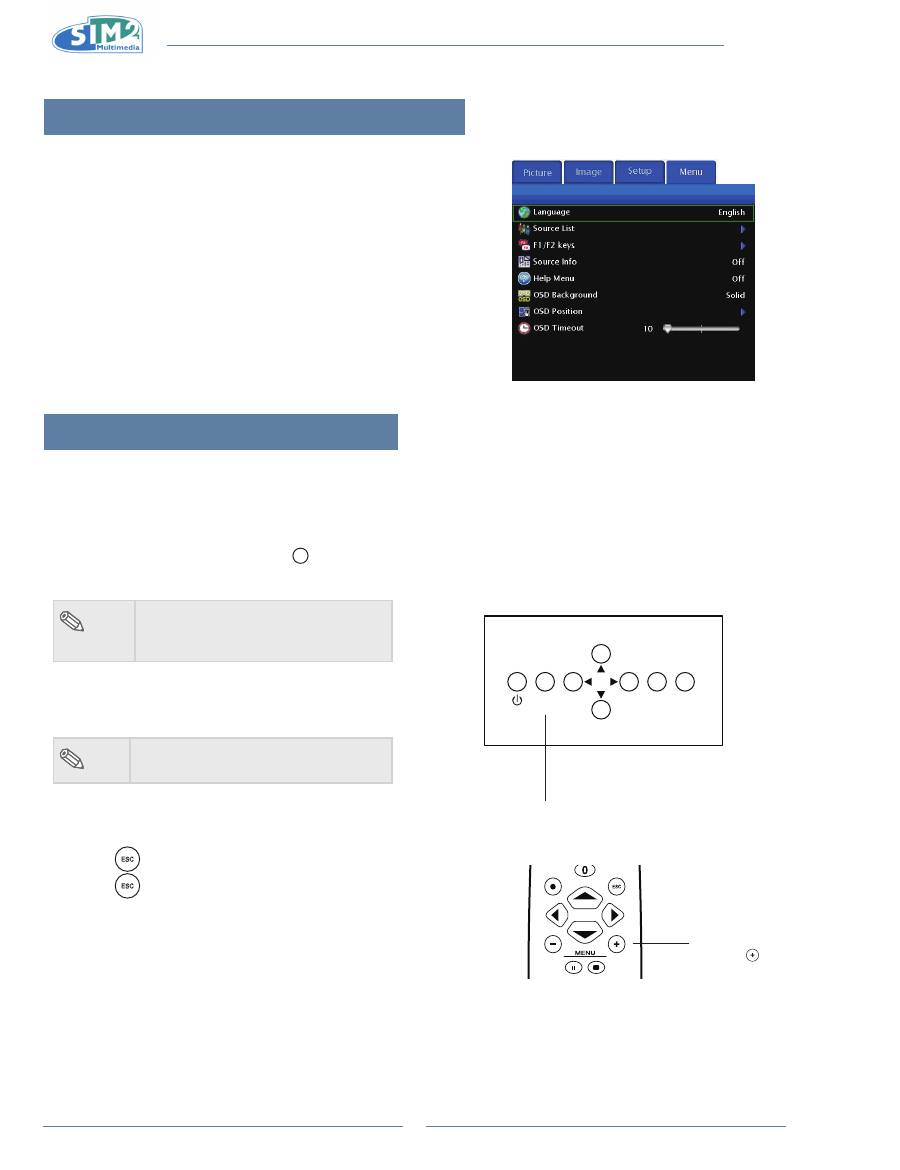
On-screen Display language
The on-screen display language of the projector can be set to
English, Italiano, Français, Deutsch, Español, Português, Русский
,
简体中文
.
Press “MEnU +” on remote control then select the
1
menu “Menu”.
The menu will be displayed.
•
Press
2
u
to select “language”.
Press
3
p
or
q
to select desired language, and then
press
u
.
The desired language will be set as the on-screen display.
•
Press “EsC”.
4
Using the Menu screen
This projector has one set of menu screens that allow you to adjust the image and various projector
settings. You can operate the menus from the projector or remote control as follows:
Menu Selections (Adjustments)
Press “MEnU +” on remote or
1
MENU
on keypad.
The menu screen is displayed.
•
note
When no input source displays,
•
the"Picture" and "Image" menu can
not be selected.
Press “MEnU +” to select the desired menu.
2
Press
3
p
or
q
to select the desired item.
note
The selected item will be highlighted.
•
Press
4
t
or
u
to adjust the item selected.
The adjustment is stored.
•
Press
5
to return to “Main MEnU”.
Press
6
, the menu screen will disappear.
ESC
SOURCE
MENU
MEnU button
LIGHT
F1
ZOOM
FOCUS
F2
MEnU +
button
English
MiCO 50
19
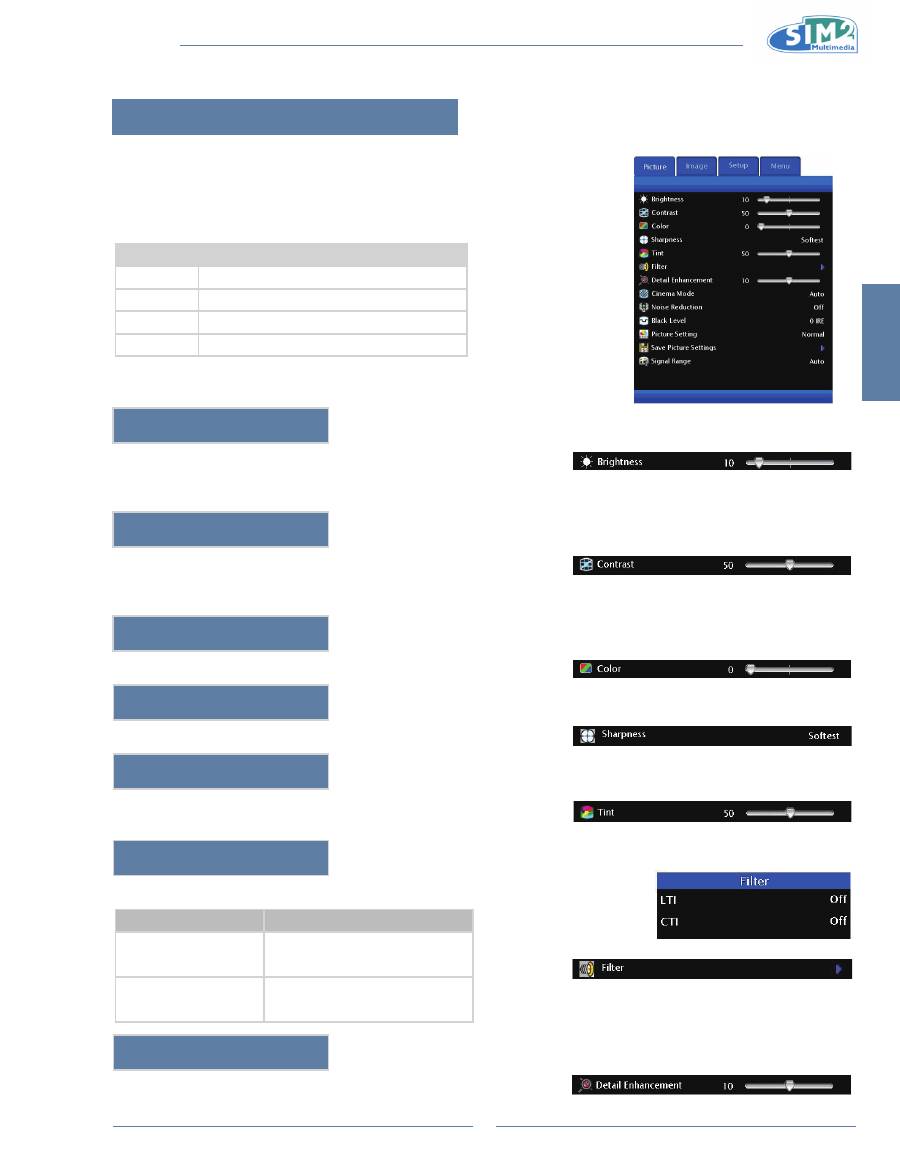
Adjusting the Picture
You can adjust the projector's picture to your preferences
with the following picture settings.
Adjusting Image Preferences
item
Description
Brightness
Adjusts the brightness of an image.
Contrast
Adjusts the contrast level.
Color
Adjusts the color intensity of an image.
Tint
Adjusts the tones of an image.
Brightness
Use this option to adjust the overall brightness of the image. Use this
control in conjunction with contrast to fine-tune the display. The scale is
from 0 to 100.
Contrast
Use this option to adjust the contrast of the image. Use this control in
conjunction with brightness to fine-tune the display. The scale is from 0 to
100.
Color
Use this option to adjust the color intensity of the image.
sharpness
Use this option to adjust the clarity and focus of the image.
Tint
Use this option to adjust the tint of your image. Press
u
to make the
image more green. Press
t
to make the image more purple.
Filter
This function allows you to set the LTI and CTI level.
Selection
Description
LTI
(Luminance Transient
Improvement)
Adjusts the LTI level to enhance
luminance, filter fuzzy edges and
remove smear.
CTI
(Colour Transient
Improvement)
Adjusts the CTI level to enhance
colour, filter fuzzy edges, and
remove smear.
Detail Enhancement
This function sharpens the details of the picture.
MiCO 50
20
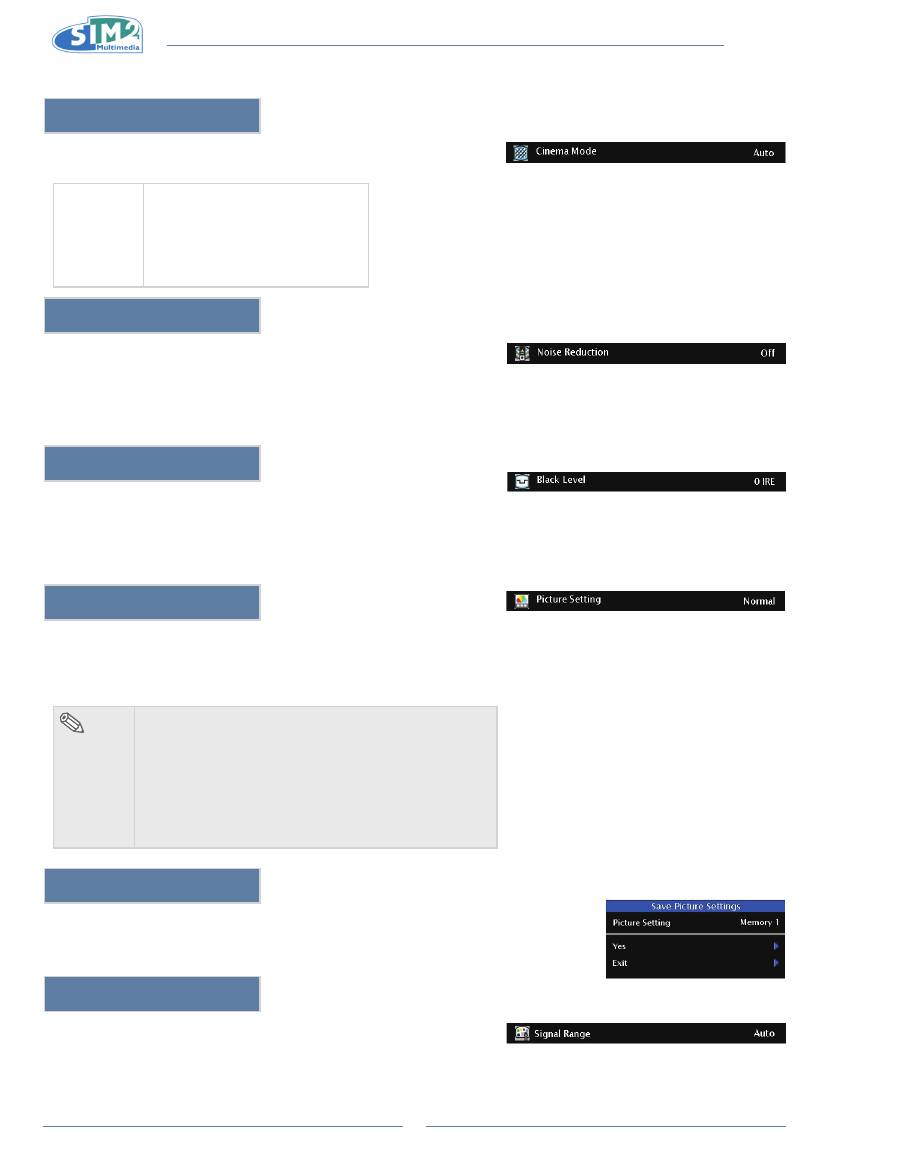
Cinema Mode
This function allows you to determine the type of incoming video content-
film. Different algorithms are applied for each of the content types.
Cinema
Mode
Reproduces the image of the film
source clearly. Displays the
optimized image of film transformed
with 3:2 pull down (NTSC and
PAL60Hz) or 2:2 pull down (PAL
50Hz and SECAM) enhancement to
progressive mode images.
noise Reduction
This function is only available for SDTV (480i/576i) and EDTV
(480p/576p) signals.
Noise Reduction is useful for clearing up noisy images. Turn it Low,
Medium, or High to keep in mind that reducing noise (which reduces high
frequencies) may also “soften” the image.
Black level
This function is only available for S-Video and Composite. This control
compensates for incoming elevated black levels present in certain video
signals. For some types of video, you may want to override the setting.
Set it to 7.5 IRE if blacks appear elevated (dark gray). If blacks appear
“crushed” (too dark), set it to 0 IRE.
Picture setting
This function stores Brightness, Contrast, Color, Sharpness, Tint, Filter,
Detail Enhancement, Gamma, Primaries, White Point, Overscan, Aspect
Ratio, Noise Reduction, and Black Level settings. Each stored setting is
reassigned to each input.
note
When Recalling saved Contents:
•
When selecting a saved memory number, the contents
of the “Picture” menu change to the adjustment values
of the saved memory number.
When Editing saved Contents:
•
Edit the contents of the “Picture” menu after selecting
the Memory number for which adjustment values are
to be edited.
save Picture settings
Use this option to save changes you made in “Picture setting” to Memory 1,
Memory 2, or Memory 3.
signal Range
Select signal range 16~235 or 0~255. Only HDMI is available.
Оглавление
- Introduzione 1.
- Collegamenti e Impostazione 2.
- operazioni di base 3.
- Funzioni facili 4.
- appendice
- introduction 1.
- Connections and setup 2.
- Basic Operation 3.
- Easy to Use Functions 4.
- Appendix
- introduction 1.
- Branchements et réglages 2.
- Opérations de base 3.
- Fonctions faciles à utiliser 4.
- appendice
- einleitung 1.
- Verbindungen und einrichtung 2.
- Grundbedienung 3.
- Leicht bedienbare Funktionen 4.
- Anhang
- Introducción 1.
- Conexiones y configuración 2.
- Funcionamiento básico 3.
- Funciones de uso sencillo 4.
- apéndice
- Introdução 1.
- Ligações e instalação 2.
- Funções básicas 3.
- Funções fáceis de utilizar 4.
- Apêndice
- Введение 1.
- Подключения и настройка 2.
- Основные операции 3.
- Простые в использовании 4. функции
- Приложение
- 简介 1..
- 连接和设置 2..
- 基本操作 3..
- 简单易用的功能 4..
- 附录
