Siemens ET375GU11E – page 2
Manual for Siemens ET375GU11E
Table of contents
- Table of contents
- Important information Before installation
- instructions
- How to avoid damage
- Your new appliance This is your new lava stone grill
- Control and indicator light Lava stone container
- Setting the grill Grilling over the lava stones
- 24
- Grilling over the
- Draining the water In the event that the water is still hot when drained, Safety switch-off
- Tables and tips Food Preheating Control setting Control setting Grilling time
- Tips for grilling
- Care and cleaning
- Glass ceramic panel and Remove light soiling using a damp cloth, or with glass ceramic cover warm soapy water. 30
- After-sales service
21
Your new appliance
Your new appliance and its accessories are
described in this section.
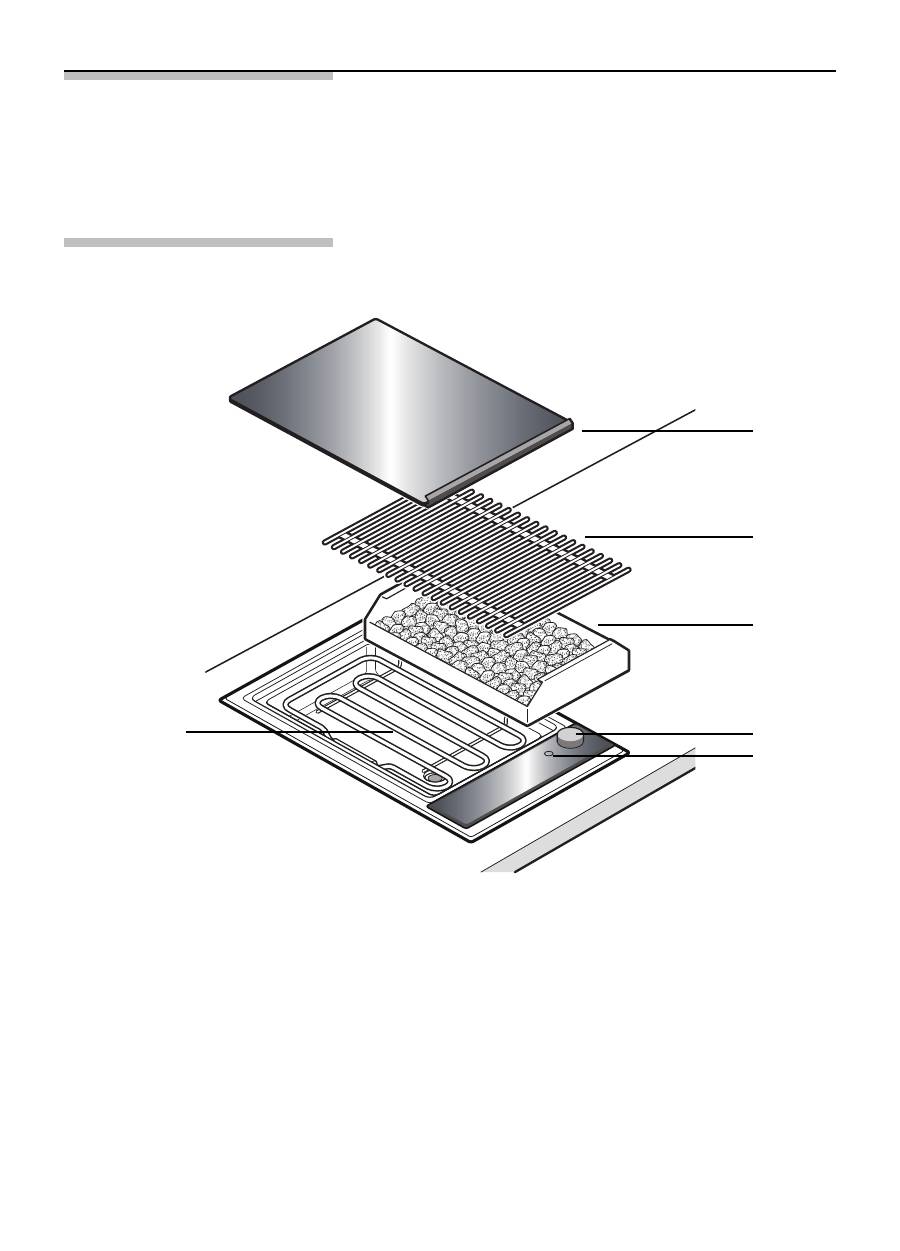
This is your new
lava stone grill
1
Glass ceramic cover
2
Grid iron
3
Lava stone container
4
Grill heating element
5
Control
6
Indicator light
1
2
3
5
6
4

22
Control and
indicator light
Turn the control to choose the heat setting of the
grill. The heat setting is infinitely variable. To switch
off the grill, turn the control to 0 after grilling.
The indicator light goes on when the grill is switched
on and warns that the appliance is hot.
Grill heating element
Caution, risk of burns! The grill heating element
몇
heats up during operation. Wait until the appliance
has cooled down before touching the grid iron or the
grill heating element.
You might notice that the grill heating element
switches on and off automatically during the grilling
time. This is normal.
You can tilt up the heating element after taking off the
grid iron. For safety reasons, tilting up the heating
element will result in the heating element being
switched off, even if the control is switched on.
Lava stone container
Before using the appliance for the first time, take the
lava stones out of the plastic bag and pour them into
the lava stone container.
Water bath
Always fill the grill trough with water before each use.
The amount of water depends on whether you wish
to grill with or without lava stones.
Caution, risk of scalding! If water splashes onto the
몇
hot grid iron or grill heating element when adding
more water to the trough, this will result in hot steam
being given off.
23
Setting the grill
With your new grill you can grill over the lava stones
or over the water bath.
The lava stones accumulate the heat from the grill
heating element and radiate an intense and even
heat.
When grilling over the water bath the rising steam
will keep grilled meat juicy and tender.
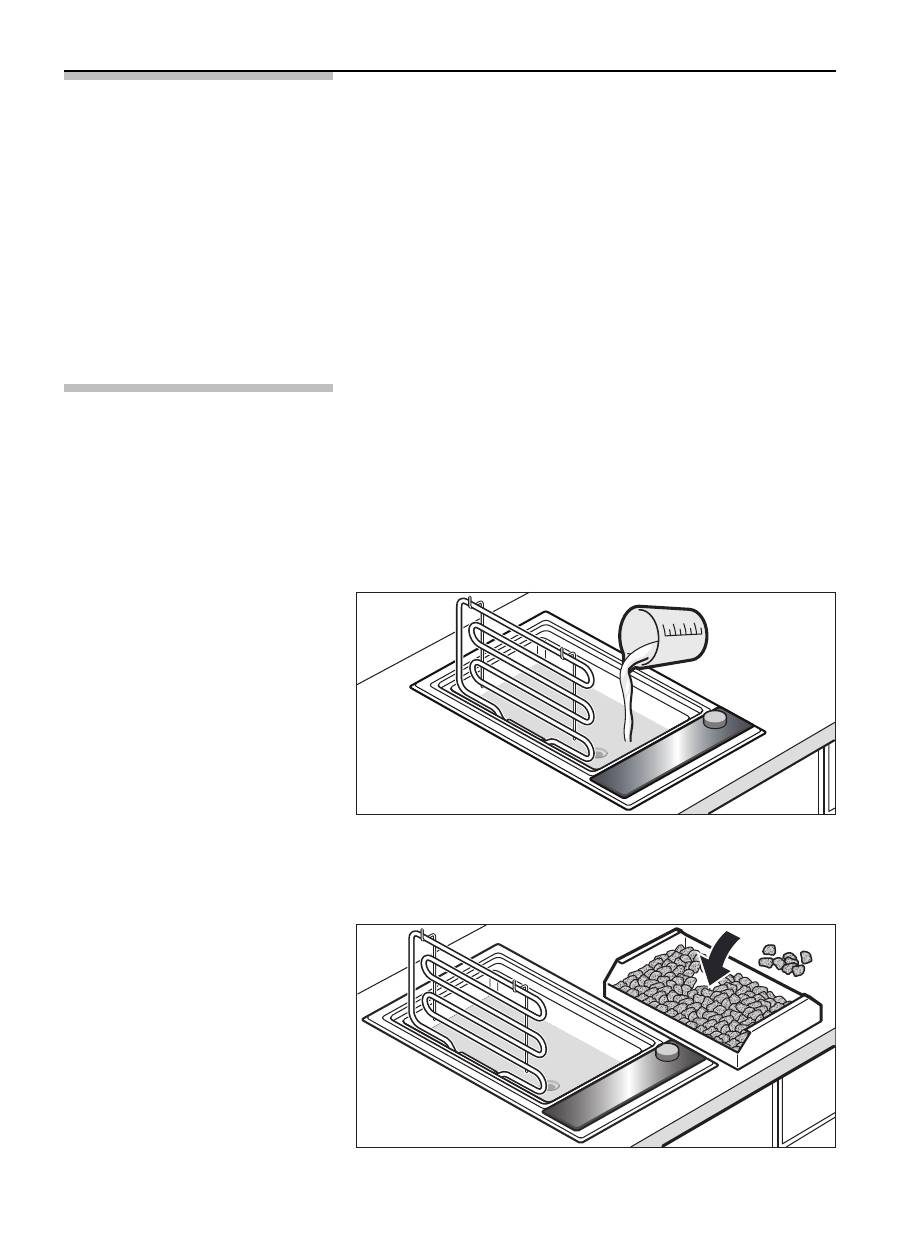
Grilling over the
lava stones
1.
Remove the grid iron and tilt up the grill heating
element. Remove the lava stone container.
2.
Pour in approx. 0.7 litres of water up to the lower
marking.
3.
Remove the lava stones from their packaging and
pour them into the lava stone container. Insert the
lava stone container into the appliance.

24
4.
Tilt down the grill heating element and put on the
grid iron.
5.
Preheat the grill for approx. 8-12 minutes on the
highest setting. Then you can put on the food to
be grilled. Select the heat setting according to the
settings table.
Note:
preheat the empty appliance for a
maximum of 8-12 minutes. If the appliance is
preheated for too long, it might switch off
(overheating protection). Switch off the appliance
and leave to cool down before switching on
again.
Fat dripping onto the grill heating element and the
hot lava stones will produce smoke. Dripping fat may
flare up briefly.
Water level
When grilling, always monitor the water level in the
grill trough and, if required, add more water up to
the lower marking.
Caution, risk of scalding! If water splashes onto the
몇
hot grid iron or grill heating element when adding
more water to the trough, this will result in hot steam
being given off.
Draining the water
In the event that the water is still hot when drained,
add some cold water to the container to cool it!
To drain the water, place a heat-resistant container
beneath the drain valve. Open the drain tap by
turning the lever down by 90°. Then close the tap by
turning the lever fully up.

25
Grilling over the
water bath
1.
Remove the grid iron and tilt up the grill heating
element. Remove the lava stone container.
2.
Pour in approx. 2.5 litres of water up to the upper
marking.
3.
Tilt down the grill heating element and put on the
grid iron.
4.
Preheat the grill for approx. 8-12 minutes on the
highest setting. Then you can put on the food to
be grilled. Select the heat setting according to the
settings table.
Note:
preheat the empty appliance for a
maximum of 8-12 minutes. If the appliance is
preheated for too long, it might switch off
(overheating protection). Switch off the appliance
and leave to cool down before switching on
again.
Water level
When grilling, always monitor the water level in the
grill trough and, if required, add more water up to
the upper marking.
Caution, risk of scalding! If water splashes onto the
몇
hot grid iron or grill heating element when adding
more water to the trough, this will result in hot steam
being given off.
Changing the lava stones
The lava stones absorb any fat which drips from the
grill. When the stones become dark, this means that
they are saturated and must then be replaced.
You can obtain suitable lava stones from your
specialist dealer or our after-sales service.

Draining the water
In the event that the water is still hot when drained,
add some cold water to the container to cool it!
To drain the water, place a heat-resistant container
beneath the drain valve. Open the drain tap by
turning the lever down by 90°. Then close the tap by
turning the lever fully up.
Safety switch-off
The safety switch-off function switches off the grill
heating element when overheating. When the grill
has cooled down sufficiently the grill heating element
automatically switches on again.
26

27
Tables and tips
Grilling table
These values are to be regarded as guidelines only.
The grilling times apply to a preheated grill and will
depend on the quality and the amount of the food.
The heat setting is infinitely variable. It is possible,
that the optimum setting for your food is between
two control settings!
Turn the food at least once.
Food
Preheating Control setting
Control setting
Grilling time
on level 9
Grilling over
Grilling over
in minutes
in minutes the lava stones the water bath
Beef steak, medium, 2-3 cm
12
8 - 9
8 - 9
8 - 10
T-Bone-Steak, pink, 3 cm
10
7 - 8
8 - 9
10 - 15
Pork collar steak, without bone
10
8 - 9
8 - 9
12 - 16
Pork cutlets*, 2 cm
8
7 - 8
8 - 9
15 - 20
Lamb cutlets, pink, 2 cm
10
7 - 8
8 - 9
8 - 12
Chicken breast, 2 cm
10
7 - 8
8 - 9
15 - 20
Chicken wings, 100 g each
10
7 - 8
8 - 9
15 - 20
Turkey steak, plain, 2 cm
10
7 - 8
8 - 9
12 - 15
Salmon steak**, 3 cm
8
7 - 8
8 - 9
20 - 25
Tuna steak**, 2 cm
8
7 - 8
8 - 9
10 - 15
Trout***, whole, 200 g
10
7 - 8
8 - 9
12 - 15
King prawns, 30 g each
10
7 - 8
8 - 9
12 - 15
Hamburgers, 1 cm
10
7 - 8
8 - 9
12 - 17
Shish kebap****, 100 g each
8
7 - 8
8 - 9
17 - 25
Sausages, 100 g each
10
7 - 8
8 - 9
10 - 20
Vegetables*****
8
7 - 8
8 - 9
8 - 12
*
cut along the bone
**
oil the grid iron
***
oil skin well, then oil again before turning
**** turn frequently
***** for example aubergine, courgette in slices 1 cm thick, pepper (quartered)

28
Tips for grilling
Quality of the meat
The grilled result depends on the nature and quality
of the meat and on your personal taste. As far as
possible, grilled pieces should be equally thick. In
this way, they will brown evenly and they will stay
nice and juicy.
Preheating the grill
Always preheat the grill. In this way, the intensive
heat radiation will seal the surface of the grilled food
and juice cannot leak out.
Preparing the food
To avoid drying out the surface and to improve the
taste, lightly brush the food before grilling with
heat-resistant oil (e.g. peanut oil). Make sure you do
not use too much oil as otherwise there will be a risk
of fire.
Always grill steaks unsalted. Otherwise, water and
soluble nutrients might leak and be lost.
Do not remove the fatty layer (e.g. on a cutlet) until
after grilling as otherwise the meat will lose juice and
aroma.
Placing the food on the grill
Place grilled pieces directly on the grid iron. If there is
only one piece for grilling, place it in the middle of
the grid iron for best results.
Turning the food
Turn the meat when small fluid drops can be seen on
the surface of the meat.
Turn grilled pieces over as soon as they can be
removed easily from the grid iron. If the meat is
sticking to the grid iron its texture will be destroyed
and juice will leak out.
Tips for grilling
Do not pierce the meat while grilling it. It may lose its
juice.
Meat is medium if juice appears on the surface of a
steak (pink inside and crispy brown on the outside).
Serve grilled food hot. Grilled food will go tough if
you keep it warm.
Dripping Fat
Fat dripping onto the grill heating element may flare
up briefly and will produce smoke. To reduce flaring
up, grill fatty food over the water bath.

29
Care and cleaning
Do not use high-pressure or steam jet cleaning
devices.
Caution, risk of burns! Wait until the grill has
몇
cooled down completely before cleaning it.
Clean the grill after every use. Burnt in residues may
be difficult to remove.
Wash new sponge cloths thoroughly before use.
Draining the water
In the event that the water is still hot when drained,
add some cold water to the container to cool it!
To drain the water, place a heat-resistant container
beneath the drain valve. Open the drain tap by
turning the lever down by 90°. Then close the tap by
turning the lever fully up.
Cleaning the metal parts
Wipe clean the metal surfaces using warm soapy
water. Polish with a clean, dry cloth.
Avoid scratching or scrubbing as this could cause
permanent scratches. Remove stubborn soiling with
a soft brush or soak with a small amount of soapy
water.
Cleaning the grid iron
The grid iron can be cleaned by hand by adding a
mild detergent to the cleaning water. Do not apply
acidic substances (lemon juice, vinegar, etc.) to the
enamel surface.
Do not scrape away burnt in residues but soak with
a small amount of soapy water.
Lava stones
It is advisable to dry very damp lava stones
occasionally in the oven at 200 °C. This will prevent
the formation of mildew.

30
Glass ceramic panel and
Remove light soiling using a damp cloth, or with
glass ceramic cover
warm soapy water.
Rinse any left-over detergent with cold water and dry
the surface well.
Unsuitable cleaning agents
Do not use an abrasive sponge or a scouring agent.
Nor should any chemically aggressive cleaners such
as oven sprays or stain removers be used.
Do not clean the grid iron, the lava stone container
and the glass ceramic cover in a dish washer.

31
After-sales service
Our after-sales service is there for you if your
appliance should need to be repaired. You will find
the address and telephone number of your nearest
after-sales service centre in the phone book. The
after-sales service centres listed will also be happy to
inform you of a service point in your local area.
E-number and FD-number
Please quote the E number (product number ) and
the FD number (production number) of your appliance
when contacting the after-sales service. The
nameplate containing these numbers can be found
on the appliance. For future reference you can note
these numbers here:
E-nr.
FD

32
Sommaire
Remarques importantes . . . . . . . . . . . . . . . . . . . . . 33
Avant l’installation . . . . . . . . . . . . . . . . . . . . . . . . . . . 33
Consignes de sécurité . . . . . . . . . . . . . . . . . . . . . . . . 34
Causes des dommages . . . . . . . . . . . . . . . . . . . . . . . 35
Avant la première utilisation . . . . . . . . . . . . . . . . . . . . 35
Votre nouveau gril . . . . . . . . . . . . . . . . . . . . . . . . . . 36
Voici votre nouveau gril à pierres de lave . . . . . . . . . . 36
Commutateur et témoin lumineux de mise sous tension . 37
Résistance chauffante du gril . . . . . . . . . . . . . . . . . . . 37
Bac à pierres de lave . . . . . . . . . . . . . . . . . . . . . . . . 37
Bain d’eau . . . . . . . . . . . . . . . . . . . . . . . . . . . . . . . . . 37
Réglage du gril . . . . . . . . . . . . . . . . . . . . . . . . . . . . . 38
Griller au-dessus des pierres de lave . . . . . . . . . . . . . 38
Griller au-dessus du bain d’eau . . . . . . . . . . . . . . . . 40
Protection thermique . . . . . . . . . . . . . . . . . . . . . . . . . 41
Tableaux et conseils . . . . . . . . . . . . . . . . . . . . . . . . 42
Tableau de cuisson . . . . . . . . . . . . . . . . . . . . . . . . . . 42
Conseil de cuisson au gril . . . . . . . . . . . . . . . . . . . . . 43
Entretien et nettoyage . . . . . . . . . . . . . . . . . . . . . . . 44
Service après-vente . . . . . . . . . . . . . . . . . . . . . . . . . 46
Remarques importantes
Lisez attentivement cette notice d’utilisation. Cela est
indispensable pour utiliser votre appareil de manière
correcte et sûre.
Conservez avec soin cette notice d’utilisation et de
montage. Si vous cédez l’appareil à une autre
personne, remettez-lui aussi les notices.
Avant l’installation
Respectez l’environnement
Déballez l’appareil et jetez l’emballage sans
nuisances pour l’environnement.
Cet appareil est marqué conformément à la Directive
européenne 2002/96/CE relative aux déchets
d’équipements électriques et électroniques (DEEE).
Cette directive fixe un cadre pour la reprise et la
valorisation des appareils usagés sur tout le territoire
de l’Union européenne.
Dommages de transport
Après avoir déballé l’appareil, examinez-le. Si vous
constatez qu’il a été endommagé pendant le
transport, ne le branchez pas.
Branchement électrique
Si le cordon d’alimentation est endommagé, il faut
qu’il soit remplacé par un technicien formé par le
fabricant afin d’éviter tout risque.
Installation et branchement
Veuillez respecter la notice spéciale de montage.
33

34
Consignes de
sécurité
Cet appareil est destiné exclusivement à un usage
domestique. Utilisez-le uniquement pour des
préparations culinaires.
Ne pas utiliser de charbon de bois ou d’autres
combustibles de ce genre pour le gril !
Pour une utilisation sûre
Ne laissez jamais des adultes ou des enfants utiliser
l’appareil sans surveillance :
– s’ils ne sont pas physiquement ni mentalement en
mesure de le faire,
– ou bien s’ils n’ont ni le savoir ni l’expérience
nécessaires pour se servir de l’appareil de manière
correcte et sûre.
Ne pas laisser des enfants jouer avec l’appareil.
Surchauffe de l’huile
Attention, risque d’incendie ! L’huile ou la graisse
ou de la graisse
surchauffées peuvent s’enflammer très rapidement.
Ne laissez jamais de l’huile ou de la graisse chaudes
sans surveillance. N’éteignez jamais avec de l’eau de
l’huile ou de la graisse qui a pris feu. Étouffez les
flammes avec un couvercle. Éteignez l’appareil.
Gril très chaud
Attention, risque de brûlure ! L’appareil chauffe
beaucoup. La graisse qui goutte peut s’enflammer
brièvement. Maintenez les enfants à distance !
Attention, risque d’incendie ! Ne conservez jamais
sous l’appareil des objets inflammables (produits de
nettoyage, bombes aérosol, etc.), dans des tiroirs ou
des casiers.
Risque de court-circuit ! Ne faites jamais passer des
cordons d’alimentation d’appareils électriques
au-dessus du gril chaud. L’isolation des cordons
pourrait fondre.
Couvercle en vitrocéramique
Attention, risque de brûlure ! Pour remettre le
couvercle en vitrocéramique sur l’appareil, attendez
que ce dernier soit bien refroidi. Ne mettez jamais le
gril en marche avec le couvercle.

Causes des
dommages
Objets durs et pointus
La chute d'objets durs ou pointus sur le bandeau en
vitrocéramique ou sur le couvercle en vitrocéramique
peut provoquer des dommages.
Couvercle en vitrocéramique
Pour remettre le couvercle en vitrocéramique sur
l’appareil, attendez que ce dernier soit bien refroidi.
Ne mettez jamais le gril en marche avec le couvercle.
N'utilisez jamais le couvercle comme desserte ou
chauffe-plat.
Avant la première
utilisation
Pierres de lave
Avant la première utilisation, sortez les pierres de
lave du sac d’emballage et versez-les dans le bac.
Faire chauffer le gril
Avant la première utilisation, nettoyez soigneusement
le gril et les accessoires, Ensuite, faites chauffer le
gril sans aliments pendant quelques minutes à la
puissance maximale. Cela permet d’éliminer l’odeur
de neuf.
Lors du premier allumage, un léger dégagement de
fumée est normal.
35
Nettoyage
Après usage, éteignez le gril. Après chaque
utilisation, nettoyez le gril à froid. Les salissures
graisseuses peuvent s’enflammer.
Réparations
Les réparations non-conformes sont source de
danger. Risque de choc électrique ! Les réparations
doivent être faites exclusivement par un technicien
d’après-vente formé par nous.
Si l’appareil est défectueux, désactivez le coupe-
circuit concerné sur le tableau électrique. Appelez le
service après-vente.

36
Votre nouveau gril
Faites connaissance avec votre nouveau gril et ses
accessoires.
Voici votre nouveau
gril à pierres de lave
1
Couvercle en vitrocéramique
2
grille
3
bac à pierres de lave
4
résistance chauffante
5
commutateur
6
témoin lumineux de mise sous tension
1
2
3
5
6
4

Commutateur et témoin lumineux
de mise sous tension
Le commutateur vous permet de régler la puissance
de chauffe du gril. Vous pouvez régler la puissance
en continu. Une fois la cuisson terminée, mettez
l’interrupteur en position 0 pour éteindre l’appareil.
Le témoin s’allume lorsque le gril est sous tension,
afin d’avertir des risques de brûlure.
Résistance chauffante
du gril
Attention, risque de brûlure ! La résistance
몇
chauffante devient très chaude. Ne touchez pas à la
grille ni à la résistance avant que l’appareil n’ait
refroidi.
Vous remarquerez peut-être que la résistance
chauffante du gril s’allume et s’éteint automatique-
ment pendant la cuisson. Cela est normal.
Après avoir enlevé la grille, vous pouvez rabattre la
résistance sur le côté. Lorsque la résistance est
relevée, elle reste éteinte pour des raisons de
sécurité.
Bac à pierres de lave
Avant la première utilisation, sortez les pierres de
lave du sac d’emballage et versez-les dans le bac.
Bain d’eau
Avant chaque utilisation, remplissez le bac d’eau. La
quantité d’eau dépend de l’utilisation ou non des
pierres de lave.
Attention, risque d’ébouillantement ! Si de l’eau
몇
tombe sur la grille ou la résistance au moment où
vous en rajoutez, cela entraîne un dégagement de
vapeur.
37

38
Réglage du gril
Ce gril s’utilise avec des pierres de lave ou un bain
d’eau.
Les pierres de lave emmagasinent la chaleur
rayonnée par la résistance et offrent une répartition
de la chaleur à la fois intense et régulière.
Si vous grillez au-dessus du bain d’eau, la viande
sera plus juteuse en raison de la vapeur d’eau
dégagée.
Griller au-dessus
des pierres de lave
1.
Enlevez la grille et relevez la résistance
chauffante. Sortez le bac à pierres de lave de
l’appareil.
2.
Remplissez le bac de 700 ml d’eau, jusqu’à la
marque inférieure.
3.
Sortez les pierres de lave du sac d’emballage et
placez-les dans le bac. Placez le bac à pierres de
lave dans l’appareil.

4.
Abaissez la résistance chauffante, posez la grille.
5.
Préchauffez le gril 8-12 minutes à la puissance
maximale. Posez ensuite les aliments à griller.
Réglez la puissance de chauffe en fonction du
tableau.
Remarque :
préchauffer le gril à vide pendant
8 à 12 minutes au maximum. Au-delà, l’appareil
peut être coupé par la protection antisurchauffe.
Dans ce cas, éteignez l’appareil et attendez qu’il
ait refroidi avant de le rallumer.
La graisse qui goutte sur la résistance chauffante et
sur les pierres de lave chaudes produit un
dégagement de fumée. La graisse qui goutte peut
s’enflammer brièvement.
Ajout d’eau
Avant chaque nouvelle cuisson, vérifier le niveau de
l’eau dans le bac. Si nécessaire, ajoutez de l’eau
jusqu’au niveau minimum.
Attention, risque d’ébouillantement ! Si de l’eau
몇
tombe sur la grille ou la résistance au moment où
vous en rajoutez, cela entraîne un dégagement de
vapeur.
Vidange de l’eau
Si l’eau est encore chaude, ajoutez-y d’abord de
l’eau froide.
Pour vider l'eau, placez sous le robinet de vidange
un récipient résistant à la chaleur. Ouvrez le robinet
en tournant le levier de 90° vers le bas. Refermez
ensuite le robinet en tournant le levier vers le haut
jusqu'à la butée.
39

40
Griller au-dessus
du bain d’eau
1.
Enlevez la grille et relevez la résistance
chauffante. Sortez le bac à pierres de lave de
l’appareil.
2.
Remplissez le bac de 2,5 l d’eau, jusqu’à la
marque supérieure.
3.
Abaissez la résistance chauffante, posez la grille.
4.
Préchauffez le gril 8-12 minutes à la puissance
maximale. Posez ensuite les aliments à griller.
Réglez la puissance de chauffe en fonction du
tableau.
Remarque :
préchauffer le gril à vide pendant
8 à 12 minutes au maximum. Au-delà, l’appareil
peut être coupé par la protection antisurchauffe.
Dans ce cas, éteignez l’appareil et attendez qu’il
ait refroidi avant de le rallumer.
Ajout d’eau
Faites attention au niveau d’eau du bac. Si
nécessaire, ajoutez de l’eau jusqu’au niveau
maximum.
Attention, risque d’ébouillantement ! Si de l’eau
몇
tombe sur la grille ou la résistance au moment où
vous en rajoutez, cela entraîne un dégagement de
vapeur.
Remplacement des pierres
Les pierres de lave absorbent les gouttes de graisse
de lave
et sont saturées lorsqu’elles prennent une coloration
foncée. Il faut alors les remplacer.
Vous trouverez auprès de votre distributeur ou de
notre service après-vente les pierres de lave qui
conviennent à votre gril.


