Binatone NHB-7705: instruction
Class: Household, kitchen appliances, electronics and equipment
Type: Blender
Manual for Binatone NHB-7705
Table of contents
Instruction Manual
Stick Blender
A

ENGLISH.........................................4
ENGLISHFRANÇAISРУССКИЙ
FRANÇAIS .................................... 14
РУССКИЙ .....................................24
УКРАЇНСЬКА ...............................34
УКРАЇНСЬКА
3
Stick Blender NHB7705
Please read the safety instructions carefully before using this
appliance. Please retain the instructions for future refer-
ence.
SAFETY MEASURES
When using your appliance, the following basic
safety precautions should always be followed:
X Before using for the first time, check that the
appliance voltage is the same as your local supply.
X Only use the appliance for the purposes stipu-
lated by the instructions.
X Only use attachments supplied with the equip-
ment.
X To avoid electric shocks, do not immerse the appliance,
plug or power cord in water or any other liquids. Do
not place the appliance where it could come into contact with
water or other liquids. If the appliance comes in contact with
water, immediately disconnect it from the mains. Do not use
the machine again until it has been serviced by an autho-
rized service center.
X Do not let children use the appliance without supervision.
X If the power cord plug does not fit to your wall socket,
consult a qualified electrician.
X Use of various adapters may result in damage to the
appliance and termination of warranty.
X Always supervise the appliance while in use.
X To avoid a circuit overload, do not operate any other high
voltage equipment on the same circuit.
X Always unplug before moving the appliance from one
place to another, cleaning and storing.
X Never pull the cord to disconnect the appliance, instead grasp
the plug and pull it to disconnect.
X Do not allow the cord or the machine itself to come in contact
with hot surfaces.
X Position the appliance and the cord so that nobody can acci-
dentally overturn it.
X Do not use the appliance if it has been dropped, or it has a
damaged power cord or plug. Do not modify or repair the
machine yourself.
X Do not dismantle the appliance as improper assembly might
result in an electric shock during the subsequent use of the
equipment. Repairs should only be done by authorized
service centers.
X Do not use the device in areas where combustible gas mixtures
or inflammable liquid vapors could present in the air, or in
areas with inflammable air-borne dust or fibers.
X This equipment is intended for household use only, not for
commercial or industrial use.
X Please follow all the requirements of this guide.
X Do not use the appliance if it has mechanical defects (dents,
cracks etc.), get it checked by the nearest authorized service
center.
4
SPECIAL SAFETY MEASURES
X Before turning the appliance on for the first
time, make sure that all components of the blender
have been properly installed.
X Do not apply too much force when installing the
blender attachment, as it may result in the break-
age of the appliance and in the termination of the
warranty.
X If a smell of burning, foreign sounds or power reduction occur
during the blending process, immediately unplug the appli-
ance from the outlet and clean the blender. If the blender still
ENGLISH
malfunctions after cleaning, contact an authorized service cen-
ter.
X It is recommended that original factory packaging should be
used for the transportation of the blender in order to prevent
its parts from breaking.
X If the ingredients are hot, allow them to cool before blending
(maximum temperature: 80
0
C). Never blend hot fat or oil with
the blender.
X Never use the blender to blend paints or solvents.
X Do not attempt to remove any ingredients when the blender is
in operation.
X Always turn the appliance off before removing the attach-
ment.
X The continuous operation of the blender should last for no
more than 1 minute and should be then interrupted for at least
1 minute.
X The blades of the blender are very sharp. Never touch the
blades of the blender.
X Turn the blender on only after it has been fully assembled.
Always check whether the appliance has been properly as-
sembled before each use.
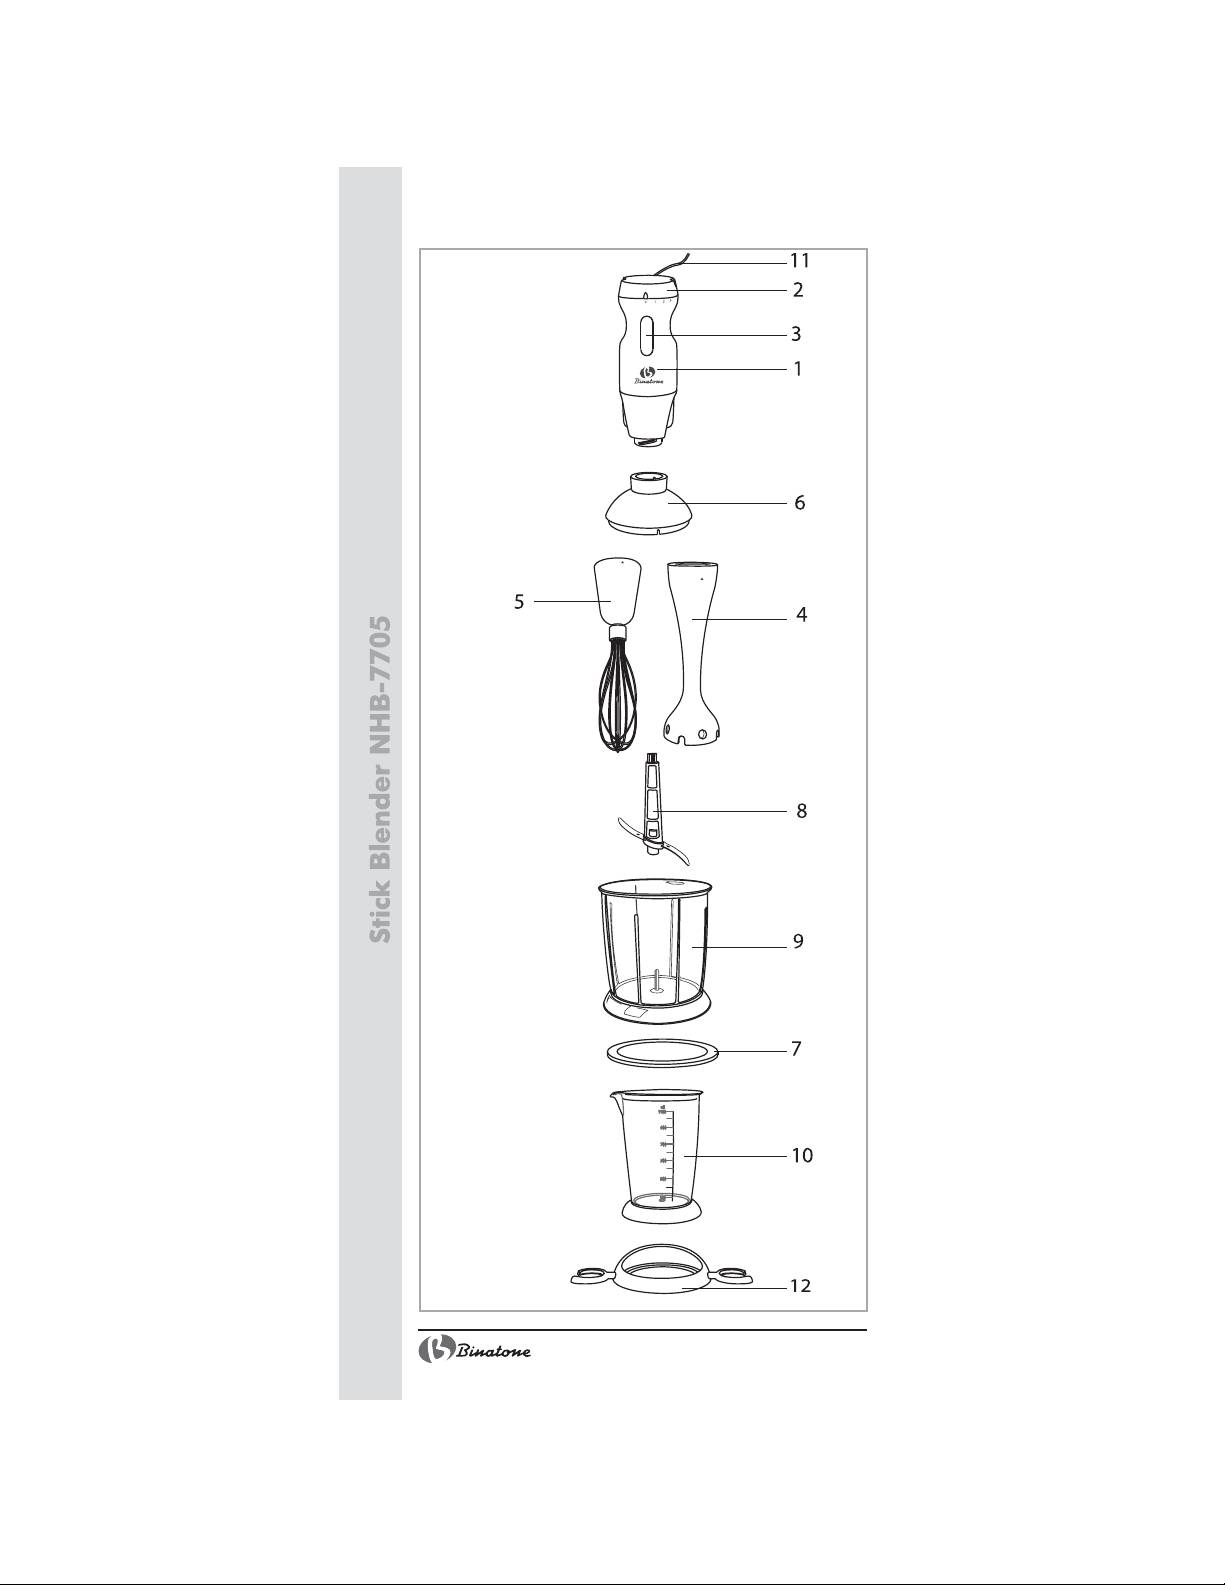
PARTS OF THE APPLIANCE
Figure A:
1. Body of the appliance
2. Speed selector
3. Power on/off button
4. Blender attachment
5. Whisk attachment
6. Blender drive unit
7. Non-skid base/ storage lid
8. Blender blade unit
9. Blender bowl
10.Mixing cup
11.Power cable
12.Wall mount
5
BEFORE USING
THE APPLIANCE
Remove the appliance from the package and
wash all the parts that will contact with products
in warm water, clean the body of the appliance
(1) and the power cable (11) with a damp
cloth and then wipe them dry.
OPERATING INSTRUCTIONS
How to use the blender attachment
and the whisk attachment:
1. Insert the selected attachment (4, 5) into
the corresponding slot of the appliance body,
aligning the arrow on the attachment (4, 5)
with the indicator on the body of the appli-
ance (1). Turn the attachment (4, 5) clockwise, until you hear
it click into the locked position.
2. Before turning the appliance on, make sure that the attach-
ment (4, 5) is installed correctly!
3. Connect the appliance to the power supply.
4. Immerse the attachment (4, 5) directly into the bowl with the
product being blended or into the mixing cup (10).
Note: to prevent splashing the blades of the blender
attachment should be completely immersed into the
product being blended.
5. Set the desired speed using the speed selector (2) and press
the power on/off button (3) to start the appliance. Hold this
button while the appliance is working.
6. Unplug the appliance from the power socket after use.
7. The appliance can be used for blending food in any bowls or
containers.
How to use the grinder attachment:
1. The grinder attachment is suitable for shallow corrugation of
meat, cheese, onion, herbs, garlic, carrot, nuts etc. Before
grinding cut large food into small cubes, remove shell, bones,
sinews and cartilages.
2. Insert the blender blade unit (8) into the bowl (9).
3. Place products into the blender bowl (9).
4. Position the blender drive unit (6) on the bowl (9).
5. Place the body of appliance (1) on the blender drive unit (6).
Align the corresponding slots in the body of the appliance (1)
and in the blender drive unit (6). Turn the body of the appli-
ance (1) clockwise, until you hear it click into the locked posi-
tion.
6. Before turning the appliance on, make sure that the drive unit
(6) is installed correctly!
6
7. Connect the appliance to the power supply.
8. Set the desired speed using the speed selector (2) and press
the power on/off button (3) to start the appliance. Hold this
button while the appliance is working.
9. Unplug the appliance from the power socket after use.
CARE AND CLEANING
1. Before cleaning always unplug the appliance
from the electric socket.
2. Remove the attachment (4, 5) from the body
of the appliance (1). Wash the attachment (4,
ENGLISH
5), the blade unit (8), the mixing cup (10) and
the blender bowl (9) in warm water and let
them dry completely.
3. Clean the blender body (1) and the power cable of the appli-
ance (11) with a damp cloth and wipe them dry.
Note: never immerse the body of the appliance (1) and the
power cable (11) into water.
4. Do not use abrasive detergents to clean the parts of the appli-
ance.
5. Before use make sure the appliance is completely dry.
6. The attachments (4, 5, 6) and the blender bowl (9) can be
stored with the help of the wall mount (12).
HELPFUL HINTS
X To get the smooth paste rotate the attachments
(4, 5) inside a container. If you need to remove
the remains of unblended food from the sides of
the container used for cooking, stop the appliance
and remove the remains of food from the sides of
the container with a spoon. After that continue
using the blender in the selected mode.
X You can change the speed of the blender while it is working.
Milkshake
Milk – 180 ml
Sugar – 10 gm
Bananas – 0.5
Vanilla ice-cream – 50 gm
Slice a banana. Put all ingredients into the blender jug and
blend at the minimum speed, then go up gradually. Blend until you
have a foamy mixture. Other fresh fruits can be used instead the
banana.
Mayonnaise
Egg yolks - 6
Mustard - 25 gm
Lemon - 1
Vinegar - 20 gm
Vegetable oil - 800 gm
Salt, pepper to your taste
7
Put egg yolks into the blender jug add mustard, salt and the
juice of half of the lemon. Blend carefully and add the oil gradually
to get a thick sauce. Add vinegar and the juice of the second half
of the lemon and blend again, season with black pepper. The
minimum speed is recommended for making the mayonnaise.
Velvety soup with zucchinis
2 mid-sized sliced zucchinis
Butter - 2 table-spoons
Onions (thin-sliced) – 2 table-spoons
Garlic - 1 big clove
Curry powder - 1 tea-spoon
Cream – 1/2 glass
Chicken broth – 1/2 l
Stew zucchinis, onions and garlic with butter uncovered in a
frying pan. The vegetables must be soft, but not fried. Chop the
stewed vegetables in the blender. Add the broth, cream and
curry and blend again carefully. Simmer until the soup boils, take
off and serve.
Egg-plant paste
Egg-plants – 2
Garlic – 1 clove
Olive oil – 1/2 cups
Juice of one lemon
Salt – 1 tea-spoon
Black pepper – to your taste
Bake the unpeeled egg-plants for 1 hour. Let them cool down
and scoop out the pulp using a spoon. Put the pulp into the blender,
cover with the lid and blend for about 10 seconds. Add garlic,
lemon juice, oil and black pepper. Blend again for about 5 sec-
onds. Cool before serving and serve with chives, parsley and
toasts.
DISPOSAL
The appliance should be disposed of in accor-
dance with waste disposal regulations in your coun-
try and with the least damage to the environment.
Only ecologically safe materials are used in
the packaging of our products and the cardboard
and paper can be disposed of with normal paper
waste.
AFTER-SALES SERVICE
If your appliance does not operate at all
or operates poorly, call an authorized service
center for help or repairs.
The warranty does not cover the fol-
lowing:
X Non-observance of the above safety mea-
sures and operation instructions.
X Commercial use (use outside the scope of
8

personal household needs).
X Plugging into a mains socket with a voltage different from the
voltage on the appliance rating plate.
X Improper care (ingress of liquid, dust, insects, and other for-
eign items and substances inside the appliance).
X Use of excessive force during appliance operation or other
damages (mechanical damages resulting from incorrect use,
shocks or dropping of the appliance).
X Unauthorized repairs or replacement of the appliance parts
performed by an unauthorized person or service center.
X Accidents, such as lightning strike, flood, fire and other acts of
God.
ENGLISH
Features may be changed by Binatone without any notice.
Warranty details are set out in the warranty card provided
with the product.
Exploitation period: 3 years after the day of purchase.
Manufacture: Binatone Industries Ltd, Great Britain, Vitabiotics
House,1 Apsley Way, Staples Corner, London, NW2 7HF, UK.
9

Mélangeur à immersion NHB-7705
Lisez attentivement cette instruction avant le premier usage
pour prendre connaissance du fonctionnement de l’appareil.
Gardez l’instruction pour s’y référer ultérieurement.
MESURES DE SECURITE
En exploitant l’appareil, respectez toujours les
mesures de sécurité suivantes:
X Avant le premier usage, assurez-vous que la ten-
sion indiquée sur l’appareil correspond à la tension
du réseau électrique dans votre maison.
X Utilisez l’appareil seulement à des fins indiquées
dans cette instruction.
X Utilisez seulement les dispositifs qui font partie de la garniture
de l’appareil.
X Pour éviter un choc électrique, ne pas plonger l’appareil,
la fiche ou le câble dans l’eau ou dans un autre liquide.
Installez l’appareil dans un endroit où il ne peut pas tomber
dans l’eau ou dans un autre liquide. Si l’appareil a été
accidentellement mouillé, débranchez-le du réseau
immédiatement. N’utilisez pas l’appareil qui est tombé dans
l’eau. Portez-le dans un centre de maintien.
X Ne pas laisser les enfants manier l’appareil sans contrôle des
adultes.
X Si la fiche mâle de l’appareil ne coïncide pas avec
votre prise selon sa structure, consultez auprès de
l’expert.
X L’utilisation de différents raccords peut conduire à
une panne de l’appareil et la cessation des
garanties.
X Ne pas laisser l’appareil branché sur le réseau sans surveil-
lance.
X Pour éviter la surcharge du réseau électrique, ne pas brancher
un autre appareil de haute puissance au même réseau que
votre appareil.
X Déconnectez l’appareil du réseau avant le
déplacement d’un endroit à l’autre et avant le
nettoyage et la conservation.
X Ne tirez jamais sur le câble pour déconnecter l’appareil du
réseau ; prenez la fiche et faites-la sortir de la prise de cou-
rant.
X Eviter le contact du câble ou de l’appareil avec des surfaces
chauffées.
X Placer l’appareil et le câble de façon à éviter le basculement
accidentel.
X Ne pas utiliser l’appareil si le câble ou la fiche de contact est
endommagé. N’essayez pas de réparer l’appareil vous-même.
Le remplacement du câble électrique et de la fiche de contact
doit être effectué par un centre de maintien agréé.
X Ne démontez jamais l’appareil vous-même ; l’assemblage in-
correct peur résulter en choc électrique pendant l’usage
ultérieur de l’appareil. Tous les travaux de réparation
doivent être effectués seulement par un centre de
service agréé.
10

X Ne pas utiliser l’appareil dans des locaux où l’air peut contenir
des mélanges des gaz combustibles, des vapeurs des liquides
inflammables, ou des poussières et fibres inflammables.
X Cet appareil est destiné à l’usage personnel et n’est pas destiné
à l’usage commercial et industriel.
X Respectez toutes les règles de la présente instruction.
X Ne pas utiliser l’appareil qui a des défauts mécaniques
(enfoncements, cassures,…): vérifiez son fonctionnement dans
un centre de service agréé.
MESURES SPECIALES DE
SECURITE
X Avant la première utilisation, assurez-vous que
toutes les pièces du mélangeur sont bien installées.
X En installant le fouet du mélangeur, ne pas
appuyer trop fort, car ceci peut conduire à
l’endommagement de l’appareil et la cessation des
garanties.
X En détectant pendant le fonctionnement de
l’appareil une odeur du brûlé, des bruits étrangers ou la dimi-
nution de la puissance de l’appareil, déconnectez
immédiatement l’appareil du secteur, en retirant le cordon
d’alimentation de la prise de courant, et nettoyez le mélangeur.
Si le fonctionnement normal ne reprend pas, adressez-vous à
FRANÇAIS
un centre de service agréé.
X Pour éviter l’endommagement de l’appareil lors de transpor-
tation, il est conseillé d’utiliser l’emballage du fabricant.
X Si les aliments sont chauds, laissez refroidir avant le traitement
(température maximum est 80
0
C). Ne jamais traiter à l’aide du
mélangeur la graisse ou l’huile chaude.
X Ne jamais mélanger des peintures ou des solvants à l’aide du
mélangeur.
X Ne pas essayer de retirer des ingrédients quand le mélangeur
est en marche.
X Déconnectez toujours l’appareil avant de retirer les fouets.
X Le temps de fonctionnement ininterrompu du mélangeur est 5
minutes au maximum, avec une pause de 1 minute au moins.
X Les couteaux du mélangeur sont très tranchants. Ne jamais
toucher aux couteaux du mélangeur.
X Ne brancher le mélangeur qu’après l’assemblage complet.
Avant l’utilisation de l’appareil, vérifiez toujours qu’il est
assemblé correctement.
11
DESCRIPTIF DES PIECES DE
L’APPAREIL
Dessin A:
1. Bloc moteur de l’appareil
2. Variateur des vitesses
3. Bouton de la marche
4. Ajutage-blender
5. Ajutage-couronne
6. Réducteur du broyeur:
7. Base non glissant / couvercle de conservation
8. Couteau du broyeur
9. Bol du broyeur
10.Verre pour le mélange
11.Cordon d’alimentation
12.Fixation murale
AVANT L’UTILISATION
Enlevez de l’appareil tout les matériaux
d’emballage et lavez par l’eau chaude toutes
les pièces qui pourront contacter aux aliments,
nettoyez par l’étoffe humidifiée le bloc moteur
(1) comme le cordon d’allimentation (11) et
essuyez-les en sec.
NOTICE D’UTILISATION
Usage de l’ajutage-blender et
ajutage-couronne:
1. Dans la prise correspondante du bloc moteur
de l’appareil, placez l’ajutage choisi (4, 5) en
coïncidant la flèche marquée sur l’ajutage (4,
5) avec la signe présentée sur le bloc
moteur de l’appareil (1). Tournez l’ajutage (4,
5) en sens horaire jusqu’au clic.
2. Avant le branchement de l’appareil, assurez que l’ajutage
(4, 5) est monté correctement!
3. Branchez l’appareil au réseau électrique.
4. Plongez l’ajutage (4, 5) directement au bol avec le produit à
préparer soit dans le verre pour le mélange (10).
Note: pour éviter l’arrosage des produits, les lames de
l’ajutage-blender doivent être complétement plongées
dans le produit à préparer .
5. Avec le variateur de la vitesse (2) mettez celle-là désirée et
pour le commencement du fonctionnement de l’appareil,
poussez le bouton de la marche (3). Au cours du fonctionnement
de l’appareil, laissez pousser le bouton.
6. Après l’usage, débranchez l’appareil du réseau.
12
7. L’appareil peut être exploiter dans tous bols et récipients.
Usage de l’ajutage-broyeur:
1. L’ajutage-broyeur convient au découpage fin de la viande,
fromages, oignon, herbes, ail, carotte, noix etc. Avant le
broyage, découpez le gros produit en petits morceaux enlevant
la coquille, os, tendons et cartilages.
2. Montez le couteau du broyeur (8) dans le bol (9).
3. Placez les produits au bol du broyeur (9).
4. Installez le réducteur du broyeur (6) sur le bol (9).
5. Montez le bloc moteur (1) sur le réducteur du broyeur (6).
Coïncidez les prises correspondantes du bloc moteur (1) et
réducteur du broyeur (6). Tournez le bloc moteur (1) en sens
horaire jusqu’au clic.
6. Avant le branchement de l’appareil, assurez que le réducteur
(6) est bien monté!
7. Branchez l’appareil au réseau électrique.
8. Avec le variateur de la vitesse, mettez celle-là désirée (2) et
pour le commencement du fonctionnement de l’appareil,
poussez le bouton de la marche (3). Lors du fonctionnement
de l’appareil, laissez poussez le bouton.
9. Après l’utilisation de l’appareil, débranchez-le du réseau.
ENTRETIEN ET NETTOYAGE
1. Avant le nettoyage, l’appareil doit être
FRANÇAIS
toujours débranché du réseau.
2. Démontez l’ajutage (4, 5) du bloc moteur
(1). Rincez par l’eau chaude l’ajutage (4, 5),
couteau (8), verre pour le mélange (10) et bol
du broyeur (9) et séchez-les avec soin.
3. Nettoyez par l’étoffe humidifiée le bloc
moteur (1) et cordon d’alimentation de l’appareil (11) et
essuyez-les en sec.
Notes: jamais ne plongez le bloc- moteur de l’appareil (1)
comme le cordon d’allimentation (11) dans de l’eau.
4. Pour le lavage des pièces de l’appareil n’utilisez pas les agents
de nettoyage abrasifs.
5. Avant l’usage, l’appareil doit être bien séché.
6. Les ajutages (4, 5, 6) et le bol du broyage (9) peuvent-être
arrangés sur le support à fixation mural (12).
CONSEILS UTILES
X Pour obtenir la masse régulière les ajutages
(4, 5) doivent être déplacés au cercle à l’intérieure
du récipient. S’il est nécessaire de nettoyer les
restes des produits non mélangés à partir des murs
du récipient dans lequel vous préparez la
nourriture, arrêtez l’appareil et enlevez les restes
des produits par le cuiller. Ensuite, continuez le
travail dans le mode choisi.
X Vous pouvez changer la vitesse du mixeur blender pendant
13

son fonctionnement.
Milk-shake
Lait – 180 ml
Sucre – 10 g
Bananes – 0,5 fruit
Glaces à la vanille – 50 g
Couper la banane en pièces. Remplir le réservoir du cocktail et
mélanger par le bol mixeur. Démarrer à la vitesse minimale,
augmenter graduellement la vitesse, jusq’au mousse. Vous pouvez
remplacer les bananes par autres fruits frais.
Sauce Mayonnaise
Jaune d’oeuf - 6 pièces
Moutarde - 25 g
Citron - 1 pièce
Vinaigre - 20 g
Huile végétale - 800 g
Sel, poivres - à goût
Mettre les jaunes d’oeuf dans le bol, ajouter de moutarde, du
sel et du jus d’une moitié du citron. Mélanger bien, puis ajouter
d’huile pour une sauce épaisse. Mettre dans la sauce du vinaigre
et du jus de la deuxièmeme moitié u citron, mélanger. Assaisonner
par des poivres. La vitesse minimale est conseillée pour mélanger
la sauce.
Potage velouté aux endives
2 endives moyennes, coupées en pièces
Beurre - 2 cuillers.
Oignon (coupé em petits morceaux) – 2 cuillers
Ail - 1 grand dent
Laurier - 1 cuillère
Crème – 1/2 cuiller
Bouillon de poule – 1/2 litre
Etuver des endives, de l’oignon et de l’ail à la poêle à frire au
beurre, sans fermer par couvercle. Les légumes doivent être mou,
non-rôtis. Emincer les légumes étuvés par le bol mixeur. Ajouter
de bouillon, du lait, du laurier, mélanger soigneusement. Mettre
au petit feu, faire bouillir, servir bien chaud.
Pâté des aubergines
Aubergines – 2 pièces
Ail – 1 dent
Huile d’olive – 1/2 tasses
Jus d’un citron
Sel – 1 cuillère
Poivre – au goût
Sans éplucher les aubergines, les faire rôtir des aubergines
pendant 1 heure. Laisser refroidir, vider la pulpe par une cuillère.
Mettre la pulpe au bol mixeur, fermer par couvercle, melanger
approx. 10 secondes. Ajouter de l’ail, du jus de citron, de l’huile
et du poivre. Mélanger encore 5 secondes. Laisser refroidir avant
de servir par des ciboulettes, du persil et des toasts
14
RECYCLAGE
Appareils électroménager doit être utiliser avec
le moindre tort pour l’environnement et en
conformité des règles d’utilisation des déchets dans
Votre région. Pour recycler l’appareil
correctement, souvent il suffit de le porter dans le
centre local de traitement des déchets.
Pour l’emballage de nos appareils, nous
utilisons uniquement les matériaux recyclables. Donc, le carton et
le papier peuvent être recyclés avec d’autres déchets en papier.
SERVICES APRES VENTE
Si votre appareil ne fonctionne pas ou
fonctionne mal, adressez-vous à un centre
agréé pour consultation ou réparation.
La garantie n’est pas valable dans
les cas suivants:
X Non-respect des mesures de sécurité
susmentionnées et des règles d’exploitation.
X Utilisation commerciale (utilisation dépassant les besoins per-
sonnels ménagers).
X Connexion au réseau à une tension différente de celle indiquée
sur l’appareil.
FRANÇAIS
X Mauvais maintien (pénétration des liquides, de la poussière,
des insectes et d’autres corps étrangers à l’intérieur de
l’appareil).
X Effort excessif pendant l’exploitation de l’appareil ou autres
endommagements (défauts mécaniques survenus suite à
l’exploitation incorrecte, la percussion ou la chute de
l’appareil).
X Réparation ou changement des pièces de l’appareil, effectué
par une personne non-autorisée ou hors du centre de service
autorisé.
X Accidents tels que la foudre, l’inondation, l’incendie ou autres
circonstances de force majeure.
Les caractéristiques peuvent être changées par la société
“Binatone” sans aucune notification préalable.
Le délai de garantie et autres pieces sont indiqués dans le
ticket de garanti joint à l’appareil.
Durée de service: 3 ans du jour d’acquisition.
Fabricant: Binatone Industries Ltd, Great Britain, Vitabiotics
House,1 Apsley Way, Staples Corner, London, NW2 7HF, UK
(Binatone Industries Ltd, Grande Bretagne)
15
Погружной Блендер NHB7705
Внимательно прочтите данную инструкцию перед первым
использованием, чтобы ознакомиться с работой нового
прибора. Пожалуйста, сохраните инструкцию для
дальнейших справок.
ÌÅÐÛ ÁÅÇÎÏÀÑÍÎÑÒÈ
Во время эксплуатации прибора всегда
соблюдайте следующие меры предосторожности:
X Перед первым использованием проверьте,
соответствует ли напряжение, указанное на
приборе, напряжению электрической сети в
Вашем доме.
X Используйте прибор только в целях,
предусмотренных инструкцией.
X Используйте только приспособления, входящие в комплект
прибора.
X Во избежание поражения электрическим током не
погружайте корпус прибора, вилку или
электрический шнур в воду или другие жидкости.
Ставьте прибор в такие места, где он не может упасть в
воду или другие жидкости. При попадании воды на прибор,
немедленно отключите его от сети. Не пользуйтесь
прибором, упавшим в воду. Отнесите его в
уполномоченный сервисный центр.
X Не допускайте детей к работе с прибором.
X Если штепсельная вилка прибора не совпадает по
конструкции с Вашей розеткой, обратитесь за
помощью к специалисту.
X Применение различных переходников может
привести к поломке прибора и прекращению
гарантийных обязательств.
X Не оставляйте включенный в сеть прибор без внимания.
X Во избежание перегрузки электрической сети не
подключайте другой прибор высокой мощности к той же
сети, к которой подключен Ваш прибор.
X Отсоединяйте прибор от сети перед
перемещением с одного места на другое и перед
чисткой и хранением.
X Никогда не тяните за шнур при отключении прибора от
сети; возьмитесь за штепсельную вилку и выньте ее из
розетки.
X Не допускайте соприкосновения шнура или самого
прибора с нагретыми поверхностями.
X Располагайте прибор и шнур так, чтобы никто не смог
случайно задеть шнур и опрокинуть прибор.
X Не пользуйтесь прибором с поврежденным электрическим
шнуром или штепсельной вилкой. Не пытайтесь
отремонтировать прибор самостоятельно. Замена
электрического шнура и штепсельной вилки должна
производиться только в уполномоченном сервисном центре.
X Никогда не разбирайте прибор самостоятельно;
неправильная сборка может привести к поражению
16
электрическим током во время последующего
использования прибора. Все ремонтные работы
должны производиться только в уполномоченном
сервисном центре.
X Не пользуйтесь прибором в зонах, где в воздухе могут
содержаться смеси горючих газов, пары
легковоспламеняющейся жидкости или в зонах, где в
воздухе могут содержаться горючие пыли или волокна.
X Этот прибор предназначен только для домашнего
использования и не предназначен для коммерческого и
промышленного использования.
X Выполняйте все требования данной инструкции.
X Не пользуйтесь прибором, имеющим механические
повреждения (вмятины, трещины и т.п.), проверьте его
работоспособность в ближайшем уполномоченном
сервисном центре.
ÑÏÅÖÈÀËÜÍÛÅ ÌÅÐÛ
ÁÅÇÎÏÀÑÍÎÑÒÈ
X Перед первым включением убедитесь в
правильной установке всех компонентов
блендера.
X При установке насадок блендера не
применяйте чрезмерное усилие, так как это
может привести к поломке прибора и
прекращению гарантийных обязательств.
X При обнаружении во время работы запаха гари,
посторонних звуков или уменьшения мощности работы
немедленно отключите прибор от сети, вынув шнур питания
из розетки, и произведите чистку блендера. Если после
этого нормальная работа не возобновилась, обратитесь в
уполномоченный сервисный центр.
X Для транспортировки блендера во избежание поломок его
частей рекомендуется использовать заводскую
упаковочную тару.
X Если продукты горячие, то, прежде чем обрабатывать их,
дайте им остыть (максимальная температура 80
0
С).
РУССКИЙ
Никогда не перемешивайте блендером горячий жир или
масло.
X Никогда не размешивайте краски или растворители с
помощью блендера.
X Не пытайтесь достать какиелибо ингредиенты во время
работы блендера.
X Всегда отключайте устройство перед тем, как снять насадку.
X Максимальное время непрерывной работы блендера 1
минута с обязательным перерывом работы не менее 1
минуты.
X Лезвия блендера очень острые. Никогда не прикасайтесь
к лезвиям блендера.
X Включайте блендер только после полной сборки. Перед
использованием прибора всегда проверяйте, правильно
ли он собран.
17

ÎÏÈÑÀÍÈÅ ÄÅÒÀËÅÉ
ÏÐÈÁÎÐÀ
Рисунок А:
1. Корпус прибора
2. Регулятор скоростей
3. Кнопка включения
4. Насадкаблендер
5. Насадкавенчик
6. Редуктор измельчителя
7. Нескользящее основание/ крышка для хранения
8. Нож измельчителя
9. Чаша измельчителя
10.Стакан для смешивания
11.Сетевой шнур
12.Настенное крепление
ÏÅÐÅÄ ÈÑÏÎËÜÇÎÂÀÍÈÅÌ
Снимите все упаковочные материалы с
прибора и вымойте все детали, которые будут
контактировать с продуктами теплой водой,
протрите корпус прибора (1) и сетевой шнур
(11) прибора влажной тканью и вытрите их
насухо.
ÈÍÑÒÐÓÊÖÈß ÏÎ
ÝÊÑÏËÓÀÒÀÖÈÈ
Èñïîëüçîâàíèå íàñàäêè-
áëåíäåðà è íàñàäêè-âåí÷èêà:
1. Установите выбранную насадку (4,5) в
соответствующий разъем в корпусе прибора,
совместив стрелку на насадке (4,5) со
значком на корпусе прибора (1).
Поверните насадку (4,5) по часовой стрелке
до щелчка.
2. Перед включением прибора убедитесь, что насадка (4,5)
установлена правильно!
3. Подключите прибор к электрической сети.
4. Погрузите насадку (4,5) непосредственно в чашу с
приготовляемым продуктом или в стакан для смешивания
(10).
Ïðèìå÷àíèå:
äëÿ ïðåäóïðåæäåíèÿ
ðàçáðûçãèâàíèÿ ëåçâèÿ íàñàäêè-áëåíäåðà
äîëæíû áûòü ïîëíîñòüþ ïîãðóæåíû â
ïðèãîòîâëÿåìûé ïðîäóêò.
5. Установите желаемую скорость с помощью регулятора
скоростей (2) и нажмите кнопку включения (3) для начала
работы прибора. Удерживайте кнопку во время процесса
работы прибора.
18
6. После использования отключите прибор от сети.
7. Прибор может использоваться в любых чашах или
контейнерах.
Èñïîëüçîâàíèå íàñàäêè-èçìåëü÷èòåëÿ:
1. Насадка измельчитель подходит для мелкой нарезки мяса,
сыров, лука, трав, чеснока, моркови, орехов и т.п. Перед
измельчением разрежьте крупный продукт на небольшие
кусочки, удалите скорлупу, кости, сухожилия и хрящи.
2. Установите нож измельчителя (8) в чашу (9).
3. Поместите продукты в чашу измельчителя (9).
4. Установите редуктор измельчителя (6) на чашу (9).
5. Установите корпус прибора (1) на редуктор измельчителя
(6). Совместите соответствующие разъемы в корпусе
прибора (1) и на редукторе измельчителя (6). Поверните
корпус прибора (1) по часовой стрелке до щелчка.
6. Перед включением прибора убедитесь, что редуктор (6)
установлен правильно!
7. Подключите прибор к электрической сети.
8. Установите желаемую скорость с помощью регулятора
скоростей (2) и нажмите кнопку включения (3) для начала
работы прибора. Удерживайте кнопку во время процесса
работы прибора.
9. После использования отключите прибор от сети.
ÓÕÎÄ È ×ÈÑÒÊÀ
1. Всегда отсоединяйте прибор от
электрической сети перед чисткой.
2. Отсоедините насадку (4,5) от корпуса
прибора (1). Промойте насадку (4,5), нож
(8), стакан для смешивания (10) и чашу
измельчителя (9) в теплой воде и тщательно
высушите.
3. Протрите корпус (1) и сетевой шнур
прибора (11) влажной тканью и вытрите их насухо.
Ïðèìå÷àíèå:
íèêîãäà íå ïîãðóæàéòå êîðïóñ
ïðèáîðà
(1)
è ñåòåâîé øíóð
(11)
â âîäó.
РУССКИЙ
4. Для мытья частей прибора не используйте абразивные
чистящие средства.
5. Тщательно высушите прибор перед использованием.
6. Насадки (4,5,6) и чаша измельчителя (9) можно хранить
при помощи настенного крепления (12).
19
ÏÎËÅÇÍÛÅ ÑÎÂÅÒÛ
X Для получения однородной массы
перемещайте насадки (4,5) по кругу внутри
емкости. Если требуется очистить остатки не
перемешанных продуктов со стенок емкости, в
которой Вы готовите, остановите прибор и
снимите остатки продуктов со стенок чаши с
помощью ложки. Далее продолжайте работу
блендером в выбранном режиме.
X Вы можете изменять скорость работы блендера в процессе
использования.
Ðåöåïòû
Ìîëî÷íûé êîêòåéëü
Молоко – 180 мл
Сахар – 10 г
Банан – 0,5 шт.
Ванильное мороженное – 50 г
Нарезать банан кусочками. Загрузить все ингредиенты в
емкость в стакан для смешивания и перемешать их с помощью
насадкиблендера. Начните взбивать коктейль на минимальной
скорости, постепенно переходя на повышенную. Взбивайте
до получения пенящейся смеси. Вместо банана можно
использовать другие свежие фрукты.
Ñîóñ ìàéîíåç
Желтки яиц 6 шт.
Горчица столовая 25 г
Лимон 1 шт.
Уксус 20 г
Растительное масло 800 г
Соль, перец по вкусу
Сырые яичные желтки выпустить в стакан для смешивания,
добавить горчицу, соль и сок половины лимона. Массу хорошо
размешать, затем постепенно влить масло до получения густого
соуса. В приготовленный соус влить уксус и сок второй
половины лимона и снова размешать. Заправить черным
перцем. Для приготовления майонеза рекомендуется выбрать
минимальную скорость работы.
Áàðõàòèñòûé ñóï ñ öóêêèíè
2 средних цуккини, порезанных на дольки
Сливочное масло 2 ст. л.
Репчатый лук (мелко порезанный) – 2 ст. л.
Чеснок 1 большой зубчик
Порошок карри 1 чайн. л.
Сливки – 1/2 ст.
Куриный бульон – 1/2 л
Потушить цуккини, лук и чеснок на сковородке с маслом,
не закрывая крышкой. Овощи должны быть мягкими, но не
поджаренными. Измельчить тушеные овощи в измельчителе.
Добавить бульон, сливки и карри и еще раз хорошо
20
- 1
- 2
