Xoro HSD 8430: INITIAL SETTINGS
INITIAL SETTINGS: Xoro HSD 8430
INITIAL SETTINGS
Once the initial settings have been completed, the player can always be operated under the
same conditions (especially with DVD discs). The settings will be retained in the memory
even after turning off the power until the settings are changed. The initial language is set to
English/German, you may change the language to your preference.
Operation
English
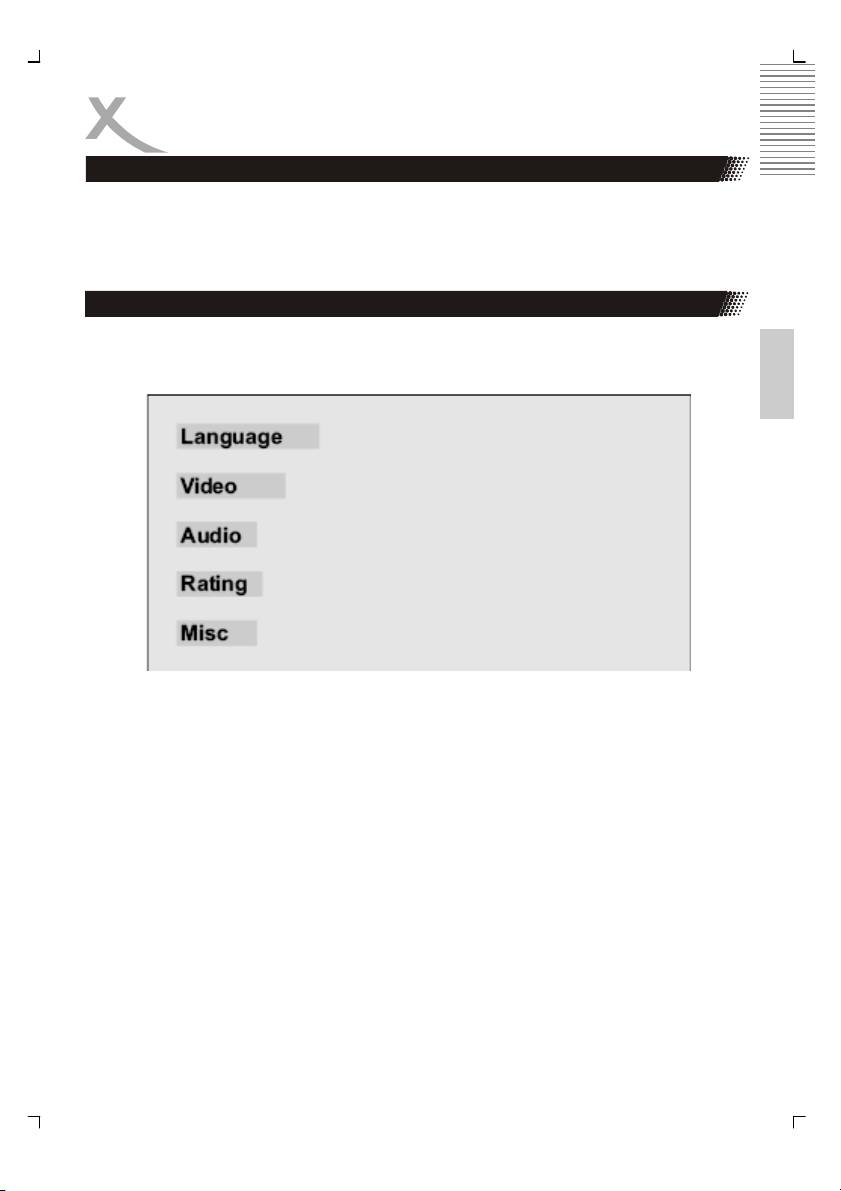
Press STOP button first then press SETUP button to enter setup interface as followed during
the stop status. You can setup Language, Video, Audio, Rating and Mics.
Press Navigation button to navigate through menus. Choose desired option and press OK
button for confirmation. On the screen is appearing a submenu with all available options. To
exit from the Setup mode, please press SETUP button once again.
31
INITIAL SETTINGS
Menu Languages
Highlight the OSD LANGUAGE option, and press the
Submenu Options
Arrow buttons to choose the OSD language you
prefer. Press OK to confirm, and it will display OSD in
OSD
English
that language; There are 6 optional OSD languages:
languages
German
English, German, French, Spanish, Italian, Russian.
French
Spanish
Italian
Russian
Highlight the SUBTITLE LANG option, and press the
English
Submenu Options
Arrow buttons to choose the subtitle language you
prefer. Press OK to confirm. If the disc you are play-
Subtitle English
ing has that language available, it will displays subti-
German
tles in that language; There are 8 optional audio lan-
French
guages: English, German, French, Spanish, Russian,
Spanish
Auto, off.
Italian
Russian
Auto
OFF
Highlight the MPEG 4 Subtitle option, and press the
Submenu Options
Arrow buttons to choose the subtitle language you
prefer. Press OK to confirm. If the disc you are play-
MPEG-4
Unicode (UTF-8)
ing has that language available, it will displays subti-
subtitle
Western European
tles in that language.
Turkish
For the languages Czech, Hungarian, Slovenian,
Central European
Polski, Slowacian and Serbian (with latin characters)
Cyrillic
please use the setting “Central European”.
Greek
For Russian language please use the setting
Hebrew
“Cyrillic”.
Arabic
For Swedish, German, French and English languages
Baltic
please use the setting “Western European”.
Vietnam
Highlight the Audio option, and press the Arrow but-
Submenu Options
tons to choose the audio language you prefer. Press
OK to confirm. If the disc you are playing has that
Audio English
language available, it will output audio in that lan-
German
guage.
French
Spanish
Italian
Russian
32
INITIAL SETTINGS
Menu Languages
Highlight the DVD MENU option, and press the Arrow
Submenu Options
buttons to choose the menu language you prefer. Press
OK to confirm. If the disc you are playing has that lan-
DVD Menu English
guage available, it will displays menu in that language;
German
There are some optional menu languages: English,
French
German, French, Spanish, Italian, Russian.
Spanish
Italian
Russian
English
Highlight the MPEG-4 Subt. Shape option, and press
Submenu Options
the Arrow buttons to choose the MPEG-4 subtitle
shape colour. Press OK to confirm.
MPEG-4
White
subt. shape
Grey
Highlight the MPEG-4 Subt. Pos. Option, and press the
Submenu Options
Arrow button to choose the position of the MPEG-4
subtitle. Press OK to confirm.
MPEG-4
Buttom
subt. Pos.
Menu Video
Followed is the Video setup screen for your reference where you can set Aspect Ratio, View
Mode, TV System, Video-Out, Brightness, Sharpness, HD Resolution and HD JPEG Mode.
Aspect Ratio
4 : 3: Choosing this setting if your DVD player is connected to a
Submenu Options
normal ratio TV. You can fill the movie to the entire screen of
your TV. This might mean that parts of the picture (the left and
Aspect ratio 4:3
right edges) won't be seen.
16:9
16 : 9: Choose this setting if your DVD player is connected to a
wide screen TV. If you choose this setting and you don't have a wide screen TV, the images
on the screen may appear distorted due to vertical compression.
Notes:
1. The image display ratio is related to the recorded disc format. Some disc can not display
images in the aspect ratio you choose.
2. If you play a disc recorded in 4:3 format on a wide screen TV, black bars will appear on
the left and right side of the screen.
3.
You must adjust the screen setting depending on the type of the television you have.
33

INITIAL SETTINGS
Menu Video
View mode
Submenu Options
These settings only take effect in case the resolution of MPEG4
video is less than PAL (720 x 576).
View mode Fill
Orginal
Player and TV are set to 4:3
Height Fit
Scaling of a file with the AR 1,33:1 and a resolution of 480x360
Width Fit
Original: Displays the native resolution of the video, including on
Auto Fit
all side borders.
Pan Scan
Pan Scan: Zoom to Fullscreen, crop on all sides, keep the
Aspect Ratio
All other settings are displaying in the same way like Pan Scan.
English
Scaling of a file with the AR 2,35:1 and a resolution of 640x272
Fill: Fullscreen / Crop on Right + Left side / keep the Aspect Ratio (AR)
Original: Displays the original resolution
Height Fit: Fullscreen / Crop strongly on Right + Left side / keep the AR
Width Fit: Fullscreen with black bar on Top + Bottom / Crop on Right + Left side / keep the
AR
Auto Fit: Same like Width Fit
Pan Scan: Same like Height Fit
Player and TV are set to 16:9
Scaling of a file with the AR 1,33:1 and a resolution of 480x360
Pan Scan: Fullscreen / Crop on all side / keep the AR
Auto Fit: 4:3 picture with black bar on Right + Left side / Crop on Top + Buttom side / keep
the AR
Width Fit: Same effect like Pan Scan
Height Fit: Same effect like Auto Fit
Original: 4:3 picture with a black bar on Left + Right side / complete resolution are shown /
keep the AR
Fill: Fullscreen / Crop on all side / AR is strongly distorted.
Scaling of a file with the AR 2,35:1 and a resolution of 640x272
Fill: Fullscreen / Crop on every side / AR is strongly distorted
Original: Diplays the original size
Height Fit: Fullscreen / Crop on Rifgt + Left side / keep the AR
Width Fit: Fullscreen with black bar on Top + Bottom side / smal crop on Right + Left side /
keep the AR
Auto Fit: Same effect like Width Fit
Pan & Scan: Same effect like Height Fit
34
INITIAL SETTINGS
Menu Video
TV SYSTEM
Submenu Options
According to the Color System of the TV, you can
choose the TV System.
TV Sytem NTSC
NTSC: Choose this settings if your DVD player is con-
PAL
nected to a NTSC TV.
Multi
PAL: Choose this settings if your DVD player is con-
nected to a PAL TV.
Multi: Choose this settings if your DVD player is con-
English
nected to a multi-system TV.
The default setting is NTSC.
Video Out
Submenu Options
Set normal video out on RGB. This is the SCART out-
put.
Video Out Component
Set normal video out via P-Scan. This is the YPbPr
RGB
output with progressive Scan in standard definition
P-Scan
resolution (576p).
VGA
Set normal video out on Component. This is the YPbPr
HD
interlaced (576i) output.
Set normal video out via VGA.
Set normal video out via HD. This settings activated the
high definition output for YPbPr and HDMI. Combined
with the setting HD Resolution=Auto the DVD-Player
set the optimal resolution to the native resolution of the
TV Set.
Brightness
Submenu Options
Use the right and Left Arrow button to move the scroll
and adjust the brightness
Brightness 1 to 16
Sharpness
Use the right and Left Arrow button to move the scroll
Sharpness 1 to 16
and adjust the sharpness.
HD Resolution
HD Resoluti-
Auto
You can select different settings for the resolution:
on
480p/576p
Auto, 480p/576p, 720p and 1080i. By 720p and 1080i
720p
the DVD-Player will upscale to this resolution.
1080i
HD JPEG
On
HD JPEG mode
mode
Off
By activating this feature in HDMI or YPbPr with high
definition resolution the picture quality increases in
sharpness and details by displaying on the TV.
35

INITIAL SETTINGS
The Picture mode settings could be helpfully if problems
Submenu Options
by the picture quality are available. The submenu in-
cludes three options, Film, VOB-Flag (PAL or NTSC) and
Interlaced (PAL or NTSC).
Bild-Modus VOB-Flag PAL
VOB-Flag NTSC
Film
• Film
Interlaced PAL
Most buyed Video-DVD having errors during
Interlaced NTSC
mastering, that the files are mixed with different
and wrong information by interlaced or progressive content and the picture flickers
strong. By using the Film option, these kind of flickering, based on authoring bugs,
could be deleted.
English
• VOB-Flag (PAL or NTSC)
If the Video-DVD is correct mastered, interlaced and progressive content has the
right information, than the Video-DVD are displayed without any picture problems.
• Interlaced (PAL or NTSC)
Please use this option, when the Video-DVD is made by interlaced DV-Cam video
content.
Menu Audio
The Bass management option allows you to set the
Submenu Options
analog audio output correspond with the external
speakers. When you set the option On, than you can
adjust reproduction of the bass sound on each group
Bass
ON
of the speakers.
Managment
OFF
• Large is for full frequency speakers
Front
Large
• Small is for medium high frequency speaker
Speaker
Small
which can not perform ultra low frequency.
Center
Larger
• None means, that the switch the channel off.
Speaker
Small
• Present: A subwoofer speaker is present and
None
switch on.
Surround
Lager
Speaker
Small
None
Subwoofer None
Present
36
INITIAL SETTINGS
Menu Audio
Test Tones
Submenu Options
• OFF: Cancel the test function. It turn off auto-
Test Tone OFF
matically when playback of a content runs.
Left
Right
• Left: Test the left output
Center
Left Surr
• Right: Test the right output
Right Surr
• Center: Test the center output
English
Subwoofer
• Left Surr: Test the left surround output
• Right Surr: Test the right surround output
• Subwoofer: Test the subwoofer output
Center delay
Submenu Options
Delay surround channel audio output in meters by
different Steps: 0.3 m, 0.6 m, 1.0 m, 1.4 m and 1.7 m.
Center delay No Delay
0.3 / 0.6 / 1.0 /
1.4 / 1.7 m
Surr delay (Surround delay)
Delay surround channel audio output by different
Submenu Options
steps : 1.0 m, 2.0 m, 3.0 m, 4.0 m and 5.1 m.
Surr Delay No Delay
1 / 2 / 3 / 4 /
Digital output
5.1 m
• OFF: Disable digital audio
• PCM: Output PCM format digital audio
• ALL: Output all digital audio formats.
Submenu Options
Digital
OFF
output
PCM
Night Mode
ALL
The Night mode option is a night listening low dynamic
mode.
Submenu Options
• OFF: Turn off the night mode
Night Mode OFF
• ON: Turn on the night mode
ON
Prologic
• OFF: Turn off the prologic decode setting
Submenu Options
• ON: Turn on the prologic decode setting
Pro Logic OFF
ON
37
INITIAL SETTINGS
Misc.
Rating
Submenu Options
In this option you can set the Parental Control and
adjust the Password.
Parental
G
Selecting a Rating option allows the user to set the
Control
PG-13
parental control feature on the player. If you choose
Adult
option Adult, any title will play on the unit (factory de-
fault). In other case, on the screen you will see a field
Set
Enter
to enter a password to access to DVD content.
Password
Password
The factory password is 8 8 8 8.
By the option Set Password you can change the factory
English
password. Enter the password, press OK button twice.
Than, enter a new password and press OK.
Misc
With this features all user settings could be reset to the
Submenu Options
default and standard settings, please choose Use de-
fault setting.
Misc Use default
By DVD Priority you can choose the priority of the DVD
setting
disc reproduction.
DVD Priority DVD Audio
DVD Video
38
Оглавление
- HSD 8430 MPEG-4 DVD-Player CD-Ripping Function
- INHALTVERZEICHNIS
- INHALTVERZEICHNIS
- SICHERHEITSHINWEISE
- MERKMALE
- ANSCHLÜSSE & BEDIENELEMENTE
- FERNBEDIENUNG
- BASISANSCHLÜSSE
- BEDIENUNG
- KARTENLESEGERÄT UND USB
- CD-RIPPING
- ANFANGSEINSTELLUNGEN
- HÄUFIGE BEDIENFEHLER
- PROBLEMBEHANDLUNG
- TECHNISCHE DATEN
- GLOSSAR
- CONTENTS
- SAFETY RECAUTIONS
- FEATURES
- REMOTE CONTROL
- BASIC CONNECTIONS
- OPERATION
- OPERATION FOR CARD READER
- CD-RIPPING
- INITIAL SETTINGS
- DISC INFORMATION
- TROUBLESHOOTING
- SPECIFICATIONS
- GLOSSARY
- СОДЕРЖАНИЕ
- МЕРЫ ПРЕДОСТОРОЖНОСТИ
- КРАТКИЙ СЛОВАРЬ ТЕРМИНОВ
- CONTENU
- CARACTÉRISTIQUES
- INTERFACES ET COMMANDES
- TELECOMMANDE
- RACCORDEMENTS DE BASE
- FONCTIONNEMENT
- LECTEUR DE CARTES ET PORT USB
- FONCTION EXTRACTION
- RÉGLAGES INITIAUX
- DÉPANNAGE
- SPÉCIFICATIONS
- GLOSSAIRE
- CONTENIDOS
- CONTENIDOS
- CONSIGNAS DE SEGURIDAD
- CARACTERÍSTICAS
- INTERFACES Y CONTROLES
- MANDO A DISTANCIA
- CONEXIONES BÁSICAS
- OPERACIÓN
- FUNCIONAMIENTO
- FUNCION EXTRACCION
- CONFIGURACIÓN INICIAL
- CONFIGURACIÓN INICIAL
- CONFIGURACIÓN INICIAL
- Solución de problemas
- ESPECIFICACIONES
- GLOSARIO
