Sigma ELECTRONIC FLASH EF-610 DG SUPER PA-PTTL (ペンタックス用): MULTI FLASH MODE
MULTI FLASH MODE: Sigma ELECTRONIC FLASH EF-610 DG SUPER PA-PTTL (ペンタックス用)
1. Set the mode of camera.
2. Set the P-TTL mode on the EF-610 DG SUPER PA-PTTL.
3. Press the
+
button or
–
button of the EF-610 DG SUPER
PA-PTTL until the LCD panel indicates the /
.
4. Check the focus. Make sure that the flash ready lamp on the
EF-610 DG SUPER PA-PTTL is lit and the camera’s built-in flash
is charged before releasing the shutter.
◆ This procedure will provide a flash output ratio of 1 : 2 (camera’s built-in flash : EF-610 DG
SUPER).
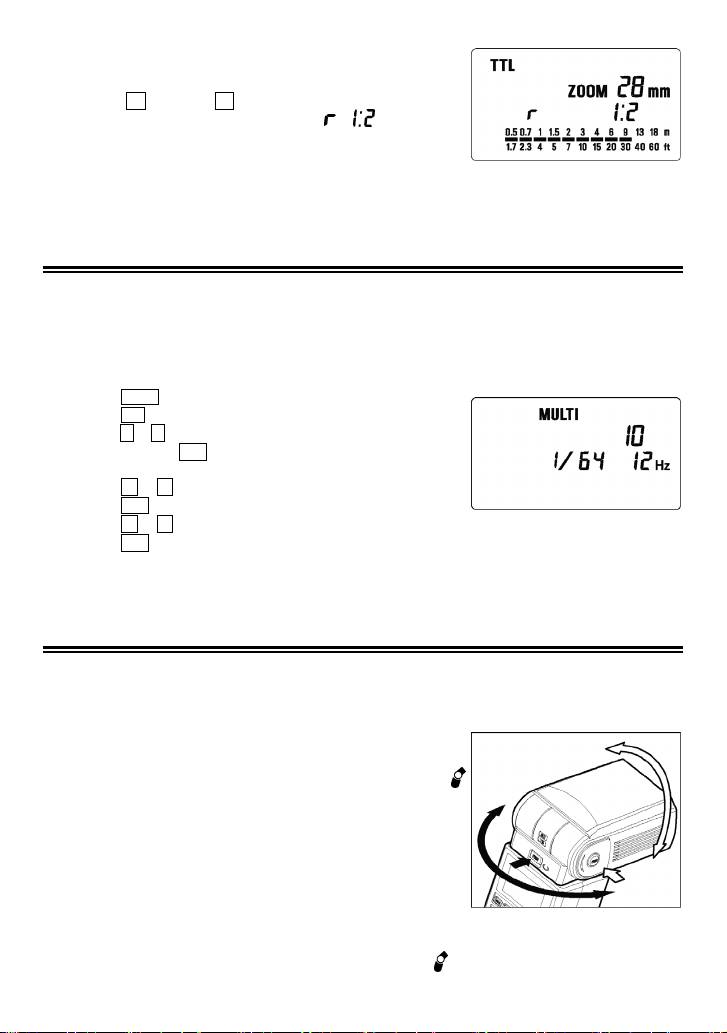
MULTI FLASH MODE
While the shutter is open, the flash will fire repeatedly. By doing so a series of images of the subject
will be exposed in one frame. A dark background with a bright subject shows more effectively in this
mode. It is possible to set the firing frequency between 1Hz and 100Hz. Up to 90 flashes can be fired
continuously. The maximum number of flashes varies, depending on the flash guide number and firing
frequency settings. (Please refer to table 3 on the last page)
1.Set the camera’s exposure mode to M mode, and set the F number
2.Press the
MODE button until the Multi-flash mode appears
3.Press the SEL button until the flash firing frequency starts to blink.
4.Press the
+
or
–
button to set the desired flash frequency value.
5.After pressing the SEL button again, the flash power level will
blink.
6.Press the
+
or
–
button to set the desired power level.
7.Press the SEL button again, the number of flashes will blink.
8.Press the
+
or
–
button to set the desired number of flashes.
9.Press the SEL button again, the display will stop blinking.
10.When the ready light of the flash is illuminated, the unit is ready to use.
Note: Please set the shutter speed longer than; Number of Flashes you want ÷ Firing Frequency
BOUNCE FLASH
When you take a photo with flash in a room, sometimes a strong shadow will appear behind the
subject, if you point the flash head upwards or sideways to reflect the light off the ceiling, wall etc. the
subject will be illuminated softly. Press the lock button and adjust the flash head to set the bounce
angle.
UP: 0°, 60°, 75°, 90°
DOWN: 0°,7°
RIGHT: 0°, 60°, 75°, 90°
LEFT: 0°, 60°, 75°,90°, 120°, 150°, 180°
When the bounce flash mode is activated, a bounce indicator
will appear on the LCD panel.
The picture will receive the color from the reflecting surface. Please
choose a white surface for bouncing.
Depending on the reflecting surface, the subject distance and other
factors, the effective distance range for the TTL AUTO may change.
Please check for correct exposure confirmation ( TTL mark on the
LCD panel) after releasing the shutter.
CLOSE-UP EXPOSURES
For bounce flash can be tilted 7° downward for close-ups. The Flash will be effective only for the
subjects 0.5 meter to 2 meters. When the flash head is tilted 7°
will blink.
19
Оглавление
- 安全上のご注意
- 各部の名称(1 ページ)
- 発光部のセット
- 液晶パネルの照明
- 連続撮影時のご注意
- モデリング発光
- マルチ発光撮影
- ワイヤレス撮影 (P-TTL 対応カメラのみ)
- スレーブ発光
- 主要諸元
- PRECAUTIONS
- DESCRIPTION OF THE PARTS
- ADJUSTING THE FLASH HEAD
- ABOUT DISTANCE DISPLAY
- MANUAL FLASH OPERATION
- MODELING FLASH
- MULTI FLASH MODE
- WIRELESS FLASH
- SLAVE FLASH
- SPECIFICATIONS
- VORSICHTSMAßNAHMEN
- BESCHREIBUNG DER TEILE
- EINSTELLEN DES BLITZKOPFES
- ENTFERNUNGSANZEIGE
- MANUELLER BLITZBETRIEB
- EINSTELLLICHT
- STROBOSKOPBETRIEB
- KABELLOSES BLITZEN (Nur für P-TTL kompatible Kameras)
- „SLAVE“ GERÄT
- TECHNISCHE DATEN
- PRECAUTIONS
- DESCRIPTION DES ELEMENTS
- AJUSTEMENT DE LA TETE FLASH
- RETRO ECLAIRAGE DE L'ECRAN LCD
- LIMITES DES PRISES DE VUE CONSECUTIVES AU FLASH
- FLASH PREDICTIF
- MODE DE FLASH STROBOSCOPIQUE (MULTI FLASH)
- FLASH DISTANT SANS CORDON (Wireless)
- FLASH ESCLAVE
- CARACTERISTIQUES TECHNIQUES
- PRECAUCIONES
- DESCRIPCIÓN DE LAS PARTES
- AJUSTE DEL CABEZAL DEL FLASH
- ACERCA DE LA DISTANCIA
- OPERACIÓN CON EL FLASH MANUAL
- LUZ DE MODELADO
- MODO DE MULTI FLASH (Estroboscópico)
- CONTROL REMOTO DEL FLASH
- FLASH ESCLAVO
- ESPECIFICACIONES
- ATTENZIONE
- DESCRIZIONE DELLE PARTI
- REGOLAZIONE DELLA TESTA DEL FLASH
- INDICAZIONE DELLA DISTANZA
- FLASH MANUALE
- FLASH DI RIEMPIMENTO
- MODALITÀ MULTI FLASH
- FLASH TELECOMANDATO SENZA FILI
- FLASH AUSILIARIO
- SPECIFICHE
- BEMÆRK
- BESKRIVELSE AF FLASHENS DELE
- MONTERING OG AFMONTERING AF FLASHEN
- TTL FUNKTION
- SYNKRONISERING MED ANDET LUKKERGARDIN
- PILOT-LYS
- BOUNCE FLASH (indirekte flash)
- SLAVE-FLASH
- SPECIFIKATIONER
- VOORZORGSMAATREGELEN
- OMSCHRIJVING VAN DE ONDERDELEN
- HET AFSTELLEN VAN DE FLITSKOP
- VERLICHTING VAN HET LCD DISPLAY
- HANDMATIGE FLITSINSTELLING
- MODEL / TESTFLITS
- MEERVOUDIG FLITSEN
- DRAADLOOS FLITSEN
- SLAVE FUNCTIE
- TECHNISCHE GEGEVENS:
- 注 意
- 關於電池
- 設定閃光燈涵蓋角度
- 閃燈連發限制
- (FP) 高速快門閃光同步 (祗適配內置 P-TTL 功能的相機)
- 反差控制同步閃光
- 無線閃光 (祗適配內置 P-TTL 功能的相機)
- 離機無線從屬(Slave)閃光模式
- 規 格
- 사용상 주의점
- 각부의 명칭
- 플래시 장착과 탈착
- TTL 오토 플래시
- 후막 싱크로 촬영
- 모델링 플래시
- 멀티 플래시 모드
- 무선 플래시
- 슬레이브 플래시
- 제품 사양
- ПРЕДОСТОРОЖНОСТИ
- ОПИСАНИЕ СОСТАВНЫХ ЧАСТЕЙ
- НАСТРОЙКА ГОЛОВКИ ВСПЫШКИ
- РАССЕИВАЮЩАЯ ПАНЕЛЬ
- ОГРАНИЧЕНИЯ ДЛЯ НЕПРЕРЫВНОЙ СЪМКИ
- СИНХРОНИЗАЦИЯ ПО ВТОРОЙ ШТОРКЕ
- КОМПЕНСАЦИЯ ЭКСПОЗИЦИИ
- НАПРАВЛЕННОСТЬ ВСПЫШКИ
- БЕСПРОВОДНОЙ РЕЖИМ
- ДОПОЛНИТЕЛЬНАЯ ВСПЫШКА
- ХАРАКТЕРИСТИКИ
- PRECAUÇÕES
- DESCRIÇÃO DOS COMPONENTES
- COMO AJUSTAR A CABEÇA DO FLASH
- PAINEL DE GRANDE ANGULAR
- LIMITES DE DISPAROS CONTÍNUOS
- SINCRONIZAÇÃO DA SEGUNDA CORTINA
- COMPENSAÇÃO DA EXPOSIÇÃO
- MODO DE FLASH ESTROBOSCÓPICO (MULTI FLASH)
- FLASH SEM FIOS
- FLASH ESCRAVO
- ESPECIFICAÇÕES
