Motorola DP 2600: инструкция
Раздел: Домашние и офисные телефоны/Радиостанции
Тип:
Инструкция к Motorola DP 2600
PROFESSIONAL DIGITAL TWO-WAY RADIO
MOTOTRBO™
DP2600
LIMITED KEYPAD PORTABLE
USER GUIDE
EN FR IT ESDE PL RU ARTU


LKP_EMEA.book Page i Wednesday, July 18, 2012 10:36 PM
Identifying Radio Controls . . . . . . . . . . . . . . . . . . . . 7
Contents
Radio Controls . . . . . . . . . . . . . . . . . . . . . . . . . . . . . 8
Programmable Buttons . . . . . . . . . . . . . . . . . . . . . . . 9
This User Guide contains all information you need to use the
Assignable Radio Functions . . . . . . . . . . . . . . . . . 9
MOTOTRBO DP2600 Digital Portable Radio.
Assignable Settings or Utility Functions . . . . . . . . 11
Important Safety Information . . . . . . . . . . . . . . . . . . v
Accessing the Programmed Functions . . . . . . . . . . 11
Product Safety and RF Exposure Compliance . . . v
Push-To-Talk (PTT) Button . . . . . . . . . . . . . . . . . . . 12
Firmware Version . . . . . . . . . . . . . . . . . . . . . . . . . . . . v
Switching Between Conventional Analog and
Digital Mode . . . . . . . . . . . . . . . . . . . . . . . . . . . . . . 13
Computer Software Copyrights . . . . . . . . . . . . . . . vi
IP Site Connect . . . . . . . . . . . . . . . . . . . . . . . . . . . . 13
Handling Precautions . . . . . . . . . . . . . . . . . . . . . . . vii
Capacity Plus . . . . . . . . . . . . . . . . . . . . . . . . . . . . . 14
Getting Started . . . . . . . . . . . . . . . . . . . . . . . . . . . . . . 1
Linked Capacity Plus . . . . . . . . . . . . . . . . . . . . . . . 14
How to Use This Guide . . . . . . . . . . . . . . . . . . . . . . . 1
Identifying Status Indicators . . . . . . . . . . . . . . . . . . 15
What Your Dealer/System Administrator
Display Icons . . . . . . . . . . . . . . . . . . . . . . . . . . . . . . 16
Can Tell You . . . . . . . . . . . . . . . . . . . . . . . . . . . . . . 1
Call Icons . . . . . . . . . . . . . . . . . . . . . . . . . . . . . . . . 17
Advanced Menu Icons . . . . . . . . . . . . . . . . . . . . . . 18
Preparing Your Radio for Use . . . . . . . . . . . . . . . . . . 2
Mini Notice Icons . . . . . . . . . . . . . . . . . . . . . . . . . . 18
Charging the Battery . . . . . . . . . . . . . . . . . . . . . . . . . 2
Sent Item Icons . . . . . . . . . . . . . . . . . . . . . . . . . . . 19
Attaching the Battery . . . . . . . . . . . . . . . . . . . . . . . . . 3
LED Indicator . . . . . . . . . . . . . . . . . . . . . . . . . . . . . 19
Attaching the Antenna . . . . . . . . . . . . . . . . . . . . . . . . 3
Audio Tones . . . . . . . . . . . . . . . . . . . . . . . . . . . . . . 20
Attaching the Belt Clip . . . . . . . . . . . . . . . . . . . . . . . . 4
Indicator Tones . . . . . . . . . . . . . . . . . . . . . . . . . . . . 21
Attaching the Universal Connector Cover
(Dust Cover) . . . . . . . . . . . . . . . . . . . . . . . . . . . . . . 4
Making and Receiving Calls . . . . . . . . . . . . . . . . . . 21
Attaching the Accessory Connector . . . . . . . . . . . . . 5
Selecting a Zone . . . . . . . . . . . . . . . . . . . . . . . . . . . 22
Powering Up the Radio . . . . . . . . . . . . . . . . . . . . . . . 5
Selecting a Channel . . . . . . . . . . . . . . . . . . . . . . . . 22
Adjusting the Volume . . . . . . . . . . . . . . . . . . . . . . . . 6
Receiving and Responding to a Radio Call . . . . . . 23
i
English

LKP_EMEA.book Page ii Wednesday, July 18, 2012 10:36 PM
Receiving and Responding to a Group Call . . . . 23
Contacts Settings . . . . . . . . . . . . . . . . . . . . . . . . . . 42
Receiving and Responding to a Private Call . . . 24
Making a Group Call from Contacts . . . . . . . . . . 42
Receiving an All Call . . . . . . . . . . . . . . . . . . . . . . 25
Making a Private Call from Contacts . . . . . . . . . 43
Receiving and Responding to a Selective Call . 25
Setting Default Contact . . . . . . . . . . . . . . . . . . . 44
Receiving and Responding to a Phone Call . . . 26
Call Indicator Settings . . . . . . . . . . . . . . . . . . . . . . 44
Making a Radio Call . . . . . . . . . . . . . . . . . . . . . . . . 27
Activating and Deactivating Call Ringers
Making a Call with the Channel Selector Knob . . 28
for Call Alert . . . . . . . . . . . . . . . . . . . . . . . . . . . . 44
Making a Selective Call . . . . . . . . . . . . . . . . . . . 30
Activating and Deactivating Call Ringers
Stopping a Radio Call . . . . . . . . . . . . . . . . . . . . . . 33
for Private Calls . . . . . . . . . . . . . . . . . . . . . . . . . 45
Talkaround . . . . . . . . . . . . . . . . . . . . . . . . . . . . . . . 33
Activating and Deactivating Call Ringers
for Selective Call . . . . . . . . . . . . . . . . . . . . . . . . 45
Monitoring Features . . . . . . . . . . . . . . . . . . . . . . . . 34
Activating and Deactivating Call Ringers
Monitoring a Channel . . . . . . . . . . . . . . . . . . . . . 34
for Text Message . . . . . . . . . . . . . . . . . . . . . . . . 46
Permanent Monitor . . . . . . . . . . . . . . . . . . . . . . . 35
Assigning Ring Styles . . . . . . . . . . . . . . . . . . . . 46
Advanced Features . . . . . . . . . . . . . . . . . . . . . . . . . 36
Escalating Alarm Tone Volume . . . . . . . . . . . . . . 47
Radio Check . . . . . . . . . . . . . . . . . . . . . . . . . . . . . 36
Call Log Features . . . . . . . . . . . . . . . . . . . . . . . . . 47
Sending a Radio Check . . . . . . . . . . . . . . . . . . . 36
Viewing Recent Calls . . . . . . . . . . . . . . . . . . . . . 47
Scan Lists . . . . . . . . . . . . . . . . . . . . . . . . . . . . . . . . 37
Deleting a Call from a Call List . . . . . . . . . . . . . . 48
Viewing an Entry in the Scan List . . . . . . . . . . . . 37
Call Alert Operation . . . . . . . . . . . . . . . . . . . . . . . . 49
Editing the Scan List . . . . . . . . . . . . . . . . . . . . . . 38
Receiving and Responding to a Call Alert . . . . . 49
Scan . . . . . . . . . . . . . . . . . . . . . . . . . . . . . . . . . . . . 39
Making a Call Alert from the Contacts List . . . . . 49
Starting and Stopping Scan . . . . . . . . . . . . . . . . 40
Making a Call Alert with the One Touch Access
Responding to a Transmission During a Scan . . 40
Button . . . . . . . . . . . . . . . . . . . . . . . . . . . . . . . . . 50
Deleting a Nuisance Channel . . . . . . . . . . . . . . . 41
Emergency Operation . . . . . . . . . . . . . . . . . . . . . . 50
Restoring a Nuisance Channel . . . . . . . . . . . . . . 41
Sending an Emergency Alarm . . . . . . . . . . . . . . 51
Vote Scan . . . . . . . . . . . . . . . . . . . . . . . . . . . . . . . . 41
Sending an Emergency Alarm with Call . . . . . . . 52
ii
English

LKP_EMEA.book Page iii Wednesday, July 18, 2012 10:36 PM
Sending an Emergency Alarm with Voice to
Privacy . . . . . . . . . . . . . . . . . . . . . . . . . . . . . . . . . . 63
Follow . . . . . . . . . . . . . . . . . . . . . . . . . . . . . . . . . 53
Multi-Site Controls . . . . . . . . . . . . . . . . . . . . . . . . . 64
Reinitiating an Emergency Mode . . . . . . . . . . . . . 54
Starting an Automatic Site Search . . . . . . . . . . . . 64
Exiting Emergency Mode . . . . . . . . . . . . . . . . . . . 54
Stopping an Automatic Site Search . . . . . . . . . . . 65
Text Message Features . . . . . . . . . . . . . . . . . . . . . 55
Starting a Manual Site Search . . . . . . . . . . . . . . . 66
Sending a Quick Text Message . . . . . . . . . . . . . . 55
Security . . . . . . . . . . . . . . . . . . . . . . . . . . . . . . . . . 66
Sending a Quick Text Message with the
Radio Disable . . . . . . . . . . . . . . . . . . . . . . . . . . . 66
One Touch Access Button . . . . . . . . . . . . . . . . . . 55
Radio Enable . . . . . . . . . . . . . . . . . . . . . . . . . . . . 67
Managing Fail-to-Send Text Messages . . . . . . . 56
Lone Worker . . . . . . . . . . . . . . . . . . . . . . . . . . . . . . 68
Resending a Text Message . . . . . . . . . . . . . . . . 56
Password Lock Features . . . . . . . . . . . . . . . . . . . . 69
Forwarding a Text Message . . . . . . . . . . . . . . . . 56
Accessing the Radio from Password . . . . . . . . . . 69
Managing Sent Text Messages . . . . . . . . . . . . . 57
Unlocking the Radio from Locked State . . . . . . . 69
Viewing a Sent Text Message . . . . . . . . . . . . . . 57
Turning the Password Lock On or Off . . . . . . . . . 70
Deleting All Sent Text Messages from
Changing the Password . . . . . . . . . . . . . . . . . . . . 70
Sent Items . . . . . . . . . . . . . . . . . . . . . . . . . . . . . . 59
Notification List . . . . . . . . . . . . . . . . . . . . . . . . . . . . 71
Receiving a Text Message . . . . . . . . . . . . . . . . . 59
Accessing the Notification List . . . . . . . . . . . . . . . 71
Reading a Text Message . . . . . . . . . . . . . . . . . . . 59
Auto-Range Transponder System
Managing Received Text Messages . . . . . . . . . . 60
(ARTS) . . . . . . . . . . . . . . . . . . . . . . . . . . . . . . . . . 72
Deleting a Text Message from the Inbox . . . . . . . 60
Over-the-Air Programming (OTAP) . . . . . . . . . . . . 72
Deleting All Text Messages from the Inbox . . . . . 61
Utilities . . . . . . . . . . . . . . . . . . . . . . . . . . . . . . . . . . 73
Analog Message Encode . . . . . . . . . . . . . . . . . . . . 61
Turning the Radio Tones/Alerts On or Off . . . . . . 73
Sending MDC Message Encode to Dispatcher . . 61
Setting the Tone Alert Volume Offset Level . . . . 73
Sending 5-Tone Message Encode to Contact . . . 62
Turning the Talk Permit Tone On or Off . . . . . . . 74
Analog Status Update . . . . . . . . . . . . . . . . . . . . . . 62
Turning the Power Up Tone On or Off . . . . . . . . . 74
Sending Status Update to Predefined Contact . . 62
Setting the Power Level . . . . . . . . . . . . . . . . . . . . 75
Viewing a 5-Tone Status Details . . . . . . . . . . . . . 63
iii
English

LKP_EMEA.book Page iv Wednesday, July 18, 2012 10:36 PM
Adjusting the Display Brightness . . . . . . . . . . . . 75
Controlling the Display Backlight . . . . . . . . . . . . 76
Setting the Squelch Level . . . . . . . . . . . . . . . . . 76
Turning the Introduction Screen On or Off . . . . . 77
Language . . . . . . . . . . . . . . . . . . . . . . . . . . . . . . 77
Turning the LED Indicator On or Off . . . . . . . . . . 78
Turning the Voice Operating Transmission (VOX)
Feature On or Off . . . . . . . . . . . . . . . . . . . . . . . . 78
Voice Announcement . . . . . . . . . . . . . . . . . . . . . 79
Call Forwarding . . . . . . . . . . . . . . . . . . . . . . . . . . 80
Menu Timer . . . . . . . . . . . . . . . . . . . . . . . . . . . . . 80
Analog Mic AGC (Mic AGC-A) . . . . . . . . . . . . . . 81
Digital Mic AGC (Mic AGC-D) . . . . . . . . . . . . . . . 81
Intelligent Audio . . . . . . . . . . . . . . . . . . . . . . . . . 82
Accessing General Radio Information . . . . . . . . 82
RSSI Values . . . . . . . . . . . . . . . . . . . . . . . . . . . . . . 84
Front Panel Programming (FPP) . . . . . . . . . . . . . . 84
Entering FPP Mode . . . . . . . . . . . . . . . . . . . . . . . 84
Editing FPP Mode Parameters . . . . . . . . . . . . . . 84
Batteries and Chargers Warranty . . . . . . . . . . . . . 85
Limited Warranty . . . . . . . . . . . . . . . . . . . . . . . . . . . 86
iv
English
LKP_EMEA.book Page v Wednesday, July 18, 2012 10:36 PM
Important Safety Information
Firmware Version
Important Safety Information
All the features described in the following sections are
Product Safety and RF Exposure Compliance
supported by the radio's software version R02.05.00.
Before using this product, read the operating
See Checking the Firmware Version and Codeplug
instructions for safe usage contained in the
Version on page 83 to determine your radio's software
Product Safety and RF Exposure booklet
version.
enclosed with your radio.
Check with your dealer or system administrator
for more details of all the features supported.
ATTENTION!
This radio is restricted to occupational use only to
satisfy FCC/ICNIRP RF energy exposure
requirements. Before using this product, read the RF
energy awareness information and operating instructions
in the Product Safety and RF Exposure for Portable
Two-Way Radios (Motorola Publication part number
6864117B25) to ensure compliance with RF energy
exposure limits.
For a list of Motorola-approved antennas, batteries, and
other accessories, visit the following website:
http://www.motorolasolutions.com
v
English

LKP_EMEA.book Page vi Wednesday, July 18, 2012 10:36 PM
TM
The AMBE+2
voice coding Technology embodied in
Computer Software Copyrights
this product is protected by intellectual property rights
including patent rights, copyrights and trade secrets of
The Motorola products described in this manual may
Digital Voice Systems, Inc.
include copyrighted Motorola computer programs stored
in semiconductor memories or other media. Laws in the
This voice coding Technology is licensed solely for use
United States and other countries preserve for Motorola
within this Communications Equipment. The user of this
certain exclusive rights for copyrighted computer
Technology is explicitly prohibited from attempting to
programs including, but not limited to, the exclusive right
decompile, reverse engineer, or disassemble the Object
to copy or reproduce in any form the copyrighted
Code, or in any other way convert the Object Code into a
computer program. Accordingly, any copyrighted
human-readable form.
Motorola computer programs contained in the Motorola
U.S. Pat. Nos. #5,870,405, #5,826,222, #5,754,974,
products described in this manual may not be copied,
#5,701,390, #5,715,365, #5,649,050, #5,630,011,
reproduced, modified, reverse-engineered, or distributed
#5,581,656, #5,517,511, #5,491,772, #5,247,579,
in any manner without the express written permission of
#5,226,084 and #5,195,166.
Motorola. Furthermore, the purchase of Motorola
products shall not be deemed to grant either directly or by
implication, estoppel, or otherwise, any license under the
copyrights, patents or patent applications of Motorola,
except for the normal non-exclusive license to use that
arises by operation of law in the sale of a product.
Computer Software Copyrights
vi
English
LKP_EMEA.book Page vii Wednesday, July 18, 2012 10:36 PM
distance of 2.5m to 3m for at least 3 min. Exceeding either
maximum limit or use without antenna may result in damage
Handling Precautions
to the radio.
Handling Precautions
The MOTOTRBO DP2600 Portable Radio meets IP55
• When cleaning the radio, do not use a high pressure jet spray
specifications with antenna attached, allowing the radio to
on the radio as this may cause to leak.
withstand adverse field conditions such as being used in rain or
dusty environment.
Do not disassemble the radio. This could
damage radio seals and result in leak paths into
• If the radio has been exposed to water or rain, shake the
the radio. Radio maintenance should only be
radio well to remove any water that may be trapped inside the
done in service depot that is equipped to test
speaker grille, microphone port and aesthetic cover (if
and replace the seal on the radio.
applicable). Trapped water in speaker grille and microphone
port could cause decreased audio performance. If aesthetic
cover is attached onto radio, trapped water in aesthetic cover
could cause corrosion on the slim connector interface gold
contacts.
• If the radio’s battery contact area has been exposed to water,
clean and dry battery contacts on both the radio and the
battery before attaching the battery to the radio. The residual
water could short-circuit the radio.
• If the radio has been exposed to corrosive substance
(e.g.saltwater), rinse the radio and battery in fresh water then
dry the radio and battery.
• To clean the exterior surfaces of the radio, use a diluted
solution of mild dishwashing detergent and fresh water (i.e.
one teaspoon of detergent to one gallon of water).
• The radio with antenna attached properly is designed to be
protected against dust and low pressure jets of water
projected with nozzle 6.3mm diameter at flow rate of
12.5 l/min, with water pressure at 30 kN/m2 and from a
vii
English

LKP_EMEA.book Page viii Wednesday, July 18, 2012 10:36 PM
Notes
Handling Precautions
viii
English
LKP_EMEA.book Page 1 Wednesday, July 18, 2012 10:36 PM
For features that are available in a conventional multi-site
Getting Started
mode, see IP Site Connect on page 13 for more information.
Getting Started
Selected features are also available on the single-site trunking
Take a moment to review the following:
mode, Capacity Plus. See Capacity Plus on page 14 for more
How to Use This Guide . . . . . . . . . . . . . . . . . . . . . . . . . page 1
information.
What Your Dealer/System Administrator
Can Tell You. . . . . . . . . . . . . . . . . . . . . . . . . . . . . . . . page 1
Selected features are also available in the multi-site trunking
mode, Linked Capacity Plus. See Linked Capacity Plus on
page 14 for more information.
How to Use This Guide
This User Guide covers the basic operation of the MOTOTRBO
What Your Dealer/System Administrator Can
Portables.
Tell You
However, your dealer or system administrator may have
customized your radio for your specific needs. Check with your
You can consult your dealer or system administrator about the
dealer or system administrator for more information.
following:
Throughout this publication, the icons below are used to
• Is your radio programmed with any preset conventional
indicate features supported in either the conventional Analog
channels?
mode or conventional Digital mode:
• Which buttons have been programmed to access other
features?
Indicates a conventional Analog Mode-Only feature.
• What optional accessories may suit your needs?
• What are the best radio usage practices for effective
Indicates a conventional Digital Mode-Only feature.
communication?
• What maintenance procedures will help promote longer radio
For features that are available in both conventional Analog and
life?
Digital modes, no icon is shown.
1
English

LKP_EMEA.book Page 2 Wednesday, July 18, 2012 10:36 PM
Charging the Battery
Preparing Your Radio for Use
Your radio is powered by a Nickel Metal-Hydride (NiMH) or
Assemble your radio by following these steps:
Lithium-Ion (Li-lon) battery. To avoid damage and comply with
Charging the Battery . . . . . . . . . . . . . . . . . . . . . . . . . . . page 2
warranty terms, charge the battery using a Motorola charger
Attaching the Battery. . . . . . . . . . . . . . . . . . . . . . . . . . . page 3
exactly as described in the charger user guide. It is
Attaching the Antenna. . . . . . . . . . . . . . . . . . . . . . . . . . page 3
recommended your radio remains powered off while charging.
Attaching the Belt Clip. . . . . . . . . . . . . . . . . . . . . . . . . . page 4
Charge a new battery 14 to 16 hours before initial use for best
Attaching the Universal Connector
performance.
Cover (Dust Cover) . . . . . . . . . . . . . . . . . . . . . . . . . . page 4
Powering Up the Radio . . . . . . . . . . . . . . . . . . . . . . . . . page 5
IMPORTANT: ALWAYS charge your IMPRES battery with an
Adjusting the Volume . . . . . . . . . . . . . . . . . . . . . . . . . . page 6
IMPRES charger for optimized battery life and
valuable battery data. IMPRES batteries
charged exclusively with IMPRES chargers
receive a 6-month capacity warranty extension
over the standard Motorola Premium battery
warranty duration.
Preparing Your Radio for Use
2
English
LKP_EMEA.book Page 3 Wednesday, July 18, 2012 10:36 PM
Attaching the Battery
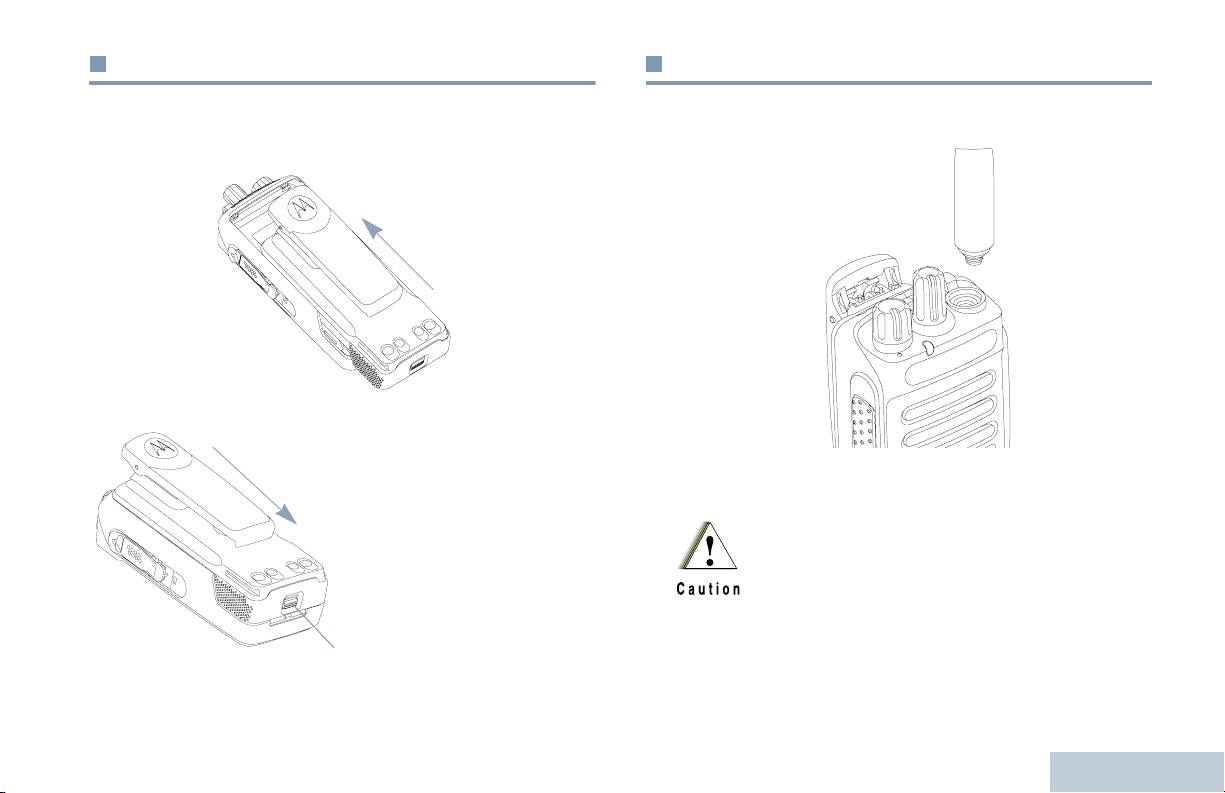
Attaching the Antenna
Preparing Your Radio for Use
Align the battery with the rails on the back of the radio. Press
With the radio turned off, set the antenna in its receptacle and
the battery firmly, and slide upwards until the latch snaps into
turn clockwise.
place.
To remove the battery,
turn the radio off. Move
To remove the antenna, turn the antenna counterclockwise.
the battery latch into
unlock position and
If antenna needs to be replaced, ensure that only
hold, and slide the
MOTOTRBO antennas are used. Neglecting this will
battery down and off
damage your radio.
the rails.
Battery Latch
3
English
LKP_EMEA.book Page 4 Wednesday, July 18, 2012 10:36 PM
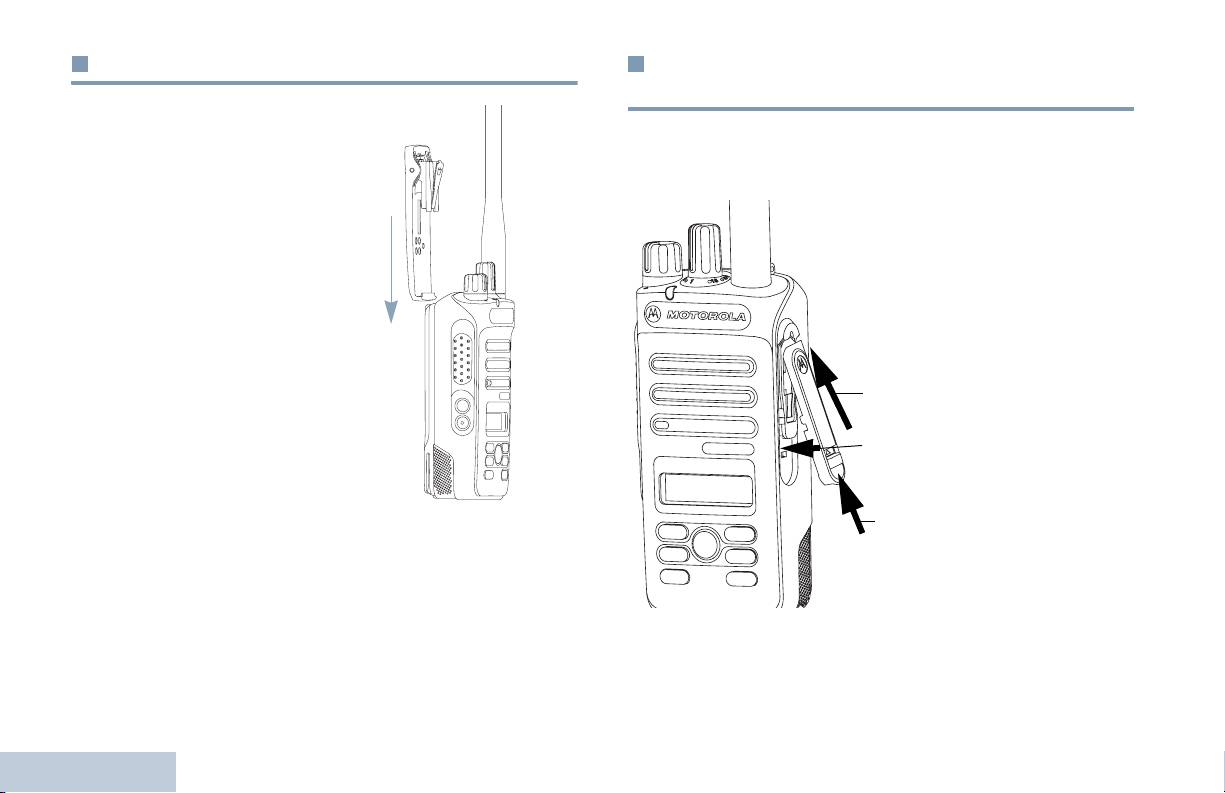
Attaching the Belt Clip
Attaching the Universal Connector Cover
(Dust Cover)
Align the grooves on the clip
with those on the battery and
The universal connector is located on the antenna side of the
press downwards until you
radio. It is used to connect MOTOTRBO accessories to the
hear a click.
radio.
Insert the slanted end of
To remove the clip, press the
the cover into the slots
belt clip tab away from the
above the universal
battery using a key. Then slide
connector. Press
the clip upwards and away
downwards on the cover to
from the radio.
seat the dust cover
properly on the Universal
Connector.
1
Secure the dust cover to
the radio by pushing the
2
latch upwards.
To remove the dust cover,
push the latch downwards.
3
Lift the cover up and slide
down the dust cover from
the universal connector to
remove it.
Replace the dust cover when the universal connector is not in
Preparing Your Radio for Use
use.
4
English
LKP_EMEA.book Page 5 Wednesday, July 18, 2012 10:36 PM
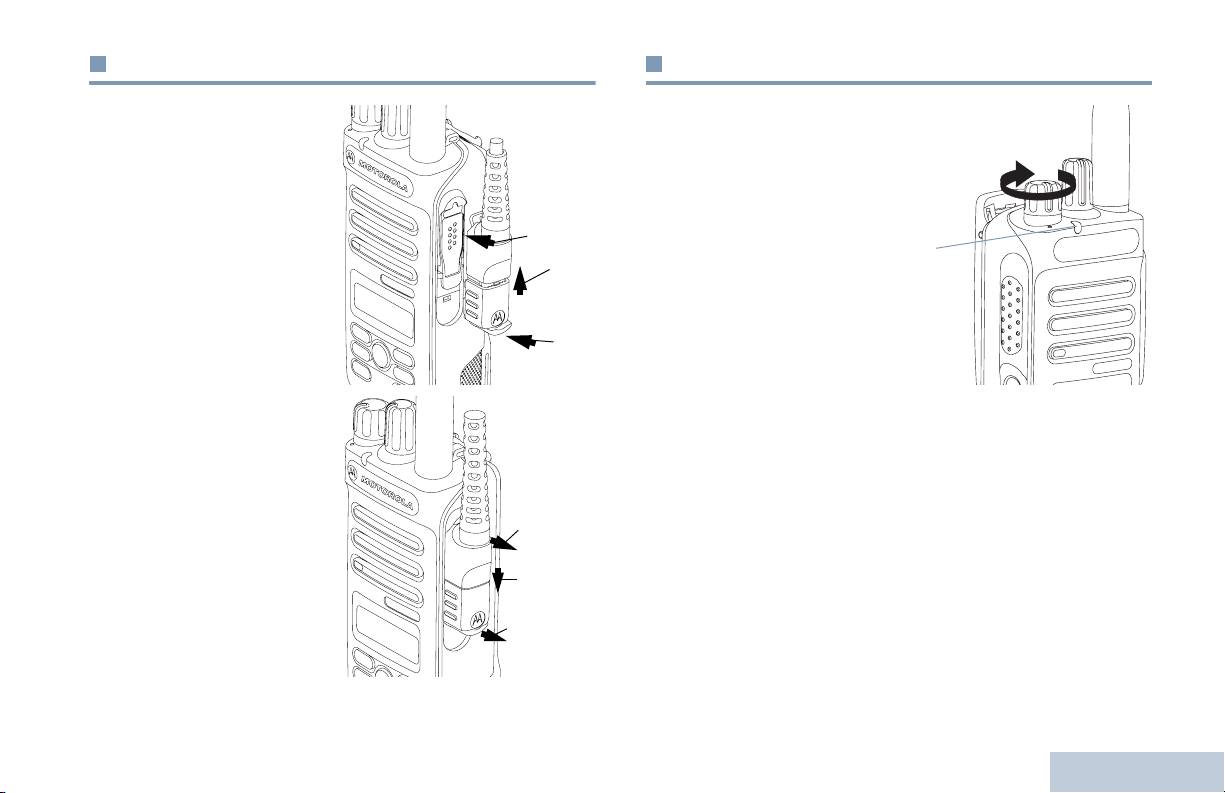
Attaching the Accessory Connector
Powering Up the Radio
Preparing Your Radio for Use
The accessory connector is
Rotate the On/Off/Volume
to be secured to the
Control Knob clockwise
universal connector on the
until you hear a click. You
antenna side of the radio.
see MOTOTRBO (TM) on the
radio’s display momentarily,
To attach the accessory
1
followed by a welcome
connector, refer to the steps
message.
LED
shown in the diagram.
2
Indicator
The LED lights up solid
green and the Home screen
lights up if the backlight
3
setting is set to turn on
automatically.
To remove the accessory
connector, refer to the steps
shown in the diagram.
3
2
1
5
English
LKP_EMEA.book Page 6 Wednesday, July 18, 2012 10:36 PM
NOTE: The Home screen does not light up during a power up if
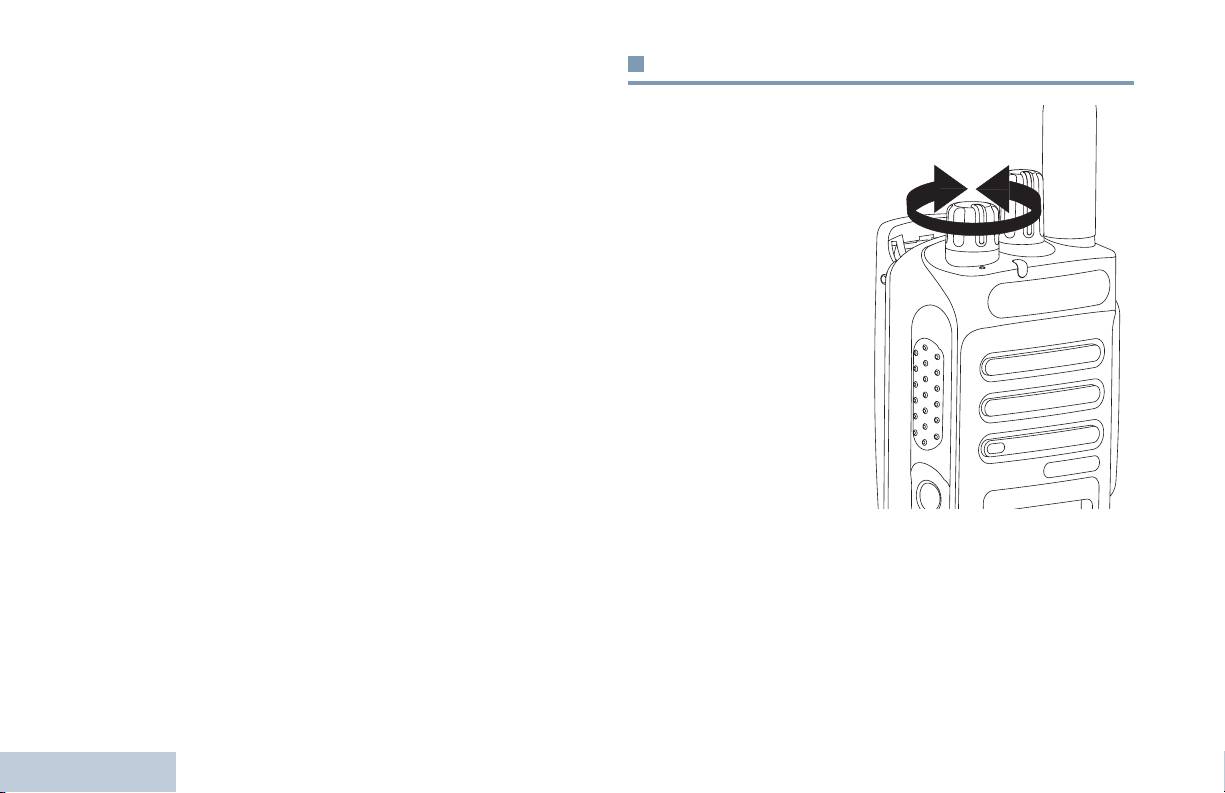
Adjusting the Volume
the LED indicator is disabled (see Turning the LED
Indicator On or Off on page 78).
To increase the volume,
A brief tone sounds, indicating that the power up test is
turn the On/Off/Volume
successful.
Control Knob clockwise.
NOTE: There is no power up tone if the radio tones/alerts
To decrease the volume,
function is disabled (see Turning the Radio Tones/
turn this knob
Alerts On or Off on page 73).
counterclockwise.
If your radio does not power up, check your battery. Make sure
NOTE: Your radio can be
that it is charged and properly attached. If your radio still does
programmed to
not power up, contact your dealer.
have a minimum
volume offset
To turn off the radio, rotate this knob counterclockwise until you
where the volume
hear a click. You see a brief
Powering Down
on the radio’s
level cannot be
display.
turned down fully.
Check with your
dealer or system
administrator for
more information.
Preparing Your Radio for Use
6
English

LKP_EMEA.book Page 7 Wednesday, July 18, 2012 10:36 PM
Identifying Radio Controls
Identifying Radio Controls
Take a moment to review the following:
Radio Controls. . . . . . . . . . . . . . . . . . . . . . . . . . . . . . . . page 8
Programmable Buttons . . . . . . . . . . . . . . . . . . . . . . . . . page 9
Accessing the Programmed Functions . . . . . . . . . . . . page 11
Push-To-Talk (PTT) Button . . . . . . . . . . . . . . . . . . . . . page 12
Switching Between Conventional Analog and
Digital Mode. . . . . . . . . . . . . . . . . . . . . . . . . . . . . . . page 13
IP Site Connect . . . . . . . . . . . . . . . . . . . . . . . . . . . . . . page 13
Capacity Plus. . . . . . . . . . . . . . . . . . . . . . . . . . . . . . . . page 14
Linked Capacity Plus. . . . . . . . . . . . . . . . . . . . . . . . . . page 14
7
English

LKP_EMEA.book Page 8 Wednesday, July 18, 2012 10:36 PM
Radio Controls
4
Push-to-Talk (PTT) Button
5
Microphone
18
1
6
Side Button 1*
2
7
Side Button 2*
8
Left Navigation Button
3
17
9
Menu Button
4
16
10
Front Button P1*
5
11
OK Button
6
15
12
Front Button P2*
14
7
13
Back/Home Button
13
8
14
Right Navigation Button
12
9
15
Display
10
Speaker
11
16
17
Universal Connector for Accessories
1
Channel Selector Knob
18
Antenna
2
On/Off/Volume Control Knob
* These buttons are programmable.
Identifying Radio Controls
3
LED Indicator
8
English

Programmable Buttons
Assignable Radio Functions
Contacts – Provides direct access to the Contacts list.
Identifying Radio Controls
Your dealer can program the programmable buttons as
shortcuts to radio functions or preset channels/groups
Call Alert – Direct access to the radio contacts list to select a
depending on the duration of a button press:
radio contact to send a call alert to.
• Short press – Pressing and releasing rapidly.
Call Forwarding – Toggles Call Forwarding on or off.
• Long press – Pressing and holding for the programmed
Call Log – Selects the call log list.
duration.
Channel Announcement – Plays zone and channel
• Hold down – Keeping the button pressed.
announcement voice messages for the current channel.
NOTE: The programmed duration of a button press is
Emergency – Depending on the programming, initiates or
applicable for all assignable radio/utility functions or
cancels an emergency alarm or call.
settings. See Emergency Operation on page 50 for
Intelligent Audio On/Off – Toggles intelligent Audio on or off.
more information on the programmed duration of the
Emergency button.
‡
Manual Site Roam*
– Starts the manual site search.
Mic AGC On/Off – Toggles the internal microphone automatic
gain control (AGC) on or off.
Monitor – Monitors a selected channel for activity.
Notifications – Provides direct access to the Notifications List.
‡
Nuisance Channel Delete*
– Temporarily removes an
unwanted channel, except for the Selected Channel, from the
scan list. The Selected Channel refers to the user’s selected
zone/channel combination from which scan is initiated.
9
English
LKP_EMEA.book Page 9 Wednesday, July 18, 2012 10:36 PM
* Not applicable in Capacity Plus
‡
Not applicable in Linked Capacity Plus

LKP_EMEA.book Page 10 Wednesday, July 18, 2012 10:36 PM
One Touch Access – Directly initiates a predefined
Transmit Interrupt Remote Dekey – Stops the
Private, Phone or Group Call or a Call Alert. or a Quick Text
transmission of a remote monitored radio without giving any
message.
indicators, or an ongoing interruptible call to free the channel.
(A Software License Key sold separately is required to use this
‡
Permanent Monitor*
– Monitors a selected channel for all
feature).
radio traffic until function is disabled.
Text Message – Selects the text message menu.
Phone – Provides direct access to the Phone Contacts list.
Voice Announcement On/Off – Toggles Voice Announcement
Privacy – Toggles privacy on or off.
on or off.
Radio Alias and ID – Provides radio alias and ID.
Voice Operating Transmission (VOX) – Toggles VOX on or
off.
Radio Check – Determines if a radio is active in a system.
Zone – Allows selection from a list of zones.
Radio Enable – Allows a target radio to be remotely
enabled.
* Not applicable in Capacity Plus
‡
Not applicable in Linked Capacity Plus
Radio Disable – Allows a target radio to be remotely
disabled.
‡
Repeater/Talkaround*
– Toggles between using a repeater
and communicating directly with another radio.
‡
Scan*
– Toggles scan on or off.
‡
Site Lock On/Off*
– Toggles the automatic site roam on
Identifying Radio Controls
or off.
10
English
