Motorola walkie talkie: инструкция
Раздел: Красота, здоровье, спорт. туризм, хобби
Тип: Портативная Рация
Инструкция к Портативной Рации Motorola walkie talkie
MOTO 7794.book Page 1 Tuesday, June 29, 2010 3:16 PM
TLKR T6 Owner’s Manual
Manuel de l’utilisateur TLKR T6
TLKR T6 Benutzerhandbuch
Manual del usuario de TLKR T6
TLKR T6 – Manuale per l’utente
Manual do Propriátrio TLKR T6
TLKR T6 Gebruikershandleiding
Instrukcja obsługi radiotelefonu TLKR T6
TLKR T6 Kullanıcı Kılavuzu
TLKR T6 Руководство владельца
Brugervejledning TLKR T6
Ägarhandbok TLKR T6
Brukerhåndbok
TLKR T6
Käyttöohje TLKR T6

MOTO 7794.book Page 2 Tuesday, June 29, 2010 3:16 PM

MOTO 7794.book Page 1 Tuesday, June 29, 2010 3:16 PM
CONTENTS
Product Safety and RF Exposure
Channel Scan Feature . . . . . . . . . . . . . . 10
for Portable Two-Way Radios . . . . . . . . . . 2
Monitor Mode Feature . . . . . . . . . . . . . . 11
Features . . . . . . . . . . . . . . . . . . . . . . . . . . 2
Voice Operated Transmission . . . . . . . . 11
English
Control and Functions . . . . . . . . . . . . . . . 3
Transmitting a Call Tone . . . . . . . . . . . . 12
Display . . . . . . . . . . . . . . . . . . . . . . . . . . . 4
Key Tone. . . . . . . . . . . . . . . . . . . . . . . . . 12
Package Contents . . . . . . . . . . . . . . . . . . 5
Roger Beep . . . . . . . . . . . . . . . . . . . . . . 12
Install the Battery . . . . . . . . . . . . . . . . . . . 5
Automatic Power Save Feature . . . . . . . 13
Battery Level and Low Battery Alert . . . . . 5
Auto Power Off . . . . . . . . . . . . . . . . . . . . 13
Charging the Radio . . . . . . . . . . . . . . . . . . 5
Room Monitor Feature . . . . . . . . . . . . . . 13
Charging the Battery . . . . . . . . . . . . . . . . 6
Specifications . . . . . . . . . . . . . . . . . . . . . 14
Using the Radio . . . . . . . . . . . . . . . . . . . . 6
Frequency Chart . . . . . . . . . . . . . . . . . . . 14
Turning the Radio on and Adjusting the
CTCSS Chart (Hz) . . . . . . . . . . . . . . . . . 15
Volume . . . . . . . . . . . . . . . . . . . . . . . . . . . 6
DCS Code . . . . . . . . . . . . . . . . . . . . . . . 16
Adjusting the Sound (Key tone) . . . . . . . . 7
Warranty Information . . . . . . . . . . . . . . . 17
Talking on Your Radio . . . . . . . . . . . . . . . 7
What is Not Covered by the Warranty . . 17
LCD Backlight . . . . . . . . . . . . . . . . . . . . . 7
Copyright Information . . . . . . . . . . . . . . . 18
Navigating through the Menu . . . . . . . . . . 7
Select Menu . . . . . . . . . . . . . . . . . . . . . . . 8
Choosing a Channel . . . . . . . . . . . . . . . . . 8
Choosing a Sub-code . . . . . . . . . . . . . . . . 8
Dual Watch Mode . . . . . . . . . . . . . . . . . . . 9
Stopwatch Activation. . . . . . . . . . . . . . . . . 9
Key lock Activation . . . . . . . . . . . . . . . . . . 9
Mode Menu . . . . . . . . . . . . . . . . . . . . . . 10
1
MOTO 7794.book Page 2 Tuesday, June 29, 2010 3:16 PM
Product Safety and
Features
RF Exposure for Portable
• 8 PMR Channels
Two-Way Radios
• 121 Sub-Codes (38 CTCSS Codes & 83 DCS
codes)
English
Before using this product, read
• Up to 8 km Range*
the operating instructions for safe
• Internal VOX Circuitry
usage contained in the Product
!
Safety and RF Exposure booklet
• 5 Selectable Call Tone Alerts
Caution
enclosed with your radio.
• Backlit LCD Display
• Headset Jack for Optional Headset
• Roger Beep
•Up timer
ATTENTION!
• Room Monitor
Before using this product, read the RF energy
awareness information and operating
• Battery Charger
instructions in the Product Safety and RF
• Battery level Meter
Exposure booklet to ensure compliance with RF
• Channel Monitor
energy exposure limits.
• Channel Scan
• Dual Watch
• Keypad Lock
• Auto Power Off function
* Range may vary depending on environmental and/or
topographical conditions
2
MOTO 7794.book Page 3 Tuesday, June 29, 2010 3:16 PM
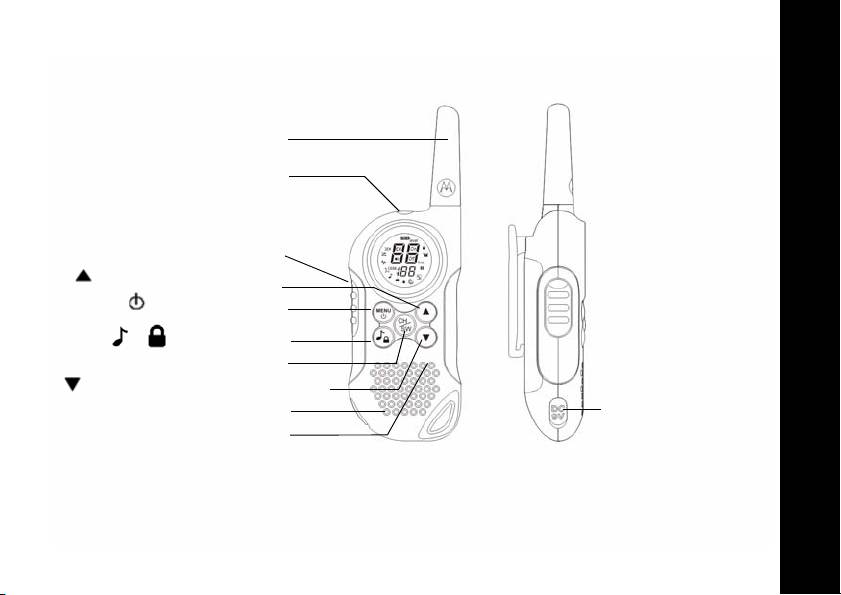
Controls and Functions
English
Antenna
Headset jack
(Headset is
not included)
PTT (Push-To-Talk) Key
(Volume/Channel up) Key
MENU/ (Menu/Power) Key
/ (Call/Lock) Key
Channel/Stopwatch
(Volume/Channel down) Key down)
Speaker
DC IN 9V Jack
Microphone
3
MOTO 7794.book Page 4 Tuesday, June 29, 2010 3:16 PM
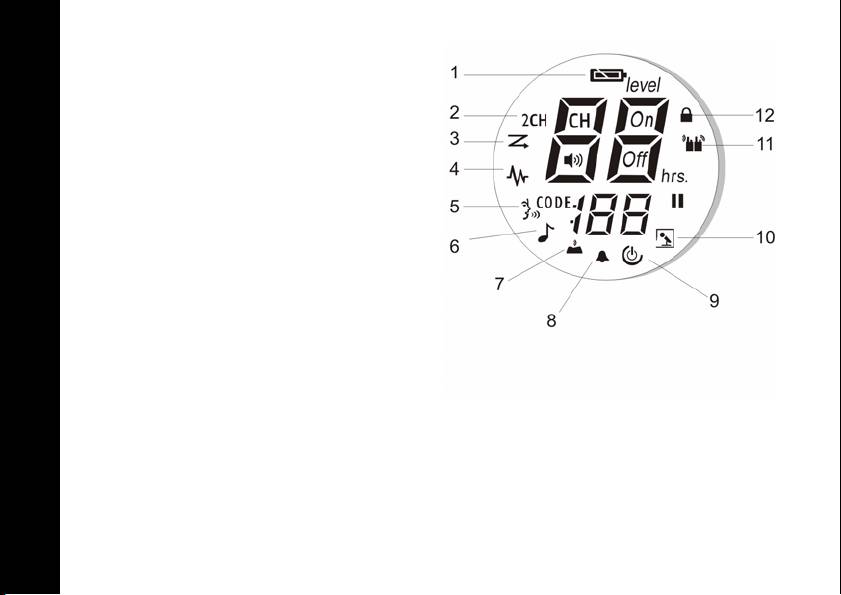
Display
1. Battery Level Meter
2. Dual Watch Indicator
3. Scan Indicator
English
4. Monitor Indicator
5. VOX Indicator
6. Sending call tone/Call tone
7. Key Tone Indicator
8. Roger beep tone Indicator
9. APO (Auto power off) Indicator
10. Room monitor Indicator
11. Transmit/Receive Indicator
12. Keypad Lock Indicator
4

TLKR_T6_EN.fm Page 5 Monday, July 5, 2010 10:56 AM
Congratulations on your purchase of the TLKR
2) Remove the battery compartment door by
T6 radio. This product is a lightweight, palm-
pressing the tab at the bottom of the
sized radio. Use it at sporting events to stay in
compartment door, allowing the door to be
contact with family and friends, hiking, skiing,
removed.
outdoors for vital communication. This compact,
3) Install the NiMH battery pack into the battery
English
state-of-the-art device is equipped with many
compartment. Be certain to follow the + and –
features.
symbols in the compartment. Installing the
battery pack incorrectly will prevent the unit
Package Contents
from operating.
Your package contains two TLKR T6 radios,
4) Replace the battery compartment door.
two belt clips, one charging cradle, AC adapter,
two battery support brackets, two rechargeable
Battery Level and Low Battery Alert
NiMH battery packs, and this reference guide.
This unit has a battery level meter on the
You may operate the unit 4 AAA alkaline
display to indicate the status of the batteries.
batteries (not included).
When the battery in the unit is low, the battery
level meter icon will flash. Recharge
Install the Battery
the NiMH rechargeable batteries immediately.
Your TLKR T6 radio uses the NiMH battery
pack or 4 AAA alkaline batteries (not included).
Charging the Radio
If alkaline batteries are used, we recommend
If you use the rechargeable NiMH battery pack,
using high quality alkaline batteries.
two TLKR T6 radios can be charged directly or
by using the supplied charging cradle.
To install the NiMH battery pack:
Make sure to turn the radio OFF before
1) Make sure your radio is OFF.
placing the radio in the charging cradle.
Otherwise the battery level meter icon won’t
indicate properly.
5
MOTO 7794.book Page 6 Tuesday, June 29, 2010 3:16 PM
Direct Charge:
prevent the unit from charging.
1. Connect the DC adapter’s plug to the radio’s
3. Make sure that the LED illuminates. Charge
DC IN 9V jack and plug the other end to a
the battery pack for 16 hours .
vehicle's accessory power outlet.
Note:The charge indicator LEDs will remain
English
on as long as the radios are left in the
Using the Charging Cradle:
charger.
1. Connect the AC adapter to DC IN 9V and to
a standard electrical outlet.
Using the Radio
2. Set the charging cradle on the desk or
In order to get the most out of your new radio,
tabletop, and place the radio in the charging
read this reference guide completely before
cradle with the keypad facing forward.
attempting to operate the unit.
3. Make sure that the LED illuminates. Charge
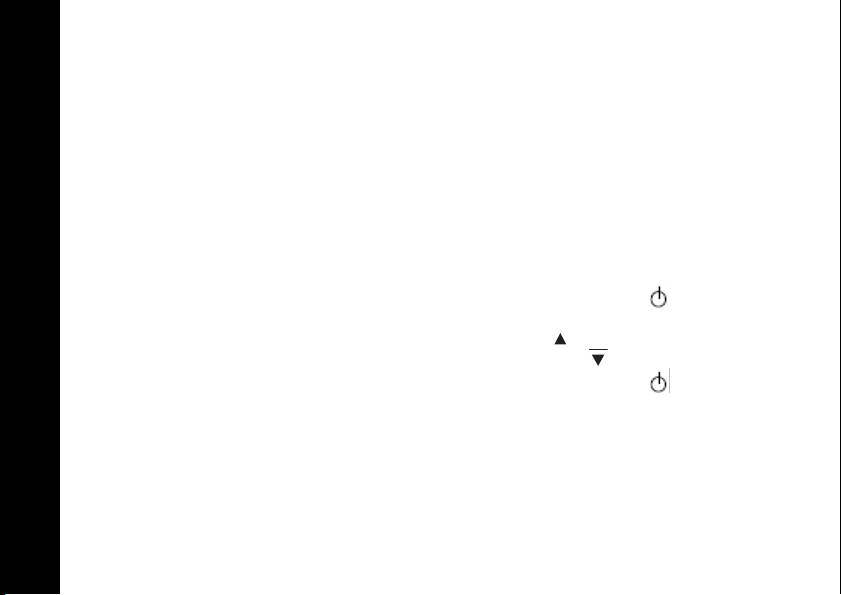
Turning the Radio On and Adjusting the
the battery pack for 16 hours and remove the
Volume
radio from the charging cradle after charge.
1. Press and hold the MENU/ key to turn the
radio ON, and increase the volume by
Note:The charge indicator LEDs will remain
pressing the key. To decrease the
on as long as the radios are left in the
volume, press the key.
charger.
2. Press and hold the MENU/ key again to
Charging the battery
turn the radio OFF.
You can charge the NiMH battery pack itself
using the included battery support bracket.
1. Place the battery support bracket into the
charging cradle.
2. Install the NiMH battery pack applying its
charging contacts to those of charging
cradle. Installing the batteries incorrectly will
6
MOTO 7794.book Page 7 Tuesday, June 29, 2010 3:16 PM
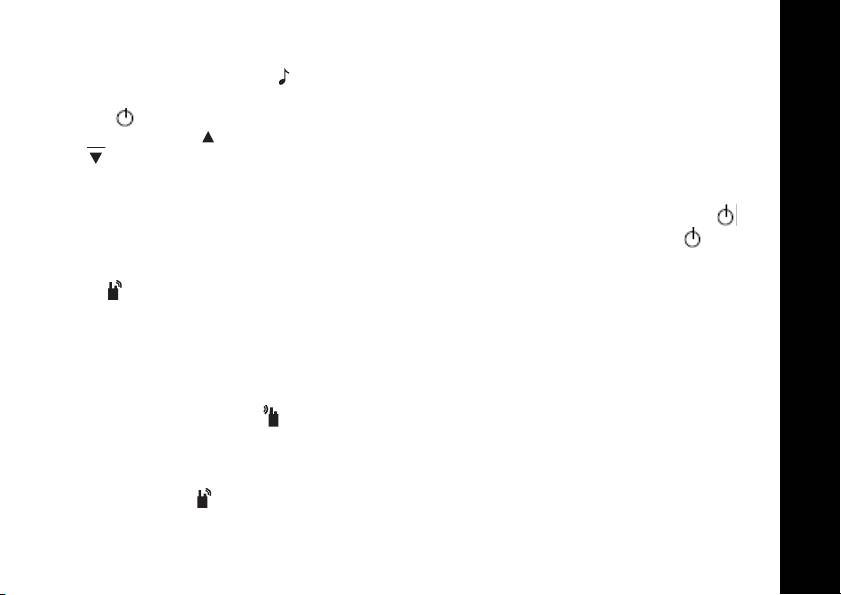
Adjusting the Sound (Key tone)
LCD Backlight
Your radio emits a beep each time one of the
The LCD backlight will automatically turn ON
keys (except for the PTT and key) is
when any key (except for PTT) is pressed. The
pressed. To turn this sound OFF or ON, press
LCD display will illuminate for 10 seconds after
MENU/ button 5 times, the Key tone icon is
the last key pressed.
English
flashing. Press the
key to switch ON. Press
Navigating through the Menu
the key to switch OFF.
To access the advanced features of the TLKR
Talking on Your Radio
T6 your radio has two Menu functions.
To talk to others using the radio:
1. To enter the Menu, press the MENU/ key.
1. Press and hold the PTT key and speak in a
2. Additional presses of the MENU/ key will
clear, normal voice about 5-8 cms away from
advance you through the Menu until exiting
the microphone. While you are transmitting,
to "Normal" operating mode.
the icon will appear on the display. To
avoid cutting off the first part of your
transmission, pause slightly after pressing
the PTT button before you start talking.
2. When you have finished speaking, release
the PTT key. You can now receive incoming
calls. While receiving, the icon will appear
on the display.
Note:When you continue to transmit for 60
seconds, the radio emits a TX Time Out
tone and the icon flashes. The radio
will stop transmitting.
7
MOTO 7794.book Page 8 Tuesday, June 29, 2010 3:16 PM
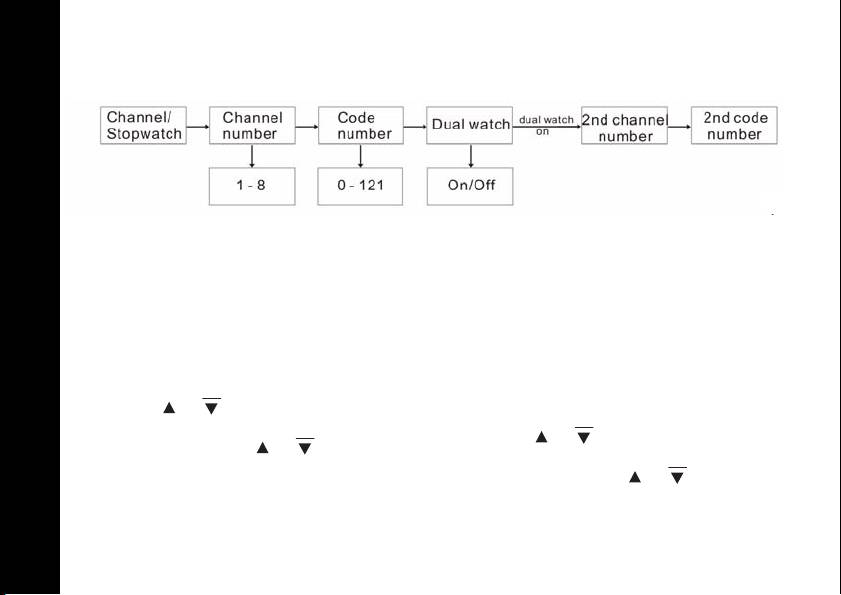
Select Menu
Your radio navigates through Select Menu as
follows:
English
Choosing a Channel
Choosing a Sub-code
Your radio has 8 channels and 121 Sub-codes
Allocating a Sub-code to your radio will help to
you can use to talk to others. In order to speak
reduce interference but remember that the
to someone, each of you must set to the same
radios that have different Sub-codes set will not
channel and Sub-code.
be able to communicate with each other. Each
of the channels 1-8 may have any one of the
To choose a channel:
codes from 0 to 121.
1. Enter the Select Menu. Channel Indicator will
1. Enter the Select Menu. Advance through the
blink.
Select Menu until the Sub-code indicator
2. Press the or key to increase or
blinks.
decrease the channel number displayed. If
2. Press the or key to increase or
you press and hold the or key, the
decrease the channel number displayed. If
channel number increase or decrease
you press and hold the or key, the
continuously.
channel number increase or decrease
3. Go to Sub-code setting to choose a
continuously.
Sub-code.
3. Exit the Select Menu.
8
MOTO 7794.book Page 9 Tuesday, June 29, 2010 3:16 PM
Dual Watch Mode
Stopwatch Activation
Your radio can scan the current channel and
You can use this radio as Stopwatch timer. It
another channel alternately. You need to set a
can time up to 60 minutes and 59 seconds.
channel number and its Sub-code for another
Note:You can receive incoming signals during
channel.
English
this mode.
To set another channel and start Dual Watch:
To use the Stopwatch Timer
1. Navigate through the Select Menu until the
1. Press and hold the key until Stopwatch
2CH CH icon blinks.
timer will display.
2. Press the or to select the channel
2. Press to start Stopwatch timer. Pressing
number, then press the key.
the key again will pause the timer.
3. Press the or to select the Sub-code,
3. Press the key to reset the Stopwatch
then press the key.
timer.
Note:If you set the same channel number and
4. Press and hold the key to exit the
Sub-code as the current channel, Dual
Stopwatch timer function
Watch doesn’t work.
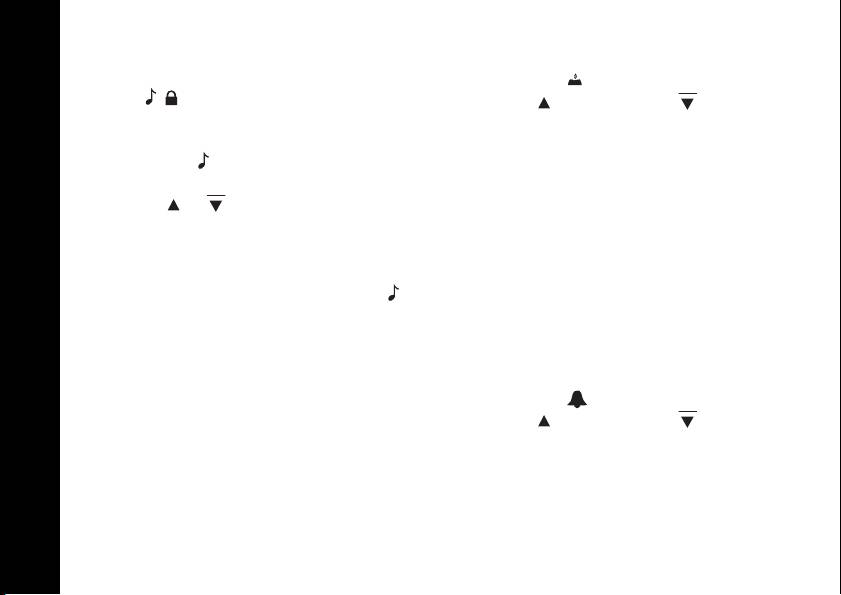
Key Lock Activation
To turn the Dual Watch mode OFF:
To Lock the keypad:
Press the key then set to OFF mode.
Press and hold the / key. The icon
appears.
To Unlock the keypad:
Press and hold the / key again. The
icon disappears.
9
MOTO 7794.book Page 10 Tuesday, June 29, 2010 3:16 PM
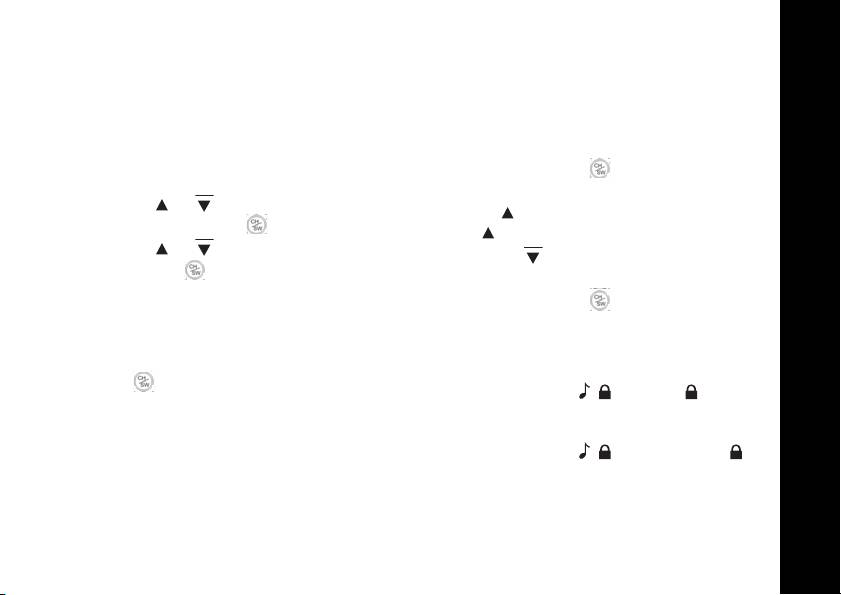
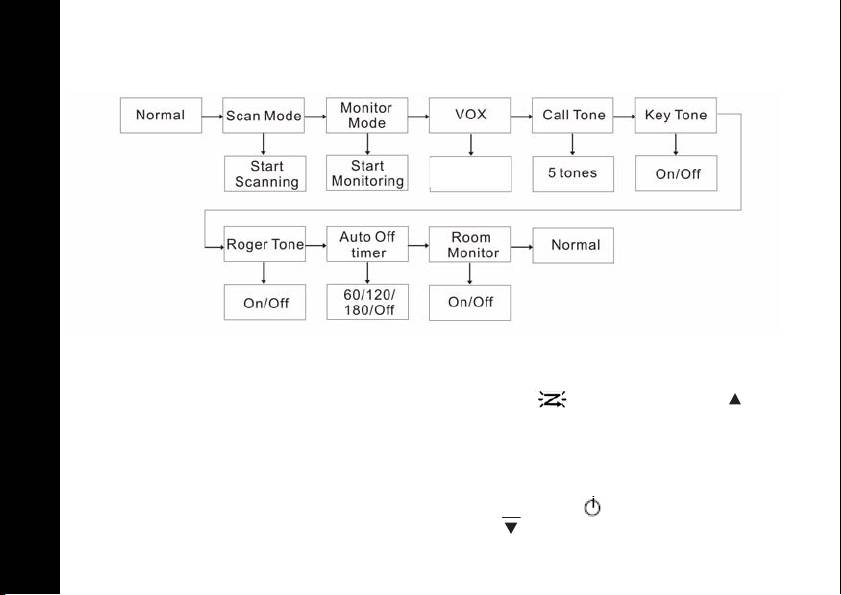
Mode Menu
Your radio navigates through Select Menu as
follows:
English
5 levels
Channel Scan Feature
To turn the channel scan ON:
Your TLKR T6 radio has a channel scan feature
1. Enter the Mode Menu. Advance through the
that allows you to easily scan all 8 channels.
menu until icon blinks. Press the key
When an active channel is detected, the radio
to turn the Scan function On. Scanning
will pause on that channel until the channel is
channel will start and the Scan icon is
clear. Then after a 2 second pause, the radio
displayed.
will continue scanning. Pressing the PTT key
To turn the Scan OFF:
while the scan is paused on a channel will allow
1. Press the MENU/ the scan icon blinks,
you to transmit on that channel and exit scan
press key to turn Off the Scan function.
mode.
10

MOTO 7794.book Page 11 Tuesday, June 29, 2010 3:16 PM
Monitor Mode Feature
To select the VOX level:
Your TLKR T6 allows you to listen for weak
1. Enter the Mode Menu. Advance through the
signals on the current channel at the press of a
Menu until the icon blinks. The current
key.
level (OFF. 1-5) also blinks. Level Off
To turn the Monitor mode ON:
English
disables VOX, while levels 1-5 set the
1. Enter the Mode Menu. Advance through the
sensitivity of the VOX circuit.
menu until the icon blinks. Press the
2. Press the or key to select the desired
key to turn the Monitor function On.
VOX sensitivity level. Use Level 1 in quiet
Monitoring channel will start and the Monitor
environments, and use level 5 in very noisy
icon is displayed.
environments. You can find the appropriate
To turn the Monitor OFF:
sensitivity level by speaking into the
microphone. If the icon flashes, your voice
2. Press the MENU/ and advance through
is accepted.
the Monitor mode. Press the key to turn
Off the Monitor function.
3. Exit the Select Menu.
Note:When you continue to transmit using the
Voice Operated Transmission
VOX function for 60 seconds, the radio
Your TLKR T6 radio is equipped with a user
emits a TX Time Out tone and the icon
selectable Voice Operated Transmitter (VOX)
flashes for 5 seconds.
that can be used for automatic voice
transmissions. The VOX feature is designed for
hands-free purposes. Transmission is initiated
by speaking into the microphone of the radio or
headset (headset is not included) instead of
pushing the PTT key.
11
MOTO 7794.book Page 12 Tuesday, June 29, 2010 3:16 PM
Transmitting a Call Tone
To turn the Key tone ON or OFF:
Your TLKR T6 radio is equipped with 5
1. Enter the Mode Menu. Advance through the
selectable call tones that will be transmitted
menu until the icon blinks.
when the / key is pressed.
2. Press the key to turn On or key to turn
English
To select a call tone:
Off the key tone.
1. Enter the Mode Menu. Advance through the
3. Exit the Select Menu.
menu until the icon blinks. The current
call tone number (1-5) also blinks.
Roger Beep
2. Press the or key to increase or
Roger Beep is a BEEP that is sent to notify the
decrease the number to the desired call tone.
end of transmission (PTT and VOX
Each tone will be heard through the speaker.
transmission). Roger Beep can be heard
through the speaker when Key Beep is on. It is
3. Exit the Select Menu.
transmitted even if Key Beep is turned off.
To transmit the selected call tone, press the
However, Roger Beep will not be heard from
key. The selected tone will automatically be
the speaker.
transmitted for a fixed length of time. Call tone
will be cancelled when the PTT key is pressed.
To turn Roger Beep OFF or ON:
1. Enter the Mode Menu. Advance through the
Key Tone
menu until the icon blinks.
Your radio emits a tone each time one of the
keys (except for the PTT key) is pressed.
2. Press the key to turn On or key to turn
Off the Roger Beep tone.
3. Exit the Select Menu.
12
MOTO 7794.book Page 13 Tuesday, June 29, 2010 3:16 PM
Automatic Power Save Feature
not able to receive any transmissions in this
Your radio has a unique circuit designed to
mode.
dramatically extend the life of the batteries. If
To turn the Room Monitor ON or OFF:
there is no transmission nor an incoming call
1. Enter the Mode Menu. Advance through the
within 3 seconds, your radio switches to the
English
menu until the icon blinks.
Power Save mode. The radio is still able to
2. Press the key to turn On or key to turn
receive transmissions in this mode.
Off the key tone.
Auto Power Off
3. Exit the Select Menu.
Auto Power Off feature allows you to set the
Note:
time that the radio turns off automatically.
- Pressing the PTT key in Room Monitor mode is
1. Enter the Mode Menu. Advance through the
invalid and the radio emits PTT Error Tone.
menu until the icon blinks.
- When the voice/noise in another room continues
2. Press the or key to select the time
more than 60 seconds, the monitoring radio
from Off, 60, 120 and 180 minutes.
stops monitoring for 5 second, and resumes.
3. Exit the Select Menu.
Room Monitor Feature
You can use one of your TLKR T6 radios as a
room monitor and use the other radio to listen
to and keep a check on the voice in another
room. When you set the room monitor feature,
the monitoring radio will detect voice/noises
(according to the sensitivity level you set) and
transmit back to the listening radio without
pushing the PTT key. The monitoring radio is
13

MOTO 7794.book Page 14 Tuesday, June 29, 2010 3:16 PM
Specifications Frequency Chart (MHz)
Ch. Freq.
Channels 8 PMR
1 446.00625
Sub-Codes 121 (38 CTCSS and
English
2 446.01875
83 DCS Codes)
3 446.03125
Operating
446.00625 - 446.09375 MHz
Frequency
4 446.04375
Power Source AAA Ni-MH battery Pack
5 446.05625
4 AAA Alkaline Batteries
6 446.06875
(not included)
7 446.08125
Range Up to 8 km
8 446.09375
Battery Life 16 Hours typical
Alkaline Bateries
Approved Accessories List
14 Hours typical
Please contact your dealer or retailer to purchase
NiMH Battery pack
these accessories.
Motorola Part
Description
No.
14
MOTO 7794.book Page 15 Tuesday, June 29, 2010 3:16 PM
CTCSS Chart (Hz)
Code No. Tone Frequency
Code No. Tone Frequency
Code No. Tone Frequency
(HZ)
(HZ)
(HZ)
English
0 Off 13 103.5 26 162.2
1 67.0 14 107.2 27 167.9
2 71.9 15 110.9 28 173.8
3 74.4 16 114.8 29 179.9
4 77.0 17 118.8 30 186.2
5 79.7 18 123.0 31 192.8
6 82.5 19 127.3 32 203.5
7 85.4 20 131.8 33 210.7
8 88.5 21 136.5 34 218.1
9 91.5 22 141.3 35 225.7
10 94.8 23 146.2 36 233.6
11 97.4 24 151.4 37 241.8
12 100.0 25 156.7 38 250.3
15

MOTO 7794.book Page 16 Tuesday, June 29, 2010 3:16 PM
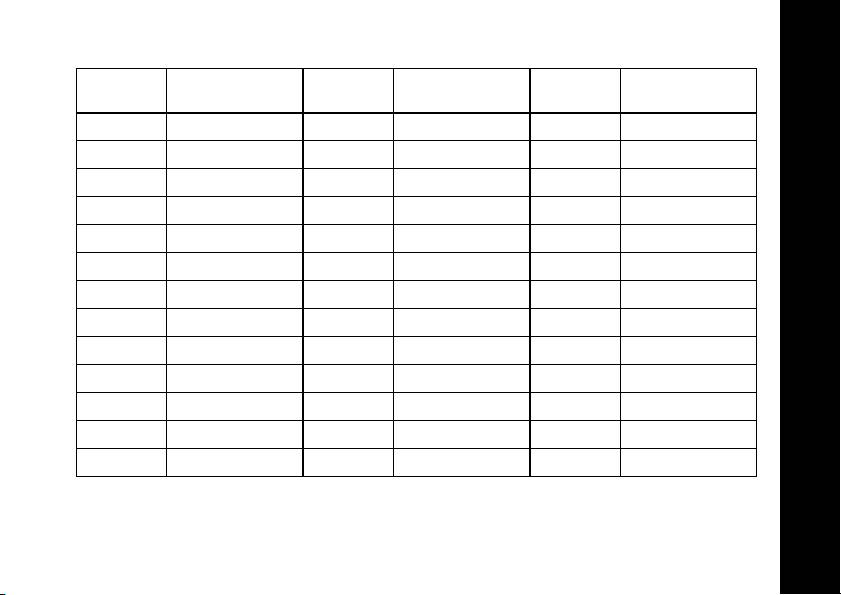
DCS Code
Code
Code Code
Code Code
Code Code
Code Code
Code Code
Code
No.
No.
No.
No.
No.
No.
39 023 53 114 67 174 81 315 95 445 109 631
English
40 025 54 115 68 205 82 331 96 464 110 632
41 026 55 116 69 223 83 343 97 465 111 654
42 031 56 125 70 226 84 346 98 466 112 662
43 032 57 131 71 243 85 351 99 503 113 664
44 043 58 132 72 244 86 364 100 506 114 703
45 047 59 134 73 245 87 365 101 516 115 712
46 051 60 143 74 251 88 371 102 532 116 723
47 054 61 152 75 261 89 411 103 546 117 731
48 065 62 155 76 263 90 412 104 565 118 732
49 071 63 156 77 265 91 413 105 606 119 734
50 072 64 162 78 271 92 423 106 612 120 743
51 073 65 165 79 306 93 431 107 624 121 754
52 074 66 172 80 311 94 432 108 627
16

MOTO 7794.book Page 17 Tuesday, June 29, 2010 3:16 PM
Warranty Information
Defects or damage from improper testing,
The authorized Motorola dealer or retailer
operation, maintenance, adjustment, or any
where you purchased your Motorola two-way
alteration or modification of any kind.
radio and/or original accessories will honour a
Breakage or damage to aerials unless caused
warranty claim and/or provide warranty service.
English
directly by defects in material or workmanship.
Please return your radio to your dealer or
Products disassembled or repaired in such a
retailer to claim your warranty service. Do not
manner as to adversely affect performance or
return your radio to Motorola.
prevent adequate inspection and testing to
In order to be eligible to receive warranty
verify any warranty claim.
service, you must present your receipt of
Defects or damage due to range.
purchase or a comparable substitute proof of
Defects or damage due to moisture, liquid or
purchase bearing the date of purchase. The
spills.
two-way radio should also clearly display the
All plastic surfaces and all other externally
serial number. The warranty will not apply if the
exposed parts that are scratched or damaged
type or serial numbers on the product have
due to normal use.
been altered, deleted, removed, or made
Products rented on a temporary basis.
illegible.
Periodic maintenance and repair or
What Is Not Covered By The Warranty
replacement of parts due to normal usage, wear
Defects or damage resulting from use of the
and tear.
product in other than its normal and customary
manner or by not following the instructions in
this user manual.
Defects or damage from misuse, accident or
neglect.
17

MOTO 7794.book Page 18 Tuesday, June 29, 2010 3:16 PM
Copyright Information
MOTOROLA, the Stylized M Logo and all other
The Motorola products described in this manual
trademarks indicated as such herein are
may include copyrighted Motorola programs,
trademarks of Motorola, Inc. ® Reg. U.S. Pat. &
stored semiconductor memories or other
Tm. Off.
English
media. Laws in the United States and other
© Motorola, Inc. 2010
countries preserve for Motorola, certain
exclusive rights for copyrighted computer
programs, including the exclusive right to copy
or reproduce in any form, the copyrighted
Motorola programs.
Accordingly, any copyrighted Motorola
computer programs contained in the Motorola
products described in this manual may not be
copied or reproduced in any manner without
express written permission of Motorola.
Furthermore, the purchase of Motorola
products shall not be deemed to grant either
directly or by implication, estoppel, or
otherwise, any license under the copyrights,
patents or patent applications of Motorola,
except for the normal non-exclusive royalty free
license to use that arises by operation of law in
the sale of a product.
18
